


Likes
Comments
Share


@Exotic_Cultivars
Follow
These grew really well stacked weight evenly, and flushed like a champ. Throw back to the first indoor scrog.

Likes
4
Share


@ObloTheGrower
Follow
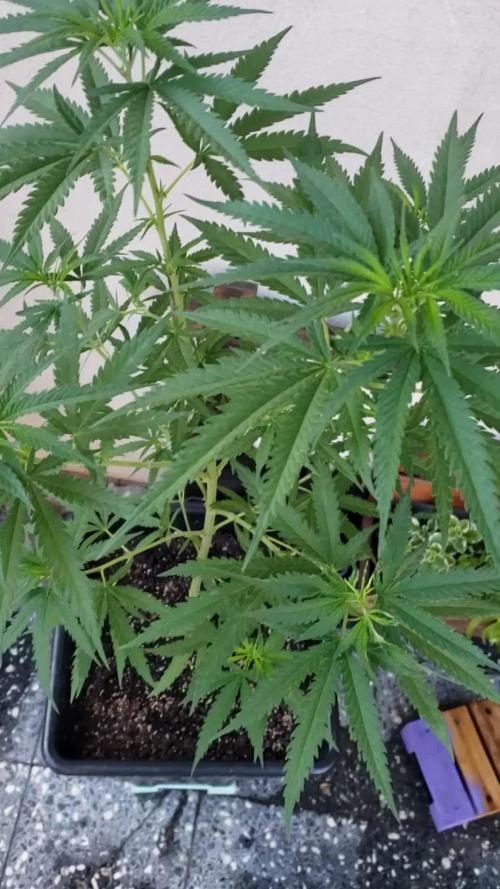
They are growing in my balcony. I have not a grow light so Im supporting them with a 85 watt Cfl at nights and put the ladies in a box to keep level of humudity high
Medya : 40 litre torf, 20 litre perlit, 10 litre solucan kompostu, 10 litre vermikulit, 10 litre yanmış koyun gübresi karışımı ile büyüyecekler. Eksik kalan için daha sonra cocopeat, perlit, vermuculite karışımı hazırlayacağım şimdilik 2.5 litre de köklenmesi yeterli. Büyük saksıda birden fazla bitki ekilecek olan medya ise toprak, supersoil
Likes
20
Share


@CanaryGrow
Follow
Big transformation in 1 week, plants are covered with buds, they didnt get a lot of stretch, the buds are just stacked. I did a massive defoliation on Sunday, removing more or less all the fan leaves i could safetly cut off without damaging bud sites. A lot of light for all the buds.
Some problems start to occur. First all the leaves got their tips dry and they twist up, i thought its nute burn but supposedly its cal-mag deficiency, so i am adding it to my nutrients now. I also got attacked by caterpillars, i found a couple but recent bites looks like there is more. Search and destroy mode + BT.

Likes
16
Share


@ChewiesGrow420
Follow
Added Exhale c02 and top dressed in each pot with 1 tablespoon per gallon of growing medium my pots are 3.6. I added 3 tablespoons. It is my hopes that with adding the slow release dry amendments and once the c02 bag sarts growing my plants will finally grow. They are short but have 4 nodes at day 21. What is an exhale c02 bag? “The ExHale bag is a patented strain of mycelium that produces an abundance of CO2 without fruiting. This means that when our bag is activated, the mycelium grows, eating the substrate it comes with, giving off heaps of CO2 straight into your garden, and it does all this for 6 months - guaranteed!”
At day 25 I am not impressed with the size of these girls? Hope they hit a growth spurt soon? Their internodes are stacked very nicely.
At day 28 growth is very slow. Practically none existent since my top dressing at day 23. 2 plants have received a very minimal nutrient burn. As I do not have a soil ph tester? I will be watering with a ph of 6.0 rather than 6.5, hopefully that helps. ONWARD!
Likes
43
Share


@MrGrow
Follow
20.04.2023
🌱 90 giorni dal seme
🌼17 giorni fioritura
💦 1.6 litri/48h
📈 5.9 ph
ec 1.6
Finita la seconda settimana di fioritura, le piante stanno bene, ho cercato di tenere le piante alla stessa altezza lungo la rete scrog. Nel fine settimana farò l ultima pulizia approfondita dei rami più bassi, che non avranno possibilità di produrre buone cime, e defoglierò in maniera copiosa. Dopodiché lascerò che madre natura faccia il resto..
Buon 420 a tutta la community 💚💚💚✌️🏻🙏


Processing
Likes
21
Share


@LittleBigTrees
Follow
Been feeding just water ready for the chop.
Some of them have all brown pistils and have pretty much stopped all together.
The kalimist indica pheno is still flowering so I'll let it go until it looks ripe 👍
Likes
48
Share


@ILoVeThiSpLaNt
Follow
Settimana prossima aggiorno con le ultime foto e con il peso secco ma già posso dire di aver superato i 500gr con 6 piante sotto 600w 😉
Likes
2
Share

@The_Doctor_Green
Follow
Hola a todo el mundo!!!😃😃 como estan??..
Antes que nada, GRACIAS GRACIAS GRACIAS🙌 a todos aquellos que me han comenzado a seguir en las redes🙌🙌.
Bueno, volvamos a lo interesante, semana 13 de esta hermosa planta, he regado como mencionó en los detalles de la planta, y lo que he notado es que la planta sigue creciendo fuerte y saludable 🤩💪.
Ha soportado las altas temperaturas de estos días, (máximas de entre 34 y 37°)💪. Poco a poco veo que se van engordando los tallos, signo de que pronto comenzará la floracion😃😃🙌🙌🤩🤩.
Pd: si no me sigues en las redes, porfavor hazlo, no te cuesta nada😅🙏😃🙋♂️

Likes
6
Share


@smokystyle35
Follow
Belle variété
Je trouve juste qu'elle pousse tout doucement par rapport à d'autres mise en même temps
Likes
5
Share


@CalGonJim
Follow
1/4/26 1:26 AM. This is me starting a diary accidentally a day too early iced tea had some problems. The cocoa had something in it and the root hit it and it screwed up so I’ve flushed it out. I put another seed in and she’s doing just great. I’ve never had this happen before so I must’ve. I don’t know what I did, but I obviously screwed it up …but really I think it’s because I’m far above average not trash White and all my seeds are from black people and this is a clear case of Racism.😡😂😂😂 I’m gonna write a book about my struggles. I think you’re all gonna really enjoy it.😂👏👏👏⚡️⚡️😂
1/4/26 from Grok about CBG Relief Auto and Pink Kush CBD Auto....
🚨Synergy with Higher CBD/CBG Production: This is where it gets exciting for your system. CBD and CBG plants (low-THC by nature) respond well to biostimulants like 👨🔬aminos because they emphasize therapeutic/terpene-focused traits over high-THC⚡️ potency. Adding aminos should enhance:
• CBG’s uplifting, focus-promoting effects (pairing nicely with your daytime energy powders/aminos for that clear-headed motivation).
• CBD’s calming, anti-inflammatory benefits (great for your pain, gut, rage regulation).
• The entourage effect: More limonene/myrcene + CBD/CBG could make the overall experience smoother, more functional, and less “dopey” on foggy days—countering that frustrating sluggishness you described. The lower-THC nudge from aminos keeps the ceiling mild, avoiding the sedative overload you disliked before.
• Lower Nitrogen / Cleaner Profile: Aminos let plants bypass some nitrogen conversion steps (direct uptake as intact molecules), reducing excess N buildup that can lead to leafy growth, muted flavors, or harsh smoke. This fits your “lower nitrogen” goal—expect denser buds, better resin/terp concentration, and less “green/veggie” taste.🚨
1/4/26 2:42AM The tub in 237 is clogged, AGAIN ..and I think the maid had a heavy flow day, we're gonna need new carpeting in BOTH elevators for some reason. And keep the butler out of the dogs room, he'll get carpel tunnel again!!
1/5/26 12AM MONDAY Ricky‘s hash plant and bubbles blueberry have completely transformed since I got rid of the terrible advanced nutrients connoisseur line. I’m not giving them any breaks. They are one star product and I’m done with them.
I’m gonna have to top all the plants now they are doing so good. They’ve become so big and bushy. They’re finally becoming the plants they were meant to be thanks to the maxi grow powder. No more burns. Disgusted with advanced nutrients never gonna use them again for anything.
1/5/26 11:20Pm...... Im so good at this, it's all too strong!! They all look great. THE TASTE HAS TOTTALLY CHANGED!!!! PERPETUAL SALAD GARDEN IMPROVED 100 PERCENT!! MAXI POWDER CHANGED THE FLAVOR PROFILE TO WAY WAY BETTER......AN WAS TERRIBLE FOR TASTE. EVERYTHING IS IMPROVING !!


Likes
41
Share


@Kmikaz420
Follow
Désolé mais pendant plusieurs jour je n arrivé plus à charger mon journal ?
Bref dernière arrosage avec nutriments ;) on y arrive tous doucement .
Autrement j ai eu un petit départ de bud rot sur la melon gum (rien de méchant 2 calices coincé entre 3 immense têtes ;) j ai donc enlever les 2 têtes et désinfecté aux mieux (les 2 têtes n avez rien j ai donc pu les goûter hier soir et j doit dire l effet est vraiment sympa ;)

Likes
3
Share


@Del_grow
Follow
Packing on the trichs now, all expressing their own tings. The cherries Jubilee has a great bud structure nice and dense but has lots of packed in sugar and fan leaves sticking out of the colas. Looks nice but is a bit detrimental to the lower stuff. I’ve defoliated but it really is dense and awkward to trim, so I’ve kinda left it.


Likes
Comments
Share


@ORION1_1
Follow
The growth took off this week! Both plants showing signs of flowering but one is ahead of the other. I'd say there was at least 6 inches of height added over the past 7 days or so. I'd consider this the first week of flower
Likes
1
Share

@CptnNugz
Follow
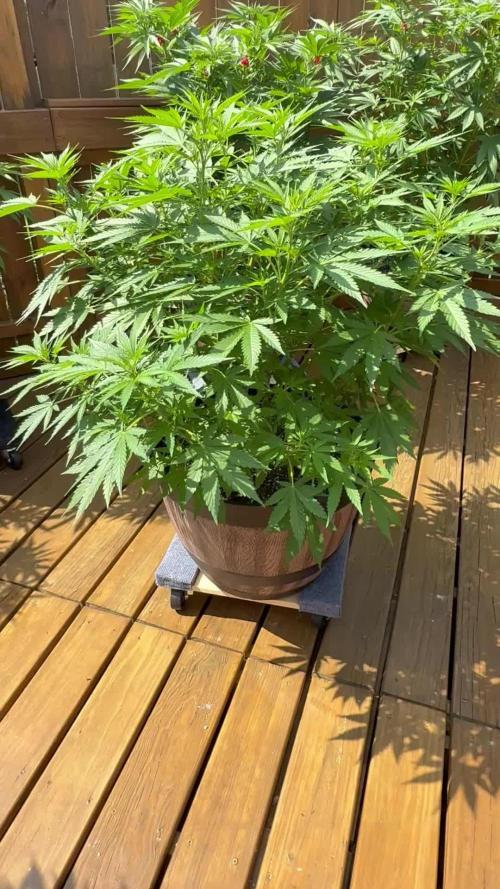
These genetics from Spliff seeds are seriously very nice! First time growing their seeds. If the flower turns out as well as the vegging of the plants I’m going to be very happy! The plant structure is very strong and they have turned into beautiful bushy plants with minimal work! I can’t wait to update when they are in flower and when it’s time to smoke it! We’re still running great off the bioflower nutrients/worm castings in the soil with very little Lotus nutrients added 1x a week with 5ml cal/mag 1x week per plant. They are happy girls!

Likes
49
Share


@masterofsmeagol
Follow
8/8 Rained all night. Still raining today and the forecast says it will continue throughout the day until midnight. It's come down heavy at times but for the most part it's a rain that plants like. Defoliated a couple leaves but nothing really needed it. Without a trellis or my tarps up the grow bags seem to dry out incredibly fast so I need to watch that. It's also "toughened" up the plant wants. I've seen them blowing straight sideways and they were fine. I do need to find that four lined plant bug and spray BT after the rain. Plants lovedcthe nutes. I might feed a little later today or tomorrow. I've got a few things to do but I'll keep this updated.
Went over and defoliated ANYTHING that needed it and combed through every plant during a pause in the storm. Then I shook them all off and did a video. This is by far the healthiest crop I've grown! I think they can handle more nutes too so I'm going to up it next feed. Still seeing stptadoc chunks missing and random pillar damage. BT will handle it. It's just so minor I'm not even sure if it should be addressed that way. I've had pretty good luck just looking for them and picking them off.
8/9 Cannabis can grow an inch or two in a day and it definitely has been! The rain has finally stopped. I went and shook all my plants off. I'm going to check and see the last time I fed and try to get a feeding schedule created that won't cause lockout. That's been a problem in the past. I've defoliated a lot of leaves lately but EVERYTHING is looking amazing. Extremely healthy. I DO need to spray BT for the pillars and I need to move that one plant back. I keep forgetting to grab the little wheels I need to make a platform. There are other ways I could do it I guess. I'll keep this updated. No damage from the storm and I went through and defoliated before and after. Forgot to upload shit and now I'm back home with this shitty internet connection. I'm trying to upload this video but we'll see. It's at like 32%. I did a full workout and came back to find this at 77% lol. I need to remember to upload things when I'm not in the middle of the woods.
UPDATE: Checked on things and did a video. Need to feed, apply bt and secure individual branches before flowering increases
8/10 LOOKS to be a beautiful day. Growbags are heavy as hell and wet on the bottom. I ALMOST fed today and I still might. The pp in the 10 seems to have leeched a lot of nutes. That and a giant blueberry cheese are the only places I'm seeing a deficiency and I want to keep it simply. I also need to put a trellis up apply BT. also if I'm going to move things around I've got to do it before I put up flowering supports. It's harder to move stuff when it's wet. I'll keep this updated. The girls look fantastic.
UPDATE: Went and trellised two of my plants. I was going to feed today but decided to wait until the next time I water. I'm only seeing deficiencies on the phrple punch in the ten and the GIANT blueberry cheese that I watered the most. Bags were heavy as hell this morning but I bet I'll need to water tomorrow. We'll see. Hahaha wow. I'm trying to upload a video but even my tough as fuck plants might have some difficulty in torrential rains like this. Wow. That's all I can say. I'll either go check and shake them off tonight or if it keeps it up I'll wait until morning I guess. What a shit show
8/11 WOW. That's probably the hardest I've ever seen it rain. Got to the grow this morning and found NO damage. It's super sunny amd windy so the bags will probably dry out. I think it's suppised to rain again Sunday. I definitely haven't had to water that's for sure. Nothing was even bent over this morning. The blue cheese I didn't fim or top (I wanted to see gow it grew naturally) pop ka was bent down a little bit but not much considering the pounding it got. You can see on the videos. Since bags were saturated I didn't need to water before I fed. I fed 1.25 pints to every plant. I gave the fifty 2.5 pints and the purple punch in the 10 got closer to a pint. I want to start out slow with nutes as I'm nor seeing many deficiencies. I may fuck around today and put some more trellises up seeing this wind bur when flower comes I can just put my tarp up. I'll update as I go.
UPDATE: WENT BACK OVER BECAUSE THE WIND WAS WHIPPING LIKE CRAZY AND TREES WERE DOWN. I SANITIZED ALL MY TRELLISING AND HORIZONTALLY TRELLISED TWO 10TH PLANETS IN FRONT AND VERYICAL TRELLISED THE THIRD. HORIZONTAL TRELLISED THE PURPL WE PUNCH IN THE 10 AND VERTICAL TRELLISED THE BLUE CHEESE IN THE 50 AND THE 10TH PLANET IN THE MIDDLE OF THE CAGE. GLAD I GOT THIS DONE. NOW I JUST NEED TO SPRAY BT AND I'LL FEEL CAUGHT UP.
8/12 Got my supports up and ready now I've just got to find the time to give the girls an application of BT. I've done a pretty good job with manual removal thus far. Bags are over watered. It's Rained so hard and so often that the bags have stayed drenched. Luckily this ridiculous wind has been drying my grow bags out relatively fast. I'm hoping that will be the case today. They're starting to dry out but it's supposed to rain tonight and I think tomorrow. Bright and sunny right now. These are some resilient plants. They seemed to like the liquid kool bloom. I noticed (barely noticeable but I was looking for it) a SLIGHT color change at the very TIPS of a few leaves on a plant but not enough to consider it burn. I will monitor but I think ive got a pretty good feeding regimen. I plan to use as little as I can get away with. I'll keep this updated.
UPDATE: WENT TO CHECK ON PLANTS AS I GOT "THAT FEELING". EVERYTHING WAS LOOKING GREAT BUT THEN I WENT AND LIFTED MY DRY 22GALS OF SOIL AND COMPATED IT TO MY 20S AND LIKE I THOUGHT THE WIND HAD DRIED THEM OUT. I CANT BELIEVE HOW QUICK THEY DRY OUT. I GAVE EVERYTHING 1.5 GALLONS AT LEAST EXCEPT FOR THE 10 WHICH I GAVE A LITTLE LESS THAN A GALLON. I GAVE THE 50 A LITTLE OVER 2 GALLONS AND I DISNT NOTICE RUNOFF. I HAD MORE WATER MIXED UP IM THINKING I SHOULDVE GIVEN IT ANOTHER GALLON. OH WELL ITS SUPPISED TO RAIN A LITTLE TONIGHT AND THEN TOMORROW. I HAVEN'T WAYERED IN LIKE A WEEK SO I PROBABLY SHOULD'VE GIVEN THE WHOLE 2 GALLONS. THEY GOT DAMN CLOSE THOUGH.
8/13 Rained like hell last night. Oh course it did. Doesn't really matter though. I had to water. I thibk the last time "I" watered was lime a week ago. My bags were dry. Plants weren't drooping and they might've been ok but I've under-watered twice already to the point they drooped right over dead looking and I wasn't going to do that again. Plants seem to love the nutes I gave. Keeping the tarps off and allowing the wind through and having my bags on pallets has really saved me this year. Everyone else is bitching about the rain and lack of sun but things are going great for me knock on wood. I'm not 'in the ground' though so that probably has something to do with it. I just need to check my plants multiple times a day. These plants are getting massive. The cage is at least 8ft tall and the biggest one is about to the top now. Almost as wide too.
8/14 I forgot to write the entry but I uploaded some pics from this morning. They were wet from the storm but I went back over and took video that's like two and a half minutes plus I took some pictures. I pulled the cage out but I need to undue one of the lathes and pull it forward. I also need to apply BT. Plants seem to be aggressively flowering (some more than others) so it's a real exciting time. I went over this afternoon and everything looked fantastic. I'll try to upload a few pictures but the video will have to wait. Didn't rain today and my bags sry out quick so I'm sure they'll be fine even if it rains. I did notice that the two plants I watered most including the smallest container seem lighter in color. IT might hust be the transition to flower but u think I need to increase feed. On the 10th planet's they are green as can be and have that SLIGHT little almost unnoticeable part you really have to look for on the tips that means it's getting its nutes but it's not burnt. I believe I'm going to have to make feeding schedules for each strain


Processing
Likes
5
Share


Processing
Likes
15
Share


@420Consinc
Follow
- WEEK 8 -
----- Day 50 -----
Woo hoo. End is in sight and the plants are still PACKING the pounds on.
Big Bertha is 11 inches long, 2 inches wide.
The hidden massive Gertha is 8 inches in circumference in the middle in just bud alone and isn't even the largest part of this 8 inch long nug...
Fed 1150ppm 13L 6.4pH
5-15+ days left.
2-4 days till I start looking into trichome finish period.
Forgot to take a regular full shot and shots of tropicanna glookies. oh well. Later tonight if I remember.
I stopped bud candy cause I'm using a lot more molasses and its literally a sugar in itself so why put in bud candy which is just sugars... seems redundant.
----- Day 51 -----
Easy day of watching.
Some nice bud shots today. The whole basement smells of weed candy. Back right Tropicanna is pineapple gummy bear, front right is just gummy bear.
Wedding Cake is like sweet weed, you get the regular smell of pot but instead of skunky its sweet but that Tropicanna is just alllll candy no weed smell at all.
I did the first 60x shot today. 5% cloudy 95% clear on the Tropicanna. Long ways to go.
I'll be doing the Wedding Cake later tonight, got side tracked.
----- Day 52 -----
Fed 1200ppm 6.4ph 12 Liters
Tropicanna Glookies is going full blown purple. Should be covered in dark purple coloration within the week.
Wedding Cake is just fat. Super fat large nugs.
Easy day. Forgot to take trichome pics of Wedding Cake will do that later today probably.
Well, the largest bud is 1 foot in circumference now... rofl
----- Day 53 -----
Easy day. Fed some water, they're getting thirsty again.
I'm going to do a 13L feeding , then next day 5L water. So that's what I did today.
I'll be dropping the Kool Bloom Powder & CaliMagic by day 56 and only feed 1/2 strength molasses only.
Will pick the buds off as they finish, not gonna do 1 big chop unless it manages to turn out that way.
Colors are going wild.
Will check Wedding Cake & Tropicanna trichomes before lights out will update pics then.
----- Day 54 -----
1300ppm 13L 6.4ph fed
Here's some pics.
Wedding Cake is nowhere near ready by the trichomes. Barely any cloudy, no amber.
----- Day 55 -----
Tropicanna really turning purple now starting to infect the leaves at top of canopy.
Can't wait for what Day 63 holds for all these ladies.
Not going to check trichomes till probably day 58
Easy day, last fert feed with chemical nutrients tomorrow, after that its just molasses.
----- Day 56 -----
Didnt even bother with ppm/pH.
Molasses. roughly 30-50ml in 13-15 Liters.
Smoked a tester of the Tropicana Glookies (Sativa)
God daaaamn. Shits fire. Extremely strong. Very Cerebral and its not even at its peak yet...
I've chosen Tuesday as Harvest day for both Tropicana Glookies plants (they're clones of each other)
A single Wedding Cake testing nug is drying right now, I'll judge when it gets harvested based on the high, and if not sufficiently near my level i'll give it 2 days before drying another nug and trying again. I want heavy ass couch-lock.
6 days for Tropicana.
Probably 8 for Wedding Cake.
Will send samples off to Canvas Labs for testing like I've done in the past and will be making both edibles and bubble hash and will post those here as they happen.
Once thats done I will see if I can restart veg mode in this grow, and if so I will keep this going until the plants die (and just make side diaries for each individual plant variety grow).
Should be interesting.
*** update ***
Where'd the 1.5 Liter water bottle go?
rofl
