


Likes
1
Share


@RosQuare
Follow
I’ve switched to a custom fertilizer blend, flushed all the plants with the new solution until the runoff matched the input values.
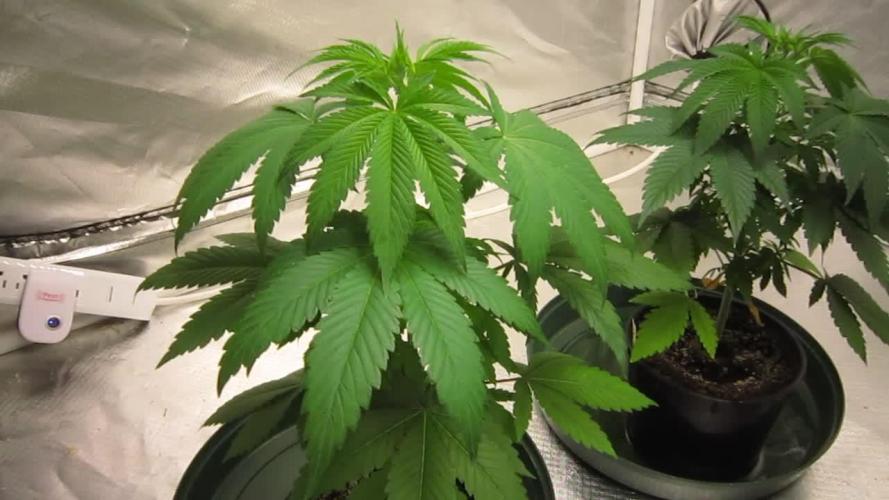
I’ve transplanted the original 3 seedlings into 1 gallon bags of promix cx (coco). Topped them and rooting the tops to make clones for this mom hunt. 1 of the originals (gorilla glue) has failed to thrive and is stunted at the 3rd node.. I’m ready to toss her.
The 4 replacement seedlings are also ready to transplant but not quite ready to top for cloning, needs a little bit more stem growth before I prune back to the 3rd node.
I’m very happy with these ladies so far. I could send the first 3 to flower right now but I’m going to wait for the other 4 to catch up first so I can run them all together.


Likes
13
Share


@Dunk_Junk
Follow
27cm vertical growth this week!!!!!! Surprising!
First watering with 6-12-36 powder mixed at 1g/Litre
Very bushy as well. I can see me strategically clipping a few leaves in the weeks to come to make sure all flower sites receive sufficient light.
Likes
142
Share


@MadeInGermany
Follow
Hey everyone 🤗.
This week was harvested properly 😍.
All of them are harvested, except for the two Tropicanna Banana (they will be on tomorrow).
All finished crop images follow little by little as soon as they have dried enough and have got their actual bud structure 😃.
I wish you much fun with the diary, stay healthy Ges and let it grow 🌱


Likes
16
Share


@Dabking
Follow
Buds fattening up. Looking to be at least a 4-7 ounce dry weight harvest .

Likes
1
Share

@Chucky324
Follow
Hello. This is the end of week 4 and the beginning of week 5 of veg.
The plants are doing good and growing well.
They are up to about 600 ppm when I water them
Did the rub test on them and was slapped in the face with a strong cat pee smell with a hint of citrus.
The smell will change as they grow, but I thought if was humorous.
Started a new underground comic for your enjoyment. It's Weirdo #13 printed in 1993.
OK. Be Great.
Chuck.
Likes
7
Share


@Adam22
Follow
Week 5 day 35 today I turned the plants 180° and defoliated not too sure if I absolutely butchered them but its done now time will tell....they've been watered straight after also I've noticed no yellow tips or deficiency on leafs all through pur which is shocking...this strain is the best one I have grown soo far I've done about 5 so far over 10 years with big gaps so learning again for sure slowly 👍 would like to grow this again soon but properly next time... temps are around 26-27 still using the cfls to keep temps up and is going well so far. Im looking for seeds for next time I want to grow but can't seem to find this strain anywhere 😕
Likes
6
Share


@masterofsmeagol
Follow
5/25 Some pics may be repeated because I forgot to add a new week. Waited until about 11 to bring the girls outside. They were definately dry on top so I used the rest of the gallon to water them. When going outside I noticed a specific kush plant that's lighter than the rest. I really need to up my water volume on these big plants. They are also getting close to not liking it in the 1 gal. and are ready for a transplant. I cleaned the cage so as soon as the weather permits these girls will be outside in the direct sunlight. Basking in the sun in the cage to finish hardening before going into their final homes which will be 20-30 gal smart pots and a 50 gal grow pot. Well SOME of them are ready for transplant. The link kush seems to take its time but it looks extremely indica-E. Weather looks like it will be amazing this week so I'm obviously stoked. Wouldn't suprise me if these girls were outdoors be the end of the week!
EDIT: THE GIRLS STAYED OUT FOR 3.5 HOURS AND LOOKED FANTASTIC. TUEY GOT SOME INTENSE SUN, EXPOSIRE TO THE HIGH RH AND A LITTLE EXPISURE TO THE HIGH WINDS. SPECIAL KUSH SEEMS TO BE THRIVING. I THINK IT WILL DO WELL IN THIS CLIMATE. THAT ONE MK ULTRA IS GROWING AT A RIDICULOUS RATE. I WATERED THE PIBK KUSH THAT WAS LIGHT. I CANT WAIT FOR THE UPCOMING WEATHER. I CAN EXPOSE THE PLANTS TO SOME DIRECT SUNLIGHT AND SEE HOW THEY HANDLE IT. I CAN ALSO GET THE GROW BAGS READY WITH SOIL MOXED AND THEM IN THE RIGHT LOCATION THE DAY BEFORE THE TRWNSPLANT TO FINAL HOME BUT IM GETTING AHEAD OF MYSELF. IM HAPPY THUS FAR. I also added another half hour of darkness so the plants will be closer to actual daylight times. They're down to 16.5. I'd like to have them lower by now but it is what it is. If some reveg I'll deal with it.
5/26 Plants seem to grow an inch I'm a day. MOST are getting to the point where they want to stretch their feet out. Good thing they'll be going in their final homes as soon as they are hardened off completely. I brought them out around 8 this morning. I have to be back at noon but I'm uncertain if leaving them out that long is a good idea. I'll probably have to check them in an hour or so. They're in the lean-to but THAT gets direct sun until the sun rises high enough in the sky to block it. I put them in here rather than the cage so they can build a tolerance to these harsh winds. Topsoil was dry as fuck. I watered everything. I focused on those that SEEMED the lightest and the largest plants. That MK Ultra plant I fimmed is going to be MASSIVE. I'll update what I do as I do it. Oh I also cleaned the bags twice and they are hanging inside the cage with the direct uv rays hitting any part that's discolored. I MIGHT do one more cleaning but I doubt it. Twice is enough. Technically three times but still. I want things to go right. It looks like I've got some pretty good phenos.
EDIT: I PULLED IN (BLOCKING VIEW FROM PART OF THE DRIVEWAY OFF) BECAUSE THAT WAS CLOSER TO MY PLANTS. I GET OUT AND START ADMIRING MY PLANTS AND LOOK ACROSS THE STREET TO SEE TWO STATE TROOPERS AND SOME DETECTIVE ACROSS THE STREET. DAD SAID AN AMBULANCE CAME BUT LEFT WITH NO LIGHTS ON. THEY WERE TALKIMG TO THE COUPLE SEPERATELY. I ATE LUNCH AND THEY WERE STILL THERE. MY HOT WIFE WENT OUT AND THE ALL STARTED FUCKING RUBBER NECKING. MEANWHILE I BROUGHT THE PLANTS INSIDE WITH THE SMALL COVER MY S.U.V PROVIDES LOL. PLANTS WERE LEFT IN DIRECT LIGHT UNTIL IT ROSE HIGH ENOUGH TO CUT IT OFF TO THE LEAN TO. PLANTS SEEM LIGHT. WELL SOME DO. I NEED TO GET A GOOD WATERING SCHEDULE DOWN. JUDGING BY HOW THESE PLANTS TOOK IT TODAY I THINK THEYLL BE OUTSIDE IN FOREVER HOMES WITHIN A WEEK.
5/27 Just poked my head in and checked on them real quick. NO damage whatsoever from all that time in the sun. I left them inside this morning so I can bring them out later in the day to see what happens. I'll add pics later and update what I do.
EDIT: BROUGHT THE PLANTS OUT TO THE CAGE AT A LITTLE BEFORE 10AM AND LET THEM BASK IN THE 85° SUN. THE WIND WAS A LITTLE ROUGH ON THEM. IT WAS ACTUALLY THRASHING THEM BUT MY INTUITION SAID 'LEAVE THEM BE' SO I DID. I DID MORE CLEANING AND FIGURED OUT SPACING IN THE CAGE AND I MIXED A 30GAL GROW BAG AND 2 20GAL GROW BAGS WITH A 50/50 MIX OF FOX FARM OCEAN FOREST AND HAPPY FROG. SOUL WAS MIXED WITH A GRADE STAKE AFTER BEING PUT IN A GALLON AT A TIME (TO ENSURE EQUAL PARTS) AND FINALLY MISED BY HAND. TAKES A LOT OF WORK. IM NOT GOING TO BE AS PICKING WITH THE OTHER ONES. I STILL HAVE MY 50 WITH SOIL IN IT. MAINLY DUE TO LAZINESS AND THE PAIN IN THE ASS IT IS TO MOCE THE FUCKER. PLUS IF IM LOW ON SOIL (WHICH IM NOT) THAT WAS GOOD SOIL AND THE PLANT HAD NO PROBLEMS SO I GUESS IF NEEDED IT FOULD BE REUSED. I NORMALLY JUST EMPTY THAT FIRST AND MIX A SHIT TON OF SOIL IN THERE AND SHOVEL IT IN THE BAGS. THIS WAS MUCH HARDER. PLANTS GOT CLOSER TO 2 HOURS OF DIRECT SUNLIGHT BEFORE I MOVED THEM TO THE LEAN TO. I WILL UPDATE WHEN I HRING THEN IN BUT DESPITE THE HARSH SUN AND WIND THEY SEEM FINE.
EDIT: BROUGHT THE GIRLS IN AT TWO BECAUSE MY WIFE HAD AN APPOINTMENT. NO DAMAGE WHATSOEVER. I THINK IF I USE THIS WEEK TO INCREASE DAYLIGHT HOURS AND UP THE WATERING THESE PLANTS WILL BE READY TO GO IN THEIR HOMES. A FEW ARE BIG AND DEF READY TO STRETCH THEIR FEET.
5/28 With the increased sun some these plants are out growing their containers. PLANTS SPENT APPROX AN HOUR AND A HALF IN DIRECT 85° SUN. EVERYTHING SEEMED FINE AND I WAS GOING TO LEAVE THEM FOR THE DAY IN THE CAGE. THEN I NOTICED THE BIG MK ULTRA'S MAIN STEM (IT GOT FIMMED BUT THE MAIN ONE) WAS STARTING TO DROOP A LITTLE. I PICKED THE PIT UP AND DESPITE A LITTLE BIT OF MOUSTURE ON THE TOP THE PIY WAS LIGHT AS A FEATHER. PLUS SETTING ON THE THEM ON THE TAR WASN'T THE BEST IDEA EITHER. I MISED UP SOME WATER AND WATERED THE PLANTS THAT SEEMED LIGHT. I NEED TO PICK UP LIKE ONE MORE BAG OF OCEAN FOREST FOR MY 50 GAL. I'M GOING TO TRY TO FINISH MY OTHER TWO 20'S AND THE TWO 10'S TONIGHT SO I'LL KNOW WHAT IM LACKING. ITS BASICALLY JUST THE 50. IF MY INTUITION SAYS ITS OK ILL TALE THE "COOLER" DAY TOMORROW AND TRANSPLANT THE THREE PLANTS TGAT ARE GETTING TO BIG FOR THERE POT. ÌF NEEDED I MIGHT GET SOME SCREENS TO USE AS A "BLIND" SO THE PLANTS DONT GO STRAIGHT TO FULL SUN ALL DAY.
EDIT: TJAT HUGE MK ULTRA REVOVETED NOCELY ONCE WATERED AND PUT IN THE SHADE. IT NEEDS TO BE TRANSPLANTED. I MAY DO ITCTOMORROW. PLANTS HAVE GOT TO BE CLOSE TO HARDENED. I MIXED ALL MY SOIL AND FILLED ALL THE GROW BAGS WITH THE MIX. I FINISHED CLEANING THE CAGE AND REMOVED BAMBOO AND TRELLISING. TOMORROW IS GOING TO BE A MILD DAY AND PERFECT FOR TRANSPLANT. SOME OF THESE GIRLS ARE GETTING VERY BIG. I RAN OUT OF SOIL AFTER THE LAST 10GAL GROW BAG. ITS NOT FILLED "ALL" THE WAY AND I GAVENT FILLED MY 50 GAL. I'LL GET THE REST OF THE SOIL I NEED FOR THAT 50 TOMORROW.


Likes
6
Share


Likes
31
Share


@SkunkyDog
Follow
Hallo zusammen 🤙.
Sie wächst sehr schön und macht keine Probleme.
Sie riecht sehr schön nach Vanille.
Sie erhalten 25 Prozent Rabatt in unserem Shop
Mindestbestellwert beträgt 75 Euro
https://greenbuzzliquids.com/en/shop/
Code: GD42025


Likes
4
Share


@Big0zGrower420
Follow
Day 49!
Starting to give her just plain water for 2 weeks of flushing. Getting really excited to harvest and then get going on another grow.
See you next week.

Likes
26
Share


@UkDank420
Follow
Going really well really happy with how the ladies have grown and how they are developing I seem to be getting taller plants back side of the tent I can only put this down to changing light to more powerful one but they all seem to be happy and doing great
Likes
7
Share


@eldruida_lamota
Follow
Vamos familia actualizamos la cosecha de las gelato Olandese de Dutchfem .
La verdad que el secado muy bien 7 días en Malla y a los botes, 40% humedad y 24 grados es la temperatura ambiental que han tenido en el secado.
Por lo demás de miedo os la recomiendo.
Gracias a DutchFem, Agrobeta y Mars hydro , sin ellos este proyecto no sería igual 🙏.
Agrobeta:
https://www.agrobeta.com/agrobetatiendaonline/36-abonos-canamo
Mars hydro:
Code discount: EL420
https://www.mars-hydro.com/
Buenos humos.

Likes
3
Share


@CanJey_Vec
Follow
Moin Community! 🌿
Unsere Ganja-Farmer-Ladies sind inzwischen in ihr neues 80×80-Zelt umgezogen – und was soll man sagen: Umzug bestens überstanden! 💪
Kräftig, sattgrün und mit richtig guter Laune starten sie jetzt in die nächste Phase. 🌱✨
Wie immer wachsen sie im Living Soil von @white_ash_botanic ,
bereitgestellt von @growandstyle – das Setup läuft einfach rund! 🌿🔥
Gemeinsam mit euch begleiten wir jeden Schritt – Tag für Tag, Leaf für Leaf.
💚 Canna Community Germany × Ganja Farmer 💚
We Grow Together. 🌿✨

Likes
9
Share


@HollowSource
Follow
The banner is looking like it's namesake. Big, green and mean. She is super dense and has colas almost as long as she is. She is fattening up. She is giving the Gelato a run for its money when it comes to bud size.
Likes
12
Share


@Mikefromjax
Follow
It’s been one hell of ride but I enjoyed every minute these are your babies and there like real kids I only let them listen to slow jams lol 😂
Likes
2
Share


@Sevikannabis
Follow
Llegamos a la última semana antes de su cosecha, dejaremos 2 días últimos a plena oscuridad y cortaremos. Tiene un olor muy fuerte a limón, una gran creación de tricomas que envuelven toda la planta. Pronto sabremos sabores y efectos. En cuanto a cosecha a resultado una cepa que al principio nos tenia un poco decepcionado pero todo cambió en el ciclo de floración, cogollos bañados en azúcar y brillante como diamantes en general, casi para comérselo 💯

Likes
19
Share


@GoldenWeedGrower
Follow
Legend
Timestamp: 📅
Measures: 🛠️
Water: 🌊
Actions: 💼
Thoughts: 🧠
Events: 🚀
________________________________
📅 D22/V20 - 14/09/23
🛠️ EC 0.8, pH 5.8
🌊
💼
🧠 CO2 Dispenser is working good, it should deliver some CO2 trough the pipe
🚀
________________________________
📅 D23/V21 - 15/09/23
🛠️
🌊
💼 Added some workers to bend her down
🧠
🚀
________________________________
📅 D24/V22 - 16/09/23
🛠️ EC raised up to 1.2, pH trend is down
🌊
💼
🧠 I'm going to change the water in the next days
🚀
________________________________
📅 D25/V23 - 17/09/23
🛠️
🌊
💼 New workers at work to let her stay down and down 💼 💼 💼
🧠 Now Capitan America and his bike is bending the main bud and the CO2 is provided by NASA 😋
🚀
________________________________
📅 D26/V24 - 18/09/23
🛠️ EC is 0.9 and pH is 6
🌊
💼 Added LST with men at work and made some defolation
🧠
🚀
________________________________
📅 D27/V25 - 19/09/23
🛠️ EC 0.9 pH 6.2
🌊
💼 LST and new bending
🧠
🚀
________________________________
📅 D28/V26 - 20/09/23
🛠️
🌊 RES Changed 💦💦💦
💼 Added very little bit of silica powder to the water
🧠 I let the plant absorb it along the night and changed the water again in the morning. It's the first time I add a silica to my grows, waiting to see what is going to happen 😉
🚀