
Likes
Comments
Share


@LazysHomegrow
Follow
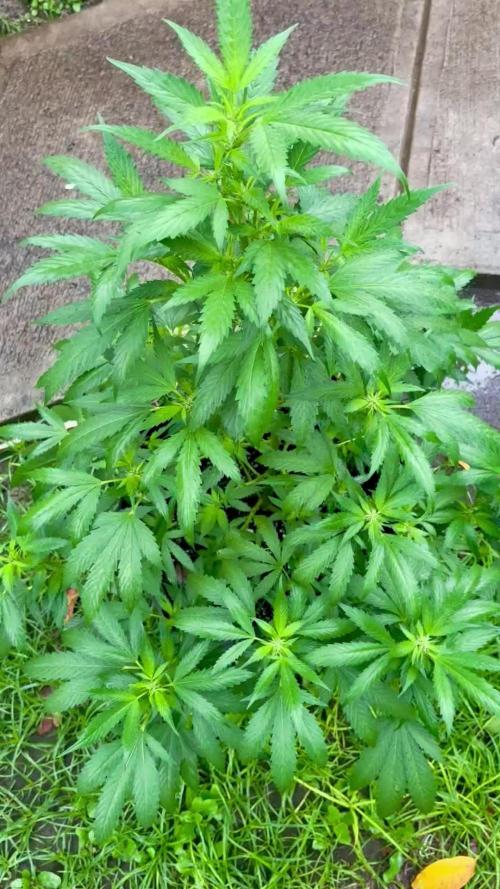
14 days on the auto watering system and the girls are looking happy. Everything survived well and my reservoir size was just right. They are looking a little hungry, but nothing s fresh mix of nutes shouldn't fix.
Things are starting to look frosty.
I'll Be pulling all the Larfy bits this week to optimize my tops.


Likes
18
Share


@Stonyways
Follow
lights up to 66w, 28 inches from the top of the plants, fox farm nutrients for this grow..... already anticipating my next grow...
start to the the Peet Pods I used were/are garbage, first and last time I will use them
Likes
6
Share


@bubatz420
Follow
Mein erster versuch main-lining anzuwenden 😊
Lemon Cherry Gelatos haben mittlerweile 8 headbuds pro plant
Denke mal werde sie noch einmal toppen um 16 headbuds zu erhalten


Likes
14
Share

@Organic473
Follow
A rainy day for this girl as she navigates the tropical depression passing over our island…the rain and Saharan dust is dumping plenty of nutrients on her.

Likes
14
Share


@LokalGrenz
Follow
It’s been 7 days and one of my amnesia hazes is getting yellowish spots on it not 100% sure what’s the issue im going assume it’s too much water? Confused cause the other have same soil and every same amount of water and don’t have those issues I have the light right now about 1.5 ft away from the plants moved the light down I felt like they was stretching and becoming real skinny been keeping the temp about 75 and humidity somewhere around the 60% also I used fishshit today in the watering hopefully that’s helps
The sour diesel I’m pretty sure I dropped the seed to deep my mistake so I removed a little soil until I seen top of it and now it’s looking like it might make it it just a little behind the amnesia haze
The two in red solo cups (black Truffles) are growing pretty fast looking bit better then the amnesia haze and I found them seeds lol anyway if you looking and see anything that could help (Please do!!!) also if your using ac Infinity controller 69 I need help!!! Today the first time I messed with it to make make the 18/6 schedule and not 100% sure if I did it right yet I wanted to make it on 5am-11pm off the other 6 I had it on 24/7 all last week and not sure is that caused the yellowing or not I doubt it but I’m NEW and I’m not sure I’m a YouTube university grad 😂😂
But yea thanks for looking and I’ll try to post more day
D14
Processing
Likes
10
Share


@GrowerGaz
Follow
This week just water from the autopots and a soil soak with some bio enhancer . Plants are really starting to smell now . Resin production on the Rado z is insane. Sadly they did not make the cut for the next drop. Happy to have been able to test them. I think they look and smell great.
Likes
76
Share


@TheFattyMcCoy
Follow
Hey yall,
Temps were high, but under control now. My girls were droopy despite having moist soil. After a good compost tea they bounced right back.
Pistol hairs are showing, haven't grown this specific cultivar before so the bud structure is a but different than others I am familiar with. Let's see what she does moving forward.
I am not a super fan of these genetics. Already have new seeds I am ready to start once these ladies are done. Over all the Strawberry Diesel from Beaver Seeds is not a noob grow, you need to have your grow dialed in.
And really be careful with PM. I am keeping humidity as low as I cam while still maintaining a decent VPD.
Challenges with this strain definitely turns me off. Looking forward to a new cultivar, already have some genetics from Michigan, those cats are really something else, they are hellbent on being better than the West coast. And they are in my humble opinion 😌 ☺️
Pure Michigan looks good, also Honey Sticks Genetics out of Maine is killing it, their Bananaconda 4 tested over 40% total cannabinoids. They want like 3k per cut, so that won't be my next, but looking forward to new genetics nonetheless.
Anyways made some new ferments, remember to use equal parts organic sugar, Jaggery is best, that is the closest form of sugar to the sugar cane plant. Cover with paper towel, 2 to 3 days later let gravity give you all that juice, don't squeeze it to get more. Keep that juice in the fridge, that is your food. Then add water to the solids and keep at room temperature for 3 months to make a vinegar. That is your cleanser.
Ask questions please 🙏
Love to see others trying KNF, or simply put Natural Farming methods.

Likes
5
Share


@HAN_GROWER17
Follow
Una cepa bastante productora, la cual tiene un desarrollo bastante explosivo!
Me gusta BSF seeds tiene muy buenos fenotipos, estables y productores!

Likes
17
Share


@CanabisLoverHobbyGrower
Follow
Nothing really to report, dropped the light to 18" running at 100% and today is first day of nutrient feed, roll on this next week 👌👍
Likes
38
Share


@Elbernaweed
Follow
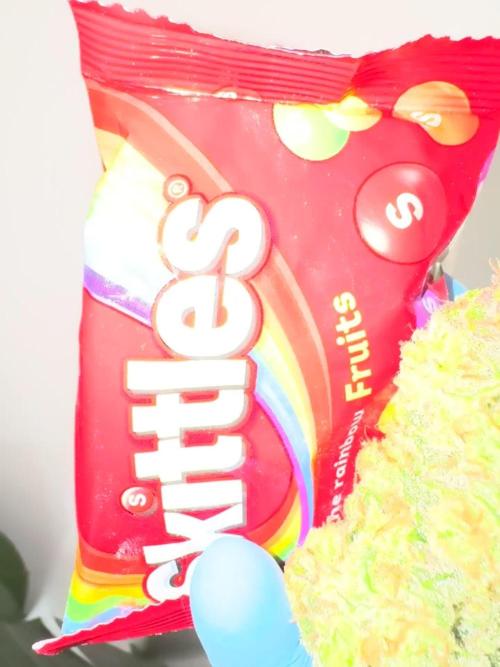
Las plantas llevan 30 días de vida, acabo de trasplantar a tiestos de 11 litros, depues de un par de días de estrés por el trasplante se espabilarán y empezarán a crecer como locas, creo que en una semana más a 18h alcanzarán un buen tamaño para pasar a floración. En los tiestos de 11 litros e añadido sustrato light mix mezclado con guano, humus y nutrihemp. Realizó la mezcla y relleno tiestos y trasplanto las plantas ai. La kritikal de growbarato a salido mongola pero se ve robusta y se está poniendo bien , voy a dejarla para ver qué sale. También e puesto un esqueje de skittles ya que supuestamente es 80% indica y tendrá el mismo tiempo de floración que las OG kush y Cream caramel. A si que ya veremos más adelante que pasa. Bueno amigos un saludo y buenos humos!😎
Esta semana e aprovechado para fumigar con preventivos, utilizó propolix de trabe , que va muy bien para prevenir los hongos como el oidio,botrithis, etc…. Añado 2 ml/L y empapó bien media hora antes de que se enciendan los focos, Este proceso lo repito cada 15 / días asta la segunda semana de floración que dejó de echarle.


Processing
Likes
10
Share


@yaron
Follow
Hi guys!its getting kind of boring but again a rainy day.They need sunlight bad,the coming days the sun will shine so we will see what happens.
Cheers!
Finally we have sunshine!The smallest one,a gg,just will not grow i dont know whats wrong with her and she is already in flower.
The rest is doing fine i think.
Cheers!
Processing
Likes
13
Share


@GangbudsGenesgdl
Follow
28/12/20. inicio de semana, 75 cm de altura hoy se aplico un nutriente foliar marca mexicana Rootz kelper son un extracto algas y azucarez y se aplico por riego giga grow. este contiene guano de murcielago
todo organico.
01/01/21. hoy se aplico un nutriente foliar marca mexicana Rootz💪 kelper son un extracto algas y azucarez y se aplico por riego giga grow. este contiene guano de murcielago
03/01/21. cierre de semana con 80 cm de altura


Likes
50
Share


@DogDoctorOfficial
Follow
Week 6 Veg Report – Runtz We Meet Again!
Another week, another step forward in our Eternity Grow Cup 2025 journey, and oh boy, do we have a lot to unpack! These Runtz girls are showing their potential, and we’re dialing in every little detail to ensure they thrive. Let’s dive deep into everything that happened this week!
Cal-Mag Deficiency Adjustment – Pheno #5’s Special Needs
This week started with a close inspection of our phenos, and we noticed that Pheno #5 was showing early signs of a calcium/magnesium deficiency. Whether it was slightly off VPD levels or this particular plant being more demanding, we decided to correct it by increasing the dose of RO Water Conditioner. Now, while this isn’t a direct substitute for Cal-Mag, it does contain trace amounts that can help stabilize the situation.
🔬 Understanding Cal-Mag Deficiency:
Calcium and magnesium are essential secondary nutrients. Calcium strengthens cell walls, preventing issues like tip burn and weak stems, while magnesium plays a critical role in chlorophyll production, allowing plants to efficiently absorb light energy.
💡 Signs of Deficiency:
• Yellowing between veins (Magnesium)
• Rust spots on leaves (Calcium)
• Slow growth and weak stems
⚡ How We Address It:
• Slightly increasing RO Water Conditioner to see if trace minerals help
• Keeping an eye on overall nutrient uptake to ensure no lockout
• Monitoring VPD (Vapor Pressure Deficit) closely to optimize nutrient absorption
Let’s see how she reacts next week!
Branching Development – Pheno #2 Leading the Race
All five phenos are thriving, but Pheno #2 is showing the most aggressive branching, pushing outward faster than her sisters. However, overall, we’re seeing very uniform growth, which speaks volumes about the stability of these genetics.
🌱 What is Branching & Why It Matters?
Branching is the plant’s way of expanding its canopy, increasing surface area for photosynthesis, and maximizing potential bud sites. Well-structured branches allow better airflow, light penetration, and more even growth—key for a successful high-yield harvest.
⚖️ Topping vs. Leaf Bending – The Training Choice
Instead of topping, I’ve decided to go with leaf bending for now. This method allows for gentle manipulation of the plant’s growth without causing major stress. Once we introduce the SCROG (Screen of Green) net, this training will help maximize the canopy spread.
Moving to the TrolMaster Ecosystem – A Game Changer
Big move this week—our Runtz girls officially transitioned into the TrolMaster Ecosystem, and let me tell you, they are absolutely loving it! Under the ThinkGrow Model 1 LEDs, they’re thriving, leaves praying upward, soaking in that optimized spectrum.
💡 ThinkGrow Model 1 LEDs – Why They Work
• PPFD of ~400 µmol/m²/s at their level, running only on Channel One
• Full-spectrum lighting tailored for optimal vegetative growth
• Passive cooling design, keeping temps stable while saving energy
Environmental Conditions (Measured on the TrolMaster Tent-X and the AMP-3)
• Temp Max: 26.6°C | Min: 16.2°C
• RH Max: 77% | Min: 52%
• VPD Max: 1.65 kPa | Min: 0.43 kPa
• Solution pH: 5.8
• EC: 0.96
• Water Temp: 16.3°C
Why These Numbers Matter:
• Keeping VPD in check ensures efficient nutrient uptake
• pH and EC levels fine-tuned for maximum root absorption
• Water temp stable to avoid root shock and slow growth
Autopot System Prep – Getting Ready for the Next Phase
The week wraps up with us cleaning and preparing the Autopots for their next phase. These self-watering systems will allow the Runtz girls to access water and nutrients at their own pace, optimizing growth as we head into pre-flower soon!
A huge THANK YOU to Zamnesia, Plagron, and GrowDiaries for making this incredible Eternity Grow Cup 2025 possible! Also, a big shoutout to my main sponsors, thank you for keeping this journey running:
🔥 Aptus Holland – Precision nutrients for peak plant health
⚡ TrolMaster – Bringing automation and accuracy to the grow
🌱 Pro-Mix – The foundation of strong roots and healthy plants
💨 The CannaKan – Premium solutions for top-tier results
Grove Bags – Revolutionizing post-harvest storage & terpene preservation
📜 Ziggi Papers – The ultimate rolling experience
And of course, a massive thank you to the community—followers, supporters, lovers, and even the haters. You ALL fuel this journey, and I appreciate every single one of you!
🚀 Good luck to all fellow competitors—watching everyone’s grows is inspiring, and the competition is fierce!
📢 Join the journey on YouTube & Instagram for exclusive content, behind-the-scenes action, and more insights into this epic run!
👊 Let’s keep pushing, learning, and making history—see you all next week for another deep dive into the Runtz We Meet Again grow! 🌿🔥
💚 growers love to all 💚
Genetics - Runtz https://www.zamnesia.com/6000-zamnesia-seeds-runtz-feminized.html
Nutrients - Plagron https://plagron.com/en/hobby
- Aptus Holland https://aptus-holland.com/
Controls - Trol MAster https://www.trolmaster.eu/
LED - https://www.futureofgrow.com/en
LED - https://www.thinkgrowled.com
Soil - https://www.promixgardening.com/en
Germination - Cannakan https://cannakan.com/?srsltid=AfmBOopXr-inLXajXu3QFgKXCXXos4F1oEvScjMKIB5MR5dk8-GJ-F49
DOGDOCTOR 15% off
Smoking Papers - https://ziggioriginal.com/
Terpene saver - https://grovebags.com/
As always thank you all for stopping by, for the love and for it all , this journey of mine wold just not be the same without you guys, the love and support is very much appreciloved and i fell honored with you all in my life
With true love comes happiness Always believe in your self and always do things expecting nothing and with an open heart , be a giver and the universe will give back to you in ways you could not even imagine so
As always, this is shared for educational purposes, aiming to spread understanding and appreciation for this plant. The journey with nature is one of discovery, creativity, and respect. Let’s celebrate it responsibly and continue to learn and grow together!
Growers Love To you All 💚
#EternityGrowCup #RuntzHunt #GrowersLove #CannabisCommunity #AptusHolland #ProMixSoil #TrolMaster #Zamnesia #Plagron #ZiggiPapers #Grovebags
Likes
20
Share


@Boomdrawfyah
Follow
57 dias de vida y 31 dias de trasplante vaya diferencia en solo 10 dias han crecido 50 cm ha augmentado el tamaño exageradamente , hay algun saltamontes comiendo alguna hoja pero nada grave , estan creciendo muy sanas y con unas hojas de 11 foliolos grandísimas la última foto hay una comparación con el culo de una garrafa de 5L


Likes
12
Share


@HighKing
Follow
All in all a good run but because of my fault with the wrong lightcolour. Wont Happen again. On to the next one. (After I smoked All these)

Likes
34
Share


@The_Bearded_Grower
Follow
Day 114 harvest has gone exceedingly well unfortunately the vids of the harvest wont post but i will keep trying thanks for following the grow and i hope to see all of you in the next grow
Update a finally got the vids !!!
well holy crap its a good harvest again for just 1 plant 9 oz baby


Likes
3
Share


@AutoCrazy
Follow
This Canuk lady has been a GEM!
It’s just about time to cut this girl down. She’s been a very nice plant to grow!
I’ve just been giving her plain water for awhile now so she is yellowing out and fattening up!
She will be coming down this weekend I’m guessing 😀
I will definitely run this genetic again! Pure gold!
😎🍿
