
Likes
Comments
Share


@Kynareth
Follow
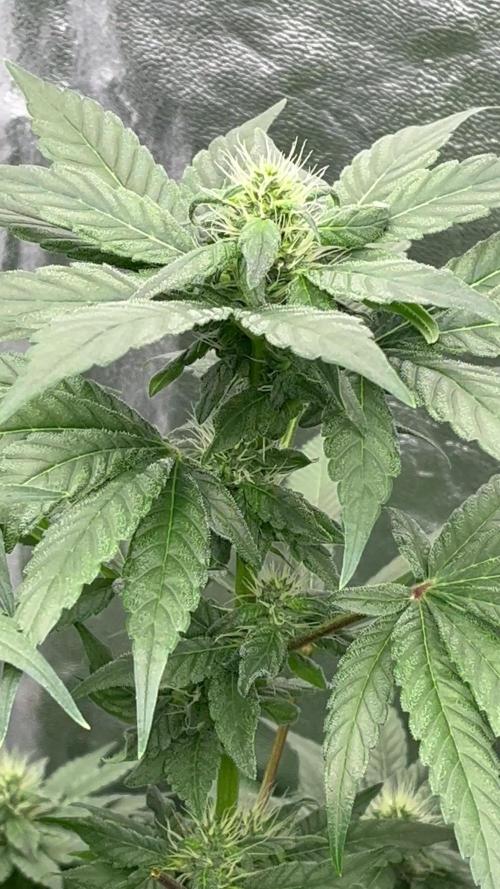
day 27 - He podado las hojas bajas y las mas grandes para que al aplicar el lst entre mayor cantidad de luz a las ramificaciones. El objetivo es conseguir mínimo 8 colas. En la próxima semana ya probablemente instale la malla scrog y pase a periodo 12/12 para floracion. Se puede ver algun ligero problema de fertilizacion (exceso) en la punta de las hojas, pero no parece algo realmente preocupante, ya que en general la planta tiene un muy buen verde como se puede comprobar en la foto de las hojas cortadas a luz mas natural.. Tambien he abierto un poco mas el gotero ya que los dos ultimos dias no he identificado agua sobrante en el plato y el coco es mejor que drene para liberar exceso de sales

Likes
9
Share


@Mr_nugs_lover_David
Follow
She has performed very good with the lst method, nice plant, fast growth, quality flowers, it's a very good choice for everyone who's looking for a good quality strain at affordable prices. Very nice genetic, this phenotype concretely has a very sweet and floral terps. You can check the other 2 phenos of ak420 here at my page


Likes
21
Share


@CanadianFillmore
Follow
Welcome growfessors 👽 to another episode of growfessor theatre, 4x4 edition. Week 5F begins for the ladies and they are looking good! Frosty trichomes are displaying themselves and bud sites are bulking up!! 🌳💚
Thanks for tuning in growfessors 👽🌳💚, tune in again for another episode!


Likes
18
Share


@rockbo47
Follow
SUMMARY: Still continuing with early bloom nutes this week. I ran out of rainwater this week for a few days and had to make a batch with tap water. Had some issues with humidity and temps now that the RH has naturally increased due to the size and bushiness of the plants and so I have had to turn the dehumdifier on however this raises the temps and so its about finding a good balance.
I did a heavy defoliation on day 44 stripping almost all fan leaves and any lower small shoots which wont ever get enough light. I also raised the light again so that it is 16" above the canopy of my tallest plant which is a few inches taller than the NL. To mitigate this I raised the NL up by a couple inches or so.
DAY 44
--------
Sunday 14th February 11:45
I made 10L of early bloom nutes with dechlorinated tap water (no rain water left), 5L at a pH of 5.7 and 5L at a pH of 5.6.
Sunday 14th February 18:00
I did a heavy defoliation on the NL stripping almost all fan leaves and any lower small shoots which wont ever get enough light. I also raised the light again so that it is 16" above the canopy of my tallest plant which is a few inches taller than the NL. To mitigate this I raised the NL up by a couple inches or so.
I fed the NL 2L of early bloom nutes which produced 550ml runoff (28%). [24°C/46%]
DAY 45
--------
Monday 15th February 18:30
I fed the NL 2L of early bloom nutes which produced roughly 800ml runoff (40%) I THINK, as I spilt a bit in the tent.
DAY 46
--------
Tuesday 16th February 11:30
I made 10L of early bloom nutes with rainwater, 5L at a pH of 5.8 and 5L at a pH of 5.9.
I forgot to turn the heat down over night and the humidity is at 56% currently. [22°C/56%]
Tuesday 16th February 18:30
I fed the NL 2L of early bloom nutes which produced roughly 1L runoff (50%). Shes still not back to her normal intake before the defoliation which was only 2 days ago.
I turned the dehumidifier on and set it to 45% as the RH had climbed to 62%. [22°C/62%]
DAY 47
--------
Wednesday 17th February 12:00
I made 10L of early bloom nutes with dechlorinated tap water, 5L at a pH of 5.7 and 5L at a pH of 5.6.
Wednesday 17th February 18:30
I fed the NL 1.7L of early bloom nutes which produced roughly 820ml runoff (48%).
DAY 48
--------
Thursday 18th February 18:30
I fed the NL 1.2L of early bloom nutes which produced roughly 670ml runoff (56%). Shes still hardly drinking much so I will dial this down to 1L tomorrow.
I adjusted a couple of ties to expose more bud sites. I had to move the light up again by 2 inches to accommodate for growth as it was sitting at 14" above the canopy. [24°C/52%]
DAY 49
--------
Friday 19th February 18:30
I found the tent at 28% RH. No idea how that's occurred but I did notice it was hotter then usual this morning. I turned the dehumidifier of for a couple of hours and it jumped back up to 61% and so I will just set it to 55% RH.
I fed the NL 1.5L of early bloom nutes which produced roughly 500ml runoff (33%) so it's looks like she may finally be bouncing back after the defol last sunday. [24°C/52%]
DAY 50
------
Saturday 20th February 11:30
The tent temp has been sat at around 23°C overnight somehow. The dehumidifier keeping the humidity around 45-50% seems to also keep the temps between 23-27°C.
Saturday 20th February 18:30
I fed the NL 1.5L of early bloom nutes which produced roughly 600ml runoff (40%). Looks like i have a humidity problem and so ive reluctantly removed some more leaves from Jesus as she is bushy again after a week or perhaps I didnt defol enough. If I have the dehumidifier off the humidity is in the low 60s but if I lower it to like 45-50% then the temps stays too high between 24°C-33°C. [22°C/64%]

Likes
16
Share


@Ladyblazed
Follow
Bud forming so fast!!!!!! Comparing to previous plants I growth in witch I used biobizz light soil I changed kind of soil in this one I’m using canna professional and the different is quite noticeable I’m really satisfied. I was worried that the small box I’m growing in would eventually make the plant suffer but it’s totally not, the plant is responding well!!
Started with the maximum dose of bud ignitor by advanced nutrient. I’m really exited for this lady can’t wait to se the beautiful complete resinous buds.. keeping growing with LOVE 💚

Likes
5
Share


@SgtDoofy
Follow
Feb 14
Just about time to move from the cup to the 3 gallon bucket. I'll start preparing the soil in that bucket now for transplant in a couple days.
Feb 15
Transplanted to a well-watered 3 gallon bucket with about 90% Ocean Forest and 10% Happy Frog. The roots will love the water I've mixed thoroughly into this soil. I'm expecting a perk-up on the leaves soon.
Feb 17
Having this second light on in the tent bumped up the temps to low 80s.

Likes
5
Share

@SgtDoofy
Follow
Feb 22
Really starting to thicken up! The soil underneath is still plenty moist even though the fan is blowing on it 24 hours a day. The roots will grow more quickly as the water dries up and the roots continue their search for more.
Likes
Comments
Share


@threalsanchez
Follow
These are cruising along nicely. They are packing on weight every day and the frost is everywhere.I can't wait to run Tikimadman man again.
Likes
3
Share


@Passx
Follow
Plant ready to be harvested in 1,5 - 2 weeks so I stopped feeding it with nutrients. The flowers got bigger and much more sticky. The smell became very strong.

Likes
6
Share


@TheSurfBud
Follow
Flowers are shaping up nice and phat.
Very sweet smells, leaves are fading out.
Always following High Powered Organics Gro-dirt Gro-Guide
@highpoweredorganics or
www.highpoweredorganics.com for more info


Likes
8
Share


@GeOMaTTiC
Follow
Figured I would start a part two, since GD doesn't go further than 32 weeks. I only have about 6-8 weeks left, so this won't be a long one, but it will be detailed.


Likes
30
Share


@ChitownCannaChica
Follow
Going to let her sit in darkness for a day or two and giving it one good flush with some cold water. She is about 15% amber. Sorry these pic suck— I broke my iPhone 8 which takes way better pictures than the new 13 pro. Go figure! So these are a touch grainy.
The smells coming off this plant are amazing and unique—- like a soapy candy funk. I never grew anything quite like it. I have 3 more seeds and I am going to have to pop them for sure.
Not too happy with how this plant grew ultra short without any stretch at all, but I only grew one out. Buds are nice and dense so it has a lot of potential.
Chopping in a few!

Likes
22
Share


@medicalhydro
Follow
Seed to harvest day 67
Sticky buds
Fruity smell
Good strees performance
Total Used power 400w


Processing
Likes
3
Share


@Kushizlez
Follow
Day 19-26 (May 10th - May 17th)
(Day 21) Stretch is almost over and the plants still look like they’re in veg. I’m seeing almost zero trichomes and when compared to my other room it’s laughable. At least the sites are starting to fill in a little. One plant is super leggy and stretchy. I’m guessing it’s Jack Herer but won’t know until late flower or harvest. The plant in the far left corner has great structure and thick pistil clumps. I’m guessing it’s either blueberry or the white og. Blueberry has a pretty distinct smell so differentiating all the strains won’t be that hard actually.
(Day 24) I’ve been rearranging the plants once in a while just to get all sides exposed to some decent light. I never realized how much I value my LED until this run. The only way I would ever use another hps for flower is if it was one of those 1000w DE lights that all the commercial grows use.
Sites are starting to fill in quite a bit now. Trichomes are still non existent though. Even on the archive genetics which is really surprising.
(Day 25) Pots somewhat dried out finally. Tomorrow I’m going to leach everything with another 2 liters each and top dress with 15ml of nature’s pride bloom, 10ml of Destiny launch and 5ml of kelp meal. I’m starting to see minor N tox on some of the plants so I will probably give them a full gallon. This tent is largely experimental so I’m going to fuck with these plants pretty heavy to iron out some theories and try some new techniques.
(Day 26) When I was watering today I noticed that slurricane, Puro loco and guava cake all hermed. The archives just got too stressed out in early veg I think. When I dug up both plants they were still being choked out by the sponge aerogarden plugs. Puro Loco was leading by far in the trichome department too. The guava cake was from a hermed bagseed so it’s not surprising at all but that kind of pisses me off about the “elite” Archive genetics, especially if you paid 200$ for a 10 pack. Then again, it was still my error and not their genetics. Luckily I didn’t pay a dime for them. Running those was a complete waste of time and space. With proper environment and no seedling stress I’m sure I could have grown some amazing looking stuff. All the European and Canadian genes look fine though. I’m sure they would have filled out a lot more if they weren’t being choked out by hermies. No signs of bananas anywhere else. Hopefully the 4 slurricanes I have outdoor this year will pull through without herming.


Processing
Likes
22
Share


@Hawkbo
Follow
Finally got my buddy to come out and add in a 20 amp outlet so I can fire up a better light. Still using quantum boards but with a 4500k spectrum. Got in a foliar with the Growzyme from green buzz liquids. Fed them right before I took the pics they look a little sad but hopefully they bounce back quickly. Not much else going on.
The code bangdang will get you discounts at..
Gorillagrowtent.com
Rainsciencegrowbags.com
KindLEDgrowlights.com and more (see Instagram Bio for @bangdangbuds)
Also check out my Instagram if your interested in entering a giveaway for a green buzz liquids starter kit including some living organics, fast plants spray and some seeds of the winner choice.
Likes
6
Share


@cwgrows
Follow
No matter what I do these girls won't stop growing taller! Honestly have considered taking off the tent and hanging the light from my ceiling.
