
Likes
Comments
Share


@1soloflowerlover
Follow
I have too many. Next run will be 4 fems rest autos. I'm in way over my head. Hoping for the best.

Likes
5
Share


@Ryno1990
Follow
Starting out great in the begining of week 3 we had a little accident in week 2 were her pot fell over an she got a little roughed up but she came back nice an strong can deffinetly tell she stalled out for a day or 2 tho other then that she's been growing great seems to be loving this fold 6 led from medic grow
Ending week 3 the Tropicana Cookies is doing pretty good now she's not doing as good as the other auto but seeing how we had a little accident with her she's doing pretty good deff loving the cronk nutrients

Likes
21
Share


@Eponymus29
Follow
Hello growmies!! Well I ended up with just one girl in the tent and two little seedlings I'm growing 12/12 from seed (I'm just curious about it, not expecting anything too impresive) this week I actually started using my scrog net to keep the taller stems from going up and making them stay at canopy level, right now ppfd is about 1100 in most parts of the canopy...

Likes
13
Share


@Robeeriegenetics
Follow
Dropped light hours down to 16 . Topped off nutrient solution with 5.0 ph evened out .removed none chosen phenos to be flowered in separate room no longer tracking those we will only follow the chosen mothers clones i cut clones today as well had the lady friend clean floor with bleach and dawn put clones in ez cloner 32 systems
Likes
59
Share


@Hashy
Follow
Grow diary 11 stage 9
Day 81 to 90
This west coast o.g has grown beyond belief. Yet again she has shown that she is going into flower but she has done this twice already and just got bigger. I have been removing the other 3 strains out the tent as its been a massive compromise on the light height, it's been to far away from some plants and way to close to this one. I have even thrown a net over her to keep her down a bit. As of day 90 she is finally alone in the tent so I can lower the power slightly on the light as I don't have much more height left for it. Also from day 91 the light schedule will be on 16/8 to make sure she does continue flowering. Can't believe it's taking so long to be honest.
Thanks for stopping by. Hopefully next post will be positive news on the flowering.


Likes
38
Share


@Wicked_Stix
Follow
We are at day 21 on this gorilla cookies. I think she would be quite a bit bigger if I didn't break one of the mains on week 2 but she is still chugging along and growing well. I upped the maxigro to .5 tsp per gallon and started them on a little armor si so they can build some strong branches. Still running them on 24 hour light and 24 hour irrigation. They are going to stay under the blurple lights for a few more weeks until I can get them in the big room under the quantum boards. I'm hoping they will flower around 4 weeks but my autos seem to enjoy staying in veg so we will see what happens.
Likes
28
Share


@Cronos
Follow
She had a great start but then it degraded. I had to cut a bunch of burned leaves. Since last topping new sites spread out and she seems to recover.
# D53
I went walk in forest and disovered very nice mulch with mycelium to prepare JMS (JADAM microbial solution) with it:
Ingredients:
- 200/300g of forest mulch with mycelium
- 2 gallons of dechlorinate water
- 3 cooked potatoes
- 7.5 gram of sea salt
Preparation:
- Add the water to the bucket.
- Add potatoes inside a mesh filter (pantyhose) and add forest mulch to an other filter, stick them to the bucket.
- Add salt, mix the water to dissolve it.
- Massage the patatoes filter then massage the mulch filter.
- Some reaction could be observed, the water moves like a current in the sea.
- Place the bucket covered with tshirt inside grow tent for approx 48 hours.
# D55
Feed with 3 liters of dechlorinated water and JMS at 1:10 ratio.
# D56
Prepare AACT based on:
- 5 liters dechlorinated water
- 15 ml molasse of sugar can
- 15 ml Bokashi tea
- 30 ml JMS
- 125 grams vermicompost
- 12.5 grams nettle
- 12.5 grams horsetail
- 5 grams growing guano
- 5 grams fish hydrolyzate
- 5 grams epsom salt
+ calmag
# Day 57
Feed with 3.8 liters of AACT.

Likes
21
Share


@cadur
Follow
Coalas are now so fattened up they are toppling over. Not had this before so have just propped them up.
Have trimmed a few leaves to get a bit more light in and some of the top leaves have started to die off so not long to go now. However, still no amber trichomes so patient I must be.

Processing
Likes
142
Share


@MadeInGermany
Follow
Hey everyone :-)
This week it smells more and more sweet and fruity in the whole room 😍.
There is actually not much to report, everyone is now under 12/12 :-).
This is the last grow that comes in the entire diary.
From now on, each plant will be added to the diary 👍.
I wish you all a lot of fun watching, stay healthy 🙏🏻 and let it grow 😎👌


Likes
96
Share


@gottagrowsometime
Follow
Welcome to my MilkyWay F1 Auto Diary, Untopped VS topped. Results are in.
Days 71-82 ripening 0-13 week 11&12
Went well. She did bulk up a tad. But not much. They spent most their lives under a 100w. But, the bud is really dense all over. No larf, at all. Its a really good quality of bud I'm getting from both phenos. As far as ToppedVsUntopped well, that result is in. With a seeds used from the same pack (same parent) making true F1s as they need to be from the same batch. It why we all got different phenos, and those who ran more than 1, from their seeds, the phenos are very close. One of mine had more of a fade and looks more purple. Both smell very lovely & fruity. Nice trichome production with very dense but, rather small buds if I do say so. But the grade itself is very high. (As grade is not rated on size) overall both turned out very similar. Even fade wise, they've both developed a lovely colour finishing under high co2 environment with the SE5000 really has brought out a lot of fade i normally do not get. look at the start. It was only a few days under this light and the past 14 days they've both popped. I will also say. A lot of their life was spent under a 12-12 (3/5s of flowering).
Topped VS Untopped pheno 2 & 1
Are very similar as I've stated this area will be filt in with harvest comments. Bud smell. How the dry went. And after a weeks cure. I'll rate it. So watch this space. These 2 phenos have been on just water for 10 days. I did a quick run off test. Got back 145ppm my tap is 110. So, they're good to go. Trichome wise. 95% cloudy 30-35% amber. (Hard to see, I'll try get pics with my scope) but, as you see. Both are fully ripened. Anymore and its just bud deg. Both plants leaves are showing end of life. Some are dying. (I'VE BEEN WATCHING THESE LEAVES AND SEEN THEY'VE BEEN DEAINED, ITS NOT BR)
Lights
The SE5000 was used for the Ripening phase. With high temps and co2 i pushed my boundaries and got a lovely fade reaction from doing so. How I know its down to this light as I've put my Runtz under it. And as soon as I did. It developed fade. My Frosted G even started getting light purple on its sides. The temp in tent has been pushed to 31-33c (that's not leaf temp as I've fans blowing on my plants, and that lowers surface temps by a few degrees.) They've been on 17hrs of high powered light. At 25-30cm id no choice. My temps are mad high this time of year.
Harvested
Both plants are been pult they're getting their last few hrs. You'll then see the last few pics in a few hrs. I'll get bud shots later, smoke reviews and then to be fair. I'll then mark it by the GD rating system. As I do with all my strains. (So I've 2-3 wk delay in my diaries as they're Harvested, mostly) both plants I'll try push them as far as I can through the drying process whole. But, as I'm dealing with high temps. Lower RH and a fastercl dry is pref to a longer dry in hot conditions might not make sense, but 30+ hot weather harvests, I've got this down. Mind you only this round all my other hot harvests some took a few weeks to rid the hay smell. This avoids it and locks in potency. Most of the drying is done by leaving the plant in the substrate just before the plant goes for itself for fluids. 4-5 day dry as opposed to 5-6 day dry with weed that loses half its stenght. (dry harvesting look it up)
Thanks to James from RQS, although I know everyone and their sister got the offer for these seeds I am defo going to be trying more from RQS, if it's buying. I'll get round to it, and depending on the quality of smoke it might be soon. If its a real nice auto, I'd love to try a fem of theirs for my winter crop in October. But, that'll depend. I've lots I want to buy & try.. and when favs are found. I'll invest.
I would like to thank everybody for the activity this diary has gotten. Its possibly one of my most active diaries I've done without a harvest. And that's in no short means down to all the views and likes from you guys. And for sure I will fully complete it, with results on the smoke Quality from both phenos, if it varies, but, results thus far, structure wise they're shockingly similar. Scary so. Topping has very little affect to the structure. She grew a main cola. But both phenos, turned puples I will say the topped one was a more troublesome plant. Maybe that had a role onin its morphology. And maybe it'll affect the bud also. The topped was more demanding nutrient wise, and drank more. Maybe to support a more even bud load. (I've yet to do a through inspection, but on the VS front, it's kinda in the air about quality, structure wise, it had very little difference. Look for yourself at the heights are 3-4cm dif) lots still to come. And I'll update it soon with more results. Again, thanks so much for the support, likes, comments and how active it is, an unfinished diary moving to my home page. 1st for me. So thank you.
Also to my light sponsors who played a part in this grow. Although both phenos owe their bud quality to 2 x 100 watts SF-1000 (SE5000 was used for ripening lovely fade) and I used a P1000, they shared even light distribution in the end for the most part. So, thanks to Bella for the upgrade. I'm sure when I run an RQS strain again, this time I'll know only have the fade to show, but the bud size too.
Thanks again my Friends. Updates pending as of 6th June.
Edit
June 7th
Both plants are hung whole and drying 24hrs. I don't like how fast they're moving. The buds are already soft. Should still be hard at this stage only 30hrs in. They'll harden up in the cure no doubt. Let's just hope they don't shrink too much. Will give daily updates
Likes
Comments
Share

Likes
1
Share

@Elron_mc_Bong
Follow
Woche 5 – Start der Vorblüte & explosive Entwicklung
Die fünfte Woche beginnt mit einem deutlichen Wachstumsschub und den ersten sichtbaren Anzeichen der Vorblüte. Besonders die GMO Cookies zeigt bereits erste Blütenansätze – ein klares Zeichen, dass der Run jetzt in die nächste Phase übergeht.
⸻
📊 Umweltbedingungen
• 🌡️ Temperatur: konstant ~22–23°C
• 💧 Luftfeuchtigkeit: 55–65%
• 🌬️ VPD: stabil bei ~1.0–1.2
• 🌱 Bodentemperatur: ~21–23°C
• ⚡ EC: leichter Anstieg seit Top-Dressing (28.03.)
👉 Setup läuft weiterhin extrem stabil im Optimalbereich
⸻
💡 Setup & Maßnahmen
• Licht aktuell bei ~60%
• Abstand: ~40–50 cm (nach Stretch angepasst)
• Gießen: 500 ml pro Topf (pH 6,3)
👉 Wasserverbrauch zieht jetzt deutlich an → Pflanzen arbeiten sichtbar stärker
⸻
🌿 Pflanzenentwicklung
Das Wachstum hat sich innerhalb weniger Tage stark beschleunigt:
• kräftige Seitentriebe entwickeln sich jetzt sichtbar nach oben
• das Canopy beginnt sich zu schließen
• Struktur wird zunehmend gleichmäßiger
👉 klassische explosive Phase vor der Blüte
⸻
🔥 Einzelbetrachtung
Top Performer:
• GMO Cookies (erste Vorblüte sichtbar 🔥)
• Hyperion / Blueberry
→ buschig, kräftig, sehr gute Verzweigung
Solide Entwicklung:
• Runtz
→ etwas mehr Stretch, wächst aber gleichmäßig weiter
Purple Punch:
→ kompakter Indica-Pheno
→ dicke, fleischige Blätter
→ bleibt niedriger, entwickelt aber stabile Struktur
👉 kein Rückstand, sondern genetischer Unterschied
⸻
🌱 Düngung
• Greenhouse Bio Feeding (~3g/L) um Tag ~24 eingearbeitet (45g pro Topf)
• Wirkung jetzt klar sichtbar im Wachstum
⸻
🧠 Einschätzung
Der Run läuft aktuell sehr sauber und kontrolliert.
Alle Parameter greifen ineinander, keine Anzeichen für Stress oder Mängel.
👉 Übergang in die Vorblüte ist voll im Gange
👉 Struktur entscheidet sich jetzt für die Blütephase
⸻
🚀 Ausblick (Mitte Woche 5)
• weiteres schnelles Wachstum
• mehr Pflanzen werden Vorblüte zeigen
• Höhenunterschiede werden deutlicher
👉 Fokus:
• Licht schrittweise erhöhen
• Gießmenge weiter anpassen
• Canopy beobachten

Likes
26
Share


@BigBlu3
Follow
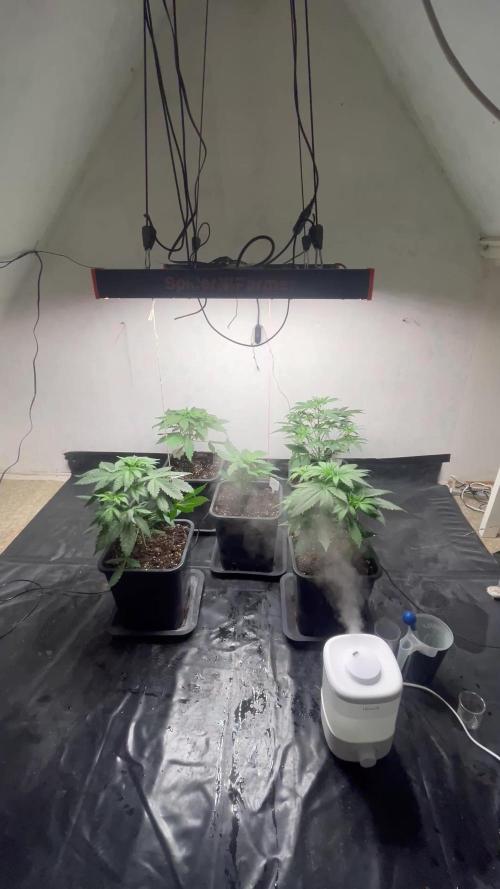
Week 6 Guys!!!!
So To Begin, This weeks Description Should break down the videos and pics above..
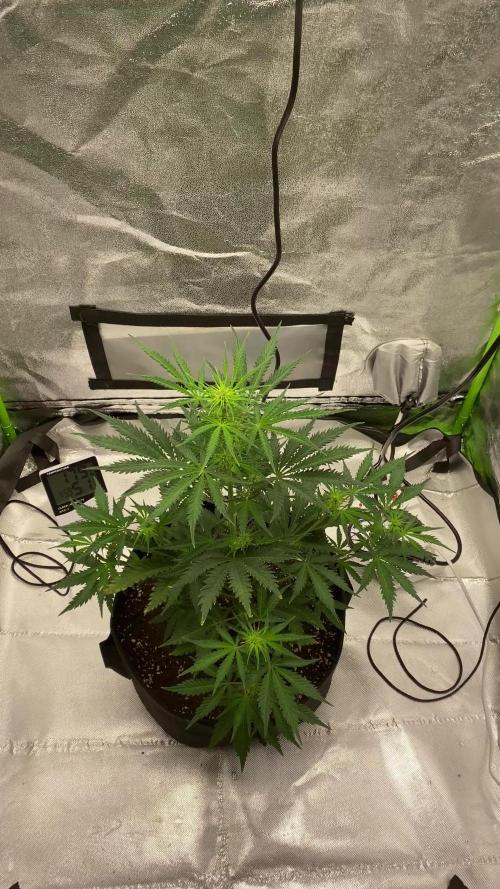
Tent 1 - 1st week of flower - Gorilla Cookies - Strawberry banana FastBuds -
Tent 2 - 5th Week of Veg - Tropicana Cookies Photo (random) & Mimosa Cake Auto Fastbuds
Gorilla cookies - 15.2 in From Soil
Strawberry banana - 14 in from soil
Tropicana Cookies - 12 in from soil
Mimosa Cake - 10 in from soil
Tent 1 Was Given 50/50 10 tbsp each Dr Earth All Purpose & Bloom
Tent 2 Was Given Only 10 Tbsp Of Dr Earth All Purpose
Starting Off The Week With Removing All LST, Except 2 that i have holding down the Strawberry ^ as you can tell thats growing from the stalk up lol.. we did that energy diverted to the stems and bud sites, Slight Defoliation and ive Added the Netting to Prepare.
Water is still aerated 18-24 hours ahead of time and still PH'd Between 6.5- 6.7 is the highest ive seen so far. The Light Cycle for Both Tents Currently is Still 20/4. I do believe Once i decide to Flip the Tropicana to 12/12 i will need to move the mimosa out to Tent 1.
Given The 1 - 1.5 week difference in all 4 i dont see the move being a issue. Will Continue to Water When light and defoliate when i can not tuck! As Always Guys Drop Some Knowledge on Me... Questions and Comments Welcome.. See You Guys Next Week!!!!
SIDE QUESTION: GIVEN I JUST FED THIS WEEK - WHEN TO I TOP DRESS NEXT... YOUTUBE SAYS WEEK 4 FLOWER TO CARRY OUT THE HARVEST!!!! <---COMMENT YOU ANSWERS FOR ME PLEASE
Likes
6
Share


@KingCatfish
Follow
Grow update. Everything going accordingly. Sick plant is budding up but no way she will recover from previous damages but that's okay. The rest are doing wonderful with Afghan kush being the start. Will re try what I did to that plant on my new puppies over in the kitty box pots. Bonsai is finishing up and the rest are all in different stages of flowering
Likes
7
Share


@High_And_Hydro
Follow
- Ich hab die erste Woche des Biobizz Allmix Düngeschemas gestartet und gebe wie immer erstmal vorsichtige 100%, da meine Erde an sich durch den Kompost recht potent sein sollte.
- Außerdem hab ich mit meinem Calmag-Rechner mein Leitungswasser angepasst. Die Werte könnt ihr auf den Bildern sehen.
- Den PH-Wert passe ich ebenfalls auf 6,5 an.#
- Die Lampe bringt zur Zeit etwa einen PPFD-Wert von 350 - 360 µmol/s/m² bei 18 Stunden Beleuchtungszeit (DLI von 22 - 23 mol/d/m²). Sie wird aber nur eingesetzt bis es warm genug draußen bleibt. Tagsüber stehen sie jetzt schon draußen, sofern es nicht regnet oder stürmt.
Die Papaya Cookies macht sich hervorragend und sie ist sehr uniform mit den anderen Fastbuds Strains bis jetzt. Sieht gut aus finde ich 💪😁👍

Likes
4
Share


@MedicinalMotive
Follow
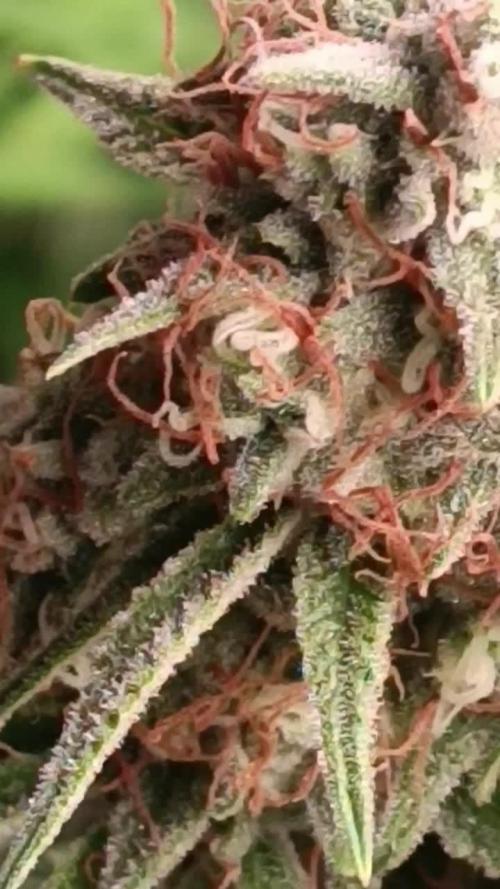
Trichchomes are about 50/50 clear cloudy I’ll have to have a proper look in a few days. I want mostly amber
Likes
50
Share


@Rwein93
Follow
Ciao ragazzi e bentoranti per i nuovi aggiornamenti!!!😉
Purtroppo ragazzi questa settimana non è stata delle migliori per i parametri. In Italia il caldo inizia a farsi sentire e nel box si sono raggiunte temperature di 30°C e l umidità è salita al 70% anche bagnando al minimo loro.
Però nel complesso tutto bene, le ragazze al limone crescono imperterrite e la numero 2 adesso misura 35 cm. La numero 1 se non l avessi piegata sarebbe stata almeno 45 cm. Una bomba!💣
Anche la numero 3 sembra che si stia riprendendo bene.👍
Avendo cambiato zona di crescita non avevo calcolato il cambio di ph dell acqua del rubinetto e il fatto che non usi prodotti con un regolatore di ph incorporato mi ha tratto in inganno.🤦♂️
Ho misurato il Ph dell acqua dopo averla fertilizzata ed era di 7.7 così ho introdotto 0.25 ml di Ph Down e l ho portato a 6.27. Ora dovrebbe assorbire i Super nutrienti che gli stando alla grandissima!!!💪
Eh niente ragazzi! Speriamo che le temperature si abbassino di un paio di gradi anche per noi perché si muore e sembra solo l inizio.
Grazie a tutti per aver guardato e restate collegati per nuovi aggiornamenti.🙏
Buona settima e felice crescita🌱🌱🌱
P.S.
Il video riprende 3 talee varie all inizio, le Lemon Tree, le MimOrange e 1 altra talea


Likes
3
Share


@NonToxicWaste
Follow
Noticed nitrogen deficiency last week with yellowing veins and some fading of new growth below. Flushed and checked pH before adding a heavy feeding of Grow Big. After a few days some color returned and she has livened back up.
