The Grow Awards 2026 🏆 


Likes
Comments
Share
@GrowwUp
Follow
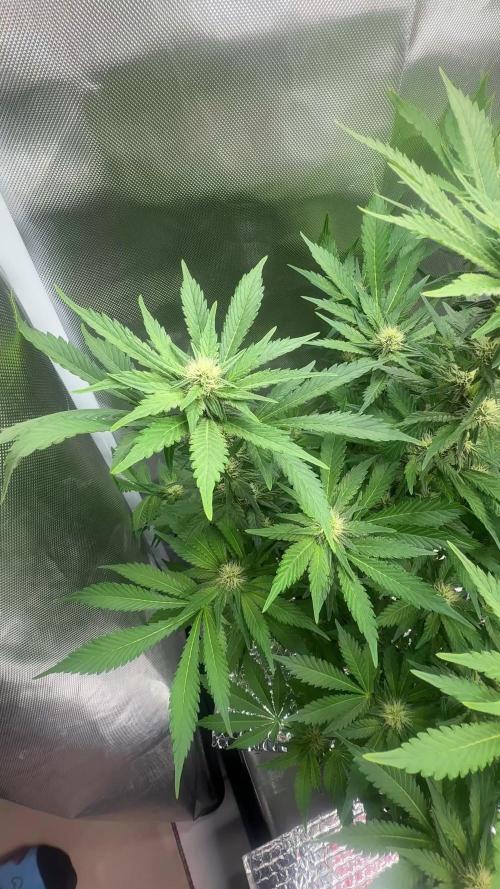
She's got really tall so far. She got some wind burn probably because the cold weather and the fan hitting the top fan leaves directly for a while since I lifted the lights a bit. She is growing several buds now and the nuts are doing a great work so far.
Likes
22
Share
@valiotoro
Follow
Hello everyone 🤩🍓
´you're a slave to money then you die📻
she grew fast and with a beautiful green colour on the leaves!
She has responded superbly to low stress training & topping and seems didn't even notice 😎
Wish you all a good day and happy growing

Likes
11
Share
@Enki_Weed
Follow
🌸 Woche 5 der Blüte
Die Early Skunks sind jetzt mitten in der Blüte und entwickeln sich richtig stark. Der Stretch ist so gut wie durch und die Pflanzen haben ein schönes, gleichmäßiges Blätterdach aufgebaut. Die Blüten werden von Tag zu Tag sichtbarer und setzen schon ordentlich Harz an.
Das DWC-System läuft stabil: frische Nährlösung, klare Werte und die Wurzeln strahlend weiß. Genau so soll es in dieser Phase aussehen. Die Pflanzen nehmen sehr gut auf und zeigen keinerlei Mängel oder Stress – Farbe, Struktur und Wachstum sind voll im grünen Bereich.
Das Klima bleibt konstant und das Setup arbeitet sauber zusammen. Licht, Luft und CO₂ greifen perfekt ineinander, wodurch die Pflanzen richtig Tempo machen.
Fazit:
Sehr starke Woche. Gesunde Pflanzen, satte Farbe, stabile Blütenentwicklung. Alles bereit für die nächsten Wochen, in denen die Buds jetzt richtig zulegen werden. 🌱🔥

Likes
10
Share
@Rob691
Follow
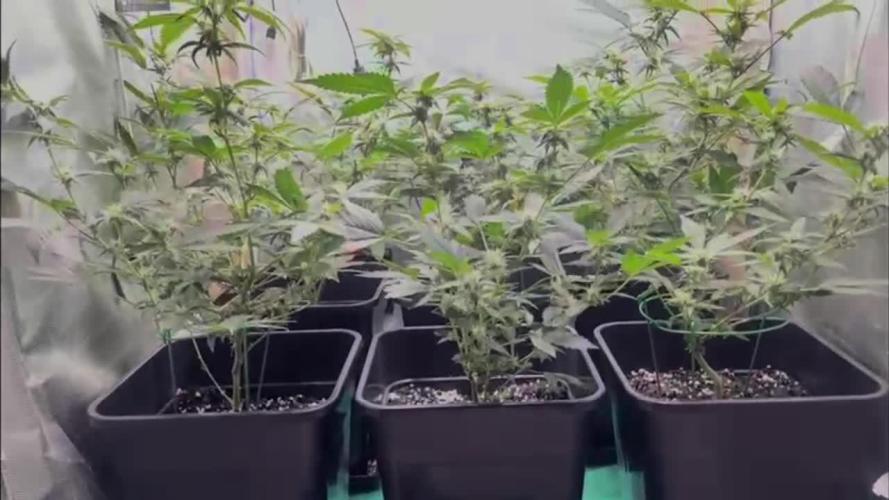
D-50 : Everyone is doing great ! The one that had a difficiency alert a couple of weeks ago has recovered. Thanks to the community's helpers !
I setup the net 2 days ago so the flowers are driven to the light and covers maximum of space in the tent. Well, with only 3 strains, I'm not sure it's very usefull, but later would be too late, so I'm doing that now.
I already know when I'm going to harvest those girls cause I will be in hollydays for one week at the end of december. So, I'll harvest between the 19th december.
I also know what will be my next grow : 3 Shogun (RQS) with 3 Chocolate Haze (RQS). All of themp in the 1m² box. I'll try main-lining with two time toppings on them. They should be a litle less tall after that and optimizing the flower production. At the same time I will test the SmartPots. I think I'm good for a 19 weeks session with 7-8 week veg. and 9-10 weeks flo. So I could start the session at the very bigining of january in the second box (Secret Jardin DP60) while the first session is gently drying...
D-53 : all is good :) just add Biobizz Microbes today. Let’s see !
D-55 : add Calmag today to the nutrients. Hope it will help the litle Pinapple that shows a bit of deficiencies.
Likes
Comments
Share
@Raster893
Follow
Entramos en su 4 semana de floracion y despues de una defolacion tardia por mi parte así van respondiendo :) seguimos usando la gran mayoria de los productos de biobiiz.pensando en si empezar añadir bio-heaven o no. Un saludoo :D buenos humooos!👽👽👽👽👽🙏

Likes
30
Share
@ChitownCannaChica
Follow
First week of flower has been completed. Much happier in the warmer tent with more intense light and a bigger pot. I trimmed her up to have 4 mains and a couple of strong side branches. Hoping for a stretch.
✌️💚🌿💨

Likes
13
Share
@Robeeriegenetics
Follow
Everything is going ok no roots yet on the clones but we got a week b4 we need to worry
Temps steady humidity steady will be topping of res with more nutes todau


Likes
53
Share
@xbrico
Follow
D92/FD64 - Now the humidity down from the cull, showing no real signs of the rot...did take 1 or 2 more smaller buds and a few from the drying box that was getting the "Grey Beard" but <touch wood>, seems to have settled.
The Lower buds appear to be ripening now and are a deep purple. This plant looks soo amazing, pity it was just not so strong against the rot (again, it was done no favours by out of whack temps [i let it get a bit low at night for colour] and humidity). Have bought a Hotbox Sulfume now for a preventative going forward so would risk this strain again now that I know it needs that bit more protection; 'cause it smells so different and looks so different, its a winner - as long as I can get it over the line safely!!! May hit this a blast with the sulfur for a couple of 2 hour sessions over the next week to ensure it remains without mold!!!!
Apart from that, nothing else to report. Happy growing all!!! 💪
Likes
16
Share
@Vps420
Follow
The flowering continues, only on one branch I went wrong I think the bud will not grow .. The girls are suffering from N deficiency (?) Or from continuous changes of Ph (?) Who is more experienced tell me .. Hope flowering finish well, I add some N.
Besides, the heat is advancing and the temperatures in the grow are rising a lot, fucking summer
Likes
3
Share
@drewnagy0510
Follow
Really love this strand has had no defects very strong Green leaf topped it once and let it grow back to three nodes then topped it again for both sides to have four notes piece one week away from flower

Likes
11
Share
@Bread_n_Buds
Follow
He who stops is lost, as an old saying goes
I don't know exactly what the origins are, so here's a new Zamnesia season.
We are in the middle of winter and despite growing in an area that isn't the warmest in Europe, it's really cold now. It's 16-18 degrees Celsius in the house and we need to bring the temperature of the propagator growbox between 20 and 25 degrees Celsius.
So we first placed a layer of those 1 cm thick "rubberized" floors that are used for gyms, they are easily found on Amazon and are very useful for insulation.
Then a heated resistance mat and then the closed propagator on top. Inside with our seedlings and the light on at minimum 20% we reached 24 degrees, not bad in fact the germination is proceeding very well.
100% opening of the seeds in water and almost all of them are opening in our biodegradable peat pots.
----- Our Green Crack F1 Hybrid Auto were born really quickly. About 24 hours in water and the two seeds had hatched, another 24 hours in soil, and off they were born on 01/12/2024 on the identity card we have this date. Special features very pretty, born regularly without any problems, if you have placenta problems or seeds that remain attached. read below.
Is a Sativa Dominant probably running for Autoflowers World Cup let’see the results. .
WARNING: Placenta Problems ---- ALWAYS look very carefully at the seedlings, if the seed or placenta prevents the cotyledon leaves from opening the plant dies after a while. Remove it delicately as if it were a condom or almost. I apologize for the example but it gives the idea to remove slowly delicately please.
WARNING: If you choose biodegradable pots choose the largest possible and not paper/cardboard ones, there is peat which is the main component of most of the soil we use.
If you want to avoid transmitting vibrations to your neighbors I recommend you install one of these gym floors under your growboxes, I did it and I also feel safer not to disturb. They are easily found on Amazon in different thicknesses, I took a gym model that is assembled like a puzzle, they are also found in children's shops, they are those floors that are assembled to make children play safely, or to train and to avoid vibrations from equipment or of any kind.
Everything will be grown Plagron Pro Mix with 100% fertilizers let's start with Power Roots 1 Ml/l
Plagron fertilizers are available on Zamnesia in convenient Pack formats for all growing styles. I used this with a simple search you can find the other products.
---- https://www.zamnesia.io/en/12119-plagron-top-grow-box-100-natural.html
—— Try this strain drive me crazy!
---- https://www.zamnesia.io/en/10677-zamnesia-seeds-green-crack-f1-automatic.html
Zamnesia Description // Forget what you think you know about cannabis. Green Crack F1 Automatic by Zamnesia Seeds is here to shake up the whole industry. Using F1 genetics, growing cannabis has never been easier. These plants offer uniform and abundant yields. Get ready to harvest high-quality buds, full of flavor and amazing effects.
Growbox and Air System - Secret Jardin DS120w + fans + Exhaust fans and filters DF16 kit
Light - Viparspectra P2000 https://www.viparspectra.com/products/viparspectra%C2%AE-2024-updated-p2000-200w-led-grow-light-with-daisy-chain-function
---- www.zamnesia.com

Likes
27
Share
@1Right_Angle
Follow
Mar 9th
-start of week 11, day 71
- grabbed a few trichome shots this morning. Real macros tonight. Decision time is nearing with ~85-90% cloudy trichomes... clear takes the cake with a few Ambers coming into being... time to look close
- RTB #1 gets a close inspection tonight, I think its first-one Done. Pistils give it away. If there are Ambers to any degree its lights out
- Zamaldelica is beyond normal flowering time, I’m waiting for the pistils to have 60-70% of them turned brown / orange. Thats tonights check.
11th a.m.
- fed the Russian Tzar Bomba 2 & the Zamaldelica, 4 L of water each @ 7:00 a.m.
- RTB#2 was placed in the Dark Tent at Lites-out (11:00) for 48 hours of Dark.
- RTB#1 gets chopped,, weighed and Hung tomorrow morning… after her 48hrs of dark. Its Time!
- Zamaldelica, whilst past her projected grow date by 2 weeks, her Pistils have finally begun to change colours from a Creamy white/yellow to Orange, currently there are close to 20-25% of them turned already. I’m putting her in the dark when 60-70% have turned
12th
- chopped the Russian Tzar Bomba #1 after being in the dark for 48 hours. 372 grams of Hanging-plant to start with.
- RTB #2 is in the dark 24hrs now and gets chopped tomorrow morning
13th
- RTB #2 was chopped and weighed this morning: 380 grams of wet hanging-weight.
It seemed obvious, visually, that the small plant would weigh more. With the bigger structure / frame I was sure the tall plant would produce more. Not so
- Zamaldelica could be chopped Saturday morning…
15th
- last day of week 11 and I believe its the last Nite of Light for the Auto Zamaldelica. 11 full weeks of Love for a 8-9 week auto-cycle. The BBP applications have extended the development of this plant.
BBP is known to add a couple of weeks to some cultivars growth and it has done this to the Zam.
Trichomes are 90% cloudy and the Pistils have remained a yellowy-white. This last week has seen the Pistils begin to Darken and are seem to be retracting Into the buds. Almost 50% have turned. We’ll see in the morning where we are. Not really interested in taking the grow into week 12. We’ll see tonight/tomorrow.
Planning for the plant to enter 48 hrs of dark in the a.m. tomorrow. Last lite for Zam, tonight
16th a.m., took a few images just before the Official Lites-out for this Grow. Zamaldelica was Not part of the official Diary but I could not leave it undocumented, given her fame and poor performance on the 1st attempt. And she shared the Tent!! She’ll be followed and documented, next time
Mar 17th 22:00 pm
- for the record, Auto Zamaldelica tipped the scales at 402 grams. A True Beauty.
- both RTB are hanging nicely @ 60% R.H. and 17.5c
Mar 22nd
- and on day 10 of hanging the RTB# 1 is doing amazing. No branches snapping, hanging in 62% RH @16c. The other plants are just a day or 2 behind. Leaves trimmed etc, all seems perfect
Mar 25th
- day 14 of the cure (targeting 20) and things are fully in cure mode. No branch snaps, at all, when twisting a Nug.
- steady at 16c and 60-62% R.H.
Likes
12
Share
@Froggman
Follow
Gave her water last night and plan for shut her down sometime this week. Today is day 84 from when she sprouted.
Likes
14
Share
@Tried_and_Tested
Follow
This was another very good week for the plants, with the flowers beginning to swell up and take shape. Some of the lower leaves are starting to yellow, but this is expected. As the light doesn't penetrate as far, the plant will begin to 'consume' those leaves and drop them to redirect energy to the tops.
The canopy is fairly even apart from 1 small spot, which does not have any colas at all. This is due to me bending away the GSC that was topped, with the intention of the lower branches stretching up. This happened with all the other plants I did it to, but not this one for some reason. I think it was due to airflow around the budsites so I added an extra fan last week to hopefully improve this.
The strongest looking plants by far are still the ones that were Topped with LST, followed by the mainlined, with only LST in last place. I have found that the LST only ones do not have stems as thick as the others, so this may impact yield later.
Not much done in the way of training apart from the odd leaf bending or stem tying. The next few weeks will most likely be fairly uneventful, as now we just need to wait for them to flower fully :D

Likes
18
Share
@Silverback_Guerilla
Follow
I thought I just had two of this strain, but it turns out that the 134g plant was actually a C4 hybrid!
It isn't as pungent smelling as the others, but seems to have it's own unique flavor going on. I like it!
115g - C4ndycaine [Candy Cane x C4]
134g - C4ndycaine [Candy Cane x C4]
151g - C4ndycaine [Candy Cane x C4]
TOTAL: 400g 👍
Likes
15
Share
@Kurow
Follow
It’s seems more leaves are praying up on the smaller girl after guess it was asking for that trim. Got some great sticky bud forming! 2+ weeks left

Likes
8
Share
@Donwon310
Follow
266 grams out of all 4 plants, roughly over half elbow. Went with grove bags. Did 5 day dry then put into totes for few days and bagged after trimmed. Sticky buds with the piney nose to it with heavy gas .
Likes
332
Share
@OrganicNature420
Follow
Germination date 🌰 03/03/2021
Day 36 🌱 11/04/2021
Strain 🍁
Purple Matcha, Humboldt seed bank
Nutrients 💉
Advanced nutrients
PH perfect sensi grow A+B (veg)
PH perfect sensi bloom A+b (flower)
B-52 (through veg until week2 of flower)
Voodoo juice (🖕🏻)
Tarantula (🖕🏻)
Piranha (🖕🏻)
Sensizym (all the way through)
Rhino skin (🖕🏻) add first leave for an hour
Big bud coco (week2+ of flower
Bud xfactor (🖕🏻)
Nirvana (🖕🏻)
Bud igniter (first 2weeks of flower)
Overdrive (last 2weeks of flower)
Flawless finish (flush week)
RockHoldings Rockresinator(week2+ of flower)
Vitalink calmag
Set Up
⛺ amazon special 1.2m x1.2m
💡 spiderfarmer sf4000
📤📥 AC infinity 6inch
💧 10lt dehumidifier
Notes🗒️✏️
Well impressed with this for my first ever coco grow 🌱👍🏻 shes looking so good. Humboldt producing some good quality seeds. I did pay a small fortune for them but looks well worth ever buck spent! Rising the ec up this week to 1.0 and will leave it there until I flip. Pretty sure I could go more but I just dont think it's worth it although I do have the best master grower at hand (PharmaZ) follow his account 👍🏻🌱
Cant really fault Advanced nutrients with this strain. I'm running 9 different nutrients of theirs and it's working out nicely no hic cups at all. Now I've seen online somewhere that you cant add bud factor x with other advanced nutrients when flowering? Is this true and genuine help would be grateful
Happy growing everyone 🌱🍁
Likes
8
Share
@xXNoShowXx
Follow
Growing medical marijuana has been such an amazing outlet for me. And I think that I would be in a much much worse place without having in my life as far as cultivating goes. I have formal education in horticulture specialist, however marijuana is so resilient and so strong and so willing and ready to live. But I plan to take it to its limits
Likes
10
Share
@Kronen
Follow
Auto Flower AK Triple Haze by Super Sativa Seed Club: Day 70 From Seed, 45 days in flower. Ripening continues with a trichome ratio of Milky 65%, Clear 25%, & Amber 10%. Weekly environment: 72F, 52% RH, 725ppm CO2, & 650-1200 PPFD 12hr lighting. Only getting mineral water to allow normal processes of mobile nutrients to move from leaf to bud & flushing Ammoniums/Nitrates out of the medium.
