The Grow Awards 2026 🏆
Likes
Comments
Share
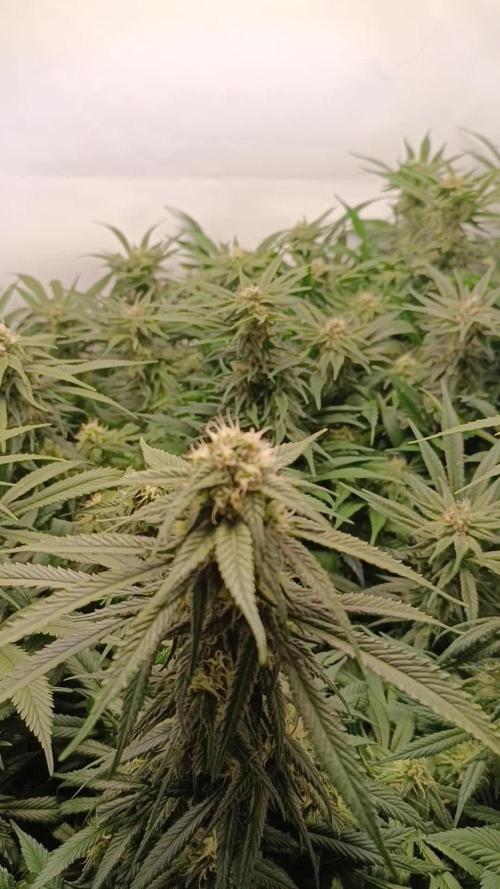
Plantas muy facil de cultivar y muy rapida .. en solo 9 semanas me saque en la #1 85g y en la #2 - #3 unos 50 cada una... en cada foto teneis el seguimento de cada planta desde la semilla a los cogollos.. consejo para todos de el banco de sweets seeds ✌️✌️
Likes
18
Share
solid week overall. RQS pKush is going along ok. the thai choc looks amazing. really cant wait for it to flower hard. a great full tent. was easy week as i want to let them grow a couple weeks with min tim then i will do a full lollipo sesh maybe next week
Likes
10
Share
@nonick123
Follow
Bienvenidos al diario de Gorilla Cookies Auto por FastBuds Día -4 (02/05): Se coloca la semilla en tubo de ensayo con 15 ml de agua (EC 0,5) + 3 gotas agua oxigenada (H2O2) en un lugar oscuro a 25 ºC durante 48 horas Día -2 (04/05): Se prepara una maceta (11L) con 8,8 Litros (80%) de sustrato PRO-MIX HP BACILLUS+MYCORRHIZAE + 2,2 Litros de Insect Frass (20%) + 110 gramos de Earth Vibes Super Soil (10 g/L substrato) Se mezcla con el agua del 1er riego (EC 0,4) la parte proporcional de la probeta de microorganismos y se riega muy lentamente hasta percolación profunda Se hace un agujero de 1 cm de profundidad, se coloca la semilla al azar en el agujero, se tapa con un poco de sustrato y se humedece ligeramente con agua en spray Se coloca parte superior botella en la zona de germinación para mantener humedad relativa alta Se introduce en el armario con la lampara ENCENDIDA para mantener la temperatura 20-21 ºC en las horas nocturnas Día -1 (05/05): Se intuye que la semilla empieza a romper el top del sustrato! NO LA TOQUES! 😡🤣 💦Nutrients by Lurpe Solutions - www.lurpenaturalsolutions.com 🌱Substrate PRO-MIX HP BACILLUS + MYCORRHIZAE - www.pthorticulture.com/en/products/pro-mix-hp-biostimulant-plus-mycorrhizae
Likes
9
Share
@Pete420
Follow
Big Buds, easy to harvest. This is my first haze plant. I cloned 22, but all died. The taste: 60% incense,30% peach, 10% lemon(or something citrus).
Likes
2
Share
Good plant overall, wish it was a bigger plant because bud structure is very nice Had a little bit of spider mites but took care of it quickly, overall handled the heat very well and this one had no bud rot Will run this stain again since I have some more seeds, hoping for a bigger phenotype next time :)
Likes
12
Share
The purple Urkle had a great start, the plant was born well despite the cold and is doing better and better since she is taking the fertilizers. For now I have put the fertilizer to root and some special enzymes that transform the residues of previous plants into nourishment....perfect I would say to renew the soil as best as possible. Never stop at the first good results guys, always improving is fuel for the next day, to keep the passion alive and have results. Growing Projects ----- I will follow this procedure, it has given birth to a plant before that will be worked with topping x16 buds and various LST and I have just germinated the second plant that will be born about 13 days after the first and will go straight to the conclusion with the main cola. I must tell you in the past I was a maniac of the topping, then I felt nostalgic for the main cola. It is always a major sacrifice to give up the Main Cola. To avoid depression and to give a better vision to our super trusted breeder, home breeder and Zamnesia heart breeder we make a plant in topping and a straight one preserving the main cola. Those videos with the rotating Main COla were liked and we produce the best Maincola of the situation- The first week went only with Power Roots 1 Ml/l and Pure Zym 1ml/l from now on we start with ALga Grow. The plants were transplanted shortly after germination because the biodegradable pots were very small. The soil is Plagron Pro Mix 100% organic renewed with 30% new soil and 20% Perlite added. (Pro mix don't have perlite but is airy we added anyway) Plagron fertilizers are available on Zamnesia in convenient Pack formats for all growing styles. I used this with a simple search you can find the other products. ---- https://www.zamnesia.io/en/12119-plagron-top-grow-box-100-natural.html Try a seed of this strain that drives us crazy... ---- https://www.zamnesia.io/en/11168-zamnesia-seeds-purple-urkle.html Zamnesia Description // / A direct descendant of a Mendocino Purps phenotype, Purple Urkle is a high-performance cultivar from Zamnesia Seeds. This feminized, indica-dominant strain is sure to win over any cannabis grower. With a THC content of 20%, Purple Urkle has a lot to offer from seed to harvest and beyond. A grape-flavored adventure, Suitable for indoors, outdoors or in the greenhouse, Purple Urkle is a very resilient strain. Growers will be impressed by how easy this cultivar can be managed. Purple Urkle can reach 120cm indoors and 160cm outdoors, but if you want more control over the height you can use the LST technique. Purple Urkle has fantastic flavors and aromas that intensify during the flowering phase. Regardless of the method of consumption, Purple Urkle offers tangy, fruity flavors that lean towards notes of grapes, berries and plums. The effects of this strain are soothing and relaxing, with uplifting sensations that make the experience suitable for any occasion, whether in a social setting or alone. Growbox and Air System - Secret Jardin DS120w + fans + Exhaust fans and filters DF16 kit ---- https://www.secretjardin.com All the best that mother nature can offer is on ----www.zamnesia.com Call for collabo: I am available for collaborations with companies of Lights and various equipment for growing (No Seeds and Nuts company please) I would like to renovate my 120x120 space that has slightly obsolete lights, and I would like to try some controllers. If you have proposals available.
Likes
9
Share
@pzwags420
Follow
On day 1 the rez is at 6.2. The highest cola is 8.5" from the light. On day 2 the rez is at 6.2. The highest cola is 7.75" from the light. On day 3 the rez is at 6.1. The highest cola is 7.5" from the light. On day 4 the rez is at 6.3. The highest cola is 7.125" from the light. On day 5 the plants are smelling and doing well. On day 6 I changed out the rez and PH to 6.1. The highest cola is 7" from grow light stretch is deff slowing down and should be over shortly. My avg PPFD at canopy is around 800. On day 7 the rez ph is 6.0. The highest cola is still 7" away from light 😅 close but not too close in my small space.
Likes
67
Share
Smells amazing 🤩 i havent trimm yet just take the big leaves with no trichromes on it as usual drying on custom 📦 box 👌💪💪💪💚💨💨💨
Likes
44
Share
@I_and_I
Follow
Found two females, plant I topped before holiday going well, mate currently looking after them, sending updates to me on holidays, all going very well, mate is bossing it looking after them
Likes
49
Share
@Roberts
Follow
RSV11 is growing great. She was topped a few days ago, leaving the 2nd, 3rd, and 4th nodes. She has a really long roots system going. She has been doing great, and nothing more to report. Thank you Spider Farmer, and Terpyz mutant Genetics. 😉🤛🏻🌱🌱🌱 Thank you grow diaries community for the 👇likes👇, follows, comments, and subscriptions on my YouTube channel👇. ❄️🌱🍻 Happy Growing 🌱🌱🌱 https://youtube.com/channel/UCAhN7yRzWLpcaRHhMIQ7X4g
Likes
19
Share
Really big bud even tho my grow room is a little hotter than one may like it stilled the purple through really fantastic grow it was nice watching an auto grow how its supposed to without any problem thank you fastbuds
Likes
17
Share
Looking good. Shes stretching like crazy! Showing some more little pistils on some bud sights. I watered her with nutes yesterday night and checked on her today and shes getting a little yellow i know its not light burn because i moved my light up higher the night before just in case. gonna wait and water her heavy with some regular water Other than that shes getting as hell
Likes
44
Share
@RakonGrow
Follow
150-200PPFD 20/4 Mein Grow Stuff Messen : + Messgerät - X-Sense WLAN Hygrometer 1 Basis SBS50 + 4 Sensoren + + Basis + + 4x WLAN Sensoren RH und Temp + Amtra Digital PH Tester + Amtra Digital TDC&EC Tester + Photone App (android Samsung S21 5G werkscallibriert (geprüft mit lichtreferenz)) + GEHE ph-Wert 500 Testkit + + Testflüssigkeit + + Pimpette + + Probenröhrchen + + Propfen + Pimpette 10ml Zelt : + Keimung und Vegetative Phase + + Growbox - DiamondBox Silver Line SL60 (60x60x160cm) (hohe luftfeuchtigkeit) + Blütenphase + + Spider Farmer 70x140x200cm Indoor Grow Tent Licht : + SpiderFarmer SF1000 (100Watt) Dim (hohe luftfeuchtigkeit) (Vegetativ) + Sanlight EVO 1.5 3-60 mit Bluethoot Dimmer (niedrige luftfeuchtigkeit) (Blüte) Abluft / Filter / Rohr: + 2x Abluftset - PrimaKlima PKEC-125-TC Set + + PKEC-125-TC Abluft + + PrimaKlima Aktivkohlefilter K2601 Flat (bis 70%rH) + Staubschutz + + Luftschlauch Aluflexrohr (Ummantelt), 3 Meter, ø 127mm + + Verbindungschelle 50mm (Metall mit Schaumstoff mit Aufhängemöglichkeit) + + 1x Universal-Schlauchschelle, 60-165mm Samen : + 3x Royal Dwarf Automatic (RQS) (buy from Zamnesia Seeds) Töpfe : + Nothers GZjiyu 6 Stk Pflanzsack Pack 2 Galonen = 8 Liter Stofftöpfe Medium : + BioBiz LightMix + + Urgeisteinsmehl für Ergänzungsstoffe + Vulkangranulat (Aquabedarf , drenage) Ventilator : + pro Zelt + + 2x Ventilator - Spider Farmer Grow Ventilator (EC 10Watt) PH Korrektur: + 500ml Plagron PH- + 1000ml Canna PH+ Dünger : + Dünger - Canna Terra Kit + + 1000 ml Terra Vega + + 1000 ml Terra Flores + + 500 ml Rhizotonic + + 500 ml PK13/14 (wird nicht genutzt , da unnötig) + + 1000 ml Cal-Mag Agent (fals ich den mal brauche) Entfeuchter : + Entfeuchter - MeacoDry ABC 10Liter Zubehör : + 1L Nanoprotect Isopropanol 99,9% (Reinigungsmittel) + 1x Topfuntersetzer 30x30cm + Grießkanne 5 Liter + Pflanzendrath 1mm x 5m + Sprüflasche 0.7L + Drucksprühflasche 2L + Messbecher + + 1L + + 0.5L + + 0.25L + Eimer 10L + Gartengießkanne + + 5L + + 10L + Plastikabdeckung mit löchern fürs Sämlingstadium (ehemals Kuchenabdeckung) + Luftschlauch Aluflexrohr, 3 Meter, ø 127mm + GrowPRO Schere Curved + Gardo Gartenschere GDGSB 180 + GrowPRO Pflanzendraht für Low Stress Training, 5 mm, 4,9 Meter + Dosierspritze, 5ml + 2x Universal-Schlauchschelle, 60-165mm + LIMITADA 15 Stücke Pflanzenbieger Verstellbar + 6er Steckdose + 2x Zeitschaltuhr (mechanisch) + Müllsack (umbau zur Trockenkammer) + Pappe + 2 x Gafa-Tape (Rolle) + Klettband 3m + Airpump Kit + + Air-Pump + + Luftschlauch silicon + + Air-Stone Trychome analyse : + Samsung S21 5G optical Zoom + DIGIMICRO Mobil + + x300 optical zoom + + HD Video + + 12MP photo + GrowPRO Mikroskop 40x mit LED CureBox : + CASO VacuBoxx E-Set Vakuumbehälter-Set aus Borosilikatglas mit Tritan Deckel + + 145x60x105 + + 170x65x125 + + 200x80x150 + + 220x80x165 (about 40-50g dry buds space) + + manual vacuumpumpe + + adapter für automatische vaccumpumpen VideoSystem: + GoPro Hero3+ Black + + Zeitraffer : 1 Bild pro Minute , gerendert in H.265 60fps . + + 12MP Bilder + + 1 Sekunde Film entspricht 1 Stunde Real . + + Ohne Dunkelzeiten. + Bild/Videoprogramme + + Photoshop (Bildsequenze render Video, Ausschnitt und Beschriftung) + + XMedia Recode (H.265 Neucodierung)
Likes
103
Share
_____ Week 6 | Day 49 - 56 ______ Day 49 🌞 - Install 2 LED BARS from Spider-Farmer. https://www.proximitylighting.com/home-2-1 THE OPTIMAL ADDITION OF LIGHT By increasing PPFD levels in the most light-hungry layers of the crop, deploys addional wattage where it's most useful to encourage: • Tighter internodal spacing • Larger average cola size • Increased cola uniformity • Higher output per square foot Day 50 🌞 - 2 Liter each Plant....gluck, gluck, gluck.... Day 53 🌞 - light switch to 12/12 - defoliation all leafs under the net Day 55 🌞 - 2,5 Liter each Plant....gluck, gluck, gluck.... ____________________________________________________________________________________________ Light - 18/6 h - 400 Watt 60% Dim. PPFD - 600 - 650 µmol Temp. avg. - 22,1° Hum. avg. - 72 % RLH
Likes
12
Share
Week 4 already!!! The plant is doing great this week, the weather continues to be great so hopefully it stays like this until the end of flowering! September 5: water September 6: nothing September 7: nothing September 8: water September 9: nothing September 10: some more spray with spider mite (only bigger leaves, of course not on the buds) September 11: nothing
Likes
14
Share
@Mr_Pgrow
Follow
Harvest video Part 4. Please check it out and let me know what you think. Peace ✌️ Mr.PersonalGrow
Likes
14
Share
@MG2009
Follow
04/14/2022 Getting rid of a grape skunk she just isn't doing anything Biscotti Skunk looking good but lemon OG is coming along nicely Been watering by pot weight (by feel) No feeding just water they should all be finished soon
Likes
5
Share
So since I had the mold and bud rot problems I had to divide my schedule of harvest and divide the product as well. - Healthy buds are ones belonging to branches where there are no signs of rot/mold. -Mid-healthy buds are untouched by disease but still belonging to a branch where there was some disease. -Last category are the salvaged ones, where I cut them from bigger buds that had disease or they were in some part affected. These 3 categories each have their own drying space and where harvested in this order to prevent spreading of spores and stuff. For the salvaged buds every time I removed a part with disease I cleaned the scissors with alcohol. I only removed the sun-leaves + penguin leaves and will be doing a dry trim for the sugar leaves later on.
Likes
14
Share
She's done! Whew! I can say that this wasn't my easiest grow. She had some issues in the beginning, due to over fertilizing (see diary) but she managed to produce some beautiful crystallized nuggets. I flushed her for a week but she looked so ready, and she's so loud, I had to chop her down. Stay tuned for the smoke report.
Likes
1
Share
@Cannerd
Follow
How ya doing mates?? Awesome week last week - all photos and logs have been added so be sure to check it out! This week is going great so far! I've switched to an early vegetative state nutrient system. As you'll see in the daily logs early this week, this bumps up the micro and grow nutes, and keeps the bloom at 0.6ml/gal. A quick note about last week - I'm unable to update the measurements, but please note that those nutrient amounts are measured in ml/gal, NOT ml/l. Anyhow, this week I'm just waiting to get my order of diatomaceous earth so that I can make up another batch of soil. I'm still debating between topping this week before repotting or letting them take root in the new pots first. Decisions decisions lol. I think at the very least I'll clean up some of the lower growth to make sure the energy is being spent at the right places. I've been switching back and forth between just LST and mainlining in the past - but I think I really like the ease and cleanliness of mainlining. The draw back is the recovery time they take in the process haha. UPDATE: The D.E. has come in, and I repotted the girls this week. I mixed in about 1.5-2 cups D.E. for the whole pot, as well as some Bat Guano and Kelp Meal for micro and macro nutrients to use on dry cycles. I've also included some photos of the mother plant to give an idea of what's to come! I've just started to flower it, which is the first time for this strain - so I'm pumped! Day 15: M.C. 01-21 After reviewing the last set of photos from last week, I figured I'd play it safe and dimmed the light back down to 25% strength. The mother plant is almost ready for flower, and I'm down some tents so she'll be taking this one over shortly. These photos were taken shortly after the lights went off, and they look quite happy! You can see some of the side branch developement in today's photo for MC-01. The pots are fairly dry now, and I've decided to move to the next stage in the nutrient regime. This kicks up the Micro and Grow nutes, while maintaining the Bloom amounts. M.C. 02-21 A nice top photo for MC-02, you can really see the lighter green in this photo. Not to worry though, as these will darken back to a vibrant green as long as I give her what she needs shortly! The pots are fairly dry now, and I've decided to move to the next stage in the nutrient regime. This kicks up the Micro and Grow nutes, while maintaining the Bloom amounts. M.C. 03-21 Look at that little leaf poking out from the 2nd node! Some slight yellowing you can see too, but again, not to worry. The new mix should rectify that. I've decided to move to the next stage in the nutrient regime. This kicks up the Micro and Grow nutes, while maintaining the Bloom amounts. Day 16: M.C. 01-21 Today is the day - for the mother! I've cleared out some space and moved plants around. So back out to the grow room these girls go! MC-01 seems much better today with the reduction in light. The 5th node is almost flattened out and the 6th coming through still. Most notably though, you can really see the work she's put into the side branches! The branches at nodes 2 and 3 are starting to produce more leaves - great sign! The new growth at the top is also a nice dark green. Added 500ml water to the tray. M.C. 02-21 MC-02 seems to have liked the adjustment of light as well. She's got nice dark green growth at the top, and the little branches at the 2nd node seem to have a full leaf! Added 500ml water to the tray. M.C. 03-21 The photo from today is cool, because you can see how close MC-01 & 03 are, even though there's almost a full node difference. MC-03 is stretch out a bit to compete with her sister for the light haha. She's also put some more effort into the side branches that you can see. Added 500 ml water to the tray. Day 17: M.C. 01-21 I figured a video would be the best way to illustrate the changes today! They've been back in the grow room under the Veg dedicated light for a day now and seem to be loving it! MC-01 has its' 5th node out, splitting the 6th node, and I can JUST see the 7th node coming in. I don't think they'll get too much more height, as you can see that the side branches are starting to stretch now! She's definitely going to be well tangled in the roots by the end of the week when I hope to repot her. M.C. 02-21 MC-02 is doing great despite the difference in height! You'll notice the side branches stretching out at nodes 2 & 3. The pots are also still fairly wet at their center, so I'll hold off on water most likely. At least this clone will have time to root more while we wait for the supplies! M.C. 03-21 MC-03 also has great side branching! If you take a look at the group photo from today, you'll see that both MC-01 & 03 are practically the same height, but MC-03 snuck in there by the stretch haha. Day 18: M.C. 01-21 My order of D.E. came in last night, perfect timing! As you can see, her roots have fully reached the bottom, and have started to migrate upwards with the water that's absorbed. The soil was a little dry for my liking, which made things a little difficult/dusty but still no mishaps! Watered around the root-zone before covering with more soil to keep the gnats down. M.C. 02-21 Not quite as much lateral root growth as MC-01, but still plenty enough for a repotting! Her soil was a little dry as well. Ideally I should have given them a light misting from the top of the soil and let is drip down to keep the dusty bits together haha. M.C. 03-21 Nice and thick root growth, no issues with repotting, and strong stalk. The extra spacing in the nodes may prove to be helpful during the training phase. Day 19: M.C. 01-21 Some nice top shots today as they slowly get acclimated to their new homes. Once I see them push out a new node, I'll probably top them. This is to make sure that they're taking to the new pot without causing any extra stress before they can take it. Today I watered them with an early veg nutrient. I like to stay cautious with nutrient boosts since they're in soil - not to mention the added nutrients from the repotting. M.C. 02-21 Top shots for the girls today. Not much change, but also no immediate signs of shock either, so I'll take it. M.C. 03-21 You can't really see it in this angled shot, but the small branch at the second node is coming along nicely! I think the girls are happy that they each have their own tray not haha. Day 20: M.C. 01-21 Definitely noticing some slow changes to the top nodes when comparing the pictures from the previous day. The leaves are slowly starting to separate, and I'm not noticing too much yellowing yet which is good. Watered with 500ml water to keep water migrating upwards to meet the roots. M.C. 02-21 Not noticing much change in this girl today, but that's okay. She's most likely focusing on the root developement instead which I can't complain about! Watered from the bottom. M.C. 03-21 Maybe seeing some separation in the top leaves, however more notably are the small branches at the 2nd node that you can see better here. Still a bit of stretching with them as they get longer. I might even keep them on for clones later on. Watered from the bottom. Day 21: M.C. 01-21 Looks like she gained some distance last night, as the top node is now above the fan leaves, unlike 2 days ago. I'm really getting eager to top them, as I don't want them to waste too much time and energy growing tissue that I'll just end up cutting off. I'll be bumping the nutrients up starting next week to keep the progress going, moving to a mid-veg stage shortly. I'm going to let things dry up tonight for a fresh boost of water tomorrow to give it a dry cycle as the pot is still a bit heavy. M.C. 02-21 MC-02 really worked hard last night it seems, as she almost completely flatted out her top leaves! I think she's ready for a topping, but I'll let her benefit from the headstart and let the other two catch up and root before. dry cycle for her tonight as well. M.C. 03-21 MC-03 was busy last night too and is now slowly flattening out the top node as well! Maybe tonight they'll have enough progress to go topless afterall haha. Dry cycle in prep for watering tomorrow.