
Likes
Comments
Share


Likes
19
Share


@Chucky324
Follow
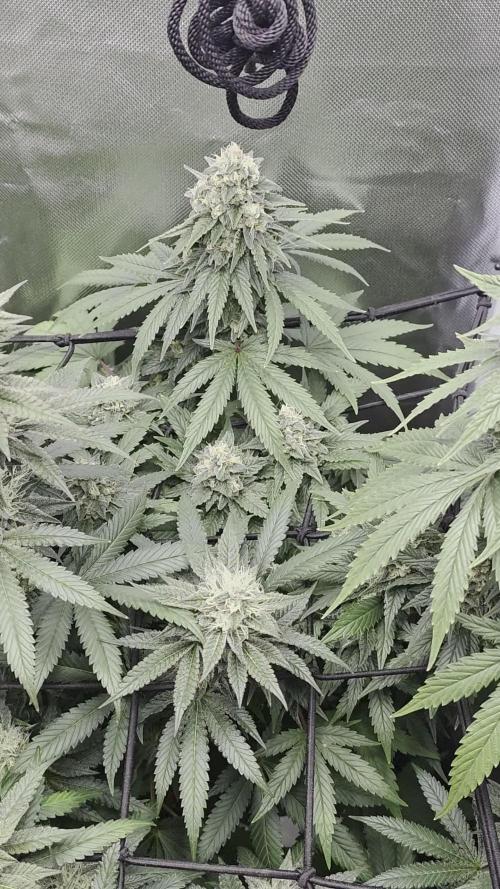
Hello. This is the end of week 8 and the beginning of week 9 of flowering.
I started my flushing on Sun. Ph adjusted tap water. Our tap water here is between 7 and 7.5 and has to be adjusted
If I put 1 drop of ph down per gallon... I get about 5.7 ph. Good to grow with.
I'm hoping to start harvest on Aug 11th and that will be 10 weeks in flowering. Just the way I like it.
Next flush will be on Thur.
We've reached the end of the underground comic... Weirdo #9.
Look for more weird comics in my other diaries and I'll continue putting them in my new diaries.
OK. Have Fun.
Chuck.

Likes
3
Share

@CheeRz
Follow
We are nearing the finish line! Both ladies look great, and the delicious aroma wafting from the tent brings a smile to my face every time. I think we should finish the run in about two weeks. 🍋🍋🍋


Likes
21
Share


@Onlypotent420
Follow
Hi all!
Grow room- no updates on the grow area status as usual.
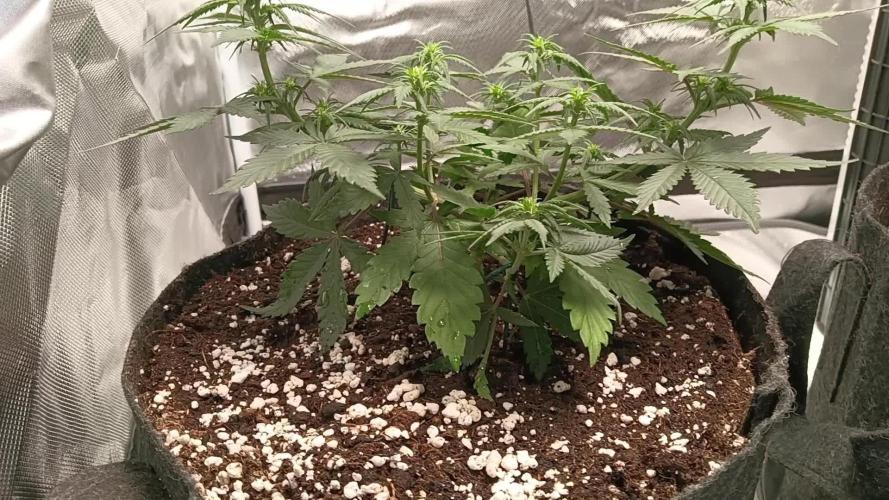
Blue dream auto- the blue dream plant is definitely starting to settle in to the flower. And just going through the motions. I kinda like I left some branches y’all in the back. If it would have been even I don’t think they would be getting as good as lighting so that’s a plus. Ppm 850
Master kush. The master kush is didn’t really do as big of a stretch the first week of flower like I thought it would. Maybe this week... all those toppings I did definitely paid off she bushing like crazy definitely. Ppm 800
Until next time #StayKited


Likes
17
Share


@Leonard_Lunte
Follow
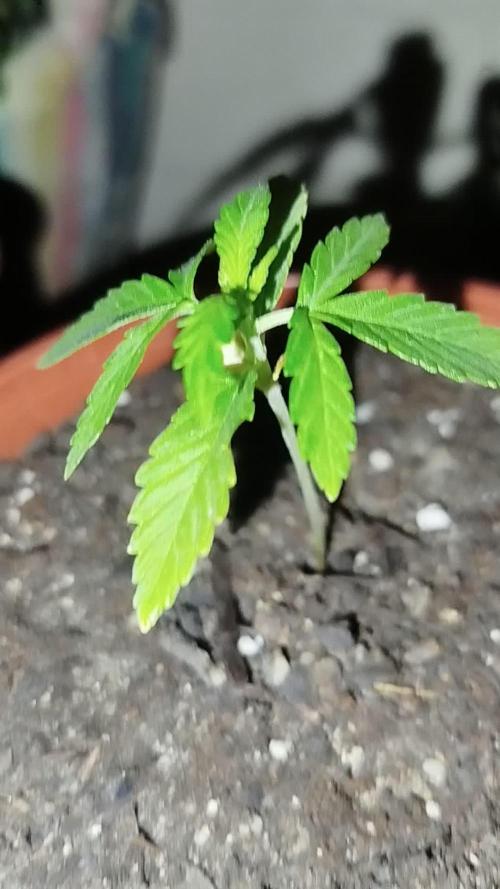
Picture 1 - Day 8 - Seedling 1 got its nutrients the first time today. 1ml/L Biobizz Grow about 700ml.
Picture 2 - Day 8 - Seedling 2.1 still stretching a bit too much, am waiting for the new light to arrive.
Picture 3 - Finally got the new setup, the grow tent isnt perfect yet but itll do for the next few weeks (its just an old temporary closet) it leaks a lot of light and moisture but since I only have these 2 mini plants rn I dont think its gonna be a huge problem until flowering.
Picture 4 - Day 9 - Seedling 1 looking good and Seedling 2.1 (3 Days old) will hopefully stop stretching now that I finally got the bigger light here. Watered 2.1 again today with just ph water.
Picture 5 - Day 10 - Nothing special happening, the plants are looking good!
Picture 6 - Day 11 - I now installed a fan in the grow area to better the ventilation. The fan is doing a great job at moving air around, but kinda messing up the moisture coming out of the humidifier... (With fan and humidifier on at same time = 40% with just humidifier running = 60-70%) Not sure how to fix that yet... Will water Seedling 1 again tomorrow.
Picture 7 - Day 12 - Seedling 1 growing good but its leaves are still looking really weird, I think theyre going up on the edges because I put them under slight wind stress, but that issue is fixed now. Some parts of some of the leaves still look really odd to me, like they got cut off or something? I dont know
Picture 8 - Day 12 - Seedling 2.1 is 6 days old now and growing good, theyre some tiny yellow dots on the leaves surface but its really slight so I dont know if its something bad. I watered both plants today, Seedling 1 with Bio Grow Nutrients and Seedling 2.1 with just Ph'd water.
Video - Day 13 - Both seedlings still growing, but looking kinda sus.

Likes
7
Share

@Mikeyc420
Follow
Strawberry gorilla is growing nicely have transferred to a bigger pot (should of done it a week early) she has started to grow white pastels
Sticking with LST buy sting the branched down to allow more light in to other budsites
Don't forget your 15% off your next seed order at fastbuds by using discount code 420CLUB
Likes
14
Share


@Rock_n_Roll_Randy
Follow
I CHOPPED ABOUT 15 AUTOFLOWERS AND MOVED SOME OF THE PHOTOPERIODS FROM THE 5X5 TENT INTO THE 8X8 TENT. ONCE ALL THE AUTOFLOWERS ARE CHOPPED I WILL MOVE ALL THE PHOTOPERIODS INTO THE 8X8 AND THEN I WILL SWITCH THE LIGHTS TO 12/12👍🤘🤘🤘
FOR EVERYTHING MARS HYDRO VISIT:
www.mars-hydro.com
www.marshydroled.ca
PROMO CODE: rocknroll
VISIT THE ALIEXPRESS STORE:
@marshydro_aliexpress
Instagram: @marshydropenny
https://youtube.com/channel/UChU5ZWwNi-DvnO3oWVU3ceA
(NEW) STRIVE NUTRIENTS 💪
Thanks for taking the time to read and check out my diary🤜🤛
FC-E6500 LED GROW LIGHT:
FC-E6500 grow light with 3978pcs OSRAM BridgeLux Diodes & Moso Driver, market-leading PPF 2.7 µmol/J, Max 2.5g yield/watt with 30% higher Average PPE, more cost-effective when compared to same style type lights. Only consumes 650W, perfectly cover 5x5ft (personal), 4x4ft (commercial) grow space. Innovative Precise Uniform Lighting-Built-in removable bars interval & dimmability enable the exact & dynamic PPFD control over each of the plant growing stages, FC-E6500 detachable bars deliverSuperior Heat Dissipation: Real Aluminum heatsink together with 6 slim profile passive cooled bars (THINNER & LARGER surface) and detachable Meanwell Driver, create less heat. save 50% hydro than other old grow lights! Driver can be mounted remotely on the side of a grow tent/rack or on an adjacent wall to remove heat from grow space. Full Spectrum UV IR LED: With Yield Max spectrum (660nm Osram enhanced Deep Red,2800k-5000k,730-740nm IR,380-410nm UV LEDs), Average PPFD the FC-E6500 LED grow lamp enables cultivators to produce BIG FAT Dense Buds, perfect for full-cycle hydroponic, soil, grow tent/grow room.
Dimmable Commercial Grow Light: Cost-efficient, easy dimming & daisy chain With a max up to 20 lights, IP65 Waterproof, master light easily controls the rest. Perfect for commercial & home horticulture.
FC4800 LED GROW LIGHT:
GET THE MAX FROM MARS👍: Welcome one of the newest members of the Mars Hydro family🤜🤛🤘. The Mars Hydro FC 4800 480W LED Grow Light can accommodate up to a 4' x 4' area for flowering. It has OVER 2000 LED chips consisting of the best selling Samsung LM301B diodes which has a Luminous Efficacy of: 220 lm/W
0.2 W, 3 V mid power,
Osram 660nm Diodes, Infrared light and UV LIGHT👍. It boasts the incredible efficiency of 2.8 µmol/J, maximum 2.5gram yield per watt with 30% higher Average PPFD. This High-intensity spectrum is beneficial for plants at all stages - from veg to bloom, and creates Big dense Buds👍. achieve 50% higher yields & quality compared with the old lights! Only consumes 480W for 4x4ft personal grows, and 3x3ft for commerical grow. It comes with a dimmer and daisy chain function with a maximum of up to 15 lights, the master light controls the rest👍. Wide 6-bar design offers even & wide canopy coverage and can maximizes your grow space. slim 180° FOLDABLE DESIGN... YES I SAID FOLDABLE🤘🤣 , making it compact and easy to install, it's IP65 WATERPROOF and will give you no worries while growing in a humid environment and makes it a flexible high performance commercial grow light for enormous SUPER FROSTY yields.😛😛😛. MARS GETS EM FROSTY BOYS👍
AWESOME HEAT DISSIPATION: The Low energy consumption FC4800 growing light has 6 passive-cooled bars and an aluminum heat-sink a removable driver you can upgrade later or have it outside your tent. with zero noise you can save up to 50% in your electricity bill compared to HID's or HPS lights!
It also has a removable driver so you can upgrade it in the future or have it outside your grow space for better heat control in your growroom👍
UPGRADED FULL SPECTRUM: Yield Max Spectrum with enhanced red (Top-Bin Samsung 3000k-5000knm, Osram 660nm Deep Red), speed up blooming & fruiting, perfectly suited for full-cycle growing. The FC4800 LED grow lamp was born for Big Buds, perfect for commercial, grow tent, grow room, hydroponics, and all soil grows.👍
THE BEST SAMSUNG DIODES: THE FC4800 has Top Bin genuine Samsung Osram Diodes, combined with remarkable 2.8 µmol/J Efficacy, 30% higher Average PPFD, 50% less energy consumption, to maximize your yields. They give you a TRUSTED 3 years warranty 100% Satisfactory guaranteed!!!
TSW2000 LED GROW LIGHT:
INCREASE YIELD AND CROP QUALITY WITH MARS HYDRO LED GROW LIGHTS: NEWEST SMD LED technology provides the highest PAR/LUMEN output (1122umol@18") and can make you get 30% higher yield compared to OLD blurple led lights. Max 2.5g yield per wattage and achieve maximum quality and quantity, much better than traditional HPS grow systems
LOW ENERGY CONSUMPTION LED GROW LIGHT: Consuming only 300W true output with 684 LEDS! It saves up to 50% energy than other led grow lights. Perfect for 3.5x3.5ft bloom stage, 4x4ft veg stage. Over 90% light energy can be absorbed by plants, it will have higher intensity in a MARS HYDRO grow tent with diamond design mylar, or by crossing over using multiple TSW2000
HIGH EFFICIENCY FULL SPECTRUM INDOOR GROW: 3000K 5000K and IR 660nm 760nm RED, makes it close to natural light, highly engineered to provide improved growing performance for plants at all stages of growing, rapid plant response from seed to flower; Uniform and wide-beam light distribution for your plant's optimal growth
8x8 1680D GROW TENT
The MARS HYDRO 8x8 Grow Tent interior is made of a unique diamond design mylar which is highly reflective. (Other companies mylar and reflective rate is as low as 50%, and it won't provide efficient light. They use thick 1680D oxford canvas, and being double stitched, it is tear proof and perfect for locking in the light. Their grow tent keeps 100% of the light inside the tent and helps your plants absorb more light. EXTRA-THICK material means No light leaks or rips at all.👍
Strong Stable metal corner adapters and poles are the trustful supporters of the tent. It's very sturdy, neither rusting or paint flaking off. quick and easy tool-free setup. They use heavy-duty metal zippers, with double layer black lining, by far the best on the market which creates a light-proof seal.
The Easy observation windows are made by double layers of cloth. Observe the growing conditions of your plants without opening the tent and avoid disturbing your plants. The observation windows also serves to dissipate heat and ventilate the air.
The tent includes 2 removable waterproof floor trays to hold soil and water. The removable tray can be taken out to wash easily.
They guarantee the grow tents are easy to install even if you've never done something like this before. Clear Instructions and no tools needed! They also offer 30-day unconditional refunds for quality problems. Just contact their friendly 24 hours customer service 👍
Likes
11
Share


@Tmasm
Follow
obrigado Royal Queen Seeds por fornecer a genéticas, hipérion F1 e bolo de casamento.
Entrega segura, dentro do prazo e muito discreta, entrega prevista em 5 a 10 dias, recebi em 5 dias, por serviço de entrega não trabalha ao fim de semana, senão recebia em 3 dias.
Experiência para possível plantio em massa, dependendo dos resolvidos.
1/5 hipérion F1 estará germinado, nos próximos dias.
1/5 bolo de casamento estará germinado, nos próximos dias.
Restantes hipérion F1 e bolo de casamento, germinarão assim que estás, terminar seu ciclo de vida, devido organização de esposo, e com isso estudo diferentes épocas do ano.
O diário será atualizado toda semana, espero que gostem (eu também)
Likes
15
Share


@northern_rookie
Follow
Hifi 4G seems to be a bit sensitive to the current and previous feeding levels. Had multiple leaves exhibit nutrient burn. Otherwise all seem to be happy. Hifi 4G, NL/Skunk and Blueberry continue to lead the pack on Bud development. God I hope I don't screw this up!


Likes
5
Share


@420Hydro
Follow
Decided this week i was gonna keep a 2nd bubba kush seedling that i didn't think was gonna germinate...Gonna get rid of the sour diesel clone....might go back to that strain later..so i will just have KO in this diary..have another diary for the other 2 bubba kush...... also got a quantom board in from alibaba...kinda scary it coming from china but doesn't everything now days...gonna order a few more of the lights for my 4x8 next fall..after this grow probably gonna take July and august off growing maybe keep few clones, but not gonna flower
Likes
16
Share


@GreeneScene
Follow
Soo this week has been “fine” .
Humidity is under control finally , the humidifiers seemingly have gotten the environment in check . I noticed “it works more efficiently” if I leave a small amount of water in the reservoir as opposed to how long it takes humidity to drop after watering with the reservoir bone dry after emptying .
I see that the top dress food still isn’t reaching the girls yet there’s more progressive lower leaf yellowing . I thought it’s take no more than a week for the waterings to render the amendments effective.
Seeing this I’ll surely give the girls their pre flowering feed much sooner . I’m planning for 4 weeks so that by week 6(WISHFUL THINKING) the food will be accessible to the girls .
Vertical growth this week has been decent , I was worrying quietly on the inside that I’d end up with nuggets on the lateral branches I’ve worked so hard to grow & constantly train.
I want to see 12 in long dense solid resinous continuous colas on these girls .
Anyways I think that’s it, another week on the GreeneScene in the books 📚.

Likes
4
Share


@Englandshigh
Follow
Very good strain to grow would recommend to everyone, very beautiful hash flavours taste dense buds definitely going to grow again
Likes
1
Share

@carlitospiratahaze
Follow
Seguimos avanzando con la pequeña papaya ya va empezando a parecer una plantita de cannabis!!
Seguimos el seguimiento con ganas de que empiece a estirar!

Likes
11
Share


Likes
167
Share


@DeepWaterGrower
Follow
🗓️ 1° WEEK FLO // DAY 1-7 (from switch) // DAY 78-84 (from dry seed)
⚡- Light: 40 cm / 200 watt. Added a second lamp to support the flowering stage;
⌛- Schedule: 12/12. First week after veg begins, I hope that the gradual approach to the critical point helps to have a quick transition;
🌡️- 23° C - 65% RH average;
📑- PH 5.8 - EC 2;
💧- 5° DWC change for both after 48 hours flush;
🍔- Transition blend: tap water EC 0.4 + Silic 0.5 ml/l + CalMag 0.5 ml/l + Hydro A-B 1.8 ml/l + Oligo Spectrum 1 ml/l + Power buds 0.5 ml/l;
🥅- ScrOG-net mounted at 50 cm on DAY 4 FLO;
🔄- I reversed the position, the phenotype #1 is now on the right side;
🌱- Pheno #1 shows burnt tips since week 5 but I don't care, she has a great shape, is enormous and gorgeous. The lateral branches are long and strong, the main stem is very thick! Pheno #2, instead, is smaller and the lateral branches are not so long but she has the best root system I've ever seen!

Likes
38
Share


@MrLahey
Follow
Originally the right plant was stunted and I was concerned that topping it would stress it too much. As such, the left plant was topped during early veg but the right plant was never topped and it shows. The main cola on the right plant gets more ppfd (around 1000) than the left plant so I’ve been bending it down once or twice a day so that maybe the left canopy can catch up.
Are there any other techniques I can do to my plant (2nd week of flower) to allow the canopies for each plant to be equal?
Last week I did a very light dose of bloom and they responded very well. I will continue to supplement lightly until the sohum soil prepackaged nutrients run out. I would imagine it will be any week now that it’s depleted?
I am very happy with the grow so far since it’s my first ever real attempt. Other than the right plant getting shocked from the living soul or overwatering the grow has been going great! I can see baby buds and pistils forming! 😀
So excited for the day I can open the tent and get bombarded by the smell of the buds.


Likes
6
Share


@Rabidreject
Follow
Thursday
this week has been good so far, I pulled each plant out yesterday and tidied everything up. I got rid of all the tiny lateral branches that didn’t make the cut and I got Rid of everything that was below about half way down the plant. Obviously the lateral branches that grew to the same height as the canopy are staying it’s just all the non starter stuff below.
I annoyingly had my in take fan die on me. We’ll sort of, it just keeps tripping the fuse on my electric so I assume it’s from when I had my res flood onto the floor - I forgot it was there on the floor because it was hidden behind the res

