
Likes
Comments
Share


@MrGrowthSpurt
Follow
***UPDATE****
6/17/2022
I forgot to mention that I transplanted both Big Bud Auto Plants, well slightly transplanted. I started Big Bud #1 off in a 16 oz grow cup and #2 I started off in a peat moss pod. Initially I just put the entire cup/pod into a 5 gallon pot without removing them from the container they were in.
After a few days, I thought to myself "won't that restrict root growth somewhat?" so I took #1 out of the grow cup and transplanted directly into the soil in a 5 gallon and #2 I cut the white netting from around the peat moss pod and planted that directly into the soil in a 3 gallon pot.
***Update end***
Week 3 went by well. I'll admit I'm at the point where I've "been there done that" I don't pay as much attention to them and kind of let them do what they do.
I lst'd Big Bud Auto #1, she is the healthiest and most robust of the group currently.
Big Bud Auto #2 is sort of a runt compared to it's sister. I believe it may have to do to the fact that I started it in a peat moss pod and placed the entire pod into the soil.
Caramelicious 2nd generation #1 is a project of mine. One of my plants hermied on my last grow and pollinated itself. This is one of the seeds from that Hermie. I am curious to see if it hermies or is a female. Because after all isn't forcing a female to hermie and pollinate itself is how feminized seeds are made? Needless to say I got over 1000 seeds, so I'm hoping that they are feminized.
White Widow #3 popped up with severe helmut head, I tried my best to pull it off without damaging the plant, but ended up ripping a small piece of the tip of the plant. It is really small rn but seems to be growing. I'm curious to see how it grows.
Lastly but not least there has been no action with my lavender and my hot chili peppers.
I fed my ladies their first nutrients today. General Hydroponics Flora 3 part series. I mixed 1/4 ml into 3 gallons of water and ph'd it to 6.6 and fed each 1 liter.


Likes
43
Share


@PEAKYPLANTERS
Follow
it's always a pleasure to do business with Barney's Farm!!!
They have never let me down even once!!
Even in the worst situations and conditions they have always been able to bring out the best for me!!
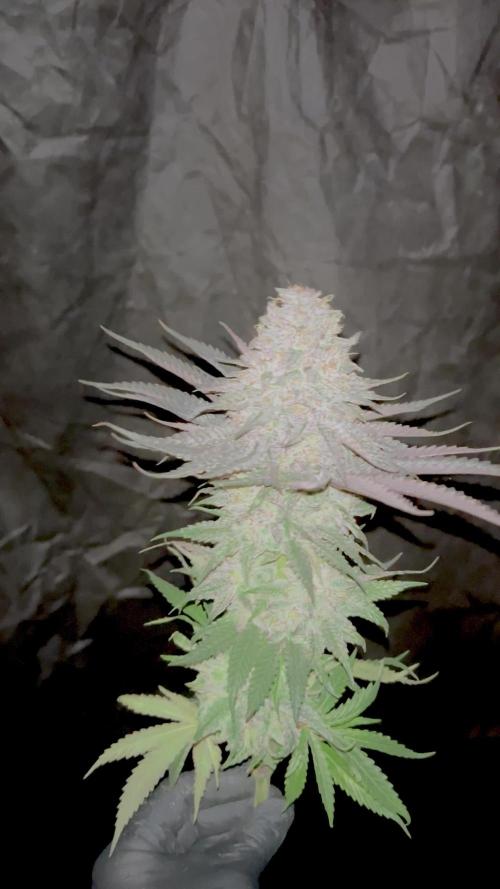
I really enjoyed forcing these plants to see their reactions, but I wouldn't do it again as a technique because it only serves to keep the canopy low but not to increase the yields...or...at least in my case I didn't find it of fundamental importance....maybe a simple cut of the apical top and that was it! but that's fine!😋
Likes
37
Share


@RFarm21
Follow
Foram regadas no dia 11/07/2021, 3 plantas com um total de 5L . E.C 0,43.
A R.Gorilla 2 foi regada com 1,5L e foi a primeira vez que foi alimentada. E.C 0,16 / pH 6.2
R.Juice - 2ml ; Bio Heaven - 1ml ; Activera - 0,5ml ; calmag - 0,2 ml ;
Ansioso para ver os resultados do LST, na royal gorilla 2 ( a mais pequena ) irei fazer o lst mais cedo e tentar não dobrar tanto o caule junto ao solo para ver as diferenças.
Será que fiz bem?


Likes
25
Share


@XperencdGmanXG
Follow
what can I say over 7 ft tall now which is impressive in this drought with only the pittance of water I've been giving them once a week. Just goes to show you that my water conservation techniques work. They are both starting to smell like a hint of chocolate and peanut butter. Can't wait to see how these ones smoke. They are also into full pre flower and should be in full flower by next weekend.
Likes
27
Share


@Sinistergrow702
Follow
Almost done with week 5 veg one more too go and these girls are getting flipped .they are doing great in my opinion tops coming up from every corner this should be a nice tent at the end of the day buds from side to side 😊

Likes
3
Share


Likes
17
Share


@The_Doctor_Green
Follow
Esta semana el drenaje del suelo me dio valores muy altos la EC en 3700 y el ph 8.3 , en los riegos anteriores el ph de riego eran de 6.3 y la EC de 1500 por eso el próximo riego volveré a hacerlo solo con agua, para ver si se normaliza.
La planta igualmente viene creciendo en optimas condiciones a nivel visual, con los cogollos desarrollándose de manera saludable.
Espero que siga asi.
Processing
Likes
6
Share


@Weedzoks
Follow
Passage de la lumière en 12/12 le 19ème jour pour lancer en floraison les féminisées.
Jour 16: Arrosage eau 4l
Jour 19: Arrosage 3l engrais complets

Likes
22
Share


@RDWCGrowing
Follow
12/25/2023-Germination Day 1
Merry X-mas 2023 I decided to start a run of SolFIre Gardens Hoodz Candyz S1. I am going to do a cup filled with RO water a touch of Hydrogen peroxide and let it sit for 24-48 hours until I see tap root then I am going to put it into a rapid rooter.. Tap root Down and put it about 1/4 of the say down the Rapid rooter.
I made some modifications to my basket on this run.. I have taken a few Pods that I use for my cloning machine and decided that I am going to try and use them as sure plants, so that I can take my water right up to the bottom of the basket this time and see if these can make my planting more consistent.
12/26/2023-Germination Day 2
Tap root achieved Planting Commencing
12/27/2023-Germination Day 3
Misted the dome lightly misted the rapid rooter and added a little water to the bottom of the pan to encourage root growth to the pan.
12/28/2023-Germination Day 4
Ground Hogs day
12/29/2023- Germination Day 5
She is up, she has broken surface, I misted the root riot, and around the bottom of the tray to try and entice root growth down rapidly.
12/31/2023- Germination Day 6
Ground Hogs Day
1/1/2024-Germination Day 7
HAPPY NEW YEARS!!.. I did it I planned it out so my planting day would fall on New Years and it worked.. Yay!!!
1/2/2024- Germination Day 8
Since the roots are not to the water yet, I am pouring one cup of water lightly on the hydroton around the lady to try and encourage root growth down to the water..
1/3/2024- Germination Day 9
Ground Hogs day, will continue until roots hit the water.
1/4/2024- Germination Day 10
Ground Hogs day, will continue until roots hit the water. I will just continue to top feed until roots are in the water.. Shouldn't be more than a few more days.
1/5/2024- Germination Day 11
Ground Hogs day, will continue until roots hit the water. I am going to change the water Sunday and kick off Week 1, I will just continue to top feed until roots are in the water.. Shouldn't be more than a few more days.
1/6/2024- Germination Day 12
Ground Hogs day, will continue until roots hit the water. I will just continue to top feed until roots are in the water.. Shouldn't be more than a few more days.
1/6/2024- Germination Day 13
Ground Hogs day, will continue until roots hit the water.
1/7/2024- Germination Day 14
Ground Hogs day, will continue until roots hit the water.

Likes
168
Share


@Still_Smoq
Follow
📆 Week 11, 15-21 July 2024
15-21 July - Observed and let the plant grow.
📑 Pablo continues to stack and swell in bud growth. She still has a few more weeks to go. I see no problems up to this point.
🍶 19 July nutrient solution changed
🍽️ 19 July feeding schedule updated
💧 Using reverse osmosis water with EC/TDS at 0
🐉 Nutrient Solution EC 2.5 at 74 degree F
🔆 Light power at 80%, DLI 40 canopy coverage at 12hrs
😤 Using PYPABL, Air Pump, 400GPH
That is it for this week. Thanks for the look, read and stopping by.

Likes
10
Share


@Hix57
Follow
La semaine 5 s'est plutôt bien déroulée, même si les autres plants ont connu un léger excès d'azote.
Heureusement, mes plantes n'en ont pas souffert.
J'ai pris la décision de les nourrir exclusivement avec des éléments favorables à la floraison.
En parallèle, je commence à défolier délicatement une à deux feuilles par jour.
Elles ont arrêté de s'étirer et elles commencent à se concentrer sur les bourgeons.
Un grand merci à Louloutre qui m'apporte son précieux soutien !
Likes
30
Share


@Tazard
Follow
Doing great this week. I’ll try and get some elevation photos next week to show the branching. These seem to be a very vigorous cross.
Likes
4
Share


@Canadian_Bud
Follow
Growing this purple was easy Going most of the way, Only drawback was she grew so big it was hard anchoring her down in the basket from the tilts, but once she was down she put on a show. Her heavy Buds were thick, hard oozing resin was potent and sticky I quickly scooped up some falling Trichomes from beneath my tray Loaded my chamber 220c and 8hrs later I finished my day.Probably could have taken half that time had i not loaded that first bowl then the next....... 😎 Just a tad over 12 Oz on my quest to hit 1 pound per plant. Some exciting Donated Seeds Coming My way. Stay Tuned Find out who they are and What I'm growing next, Going to be some exciting shit. Thanks for following😍

Likes
48
Share


@Northern_Ent
Follow
Sep 7: Gorilla Cookies is doing great. It’s the biggest of the four plants with the most uniform manifolding job, it’s also the furthest along in flowering and will be the first one to finish. Hopefully by later this month and that we get lots of sun to drive trichome production.
Still doing the 730 nm far red light at dusk as a bloom booster, and I’ll keep doing that until the end. And don’t take flash pics of your buds unless you’re then immediately using a far red light to put them into dark mode.
Sep 9: bit of defoliation of lower branches and buds to direct plant’s energy upward and to maintain good airflow especially down low. Used my last bit of Cal-Mag as a few leaves on each of the plants was starting to show a minor calcium deficiency.
Sep 10: beautiful weekend is probably the best one all summer with nice sun, no smoke and perfect room temperature sort of weather. Sitting here a minor gust of wind blew her over. This the fifth time a plant has blown over lately but first time for this one. The 5 gallon bags are big enough for what I want but still easy to move around to maximize sunlight. A drawback is the small pot needs to be stabilized by filled buckets.
Sep 12: these buds are forming quickly and she is ahead of the other three plants by at least a week. Raising odour level to normal which is probably pretty loud for other people who can still smell most things.
The tops are starting to look white when viewed from a distance so that’s pretty cool.
Likes
32
Share

@BudVision
Follow
Hello growers,
I harvested all the chicks 🐥 and La Bomba was left alone in the coop 😀💣. The aroma is sweet and spicy, hard to describe but very pleasant. The buds are dense and beautifully colored.
I put them to dry in a space at 17 °C and 60% relative humidity.
Peace and happy growing! ✌️

Likes
12
Share


@CANNASIM
Follow
Hello, long time, no grow. I’m trilled to start on a new grow project, i’m away from growing a long time, but my love for ot was always present, i miss it a lot so i have got a few strains from Fastbuds to test and come back with a minimal setup.
I have got the Fastberry, Bluedream, and the 1:20 cbd, they have sent in the Banana Purple punch
Ok, so what is a minimal setup? For this grow i have choose to grow in my balcony, it is fairly big and i gave good sunlight, we are in summer now, so temps are high, swinging a lot. It is raining often as well so I did not need to water much.
For the nutrients i will go organic i think, in my substrate i have about 30% warm castings, so i’m good for till mid grow length +-, i might add a bit of nutrients in 30 days mark.
The objective of this experiment is to use as little as possible, 360 degrees.
For the germination process i have used a mixed process method, that i have learned from Fastbuds and i have loved it, 24h in a glass of filtered water, paper towel for about 24h -48h and then the Floraflex gremination pellets, i have tested on the jiffy and worked fine as well. Cool about this method, if you are more on the anxious side or like to control more the process this is the way, you can follow the hole process and see the development in parts. I will add images later on, for this breakdown.
Well that is it, lets hope for a cool, safe journey for this girls.
Likes
16
Share

@Northern_Ent
Follow
May 11: wildfire smoke rolled in this morning for the first time this year. Last year was horrible but hopefully this year won’t be as bad. Today was stay inside the house sort of bad smoke but it’s supposed to blow over soon. Hope.
Plant looks good and happy in the final container.
May 12: took out a couple of small cedars and I have a new sunniest spot in the yard, or at least for the next 12 weeks or so.
Today’s sunlight is like what it will be like in early August (6 weeks to solstice).
May 16: cool and rainy today but some sun at the end. She’s still doing great, and definitely better than most of my previous starts. I think I had the soil too wet before, or maybe the apple thing actually works. Either way she’s off to a good start and we’re on schedule with the May long weekend coming up.
May 17: cool and rainy all day. Left plant in the mini-greenhouse all day.
Likes
39
Share


@J_diaz420
Follow
Día 14 primer riego fertilizante vegetativo.
Día 15 riego foliar con estimulador de floración delta 9.
Día 18 riego con vegetación, floración y se cambia fotoperiodo a floración
Total días vegetativos: 18
Comienza la floración 💪👌🍀

