
Likes
Comments
Share


@DreamIT
Follow
-Sponsored by:
🌴SPLIFF SEEDS🌴-💡VIPARSPECTRA💡-💐GREEN BUZZ LIQUIDS💐-🛠️WEDRYER🛠️
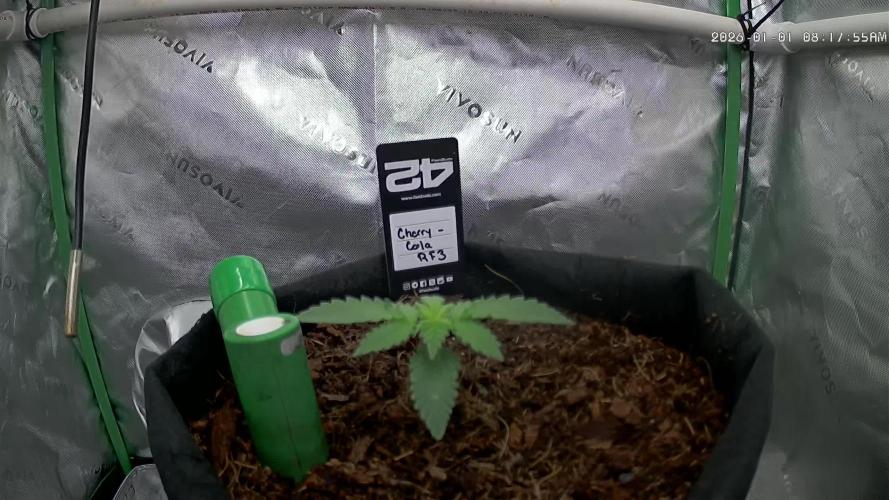
🏁18/6 hello growerz, with today I start the resumption of diaries on GD. I have 13 new genetics in germination and as many diaries. I start by putting the seeds in water for 24 hours, after a day I will put the two seeds in two different jiffies, one with humic acid from greenhouseseeds and the other with just plain water. Get comfortable and follow the updates 😉👋🦄
19/6 The seeds were divided and placed in two different jiffies, one with humic acid and one with water only.
21/6 after another 24 hours in the dark the jiffies were moved under the lamp. let's start the dances!
23/6 nothing to report
24/6 ready to say hello to the world ( only the one in humic acid at the moment )
25/6 I wait for the seed to appear in the water
30/6 finally even the second seed has opened! yeeee, I had lost hope and instead there he is looking at me 😀
__________________________________________
Personal advertising (contains affiliate links)
__________________________________________
🦄 Are you new to the world of cultivation and don't know where to safely buy your seeds?
Fast and anonymous shipping. Check out their hilarious graphics. (no affiliate links)
✅https: //bit.ly/spliffseeds_
__________________________________________
Did you know that Green Buzz Liquids fertilizers are 100% vegan? A complete line of products ready to give the best to each of your plants! Visit the site and see my journals to see how they work 🦄
🤯 And with the code "dreamit" you will immediately receive a 15% discount on your purchases
✅https: //bit.ly/GreenBuzzLiquidsPro
__________________________________________
👀 Are you looking for a good lamp to start with? 👀
🌞Viparspectra has something more than the others, take a look at their site.
⏩ Use "GDVIP" for an extra discount or "DREAMIT3" for an extra 5 %% discount
👀 Search for it on Amazon
✅Amazon USA: https://amzn.to/30xSTVq
✅Amazon Canada: https://amzn.to/38udUVe
✅Viparspectra UE: bit.ly/ViparspectraUE
✅Viparspectra USA: bit.ly/ViparspectraUS
______________________________________________
🌈 Tired of blowing on your weed hoping it dries quickly? Check out the Wedryer website! You will find a well-made accessory that will help your weed dry in just 8-10 days without the annoying risk of finding mold or other annoyances! (no affiliate links)
✅https: //bit.ly/Wedryer_
______________________________________________
📷🥇Follow the best photos on Instagram 🥇📷
https://www.instagram.com/dreamit420/
Backup
https://www.instagram.com/dreamit4200/
🔻🔻Leave a comment with your opinion if you pass by here🔻🔻
🤟🦄💚 Thank you and good growth 💚🦄🤟

Likes
120
Share

@FatnastyzBudz
Follow
Went to daily water this week and gave her Royal Rush. I will once a week now till almost flush.
Tracking the moisture curve with Ecowitt in coco is working just fine. Can see the cycle getting little by little shorter. Exciting!
The timelapse is most of the week? I think. Idk its this week though. I may have knocked it over and moved the plant. But it is what it is. Just playin around anyways. 😁
Back to plant, I was going to top her. But clearly I did not. I may bend her tomorrow, well see. She is eating little, she stacks at 325 ppm but not much. Oh and some ca dots arrived, but its old. Should be flower any time! 😁😻🤘.

Likes
223
Share


@Tropicannibis_Todd
Follow
💩Holy Crap We Are Back At It And Loving It💩
Growmies we are at DAY 14 and all three are doing great👌
So I'm starting to pull some of them over and doing some light LST training 🙃
Nutrients are now going to feed NutriNPK Grow 28-14-14
Lights being readjusted and chart updated .........👍rain water to be used entire growth👈
👉I used NutriNPK for nutrients for my grows and welcome anyone to give them a try .👈
👉 www.nutrinpk.com 👈
NutriNPK Cal MAG 14-0-14
NutriNPK Grow 28-14-14
NutriNPK Bloom 8-20-30
NutriNPK Bloom Booster 0-52-34
I GOT MULTIPLE DIARIES ON THE GO 😱 please check them out 😎
👉THANKS FOR TAKING THE TIME TO GO OVER MY DIARIES 👈
Likes
16
Share


@BudsBanditUK
Follow
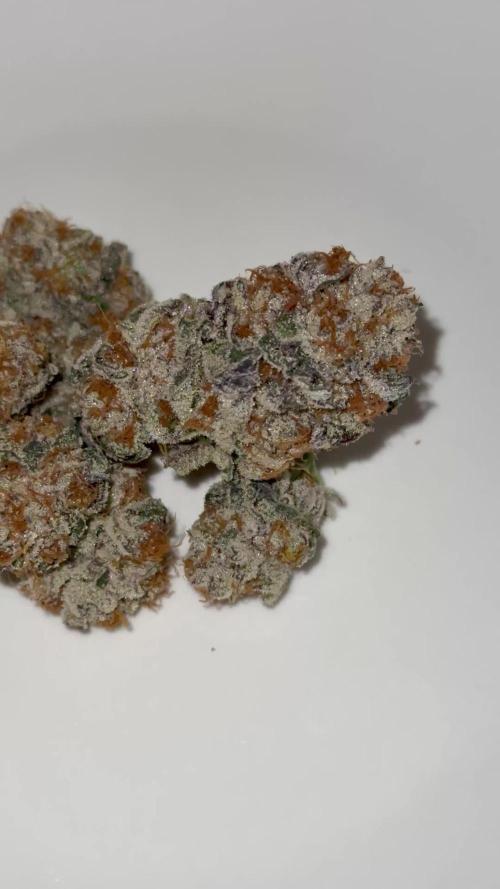
What can i say. She is a stonker. Smells amazing looks mental. Fastbuds smashed this one again. I am excited about this one. I havent seen anyone grow this before.
Likes
14
Share


@Rock_n_Roll_Randy
Follow
I MOVED THE AUTOFLOWERS THAT ARE LEFT INTO THE 5X5 TENT TO FINISH, AND I MOVED ALL THE PHOTOPERIODS INTO THE 8X8 TENT TO FLOWER👍🤘🤘🤘🤘
FOR EVERYTHING MARS HYDRO VISIT:
www.mars-hydro.com
www.marshydroled.ca
PROMO CODE: rocknroll
VISIT THE ALIEXPRESS STORE:
@marshydro_aliexpress
Instagram: @marshydropenny
https://youtube.com/channel/UChU5ZWwNi-DvnO3oWVU3ceA
(NEW) STRIVE NUTRIENTS 💪
Thanks for taking the time to read and check out my diary🤜🤛
FC-E6500 LED GROW LIGHT:
FC-E6500 grow light with 3978pcs OSRAM BridgeLux Diodes & Moso Driver, market-leading PPF 2.7 µmol/J, Max 2.5g yield/watt with 30% higher Average PPE, more cost-effective when compared to same style type lights. Only consumes 650W, perfectly cover 5x5ft (personal), 4x4ft (commercial) grow space. Innovative Precise Uniform Lighting-Built-in removable bars interval & dimmability enable the exact & dynamic PPFD control over each of the plant growing stages, FC-E6500 detachable bars deliverSuperior Heat Dissipation: Real Aluminum heatsink together with 6 slim profile passive cooled bars (THINNER & LARGER surface) and detachable Meanwell Driver, create less heat. save 50% hydro than other old grow lights! Driver can be mounted remotely on the side of a grow tent/rack or on an adjacent wall to remove heat from grow space. Full Spectrum UV IR LED: With Yield Max spectrum (660nm Osram enhanced Deep Red,2800k-5000k,730-740nm IR,380-410nm UV LEDs), Average PPFD the FC-E6500 LED grow lamp enables cultivators to produce BIG FAT Dense Buds, perfect for full-cycle hydroponic, soil, grow tent/grow room.
Dimmable Commercial Grow Light: Cost-efficient, easy dimming & daisy chain With a max up to 20 lights, IP65 Waterproof, master light easily controls the rest. Perfect for commercial & home horticulture.
FC4800 LED GROW LIGHT:
GET THE MAX FROM MARS👍: Welcome one of the newest members of the Mars Hydro family🤜🤛🤘. The Mars Hydro FC 4800 480W LED Grow Light can accommodate up to a 4' x 4' area for flowering. It has OVER 2000 LED chips consisting of the best selling Samsung LM301B diodes which has a Luminous Efficacy of: 220 lm/W
0.2 W, 3 V mid power,
Osram 660nm Diodes, Infrared light and UV LIGHT👍. It boasts the incredible efficiency of 2.8 µmol/J, maximum 2.5gram yield per watt with 30% higher Average PPFD. This High-intensity spectrum is beneficial for plants at all stages - from veg to bloom, and creates Big dense Buds👍. achieve 50% higher yields & quality compared with the old lights! Only consumes 480W for 4x4ft personal grows, and 3x3ft for commerical grow. It comes with a dimmer and daisy chain function with a maximum of up to 15 lights, the master light controls the rest👍. Wide 6-bar design offers even & wide canopy coverage and can maximizes your grow space. slim 180° FOLDABLE DESIGN... YES I SAID FOLDABLE🤘🤣 , making it compact and easy to install, it's IP65 WATERPROOF and will give you no worries while growing in a humid environment and makes it a flexible high performance commercial grow light for enormous SUPER FROSTY yields.😛😛😛. MARS GETS EM FROSTY BOYS👍
AWESOME HEAT DISSIPATION: The Low energy consumption FC4800 growing light has 6 passive-cooled bars and an aluminum heat-sink a removable driver you can upgrade later or have it outside your tent. with zero noise you can save up to 50% in your electricity bill compared to HID's or HPS lights!
It also has a removable driver so you can upgrade it in the future or have it outside your grow space for better heat control in your growroom👍
UPGRADED FULL SPECTRUM: Yield Max Spectrum with enhanced red (Top-Bin Samsung 3000k-5000knm, Osram 660nm Deep Red), speed up blooming & fruiting, perfectly suited for full-cycle growing. The FC4800 LED grow lamp was born for Big Buds, perfect for commercial, grow tent, grow room, hydroponics, and all soil grows.👍
THE BEST SAMSUNG DIODES: THE FC4800 has Top Bin genuine Samsung Osram Diodes, combined with remarkable 2.8 µmol/J Efficacy, 30% higher Average PPFD, 50% less energy consumption, to maximize your yields. They give you a TRUSTED 3 years warranty 100% Satisfactory guaranteed!!!
TSW2000 LED GROW LIGHT:
INCREASE YIELD AND CROP QUALITY WITH MARS HYDRO LED GROW LIGHTS: NEWEST SMD LED technology provides the highest PAR/LUMEN output (1122umol@18") and can make you get 30% higher yield compared to OLD blurple led lights. Max 2.5g yield per wattage and achieve maximum quality and quantity, much better than traditional HPS grow systems
LOW ENERGY CONSUMPTION LED GROW LIGHT: Consuming only 300W true output with 684 LEDS! It saves up to 50% energy than other led grow lights. Perfect for 3.5x3.5ft bloom stage, 4x4ft veg stage. Over 90% light energy can be absorbed by plants, it will have higher intensity in a MARS HYDRO grow tent with diamond design mylar, or by crossing over using multiple TSW2000
HIGH EFFICIENCY FULL SPECTRUM INDOOR GROW: 3000K 5000K and IR 660nm 760nm RED, makes it close to natural light, highly engineered to provide improved growing performance for plants at all stages of growing, rapid plant response from seed to flower; Uniform and wide-beam light distribution for your plant's optimal growth
8x8 1680D GROW TENT
The MARS HYDRO 8x8 Grow Tent interior is made of a unique diamond design mylar which is highly reflective. (Other companies mylar and reflective rate is as low as 50%, and it won't provide efficient light. They use thick 1680D oxford canvas, and being double stitched, it is tear proof and perfect for locking in the light. Their grow tent keeps 100% of the light inside the tent and helps your plants absorb more light. EXTRA-THICK material means No light leaks or rips at all.👍
Strong Stable metal corner adapters and poles are the trustful supporters of the tent. It's very sturdy, neither rusting or paint flaking off. quick and easy tool-free setup. They use heavy-duty metal zippers, with double layer black lining, by far the best on the market which creates a light-proof seal.
The Easy observation windows are made by double layers of cloth. Observe the growing conditions of your plants without opening the tent and avoid disturbing your plants. The observation windows also serves to dissipate heat and ventilate the air.
The tent includes 2 removable waterproof floor trays to hold soil and water. The removable tray can be taken out to wash easily.
They guarantee the grow tents are easy to install even if you've never done something like this before. Clear Instructions and no tools needed! They also offer 30-day unconditional refunds for quality problems. Just contact their friendly 24 hours customer service 👍
Likes
20
Share


@cpt420
Follow
Last week of flowering then switching to 12/12 light cycle. Put the other plant into a bigger pot. Roots looking healthy and plants are still loving the nutrients.

Likes
4
Share


@Freddd
Follow
The phenotypes are now very distinct, the small plant's leaves go directly from green to dark plum colour they do not go yellow at all. Unlike the early orange bud. It almost looks like it has a blue light on it.

Likes
9
Share


@Knorke14
Follow
EC 1.2
PH 5.8
I am very impressed by the rapid growth. The roots seem to be very healthy. I have raised the light to encourage more vertical growth.

Likes
7
Share


@420lor
Follow
Bueno bueno, pues empezamos la recta final de esta maravilla de planta. A tan solo 2 semanas como máximo para el corte, tienen un aspecto espectacular, han engordado perfectamente y están duros como piedras!! Una genética que volveré a prepetir

Likes
10
Share


@GuanoRomano
Follow
🌼 Flowering – Week 2 (Days 36–42)
10/18 (Day 36 – Start of Week 5):
Watered with the same nutrient solution as last week (2.5 ml/L CalMag + 1.4 ml/L Coco A + 1.4 ml/L Coco B).
Not adding PK yet — I’ll wait until the stretch fully ends before introducing it.
Measured heights today: tallest = 122 cm, shortest = 61 cm, average = 84 cm.
Did not measure runoff this time.
10/19 (Day 37):
Average vertical growth today: +4.66 cm, showing the stretch is slowing down.
Watered again with the same solution as yesterday.
The canopy remains uneven, with clear height differences between phenotypes — I’ll adjust pot heights soon to improve light distribution.
Plants look healthy overall, no visible stress or nutrient issues.
10/20 (Day 38):
Watered with water + CalMag + AN Micro (micronutrient maintenance day).
Adjusted the height of the shorter pots, and now PPFD across the canopy is much more uniform.
Average daily growth was +5.33 cm — the defoliation slowed them down briefly, but they’ve regained momentum.
The tallest plant is now 132 cm, and I’ve had to raise the lights to their maximum height — any further stretch could become a problem for space.
10/21 (Day 39):
Watered with the same nutrient solution as before, increasing total volume to 1.5 L per plant to achieve about 25% runoff.
Performed a massive defoliation — foliage density was too high, and the dehumidifier couldn’t keep up with transpiration.
Suspect that the excessive stretch was partially due to insufficient light intensity, since readings were only ~360 PPFD when ideal for this stage is 500–600 PPFD.
Raised light intensity to 430 PPFD to gradually correct this.
10/22 (Day 40):
Same watering as yesterday (1.5 L, ~25% runoff).
Runoff: EC 1000, pH 6.6
Plants look strong and are adapting well to the increased light.
Tomorrow I’ll introduce PK 13/14 at low dosage to initiate the first phase of bloom boosting.
10/23 (Day 41):
Watered with 1.5 L.
Introduced 0.3 ml/L PK 13/14 (first light dose) and 0.5 ml/L AN Micro after noticing one plant showing small brown spots between leaf veins (possible early micronutrient deficiency).
Runoff: EC 1000, pH 6.6
Plants look stable overall, no visible stress from new additives.
10/24 (Day 42 – End of Week 5):
Watered again with the same solution as yesterday.
Input/Runoff: EC 1000, pH 6.6
Humidity has been difficult to control — RH stays around 60%, which lowers VPD.
Planning to increase airflow and raise temperature slightly to improve VPD levels and moisture evacuation.
Week 5 Summary
🌸 Stage: End of stretch and transition to full flower development.
📈 Growth: Height stabilized around 130 cm (tallest). Stretch nearly complete.
⚙️ Feeding:
Base mix: 2.5 CalMag + 1.4 A/B (EC 1300).
Runoff steady at EC 1000 / pH 6.6, indicating perfect nutrient uptake.
Introduced PK 13/14 (0.3 ml/L) and AN Micro (0.5 ml/L) for bloom support.
💧 Watering: 1.5 L with 25–30% runoff per plant. No salt buildup detected.
💡 Lighting:
PPFD increased from 360 → 430 µmol/m²/s after noticing under-lighting.
Canopy adjusted by raising pots; more uniform distribution achieved.
✂️ Defoliation: Heavy leaf removal on Day 39 to control RH and open airflow.
🌡️ Environment: RH stable around 60%, but VPD slightly low (target ~1.2 kPa).
Working to improve air exchange and temperature for better balance.
🌿 Overall health: Strong recovery after defoliation, no new deficiencies or stress. Early bud stacking visible.
➡️ Plan for Week 6 – Flowering Week 3 (Days 43–49)
🎯 Objective: Consolidate flowering, strengthen bud sites, and maintain climate stability.
Nutrients:
Maintain base feed at EC 1300–1400 µS, pH 5.8 ± 0.1.
Increase PK 13/14 slightly to 0.4–0.5 ml/L if no stress appears.
Keep AN Micro 0.5 ml/L once per week for micronutrient balance.
Environment:
Target VPD 1.1–1.3 kPa (temp ~26–27 °C, RH 50–55%).
Improve dehumidification and circulation — consider stronger exhaust or intake fan cycles.
Lighting:
Increase PPFD to 500-600 µmol/m²/s.
Monitor for any light stress at canopy level (tallest plants close to the lamp).
Defoliation:
No more heavy pruning — just remove large leaves shading bud sites.
Observation:
Track bud swelling and trichome development.
Watch humidity closely during night cycles to avoid mold risk.
Likes
17
Share


@Eddjack
Follow
Sta andando benissimo, ha reagito bene al topping al 6 nodo. Ora ha due belle cole principali, gli altri rami l'ho legati alle foglie a ventaglio in mondo da farli partire orizzontalmente. In oltre ho anche abbassato l'umidità al 50% per spingerla a bere dalla terra.si è ripresa subito dopo appena 24 ore ha ripreso tutto il suo vigore e bastato una bella inzuppata . Ora qualche altro giorno di riposo e la mando in fioritura .

Likes
24
Share


@OGOZHigh
Follow
So Buddy‘s
Den Ladys geht es hervorragend. Sie machen ordentlich Fortschritte.
Wetter spielt wieder Perfekt mit.
Updates folgen ✌️


Likes
6
Share


@MaestroBud
Follow
Skywalker Haze has officially entered the first week of flowering after 9 weeks of well-balanced vegetative growth, supported by continuous LST, selective pruning and meticulous management of the SCROG net.
The plant presents a balanced structure between apical and lateral, tight nodes, and a compact but airy leaf development.
📊 Current environmental data:
Light: Phlizon FD9600 1000W set to 100%
Photoperiod: 12/12 (10:00–22:00 hours)
Average VPD: 1.1 kPa
Humidity: 58%
Day/Night Temp: 27° / 22°C
💧 Weekly nutrient solution (50 L total):
pH Perfect Grow/Micro/Bloom: 4 ml/L each
Sensizym: 2 ml/L
Bud Candy: 2 ml/L
B-52: 2 ml/L
Cal-Mag AN: 2 ml/L
Rhino Skin: 2 ml/L
Final EC: 1.4 mS/cm
pH automatically stabilized around 6.3 thanks to the AN system
Irrigation via MarsHydro dripkit (24W – 900 L/h) on electronic timer: 2 cycles/day of 4 minutes each, managed with continuous aeration of the tank.
🧠 Observations:
The plant has started stretching with a constant but controlled rhythm. The upper leaves are vigorous, without signs of excess nitrogen. Internodes well spaced. The response to the change of photoperiod is excellent.
🔧 Objective: maintain harmonious vertical development, stimulate early formation of calyxes and continue with floral stimulators starting from day 10.
Processing
Likes
7
Share


@Mr_nugs_lover_David
Follow
This ladies look absolutely gorgeous and super strong, they're gonna be flipped into flower tomorrow on February 15th when they'll hit the 30th day since they were planted and the first day of flower!
As said, I have flipped this ladies into flower on February 15th so now I think we're gonna see a beautiful stretch specially on this 2 plants which are the biggest one in the tent, very nice genetic, cannot wait to see their performance ❤️💛💚👨🌾 stay tuned everybody! This is gonna be a beautiful run! ✌️

Likes
2
Share


@Grandillustrator
Follow
Having to constantly move the ties as each branch keeps pulling in closer together , keeping on top of defoliation starting to get a weak smell when opening the tent overall plants healthy

Likes
14
Share


@Tried_and_Tested
Follow
This was another very good week for the plants, with the flowers beginning to swell up and take shape. Some of the lower leaves are starting to yellow, but this is expected. As the light doesn't penetrate as far, the plant will begin to 'consume' those leaves and drop them to redirect energy to the tops.
The canopy is fairly even apart from 1 small spot, which does not have any colas at all. This is due to me bending away the GSC that was topped, with the intention of the lower branches stretching up. This happened with all the other plants I did it to, but not this one for some reason. I think it was due to airflow around the budsites so I added an extra fan last week to hopefully improve this.
The strongest looking plants by far are still the ones that were Topped with LST, followed by the mainlined, with only LST in last place. I have found that the LST only ones do not have stems as thick as the others, so this may impact yield later.
Not much done in the way of training apart from the odd leaf bending or stem tying. The next few weeks will most likely be fairly uneventful, as now we just need to wait for them to flower fully :D


Likes
7
Share


@Chris_222
Follow
Hab von sensi seed ein Bestellung gemacht mehreres wird folgen. Heute hatte sind alle 5 geschlüpft und sofort
rein damit,da ich in einer phase bin wo ich am Experimentieren bin will ich das mit euch teilen mfg

Likes
29
Share


@Basementganja
Follow
This C4 auto was very fast to flower, and stretched up to produce some very pretty, berry smelling/tasting nugs!
The buds didn't flower very dense, they formed as fox-tail shapes.
Yield is on the low-end of acceptable, but good considering the bud structure!
I'm growing another next run, to compare phenotypes!
Likes
16
Share


@Ieiogrow94
Follow
Eccoci qui...
Tutto va per il meglio, questa settimana si inizia a vedere la resina e ora si inizieranno a formare le cime, per questo aggiungo Sugar Shot di @xpertnutrients vedremo l'evoluzione settimana prossima.
Come potete vedere nel complesso tutto va alla grande e c'è un odore nella stanza davvero troppo ed uno strato di resina che sembra zucchero a velo sono davvero molto molto curioso di vedere tutto quello che ne uscirà fuori...
Grazie a tutti per il supporto🔥🌲❤️