
Likes
Comments
Share


@DogDoctorOfficial
Follow
I love this community and how everyone helps everyone, fell blessed to be part of this all, thank you all for being here and for showing us your gardens , together we grow faster and better every day

Likes
18
Share


@Mazgoth
Follow
Not really big buds but going really good,they have time to grow more flowers but don't hope too much,still love them,D53(Update)I purchase an CFL maxibright 200W and I'm gonna still with that until harvest

Likes
24
Share


@DeepRootsGrowTrees
Follow
GORILLA COOKIES 🍪 FF / FASTBUDS
WEEK #17 OVERALL
WEEK #9 FLOWER
This week she's doing good buds are looking good they are mostly dense decent trichome coverage and she's got a nice aroma to her and her buds are looking good she's got a few big buds going on. Stay Growing!!
Thank you for stopping by and taking a look it's much appreciated!!
Thank you FASTBUDS!!
FASTBUDS / GORILLA COOKIES 🍪 FF

Likes
22
Share
@DogDoctorOfficial
Follow
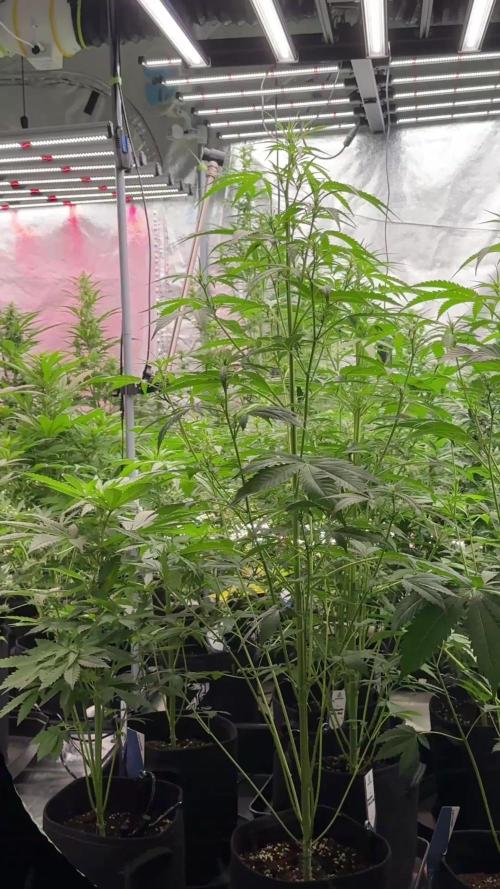
🌸 Week 4 Flower — Permanent Marker 🌸
Here we are, my dear friends, entering the 4th week of flower and things are getting really exciting. The two phenos are now starting to show their true personalities:
• Pheno #1 — our sky-reacher, standing proudly at 2 meters tall! She’s stretching hard, aiming for the moon, and has forced me to pull the lights all the way up. Fingers crossed she slows down here, but what a presence she has in the room.
• Pheno #2 — the compact sister, sitting around 120 cm tall, balanced, and just as beautiful. Both are similar in structure and leaf formation, but their size difference makes this grow even more fascinating.
Despite the heat challenges earlier, the girls are holding strong. With the AC unit now installed, conditions are finally more under control, and I’m hopeful it will make all the difference going forward.
✨ This Week’s Focus ✨
• Height management: Lights are maxed out, now it’s all about keeping balance and preventing stress.
• Environment: Temps are more stable with the AC, giving the plants the comfort they need to keep stacking.
• Observation: These differences between phenos are a reminder of how unique each expression can be, even within the same strain.
🌱 Nutrition
Still running with the Aptus organic program: regulator, top booster, calmag when needed. The base super soil and pellets are carrying the weight beautifully. Leaves are lush, flowers forming, and energy is focused upward.
🔎 A Note on Pheno Hunting
One of the most exciting parts of growing from seed is watching the phenotypes express themselves. Even seeds from the same pack can show different growth patterns, some stretch tall like Pheno #1, others stay compact like Pheno #2. Neither is “better” or “worse”, they simply carry different traits from their genetic background. This diversity is what makes pheno hunting so magical: it gives growers the chance to select the expression that best suits their style, space, and taste.
🐝 The Dognabis Cup is ON! 🐝
This week also marks a special moment, the Dognabis Cup is officially underway! 🎉
Welcoming packs have started arriving at growers’ doors, unboxing photos and videos are already popping up, and the first diaries are live. It’s a joy to see the community coming together.
💌 Invitation
I invite everyone to check out the new Cup diaries, cheer for each other, share experiences, and most of all, have fun. Remember, the more complete and detailed the diaries are, the better your chances to win. And with both autos and photoperiods in the packs, everyone has two chances to shine.
**THE DOGNABIS CUP OFFICIALLY STARTED** ⏰
@everyone
**The Dognabis Cup** is an independent, community-driven virtual competition designed to bring people together, celebrate and share the passion for cultivation. This competition is organized by DogDoctorOfficial and is not affiliated with any of other third-party platforms.
More than 30 contenders will have to grow with the same genetics and using one of our Aptus Pograms (Premium, Clean, Super Soil).
We can follow weekly updates
***(list will be updated all the time as more growers join)***:
🌱 **Dognabis#09P** (**P**hotoperiod)
https://growdiaries.com/diaries/285981-grow-journal-by-sadhus
🌱 **Dognabis#09A** (**A**utoflower)
https://growdiaries.com/diaries/286091-grow-journal-by-sadhus
🌱 **Dognabis #16P**
https://growdiaries.com/diaries/285519-grow-journal-by-fabisfinest
🌱 **Dognabis #017P**
https://growdiaries.com/diaries/285851-grow-journal-by-highgrower0711
🌱 **Dognabis #18P **(**P**hotoperiod)
https://growdiaries.com/diaries/265751-grow-journal-by-develgrow
🌱 **Dognabis #18A **(**A**utoflower)
https://growdiaries.com/diaries/285549-grow-journal-by-develgrow
🌱 **Dognabis #21P**
https://growdiaries.com/diaries/285531-grow-journal-by-mrs-larimar
***Here are some other useful links:***
*Dognabis Cup on Instagram:*
https://www.instagram.com/dognabiscup/
*Explore Aptus Premium Programs:*
https://aptus-holland.com/premium-programs/
*Explore Aptus Clean Programs:*
https://aptus-holland.com/clean-programs/
*Explore Aptus Super Soil Programs:*
https://aptus-holland.com/super-soil-programs/
Happy growing everyone 💚
⸻
🔥 The garden is alive, the Cup is alive, and I couldn’t be more excited. Week 4 flower is just the start of the show, let’s keep pushing forward.
Good luck to all participants, and may the buds be ever in your favor! 🌿💚
📲 Don’t forget to Subscribe and follow me on Instagram and YouTube @DogDoctorOfficial for exclusive content, real-time updates, and behind-the-scenes magic. We’ve got so much more coming, including transplanting and all the amazing techniques that go along with it. You won’t want to miss it.
• GrowDiaries Journal: https://growdiaries.com/grower/dogdoctorofficial • Instagram: https://www.instagram.com/dogdoctorofficial/
• YouTube: https://www.youtube.com/@dogdoctorofficial
⸻
Explore the Gear that Powers My Grow
If you’re curious about the tech I’m using, check out these links:
• Genetics, gear, nutrients, and more – Zamnesia: https://www.zamnesia.com/
• Environmental control & automation – TrolMaster: https://www.trolmaster.eu/
• Advanced LED lighting – Future of Grow: https://www.futureofgrow.com/
• Root and growth nutrition – Aptus Holland: https://aptus-holland.com/
• Soil & substrate excellence – PRO-MIX BX: https://www.pthorticulture.com/en-us/products/pro-mix-bx-mycorrhizae
• Curing and storage – Grove Bags: https://grovebags.com/
⸻
We’ve got much more coming as we move through the grow cycles. Trust me, you won’t want to miss the next steps, let’s push the boundaries of indoor horticulture together!
As always, this is shared for educational purposes, aiming to spread understanding and appreciation for this plant. Let’s celebrate it responsibly and continue to learn and grow together.
With true love comes happiness. Always believe in yourself, and always do things expecting nothing and with an open heart. Be a giver, and the universe will give back in ways you could never imagine.
💚 Growers love to all 💚


Likes
58
Share


@Mrs_Larimar
Follow
Saturday, Feb. 20th.
San fernando Valley Girls were transplanted, and moved into
Bigger Tent, and under the Marshydro SP-3000
They are showing loooong Leaves, They are growing Vigor
and they seem to behappy in their new Envoirement
I did alittle defoiliation-means i cut the Bottom shoots
Lights are running on 50 Percent
If you want to buy the tent or the Lights, here are the Links:
Light: http://bit.ly/marshydro-sp3000
Tent: http://bit.ly/marshydro-120x60tent

Likes
91
Share


@MrCOCO
Follow
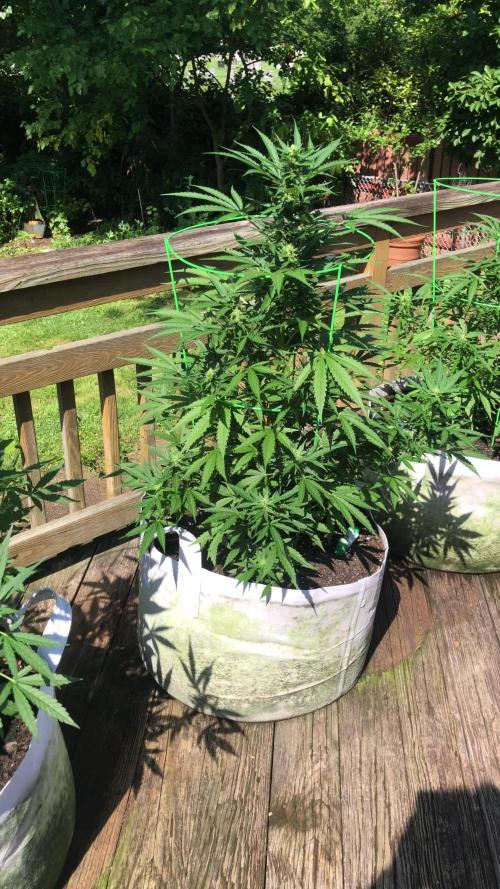
The girls grew up again and are already 110 cm tall. I don't see any problems ... I did supercroping and they are fine too ... We keep going ...🍃🍃🍃

Likes
20
Share


@Bongman
Follow
Hi All,
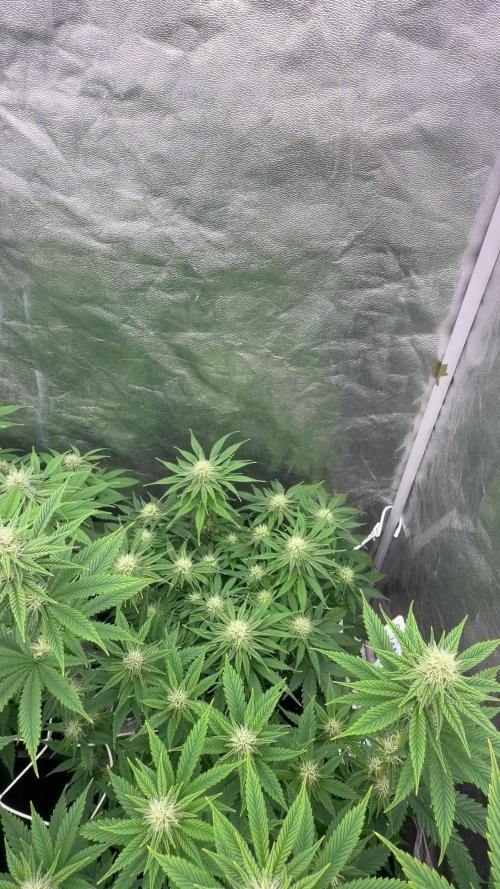
We are approaching harvest and will only use PHed water this week.
Trichomes are mostly opaque and maybe 3-5% amber. This is my first time growing this strain so I don't know how she will finish. So I think I am going to chop part of it and leave the rest to ripen for another week.
So stay tuned...
***Mid-week update***
Week 7 day 5
Made a cut and dried it for a day. Placed it under the microscope and took some photos and video. I think she has at least another week to go. I will only use Phed water this week. Maybe a molasses flush on week 7 day 7. Since this is my first time growing this strain and this is from seed so I might do a first cut and let it really mature for another week or two just to see if the bud will keep swelling up.
Happy growing.
BM
4TweentY
Likes
19
Share


@TylerBud
Follow
hey all😎
im in a middle of vacation and finally had a moment at least to check on the ladies.
they are .. awesomee 😎
big too high , reaching between 2 to 3 meters,
just started to flower , got to make big big maintenance soon. 🤞

Likes
5
Share


@Elevated_97
Follow
I am no longer going to be using the fox farm nutrient line not for any other reason than I just want to switch it up and go with something else before I go into flower. I'm not saying fox farm if a bad line, I just want something different. I feel fox farm is the line you go to when your first starting out and buying from Amazon, not downing anyone I've done it myself we've all been there and it works well for the price. But if you get their full line including Bush doctor and all it gets to be a bit mutch. I haven't went that far yet because of that, I don't want to feel like I have to buy 12 different nutrient solutions and when you do you find out you really only needed 5 or 6. Its for this reason I've decided to go with the Mills line of bottled nutrients their line up is 6 solutions total they are a bit pricy for the 6 one of the bottles being $120.00 US alone, but I'm also a firm believer in you get what you pay for and every resource and review I've seen makes me have high expectations for this nutrient line. Updates soon to come over the next few weeks as I have been currently flushing my plants for the past 2 days getting ready for the new neuts. I flushed with just straight water ph 6.0 the first day and again the next day (today Jul 25) and once again a few hours later with cal mag, silica and a little bit of recharge to help hold the plant over until I feed the new neuts and help ease them in as well. Until next time happy growing fellow growmies

Likes
3
Share

@MindFlowers68
Follow
This week was similar to last week. Rain every other day with intense sun. There were no major changes I made. I did slide my pots over a few feet to try to catch more sunlight. Mainly just been on scouting duty making sure there are no questionable bugs hanging around. A few things seem to take a liking to them but leaving them lone for the most part. One thing I noticed with the autos is that they seemed to adapt a whorled phyllotaxy along with the lemon ak that started with 3 from seed. They got their weekly does of boogie brew, but think I will stop feeding after this week.
Likes
29
Share


@nonick123
Follow
Día 6 (29/04) Spray solo agua el top del sustrato. DLI 13
Día 7 (30/04) Spray solo agua el top del sustrato. DLI 13
Día 8 (01/05) Spray solo agua el top del sustrato. Subo a DLI 17
Día 9 (02/05) Elimino la cúpula casera de humedad y empiezo a regar con 300 ml solo agua
Día 10 (03/05) Empiezo a luchar con una ola de calor inesperada para esta época, que me trae temperaturas exteriores de 30 ºC y humedad relativa del 30%...
Mantengo la cúpula casera de humedad
Día 11 (04/05) Hace muchísimo calor.. 30 °C. A ver como lo llevan
Hago un invento casero para aumentar la humedad
Día 12 (05/05) Primera alimentación con Aptus! 300 ml H2O + Regulator 0,15 ml/l + CaMg-Boost 0,25 ml/l + Startbooster 0,25 ml/l - pH 6.2
Creo que las plantas se ven un poco pequeñas para tener 12 días... esperando por explosión de crecimiento en los próximos días....
💦Nutrients by Aptus Holland - www.aptus-holland.com
🌱Substrate PRO-MIX HP BACILLUS + MYCORRHIZAE - www.pthorticulture.com/en/products/pro-mix-hp-biostimulant-plus-mycorrhizae


Likes
5
Share


@CreamyNuggets
Follow
Sorry for the long time no update. Work got busy and I haven’t had the time to update this. Flower has gone pretty smoothly and the girls are getting ready to finish up. I have 3 bubba pupils in the tent at the moment, with a reservation privada purple wreck, freedom of seeds Godberry, and a serious seeds AK-47. The bubba pupil phenotypes look to be all the same. Low yielding with some extremely resinous quality buds. The smell is funky and grapey. The bubba pupil buds look like they’ll be all finished up in about 1 week to 10 days. Most of the trichomes are milky, and I have yet to spot any that have turned amber. The purple wreck is starting to purple out and probably has 2 weeks and some change left. The Godberry is probably the most resinous plant, and looks like it will be the second heaviest yielder next to the AK-47. The resin on the Godberry is extremely fruity, and leaves your fingers smelling like a bowl of fruit loops after plucking a few fan leaves. The AK-47 is the fattest bitch of them all. Big colas everywhere across its canopy and they’re falling over because I did not install a trellis on this grow. The AK-47 has an old school funk to it, and has around 5% amber trichomes. I’m thinking I will start to flush her at the start of week 8 (in 3 days) and let her finish up at a full 8 weeks.

Likes
21
Share


@BigDaddyK
Follow
2 plants in middle
Smashing it , look at the roots - Katana = trust me 👍
Change Monday’s
Big one eating 14 ml A+b a day

Likes
7
Share


@GeTxShiFtY
Follow
Flowering Week 9:
23.03.2026 - 30.03.20206
Permanent Whitemarker began to purple up in this week. It starts turning the white pistols into orange. Smells really strong!
The Platinum Mimosa Cookie got watered on the 28.03.2026 for the last time and received some time without water to predry and turn its last energy into the buds.
The Crazy Roze is turning out really nice in this week and also doesnt needs too much time2be done! Terps are smelling insane! It looks like it got some purple genetics in it and is turning the pistols also orange this week!


Likes
16
Share


@KushManF
Follow
Started low stress training this week. Still doing every 2nd day nutrient feeding. Good growth so far. Let’s see how LST goes, only issue with LST is that plant keeps obviously growing towards sun. But I am monitoring it to check the angles it’s growing at.

Likes
5
Share

@PurpleBeen
Follow
Week 4 / flowering
Everything is going very well. The pistils are swelling rapidly at the start of the fourth week. Monster, PK, 52, and 34 are all showing strong development. I’ll gradually increase the Bloom nutrients and add Crescendo Plus Booster subsequent to the final two irrigations using humic acid and low-EC water (~500 ppm), the crop is ready for controlled fertilization
Repotting : 23/04/2026
12/12 swtich:15/04/2026
Middle: Strawberry Lemonade 16-20l x2
Background : Amnesia Lemon :11l x2
Front : Cherry Mc Muffin 7l / Oreoz : 11l
Topping : 01/05/2026
Light : 60cm-75cm / 75-100% dimmer
24-26 degrees / 30-40 % hygro
22-24 degrees
Watering is light at this stage — around 1l2;2;2l5 depend pot size ( 1. watering humic ; 2. if plants show excess signs(1) if not, 3. watering with fertilizers flower )700-1000 ppm calmag 1/2 watering

Likes
10
Share


@Kosta_boy16
Follow
14 weeks old , First day of week 15 😬
New white pistils .. and leaves yellowing
Trichomes getting milky no amber as yet started a flush for a few days will assess again , somewhat fuller bud
But def need a higher watt light and scrog to get the most out of the plant I think , main cola seems most tight as it’s been closer to light
Good learning experience not bad for first grow
Buds are sticky :)


