
Likes
Comments
Share


Likes
8
Share


Likes
18
Share


@Chubbs
Follow
420Fastbuds
GelatoAuto
Week 5
What up grow fam. Hopefully everyone had a great 420. These 3 beautiful ladies are growing amazing. Started there transition into flower this past week. So where starting to get some great growth and all in all the plants look super healthy. Happy Growing


Likes
51
Share


@eldruida_lamota
Follow
Bueno resumiendo cookies gelato es una variedad híbrida muy fácil de cultivar pero ojo, cuidado con los últimos riegos si no queréis perder cosecha por moho. Lo demás de 10 pegada heavy sabor increíble, cogollos duros como rocas y bañados de una gran capa de polen.
El ambiente del secado se mantuvo en 23 grados de media y la humedad estuvo por debajo de los 45% en todo momento.
Poco más la verdad estuve encantado de poder cultivar una genética tan potente .
Un saludazo que paséis un final de año increíble y por supuesto buenos humazooos💨💨💨.

Likes
26
Share


@CannaBoy7
Follow
#myseed.ge
#soil-N1
#mysun.ge
#GROWROOM
#MYSEED-GROWROOM
it was the transplant week, everything is going perfect <3

Likes
120
Share

@Hologram
Follow
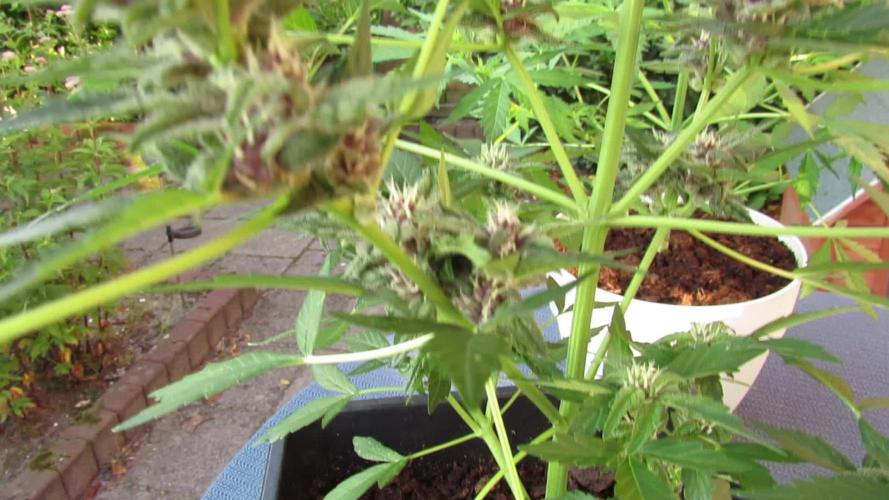
OK, im doing an update now becouse my breakup cake is going tranny!!(hermie)
I already have noiticed she was not growing as strong .. but u can blame that on anything , especially when growing outdoor..
but this morning i saw that she was g(r)oing 'bananas'!😢
I have put her aside from the rest (in the back of garden) but think gonna have to terminate her asap!..(and i will, right after this post👍)
The weed she will give will be filled with seeds and those seeds will be hermies too, so wothless..
and if i dont throw her away quick she can infect the rest.
So goodbye breakup cake..😢
who wants to eat a cake when they are breaking up anyway..😒 (just hiding my pain with lame humour 😳)
happy growing for all ✊

Likes
38
Share


@Crownlaura
Follow
10 weeks / 70 days old today.
Buds are all a bit fatter and a bit frostier this week! They glisten in the light and and are well and truly coated.
Noticed a few leaves with brown spots this week and after reading up I decided it could be a calcium deficiency. Gave a cal mag feed and monitored and no more brown spots have appeared. We’re pretty close to the finish line now so not sure I’ve done the right thing or whether I should just let it be. Few more old leaves at the bottom started to yellow so chopped them.
Some trichomes are starting to turn milky but majority are still clear. Haven’t bothered with a picture because it’s so hard to get a clear one.
Still taking up lots of water and giving 3ml of bloom nutrients in every water. Been reading lots about flushing and I’m not sure whether to do it. Read lots that say if it’s cured properly then there isn’t any difference to the taste. I think half the battle is knowing when to do it. How does a beginner know when you’ve got 2 weeks left?!
Been tempted to chop off the popcorn buds and so glad I didn’t. I put some bulbs lower down to give them plenty of light and they’re fattening up pretty well.
Bit worried again about the space issue. Lots of new pistils have sprouted and most are around the top buds. Read that it could be foxtailing due to light stress but could also just be buds fattening out and having a last try at pollinating 🤷🏻♀️ who knows!
Overall another exciting week getting closer to the finish.
Booked our summer holiday for August and trying to decide whether to start a new grow when these finish. there’s a risk they might not be done in time but I’m desperate to try again and improve on this one. I have well and truly got the grow bug!!

Likes
11
Share


@ButterfliesLittleFarm
Follow
Hello Diary,
In the end I can only say well done Royal Queen Seeds.
I have grown a total of 4 out of 8 new hybrid F1 strains so far and all of them exceeded my expectations.
Apollo F1 is no exception, although it was the smallest on the Farm, the flowers are the hardest and incredibly fragrant.
During the entire cycle of growth and development, it proved to be very resistant, so that the plant looked impressive until the very end.
The effect of Apollo F1 is relaxing, so I can consume it during my free time as well as when I am engaged in some creative work. It certainly removes stress and bad mood.
At the end of drying, I got a little less than 50g, 49g to be exact, which is satisfactory especially because of the high quality flowers.
I think I have mostly written everything that I thought was important, if anyone reading this text has any questions about Apollo F1, feel free to ask, I will be happy to answer.
I would like to thank everyone for their support and comments, and especially Royal Queen Seeds for their many years of support.
Likes
126
Share


@ScotlandDrGreen420
Follow
Day 2 : Plant is looking nice and healthy , will update pics later , as for today , snow man building with the little man :)
Day 3 : ppms sitting at a stable 650 , little dawg is looking awesome, starting to bulk right up!!
Day 4 : dawg drank 4 litres of water and 120 ppms overnight , upped ppm to 750.
Day 5: This little dawg just keeps on drinking haha... Further stretch and bud sites starting to open up.
Day 6: slight defoliation and tightened wires to open the inner branches


Likes
10
Share


@DaddyPrime2
Follow
6/19/2024 this plant is short and stinky as fuck even as a cutting. Excited for this next run I'm doing. The last clones from this nursery, were the rs11 and purple octane and those were phenomenal. Let's see where this goes yall
6/25 been staring at her trying to envision how to go about training or topping. She's short and the lower branches are fairly prominent and reaching close to main stem. I will probably Top her after she starts growing regularly and gives me some more to work with.


Likes
10
Share


@CanarianGrow92
Follow
Week 2 vegetation for the ztrawberry from fastbuds 420.
All good at the moment, we are testing the xpert line with these girls.
1ml of master grow A+B
1ml of master root
We removed the 2 lowest sets of leaves and branches. We do this because we have the girls in 7 liters and quite some plants together, so i prefer to concentrate on the main bud and only some side buds
Likes
8
Share


@snoopdogguy
Follow
I basically skipped week 17 as there was nothing new except I added some compost tea that I made with come compost, vegetable scraps, a few cedar clippings and neam oil (oh and some fertilizer ... I forget what)
Sprayed with neam oil/soap mix

Likes
71
Share


@DogDoctorOfficial
Follow
Week 11 Flower Report for the Anesia Run 🌸🌿
Hey Grow Diaries fam! 🌱✨
Welcome back to another exciting update on our Anesia run. We’re deep into Week 11 of flower, and let me tell you, the garden is absolutely thriving! The girls are showcasing their full potential, and the canopy is a vibrant sea of frosty buds. Grab a cup of your favorite brew, sit back, and let’s dive into this week’s report filled with fun facts, details, and a sprinkle of positivity! 🌟🌸
Nutrient Update 🌿🔬
This week, we’ve continued with our nutrient regimen, making a few key adjustments to ensure the plants are getting everything they need to produce those sticky, resinous buds. Our mix includes:
• Regulator: Keeping the plants’ stress levels in check and ensuring optimal growth.
• CalMag: Providing essential calcium and magnesium for strong cell walls and overall plant health.
• P-Boost: Enhancing flower development and increasing bud size.
• K: Introducing potassium to boost bud density and improve overall flower quality.
• Top Booster: Supporting the final push in flower production, ensuring those buds are as big and healthy as possible.
Our TDS has been adjusted to 500, with a pH of 6.0, keeping the environment perfect for nutrient uptake. 🌿💧
Environmental Control 🌞🌡️
Temperatures have been steady at 21°C, creating the ideal environment for our girls. Consistency is key in these final stages, as we want to avoid any stress that could affect bud development. 🌡️
Fun Facts & Details 🌸✨
1. Trichome Wonderland: The trichomes on these ladies are sparkling like diamonds. Did you know that trichomes are the plant’s way of protecting themselves from UV rays and pests? They also contain the highest concentration of cannabinoids, making them the heart of the plant’s potency.
2. Pistil Party: The pistils are starting to turn a beautiful amber, signaling that harvest time is approaching. Fun fact: pistils are the female part of the flower and are responsible for catching pollen to produce seeds. In our case, no seeds, just beautiful, potent buds!
3. Aroma Explosion: The terpene profile is off the charts. Walking into the grow room is like stepping into a fragrant garden. Each strain has its unique scent, from the sweet and fruity notes to the pungent and earthy undertones. Did you know terpenes not only provide aroma but also enhance the effects of cannabinoids through the entourage effect?
4. Leaf Yellowing: Some of the lower leaves are beginning to yellow and fall off. This is perfectly normal as the plant focuses its energy on bud production. It’s a sign that our girls are nearing the end of their life cycle, putting all their effort into flowering.
5. Bud Density: The buds are getting denser by the day. Proper potassium levels have been crucial in achieving this. Dense buds mean more weight and better quality, making all our efforts worthwhile.
Special Shoutouts 🌟❤️
A massive thank you to our amazing community and all the support we get on Grow Diaries! Your comments, tips, and encouragement mean the world to us. 🌍✨
Anesia Seeds, thank you for these incredible genetics. Each plant is a masterpiece in its own right. 🌱❤️
To our sponsors Aptus Holland and Future of Grow LED, your products have been pivotal in creating this green oasis. And let’s not forget the TrolMaster for keeping our environment in check.
For everyone following along on YouTube, don’t miss out on our series Welcome to the Green Oasis. This week’s episode dives deep into the latest updates, techniques, and everything you need to know about growing these beautiful plants. 🎥🌿
Invitation 🌟
Don’t forget to check out our YouTube channel for more detailed insights and exclusive content. Let’s grow together and spread the positivity! 🌿🌞
Conclusion 🌸✨
Week 11 has been a journey of growth, learning, and joy. The girls are almost ready to reward us for our care and patience. Stay tuned for the final stages as we approach harvest, and as always, keep growing and glowing! 🌟🌱
Thank you all for being part of this journey. Until next time, happy growing! 🌿❤️
#GrowDiaries #AnesiaSeeds #AptusHolland #FutureOfGrowLED #TrolMaster #CannabisCommunity #HomeGrow #CannabisCultivation #PositiveVibes #KeepGrowing #WelcomeToTheGreenOasis #Episode11
Apricot Oreoz = AO
Zoomiez = Z
Future#1 = F
https://anesiaseeds.com/
Plant nutrition - Aptus Holland - https://aptus-holland.com
LED Photons - Future of Grow - https://www.thefuturofgrow.com/
Controls - Trol Master - https://www.trolmaster.eu/
Watering - Autopot - https://autopot.co.uk/
Tent - Mars Hydro - https://marshydro.eu/
Love and attention - Me, myself and i
As always thank you all for stopping by, for the love and for it all , this journey of mine wold just not be the same without you guys, the love and support is very much appreciated and i fell honored and blessed with you all in my life, With true love comes happiness. Always believe in your self and always do things expecting nothing and with an open heart , be a giver and the universe will give back to you in ways you could not even imagine so
More info, the ocasional give-away and exclusive updates from all my adventures can be found - links in the profile description
Friendly reminder all you see here is pure research and for educational purposes only
Growers Love To you All

Likes
6
Share


@Faradumnezeu
Follow
Дал на начале недели дельту по листу, после выключения лампы.
Очень заросла но стричь не буду, до стрижки целых две недели.
Много веток тоже не порезал, посмотрим как будет далее

Likes
9
Share


@Lifesgarden420
Follow
This lady is getting better every week
All of her sisters are too
Amazing genetics with amazing nutrients


Likes
7
Share


@Sabac
Follow
Primera semana. De mis plantitas.
Creciendo sanamente. Hay 2 que se quedaron un poco atrás en crecimiento, las 17 restantes todas parejas. Esperemos que sigan creciendo de forma normal y sin problemas.


