


Likes
3
Share

@pareto
Follow
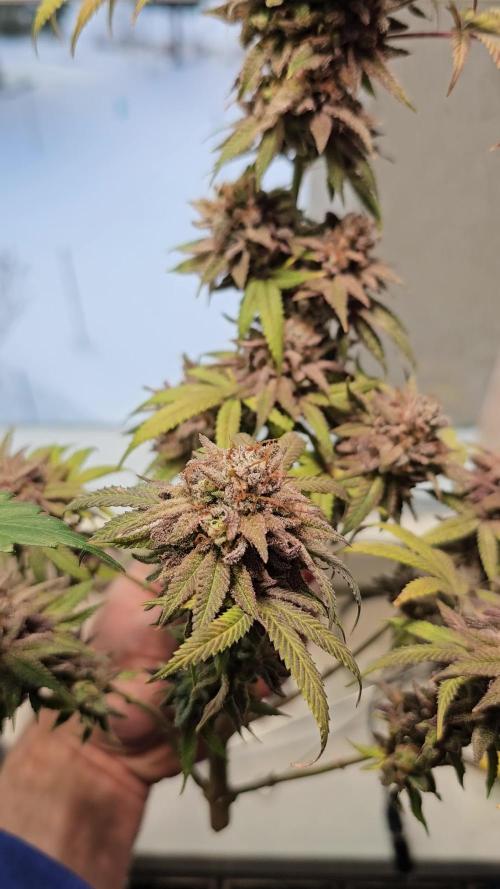
All in all I am quite happy with how things turned out. I got to use the short days to grow a photoperiod. This was not planed though, since it was packaged as a Skunk Auto.
I think its Lemon Orange. Saw it grow before and it really looks the same. Smell is also in the neighbourhood
After drying I saw that almost everything was modly. Had to throw almost the whole plant away.
Runtime: 141 days
-----------------------------------------------------------------------------------------------------------------------------------------------------------------------------
Set up cost (fixed costs)
-Lamp: 40€
-Timer: 3,5€
-Pot: 4€
-Total fixed costs: 47,5€
Given 5 years (or 15 grows) usage time translates to around 3,17€ per grow in materials.
Variable costs:
-Seed: 5,54€
-Soil: 4,5€
-Fertilizer: 3,50€
-Power: 28,64€
-Total variable costs: 42,18€
-Total costs per grow: 45,35€

Likes
Comments
Share


@GERGrowDesigns
Follow
Welcome to Flower Week 2-3 of Divine Seeds Auto White Widow
I'm excited to share my grow journey with you all as part of the Divine Seeds Autoflowering Competition 2025. It's going to be an incredible ride, full of learning, growing, and connecting with fellow growers from all around the world!
For this competition, I’ve chosen the Feminized Automatic strain: Auto White Widow
Here’s what I’m working with:
• 🌱 Tent: 120x60x80
• 🧑🌾 Breeder Company: Divine Seeds
• 💧 Humidity Range: 50
• ⏳ Flowering Time: 58 Days
• Strain Info: 20%THC
• 🌡️ Temperature: 26
• 🍵 Pot Size: 0.5l
• Nutrient Brand: Narcos
• ⚡ Lights : 200W x 2
A huge thank you to Divine Seeds for allowing me to be a part of this amazing competition and Sponsoring the Strains. Big thanks for supporting the grower community worldwide! Your genetics and passion speak for themselves!
I would truly appreciate every bit of feedback, help, questions, or discussions – and of course, your likes and interactions mean the world to me as I try to stand out in this exciting competition!
Let’s grow together – and don’t forget to stop by again to see the latest updates!
Happy growing!
Stay lifted and stay curious!
Peace & Buds!

Likes
10
Share


@Lazuli
Follow
What a fat dense buds she got, i switch to overdrive now and some calmag, no more nitrogen so she is faded at week 12 and ready for harvest


Likes
Comments
Share


@JardineiroBr
Follow
Essa planta vou tocar sem treinamento pois acho wireless o caule está frágil na base.

Likes
1
Share


@UDUDUDUDU
Follow
lost one, i think ants ate it. de rest r solid, and one is a miniature ?
Likes
48
Share


@DreamIT
Follow
💐🌟HESI contest🌟💐
💮 15.2...
💮 16.2 New videos a bit strange, but weed is also this 🤣🤣🦄💚new updates later, yeah!
💮 17.2
💮 18.2
💮 19.2
💮 20.2
💮 21.2
____________________________________________________________________________________
❕❗❕ Do you already know HESI products?
Take a look at the details You will be fully satisfied 😉
👀 https://www.hesi.nl/en/products
📜 A look at the details of what I'm growing 📜
🍓🍌🍇Strawberry Banana Grape by Seedsman🍇🍌🍓
⚧ Gender
▪️ Feminised
➰ Genes
mS
🎄 Genetics
▪️ Strawberry x Grape x Banana OG
🚜Harvest
▪️ 400 - 500 g / m²
🌷Flowering
▪️ 60 - 65 days
✨THC
▪️ 15.0-20.0%
✅CBD
▪️ 1.0%
🏡Room Type
▪️ Indoor
🌄Room Type
▪️ Outdoor
🕋Room Type
▪️ N/D
🎂Release Year
▪️ 2019
__________________________________________________________________________
📷🥇 Follow the best photos on instagram 🥇📷
https://www.instagram.com/dreamit420/
🔻🔻Leave a comment with your opinions if you pass by here🔻🔻
🤟🤗💚Thanks and Enjoy growth 💚🤗🤟

Likes
1
Share


@Reubenrubbish
Follow
Dry weight including airy lower buds from 6 plants is roughly about 16-17 oz.

Likes
25
Share


@festaOG
Follow
I have checked the plants and one plant is now showing about 10% amber trichomes on old growth. New growth clear.
Starting to see some nice colour changes across the canopy.
Have fed them a weaker feed to start the week but included a microbe tea.

Likes
9
Share

@Legendaryseedthumb
Follow
Harvest about a week early to not get any amber thricomes.
The buds look amazing so sugary don’t want them to become amber.
Will press like 70-80% into rosin. So don’t want no ambers’s.
Otherwise this strain was amazing to grow! It was super stable all the time and produced some
Sick buds for me! This shit smells like gods v*gina!

Likes
49
Share


@FoTwenny
Follow
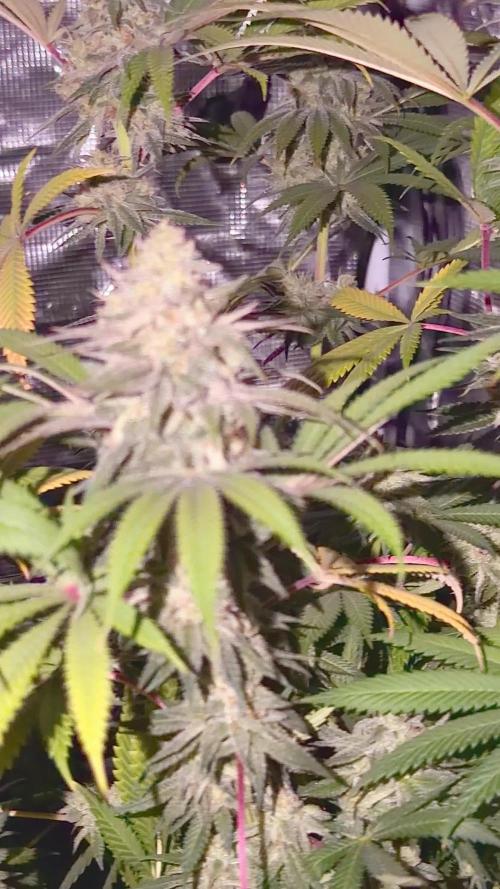
🗓️ Week 17: 3/23 - 3/29
📆 Week 7 of 12/12
🌄 The plant is starting to go into senescence and presenting some beautiful colors as she begins to fade.
💡 Received new lighting courtesy of Growers Choice. They sent me the ROI-E420 with the Master Controller. First impression is amazing. Looks and feels like very high quality build. The spectrum seems more blue than the 3000k lm301H Kingbrite bars I have been using. The bars are thinner and packed with a lot of diodes, so they do run a little hotter than the KB at full power. I adjusted and now running them at 90%. For now the Kingbrite bars are being used as side lighting dimmed to about 30-35% depending on Grow room temps.

Likes
14
Share


@TOMI08
Follow
47.nap
A elkezdtem finomat adni nekik
Hesi tnt 10ml 10l víz
Hesi supervit 2csep 10l víz
Plagorn alga bloom 2.5ml 10l víz
Ph 5.8
Mint este esövizzel premezem őket imádják!
Ezek a tápok hihetetlenül működnek kis mértékben is!
2hetente fogom 0.7ml növelti a tápanyagokat
Holnap kapnak neem olajat permetezve 2ml 0.5l víz
Likes
11
Share


@CURATI_DA_SOLO
Follow
Questa settimana lei ha dato uno scatto di crescita veramente enorme! E arrivata facilmente a 1 metro di altezza (mi arriva al mio gomito) Si iniziano a sentire un po' di dolci odori, molto leggeri ma ci sono! I pistilli iniziano a riempire i calici e le punte tendono a diventare più chiare (simbolo di inizio fioritura) non mi aspettavo tutta questa crescita considerato si è beccata 2 topping , uno al 5 nodo e li altri due al secondo uno da destra e l'altro da sinistra...si è veramente ripresa stupendamente anzi in realtà non ha mai dato segni di rallentamento! Ecco perché io adoro le genetiche di ANESIA ! Sono veramente stabili , segno di numerosi incroci! Anche i loro fertilizzati sono veramente ottimi grazie al biopotenziatore adesso cresce il micelio nel mio substrato!!! Mai vista una cosa del genere prima! Sul serio tutta la potenza in solo 3 prodotti! Ringrazio veramente i ragazzi di anesia per queste splendide genetiche ! Per non parlare della semplicità di preparazione! Grazie ancora a tutti voi per essere sempre in prima linea con i vostri commenti e likes! 🌈🌱🌈 Auguro una buona giornata a tutti voi!!!!😘

Likes
10
Share


@AMNESIAHAZEPK
Follow
OKAY SO I KEPT THEM IN MY DIY SETUP FOR A WEEK AND GAVE THEM THEIR FIRST SUNSHINE TODAY 04/28 NOW THEY ARE ON A 24HR LIGHT SCHEDUELE. SUNRISE IS 5:30AM AND SUNSET IS 6:45PM.
I SHIFT THEM OUTDOOR AT 2:00AM AND THEN GET THEM INDOORS AT AROUND 6:30PM UNDER CFL LIGHTS SO NO LIGHT TIME IS FROM 2:00AM TILL SUNRISE WILL KEEP THEM LIKE THIS THROUGH OUT THEIR VEGETATION.
ATM I HAVE'NT ADDED ANY NUTRIENTS OR SOIL. BUT I WILL BE ADDING LIQUID NUTRIENTS NPK 40:20:20 FOR VEGETATION IN THE NEXT WEEK.
I NOTICED A YELLOW DECOLOURATION ON THE EDGES OF THE COTYLEDONS OF ONE PLANT BUT SINCE IT WAS THE FIRST DAY OUTDOORS I THINK IT IS HEAT STROKE PLUS I HAD TO MAKE A MAKESHIFT DOME TO KEEP THE BIRDS AWAY (OUTDOOR PICTURE ATTACHED) TOMORROW I WILLSHIFT THEM IN A GLASS MADE GREENHOUSE WITH VENTILATION SO WON'T BE NEEDING THE DOMES.
KEEP IN MIND THIS IS MY SECOND GROW IN MY REGION (PAKISTAN) AND THE FIRST ONE WAS AMNESIA HAZE AUTO FROM ROYAL QUEEN. THIS YEAR I AM PLANNING TO PLANT
SOUR DIESEL
AMNESIA HAZE
NORTHREN LIGHTS
AK 47
YOU CAN CHECK OUT MY DIY INDOOR GROW SPACE IN THE PICTURE ATATCHED IT'S MADE OUT OF SOME MATERIAL I HAD FROM MY PHOTOGRAPHY STUFF
I HAVE ALREADY STARTED WITH THE SOUR DIESEL FINGERS CROSSED AND I'LL START PLANTING THE OTHER ONES IN THE COMING WEEKS.
Add me on Snapchat! https://www.snapchat.com/add/amnesiahazepk!!


Likes
105
Share


@PEAKYPLANTERS
Follow
Hello weed green thumb friends
My experience with these girls was fascinating, although as often happens the phenotypes seem to be totally different... there is always one who is born to become your favorite 😜
My favorite girl has grown some WONDERFUL flowers and I am so impressed with her huge resin filled flowers.....mmmmmm I can't wait to get my mouth on them 😋

Likes
5
Share


@MadeInGermany
Follow
Harvest day 68
since time switch
to 12 / 12 h
Hey guys :-)
Finally it's time 💚
The lady is done the large leaves have been removed and hung upside down to dry in the dark drying room.
You can now stay there for 13-15 days at a temperature of 18-20 degrees and 55-62% humidity.
After 13-15 days it is neatly trimmed by hand and placed in jars with boveda packs 62.
After 4 weeks Boveda 58% come in and are ready for testing ;-).
After everything has been cut cleanly, the last update comes with the smoke report and the finished pictures.
Let's get to the plant 💚.
First of all I would like to compliment Green House for this genetics.
Unfortunately, the rating system at Growdiaries is a bit strange because I have to give the stars before the Smoke Report and in the end it might have led to more stars in terms of taste.
The growth was great from start to finish.
She had no problems at all and also had no problems with animals 👍.
I'm amazed at the great smell the beautiful buds give off😀.
Of course I cut cuttings and if the taste is as good as the smell it will be grown again ☺️.
A final report comes with the Smoke Report.
Until then, I would like to say thank you to the whole Green House team and wish you all the best fun with the diary 💚🙏🏻
Have fun and stay healthy 💚🙏🏻
👇🏼👇🏼👇🏼👇🏼👇🏼👇🏼👇🏼👇🏼👇🏼👇🏼👇🏼👇🏼
‘Powered by GreenHouse Feeding’
Copy the link for 10% off all Nutrients 👇🏼
http://shop.greenhousefeeding.com/
affiliate/madelngermany_passiongrower/
👇🏼👇🏼👇🏼👇🏼👇🏼👇🏼👇🏼👇🏼👇🏼👇🏼👇🏼👇🏼
Water 💧 💧💧
Osmosis water mixed with normal water (24 hours stale that the chlorine evaporates) to 0.2 EC. Add Cal / Mag to 0.4 Ec Ph with Organic Ph - to 5.8 - 6.5
MadeInGermany
Likes
5
Share

@Nony_grows
Follow
Flowers are starting to form and I’m just watching these closely because it’s my first time running them and I’ve seen a few people have issues with herms

Likes
54
Share


@Mr_Horse
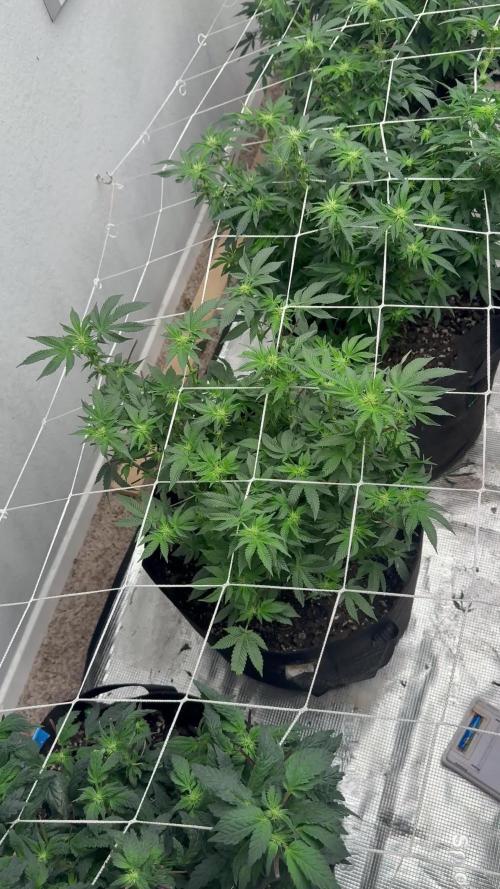
Follow
Everything looking great going into week 9, very exciting watching these ladys mature. Height management was difficult this run due to lack of training uniformity. Maxed out light height as these ladies are still quite tall even with intense LST.