
Likes
Comments
Share


@MG2009
Follow
07/30/2023
Begining week 3 of veg and growing. AK #1 up to 9.5", AK #2 is up to 6.",, Bruce Banner is up to 9".
Hope for big growth this week🙏🏻 I will do no training for fear of slowing them down.
But top dress with 5-2-4 and will change to flowering food
08/03/2022
Week #3 day 4 Bruce Banner is showing some pistols, starting to feed Big Bloom, first of her biweekly feedings
Description of Bruce Banner Auto - Ganja Farmer Seeds
Are you in search of a real hidden strength and power? The solution is an autoflowering strain Bruce Banner Auto from Ganja Farmer Seeds. It is an extremely productive Sativa-dominant plant. The concentration of THC can reach even 25%! Those traits do not come as a surprise as it is based on Bruce Banner and Gorilla Cookies Auto. It can grow up to 130 cm. These feminized marijuana seeds are unusually productive. What is the aroma of this potent strain? A delicate fruity and flowery aroma combined with earthy notes. The effect is surely strong and affects mind and body. It is long lasting and will stimulate imagination of every cannabis enthusiast.
Data sheet of Bruce Banner Auto
Genetics: Bruce Banner x Gorilla Cookies Auto
Flowering type: Autoflowering
Strain type: Autoflowering
Sex: Feminized
Indica/Sativa/Ruderalis: 41,1/58,7/0,2 %
From seeds to harvest: 9 weeks
Height Indoor: 50-110 cm
Harvest Indoor: 400-500 g/m2
Harvest Outdoor: 50-150 g/plant
THC: 18-25 %
CBD: 0,1 %
Taste: Fruits, Sweet, Earthy, Diesel, Floral
Effect: Happy, Creativity boosting, Stimulating
General specification of Bruce Banner Auto
Brand Ganja Farmer Seeds
Seed type
Seed type Autoflowering
Sex
Sex Feminized (100% females)
Flowering type
Flowering type Autoflowering
From seed to harvest
From seed to harvest Very short (up to 65 days)
Indica or Sativa
Indica or Sativa Mostly Sativa
Height
Height Short
Yield
Yield High
THC content
THC content Very high (+20%)

Likes
Comments
Share


@The_Feral_Planter
Follow
A week of INCREDIBLE Growth! I've turned down the intensity of the light to encourage them to stretch more towards the net.
They share the 2x4 with a Photoperiod that is now 50 Days old and flipping to flower... from here on the Orange Panda will be under 12/12 until she is ready to harvest. At about 22 days old, I think she will do just fine.
Thanks for looking through my diary, make sure to watch the short video to get a bit more info in a shorter amount of time. I'm not the best with writing these up, and it's more difficult only adding PH water and Recharge occasionally...

Likes
27
Share


@TheCannaProphet
Follow
------------------------------------
~SEEDSMAN PEYOTE ZKITTLEZ~
------------------------------------
Description
Peyote Zkittlez is an Indica-dominant hybrid strain bred by pollinating Peyote WiFi with the sweet-tasting Zkittlez. Peyote WiFi is itself a cross of Peyote Purple and the US Indica WiFi strain. Zkittlez is a 3-way cross of Grape Ape, Grapefruit and a third, top secret, strain.
Peyote WiFi is an Indica-dominant strain which is a cross of Peyote Purple, derived from a single purple phenotype which was back-crossed for several generations to cement its qualities, and WiFi, a US Indica strain created by crossing The White with Fire OG. This plant is medium-sized with large, broad leaves and takes around 75 days of flowering before it is ready to harvest producing very generous yields of highly potent weed - up to 650 gr/m2 indoors and 1500 gr/plant when cultivated outdoors. The THC potential of this strain is very high with plants attaining 26 - 28%.
Zkittlez is a sweet-tasting Indica-dominant (80%) cannabis strain which produces high yields boasting high levels of THC. This is a very colorful strain displaying green and purple colors with bright orange pistils.
Zkittlez is a 3-way cross between Granddaddy Purple, Grapefruit and Afghani. It is suitable for growing in all environments and takes between 60 - 65 days to complete flowering indoors. Outdoors it will be ready to harvest during late September in northern latitudes. Yields are very good and vary between 450 - 600 gr/m2.
Zkittlez' scent is very sweet and entices with ripe tropical fruits and candy which also follow through in the taste as well. THC production is in excess of 20%. The effect is very uplifting, especially for an Indica strain. Therapeutically it is used to combat stress, depression and anxiety as well as for those with ADHD.
Peyote Zkittlez will make a superb, highly potent and high-yielding Indica-dominant addition to all seed collections which is certain to become a growers' favorite. Get yours from Seedsman now.
*description credit to Seedsman Seeds
__________________________________________________________________________________________________________________________________________________________________________________________________________________________________________________________________________________________________________________________________________________________________________________________________________________________________________________
BREEDER/BRAND: Seedsman
PRODUCT TYPE: Seeds THC
GENETICS: Peyote WiFi (The White x Fire OG) x Zkittlez
VARIETY: Mostly Indica
FLOWERING TYPE: Photoperiod
SEX: Feminized
THC CONTENT: 20%+
YIELD: Indoors: up to 650 gr/m2; Outdoors: up to 1500 gr/plant
GROWS: Indoors, Outdoors
FLOWERING TIME: 60 days
MEDICAL CONDITIONS: Anxiety, Depression, Stress
MEDICINAL PROPERTIES: Yes
EFFECT: Powerful, Relaxing
__________________________________________________________________________________________________________________________________________________________________________________________________________________________________________________________________________________________________________________________________________________________________________________________________________________________________________________
THE SETUP:
~Planted into Jiffy Peat Pellets that were hydrated with de-chlorinated water with SuperThrive added then ph'd to 6.0 @ 80℉
~Grown 100% organic in 10g fabric pots with Mother Earth 70/30 Coco/Perlite medium amended with 2tbs/g of Down To Earth 4-4-4 / 2 cups/g of Earthworm Castings / 1tbs/g of Dr. Earth Flower Girl 3-9-4, 1tbs/g of Dr. Earth Bat Guano, 3/4 cup of Down To Earth Azomite and 1 tsp/g Down To Earth Fish Bone Meal.
~24hr light cycle during Germination / 19/5 light cycle for Vegetation and 12/12 for Flower
~Straight water ph'd @ 6.2-6.8 when needed and weekly Compost Tea's.
__________________________________________________________________________________________________________________________________________________________________________________________________________________________________________________________________________________________________________________________________________________________________________________________________________________________________________________
WEEKLY UPDATES:
9/20- 💥BOOM!💥 Week Six of flower is here and my girl's in high gear, stacking her flowers and pumping out trichomes!
Today I watered her with 1.5g de-chlorinated water with 5ml/g of Botanicare CalMag+ added, then ph'd to 6.2 @ 72℉. I turned her pot and plucked a couple of yellow shade leaves...the basic daily maintenance.
9/22- I didn't water her yesterday as she looked great and was 'praying' hard. Today she was given 1.5g of de-chlorinated water which was ph'd to 6.2 @ 72℉ which I gave her through her drip pan (bottom chuggin) and I also gave her pot a turn.
She continues to pile on the trichomes and is taking on a exquisite purple hue to her flowers! She is definitely one of the most photogenic cultivar's I've grown, especially with her 'Triple Headed flower', and is looking lovelier by the day! 😍
9/24- We're getting close to wrapping up Week Six of flower in a couple of days, which will put her around two or three more weeks from finishing, with the most exciting weeks yet to come!
I didn't water yesterday and today I went ahead and Top Dressed her with 2 tbsp/g Dr. Earth Flower Girl 3-9-4, 1 tbsp/g Dr. Earth Gold Premium 4-4-4, 1/2 cup Down To Earth Bio-Fish, 1/3 cup Down To Earth High Phosphorus Bat Guano and 2 cups of Worm Castings.
I watered in the Top Dress with 1.5g of de-chlorinated water which was ph'd to 6.2 @ 72℉ and let her enjoy her meal! 😜
9/26- After her heavy watering on the 24th I didn't water yesterday and when I checked her today at 'lights on' and she still had some weight to her pot and her leaves were praying hard so I held off on watering today and will hit her tomorrow with her usual 1.5g watering.
~Thanks for stopping in! Things should be getting a lot more interesting in the coming weeks...Stay lifted and be Blessed! 😎🙏~


Likes
21
Share


@Felloffthegrid420
Follow
Good week looking good very proun
proud to be running in house the mannn

Likes
21
Share


@cheetah844
Follow
The shortest plant of them all. She'll be easy to keep from getting to close to the lights. 😁 Healthy growth.
I topped every bud site on every plant, both indoors & outdoors.
Likes
40
Share


@Ganjagrandaddy
Follow
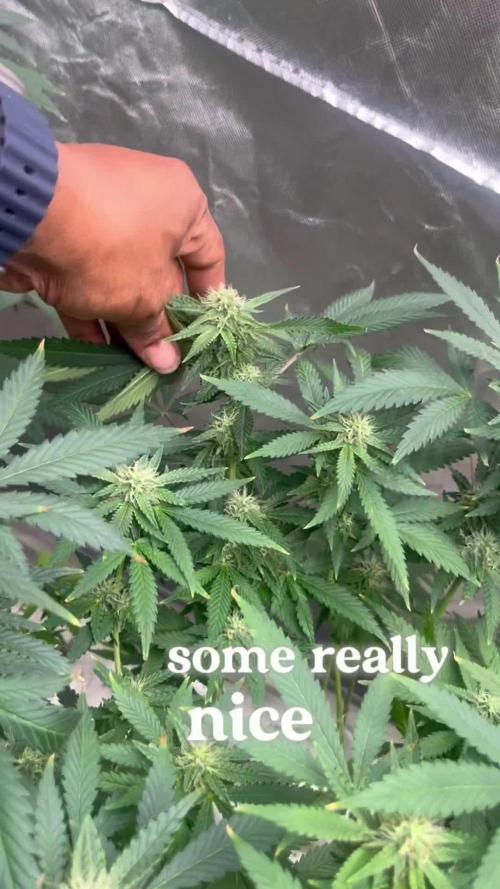
Day 70: These ladies are still going for it with new pistils making them look even chubbier. #1 In the LOS is beautiful and thick . There are so many leaves swallowed whole by her buds that she will be a nightmare to trim the.mout of.lol
#2 Is so ready to come out unlike her sisters. She is so damn frosty and demonic looking now. I cannot wait to sample these girls. They smell so pungent of sweet varnish that hit your nose with a kick. I expect a cure will lose some of the varnish terp a bit. They all feel so gritty , greasy too. my fingers get a sticky residue after playing with them. #2 is being put intonthe dark for 36 hours to encourage her to push oils out a little before the trim and dry.
#3 Is getting quite big and even though she looks like a totally different plant , she smells identicle to the other 2. She looks like she will go a couple more weeks at least so a staggered harvest for the Lsd-25 which helps with trim jail.
roll on smoking this star of the show , even if fast buds screwed me over with early photo comp withdrawal!!!!!!!!
Likes
14
Share


@JamieKnolliver
Follow
In Woche 9 Netz in 1m2 growbox gespannt.
Beginn von LST durch anpassen an das Netz um die Pflanzenoberfläche zu vergrößern.
Einige größere ‚Fanleaves‘ entfernt

Likes
11
Share


@Crwfz1
Follow
Lots of training on all the girls this week all original sensible two gorilla glue one is the biggest under scrog already ghost is right behind then going to lay the last babby gorrilla across light range stay tuned


Likes
2
Share


@fabialien
Follow
Semana 7 de vida, seguimiento de lunes a lunes.
Lunes 19 agosto 2024, evidencia de una semana transcurrida, en la cual proporcionamos terpinator a todas, purpinator solamente a Purple cherry de Positronics, a las otras 6 alimentamos con Armor Si.
Próximo riego será de Bases PH perfecto de Advance Nutrients a todas.


Likes
12
Share

@All_our_small_plants
Follow
Bewässerung: 700ml
pH-Wert: 6,1
EC-Wert: 1,2
Temperatur: 22ºC
Luftfeuchtigkeit 62%
Schädlingsbekämpfung:
PPFD: 500 µmol/m²/s
DLI: 33
Düngemittel: Mineralischer Dünger 3.5-6-6
Besonderheiten: Wurden direkt in die erde gepflanzt in einer Kokos-Quelltabletten.
-Tag 43 Heute haben wir sie wieder gegossen und ihr Dünger gegeben. Sie ist sehr schön im Stretch und bildet so langsam ihre ersten Buds😎
-Tag 45 heute wurde sie wieder gegossen und hat Dünger bekommen😍
-Tag 47 Heute haben wir mit effektiven Mikroorganismen, mit Nematoden und mit Plagron Power Buds gegossen
-Tag 49 Heute haben wir sie mit etwas Dünger gegossen, sie sieht sehr gut aus, hat das Stretching abgeschlossen und beginnt jetzt mit dem Bulking 😍

Likes
20
Share


@DaddyPrime2
Follow
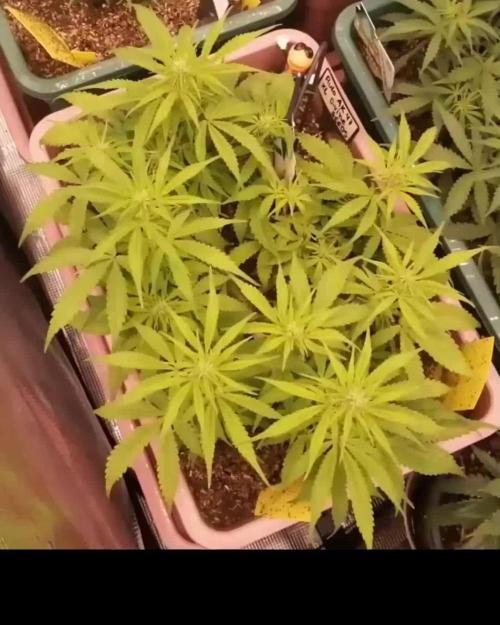
Day 14. Weather is finally warm enough to put them out completely. Was kind of concerned with even getting them to this point. I started them fairly early.
Day 15.
May 9th, 2024
They lasted all night outside finally and will stay. I did add some worm casting on top of the soil. I plan to add some veg nutes soon. Will be using roots organics terp tea line.
May 11th
#3 is 3.5 inches
#2 2.25 inch
#1 2 inch
Likes
38
Share


@MrSpooky882
Follow
Die Woche ist ansich gut verlaufen, 2 Pflanzen haben irgendetwas aber ich weiß nicht woran es liegt.
Morgen/heute werden alle plants ausgedünnt, und ich werde die beiden Kastenventilatoren rechts und links an den Zelt Wänden gegen oszilierende monky Fans an den Mittel Stangen anbringen, ich spare Platz in der Mittel Reihe den ich brauche.
Ich bin sehr zufrieden bisher mal sehen ob ich raus finde was die 2 Pflanzen haben...ansonsten wünsche ich euch eine schöne woche und stay high 😬😁👌
Ach so an Dünge tagen gieße ich immer easy 2L pro Topf. Und dazu von Madame Grow alle 4 bis 7 Tage Flower Karma rauf sprühen das Zeug ist top!👌
The week itself went well, 2 plants have something but I don't know what the reason is.
Tomorrow all the plants will be thinned out, and I will put the two box fans on the right and left of the tent walls against oscillating monky fans on the middle poles, I save space in the middle row that I need.
I'm very satisfied so far, let's see if I can find out what the 2 plants have... otherwise I wish you a nice week and stay high 😬😁👌
Oh, on fertilizer days I always pour easy 2L per pot. And spray Madame Grow with Flower Karma every 4 to 7 days, the stuff is great!👌😬


Likes
13
Share


@GrowerGaz
Follow
Always quite straight forward once the autopots kick in. They have been in flower 5 days and already the five fems have shown their sex , just waiting on tht regular Cuppa t. This week just pH water and foliar feed with my homemade KnF nutrients.
Recieved a lumatek Attis 300w to test this week, so am very happy so far as the plants are thriving since I put it in and flipped


Likes
17
Share


@Naujas
Follow
wow wow !!!! 404 gr ! from the suitcase!!!!!!!258 gr of wet dried buds!!!!!!! I am impressed with the result, and I don't really believe that I will ever be able to improve it :) It was a truly amazing journey with FastBuds Gorilla cookies auto, my house is filled with a wonderful sweet smell, the buds look really full and very very shiny :) I also collected a lot of sugar leaves from which I will make bubble hash:) the girl coped with high temperatures and high humidity throughout her growth, which is why I was afraid of rot, but everything went well!!!! She is amazing. smoke review and dry weight will be up very soon, good luck to everyone :)!!!
Likes
9
Share


@Siriuz
Follow
Ok guys so she was bushy again and so we did defoliation again.
You can see the difference and then after that started flowering even more
Plus the fact we are increasing the amount of molasses added to the soil plus the floranova bloom nutes.
They are very thirsty girls, taking around 1.5-2lts per 48 hrs
So almost like a 1 liter per 24 hrs
Very good SoG to make them feel even more comfortable
Going to change schedule from 24/0 to 19/5 and see if they evolve!
Thinking about adding some humus to the soil as well, other than that they have been under good conditions
Temp is steady at day time around 24C top and night time is 18-19C minimum
RH around 45-60%
Mostly 45% control environment with AC
Cant wait to see big colas coming soon!
Have fun enjoy the videos!


Likes
6
Share


@Muravushka
Follow
During my previous grow, I harvested and made some bubble hash. Afterward, I dropped the used, wet buds onto this coco, and it seems some seeds sprouted from the leftover material. I’m not even sure if they’re photoperiod or autoflower, but hey—let's roll with it!
Both my pH meter and PPM meter are broken. I have no idea why they keep breaking so often. They’re ADWA meters, and while you can replace the reading elements, the replacements cost half the price of a new meter. It’s frustrating, and I really don’t want to keep buying them every time I start a new grow
Processing
Likes
22
Share


@Marrocko
Follow
Buenas growers
Algunos problemas con la temperatura alta pero ya todo controlado.
Están creciendo creo que bien.
A ver como se portan en los próximos días
Saludos y buenas cosechas
✌️🏼Peace