


Likes
33
Share


@weedelicious030
Follow
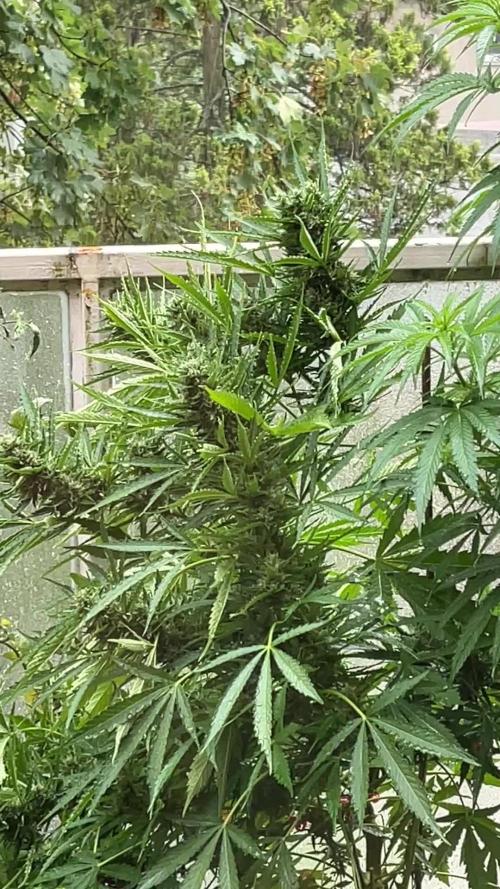
Letzte Woche wurden die Damen in ein größeres Zelt gebracht nachdem sie vorher in 18l Töpfe gepflanzt wurden. Leider kann ich bei dem Grow die Beleuchtung ändern. Alle pfanzen stehen jetzt unter einer GC Bar 8 von "Greenception".


Likes
38
Share


Processing
Likes
34
Share


@Organijuana
Follow
Feeding nutes based on chart, water in (sameday) ..... clean compost brewer and brew new batch (sameday) ..... use compost tea once wk (nextday, water in lil) and discard and clean for next week.... defoliation a lil daily..... HENCE ... becoming more of a chore or should I say we have a great relationship right now. A coexistence, a sudden need for one another. They are my sheep and I am there shephard! Now lets harvest some cotton!


Likes
5
Share


@Ninjabuds
Follow
My gas tax plant is looking absolutely incredible right now. It's got these massive buds that are super dense and have this awesome dark color to the leaves. I'm so excited to see how it turns out when it's finally ready to be harvested. I've been checking the height, the thickness of the stem, and the density of the buds to get an idea of how much longer I have to wait. I think I might start flushing it soon.
The past few weeks have been so beautiful, watching the plants grow and change. It's amazing how something so small and fragile can turn into something so strong and vibrant. Now that they're getting ready to bloom, it feels a little bittersweet. I'm so excited to see the finished product, but I'll definitely miss having them around while they're growing.


Likes
50
Share


@AsNoriu
Follow
Day 82.
Its 81 day from seed touched soil ! If leaves would be healthier, i would run them at least one more week, but it is, what it is.
They spent 24 hours in darkness and now its Trim Jail !!! ;)))
Harvest Day !
Day 88. Tried bud from each, clearest weed straight from drying rack ! Only 3 feeds makes huge difference to harshness at the beggining. Still Queen is pure Tangie, can it be seed mistake ? ;)))
Day 89. Boy i am f@ckingly surprised !!! Heather - I love You, Your team, Your strains !!!! I still don't get how, but numbers are amazing, Thank You very much !!!!
Will update this diary as cure goes, but i feel so many nice words were unspoken, felt that FB will change my view about Autos - and they DID !!!
Amazing house !
Happy Growing !

Likes
64
Share


@Natrona
Follow
Sponsored grow 👉WeedSeedsExpress👈
Week 7 / Flower week 3
2/23-3/1
Week 7 flower week 4 Love Potion is in flower, the buds are puffing out with many white pistols. Trichomes are just starting to form Love Potion got her first defoliation removing fans and any bud sites and more pins added on 2/24. Since I have overfed my gals, this week I am trying to remove excess fertilizer from the planting medium by giving ph 6.5 water only. I am hoping since Love Potion is behind the other gals, I’ve addressed the over feeding issue and she will not show burnt tips and look pretty out her life.
Ph 6.5
Temp 65
Thank You @WeedSeedsExpress for the opportunity to grow your strains.
Your likes and comments are appreciated. Thanks for stopping by.
Growers love 💚🌿
💫Natrona💫

Likes
Comments
Share


@CityFarmer
Follow
Hello everyone,
Even tho I've been busy around the house this week, I took a few minutes and transplanted these into 5 gallon fabric pots, get them going early in some super soil. Lets see how they turn out. Ill have better picture's for you guys next week...
See you guys next week...

Likes
9
Share


@Chupadeos
Follow
La temperatura en la zona que vivo está muy alta y es casi imposible tenerla más baja,y no puedo instalar aire acondicionado,así que están con mucha ventilación y agua.ellas se ven muy sanas y con muchas ganas de absorber abonos,han reaccionado muy bien al cambio de foto periodo,después de tener estás temperaturas tan altas ellas no muestran signos de problemas se ven muy sanas y fuertes ,en el futuro veremos qué tal van bajo temperaturas incluso más altas ,aunque personalmente las veo perfectas para soportar lo que venga, estas pequeñas nos van a sorprender.
Processing
Likes
6
Share


@BlueDream17
Follow
It's a shame my ventilation system came in a month after I grew mold but at least I can make some brownies with about 25 grams of some pretty dank bud.

Likes
15
Share


@RunWithIt
Follow
Whole grow went off without a hitch. Actually haven't had this smooth of an experience with a plant in a while. This strain is a MUST TRY!!! I'm going to be toking on pure gas for a while! 👌😎
Cheers all! Got another one of her right around the corner as well 😂

Likes
16
Share


@Kingseeds
Follow
Dark purple buds and frozen cola
Finish in 67 days
She needs normal light and feeding

Likes
30
Share


@SqwshKush
Follow
1st Week of Flowering!
28 Aug - first 10am-10pm (12hr) cycle today, having had a shorter light period yesterday to adjust to 10-10. LST’d most plants - reminding ones tomorrow will be done. Drying out pots as felt like was overwatering - will monitor wilting and water tomorrow evening but hopefully won’t suffer too much. High temps with LED’s at 60% intensity today. Turned to 70% tonight as need to lower hanging height having LST’d but didn’t want to upset plants in dark cycle as too late (lights off). Will turn back to 60% and drop to 45cm having seen canopy adjust to LST.
29 Aug - all plants watered w/2ml/L seaweed & 3ml/L flower powerfeed. Learning to control humidity & temps. All progressing. More LST done today but forgot an overall picture! Biscotti Mintz showcasing its strong genetics.
30 Aug - going well!
31 Aug - turned lights from 70-%50 as maybe, maybe(?) too intense…just felt instinctively to do so. No yellowing but don’t look 110%?
1 Sept - all watered w/ 3ml/L liquid feed, 1L each. Also raised lights a little (5cm) to get better coverage. Looking good.
2 Sept - going well. Seems like plants enjoying 50% light @50cm approx.
3 Sept - progressing further. Moved plants 5-10cm closer to tent door so far plant was under light a bit more so more even. Will maybe up light to 60% commencing week 2 of flower tomorrow. Will water tomorrow having top dressed with organic dry medium bloom nutes to help keep P levels up since low in Powerfeed I’m using.


Likes
5
Share

@Mo_Powers
Follow
unfortunately it was a very rainy week. i hope that no bud rot will develop. due to all the water one branch broke under the weight. but i tied her tightly and she is still doing well. she smells incredible and it is getting more and more intense. let's hope for a few weeks of sunshine until harvest and that everything goes well. power buds from plagron is definitely good for her.
Likes
15
Share


@NokEternal
Follow
Entering the 9th week things are going Splendidly, I had to adjust the lights up a bit as NLA#1, Suffered a little bit of what looks to be Light Burn, Other than that, The Girls are filling out nicely, and the aroma is kicking in good. I also decided too go ahead and start using Fox Farm Bembe, which to my understanding is a Molasses backed with Microbes for the Root Zone, That and I've Heard it's a natural sweetener as well. Thanks everyone thus far for the views and likes, One Love...

Likes
12
Share


@Pedro_88
Follow
ya estamos en las últimas semanas, aún falta un poco pero estamos ahí, con mucho esfuerzo y dedicación se que llegara a su etapa final

Likes
10
Share


@DutchBarnacle
Follow
Welcome to veg! 🎉🎉
Day 7: 300ml camomile cinnamon tea (pH 6.0)
Well, it seems the fungus gnats are out of troop replenishments. Activity has died down somewhat but there are still some adults crawling around. We'll have to be patient.
She's doing great though and we won't have to worry about her damping off. PPFD has been increased to 475 and we're now back on the 18/6 schedule, and the DLI is now 30.
Day 12: 300ml camomile cinnamon tea (pH 6.0)
The SQA was defoliated to slow down the main apex and allow more light to the lowest nodes. In hindsight, this might have been a bit too early but unfortunately we cannot reattach the leaves.
Likes
26
Share


@pifflestikkz
Follow
Day 29
29/07/24 Monday
Nice feeding today with De-chlorinated tap water pH 6.
Gave her 300 ml and she had a small run off.
Getting chunky in the stem now 💪💚
Day 31
31/07/24 Wednesday
De-chlorinated water pH 6 today with Plagron pk13-14 5ml to 5L
Plagron power buds 5ml to 5L
Used 300ml of the 5L solution.
I will be using these on water days from now on as they are advised to be used every irrigation.
We'll see how they perform 💪💚
Day 32
01/08/24 Thursday
Another feed today using de-chlorinated tap water pH 6, there now taking 300ml every evening.
Day 35
04/08/24 Sunday
END OF WEEK 😁
De-chlorinated tap water pH 6 today with Plagron products. 300ml each.
Had a issue with leaf invaders this week, I have treated and am checking every 48 hrs so far seems ok and not progressive.
All plants look great, very healthy, one of the Overdose is way behind and due to space maybe culled at flower I'll see how she gets on.
