
Likes
Comments
Share


@steadfast_grower
Follow
#########################################
HARVEST (Day 93 / June 4)
#########################################
-----------------------------------------------------------
GROW SUMMARY
-----------------------------------------------------------
Grown in 4x4 tent - but I only used 2x2 space because of heater and dehumidification and other plants (Outlier Z). This plant used a dedicated CMH 315 light. The plant was grown in hydroponics using a custom single-site PA hydroponics clone RDWC system with Advanced Nutrients Sensi Coco line, Microbial Mass and Orca for beneficials. I also experimented with Rapid start in the RDWC system, but I didn't see explosive root growth relying on Rapid Start as an additive to the system verse using it when starting in rapid rooters which worked well.
All around a pretty easy grow and things went very well. Topped twice for a mainline structure and she really spread out. Sparkling golf ball size nugs down the branches and spaced out nicely. The scent off her was like burned rubber/tires or maybe fresh blacktop. A single water change which was only performed when switching to bloom nutrients around week 7.
-----------------------------------------------------------
HARVEST
-----------------------------------------------------------
No dark period and no flush. On day 93 she was chopped and hung to dry.
-----------------------------------------------------------
DRYING
-----------------------------------------------------------
Entire plant hung upside down for 15 days. The temps were dialed in at 60F by using the S6 intake fan pulling air from the AC through intake vent on side of the tent. Humidity was dialed in at 63%/60F for 24hr, 62%/60F for the next 48hr. Then 60%/60F for the third day and onward. AC Infinity T6/S6 exhaust and intake fans were on the setting of '2' during drying until day 7, then I could turn down to a setting of '1' once the plants were not transpiring excess moisture. Trimmed on day 18. Then the jars were left open in the tent for another 12 more days for a full 30 day dry at 60%/60F while rolling the jars frequently. Also ran dehumidifier in the tent but it only ran for 1-2 minutes every hour because the AC was doing most of the dehumidification on the intake.
-----------------------------------------------------------
TRIMMING
-----------------------------------------------------------
Trimming was an absolute breeze. All swelled nuggets, very little sugar leafs left to trim.
-----------------------------------------------------------
CURING
-----------------------------------------------------------
Flower product was transferred to 1L mason jars averaging 35g of product per jar. I added a mini hygrometer to each jar and chose not to use a boveda this time. The RH averaged 62-64% when trimmed flowers went in jars.
Jars were left open in the tent for a total dry time of 30 days from harvest keeping the tent at 60%/60F.
Once closed, the jars were burped once a day for the first seven days, once every other day for the next seven days, rolling jars often. The burp was only for 3-5 second for air exchange until a. 62% was maintained in the jar.
-----------------------------------------------------------
YIELD
-----------------------------------------------------------
* Weight calculated at 62% humidity after 30-day dry and 14-day cure.
==============================
FLOWER PRODUCT
==============================
180.41g (6.44oz)
==============================
TRIM PRODUCT
==============================
57g (2.03oz)
** All major fan leaves, stems, and branches removed from trim product.
==============================
TOTAL OVERALL YIELD
==============================
Total: 238.41g (8.51oz)
==============================
SPACE YIELD
==============================
238.41g / 4 sqft (2x2 canopy) = 59.60g per sqft
==============================
WATTAGE YIELD
==============================
315 Watts / 4 Square Foot (3x4 canopy) = 78.75 watts per sqft.
238.41g / 315 watts = 0.76 grams per watt
-----------------------------------------------------------
PRODUCT TEST
-----------------------------------------------------------
Bag appeal is top-notch. Trichome covered, with aromas of that unique 'kush' you can quickly identify based on experience.
Best OG Kush I've ever tried, hands down! The flavour is kushy, smoke is smooth and definitely my favorite strain in my tote of cured harvests at the moment. I can't keep my hands off of the jars. Definitely not a daytime strain, even for experienced users, although I'll use it in the afternoon when life is throwing curve balls. The effects rise you up, then sets you right down and will wash away all that anxiety after a long day. Put it this way....if I puff a few hours before bed, I still feel it the next morning when I peel my eyes open. No joke.
I'll definitely be growing this one again, maybe even next run because I'll be sad when I run out.
-----------------------------------------------------------
REGRETS
-----------------------------------------------------------
Not running more of this amazing plant.
-----------------------------------------------------------
NEXT RUN
-----------------------------------------------------------
This was the first run at my new residence so it will take some time to get it dialed in. I had some calibration issues which are now fixed. I'm going to be shooting for 1gram per watt on the next run.
-----------------------------------------------------------
FINAL THOUGHTS
-----------------------------------------------------------
DarkOwl is the best autoflower I've grown yet. I'm now eager to give the Bruce Banner #3 they released a run and will surely acquire future releases from DarkOwl.
-----------------------------------------------------------
THE END
-----------------------------------------------------------
Thanks for checking out my diary! I typically journal in my notebook but I put some time and effort into documenting my grows on this platform in hopes it will help a new or experienced grower with their DWC journey. Any questions or suggestions are welcomed.
Happy growing!

Likes
64
Share


@DogDoctorOfficial
Follow
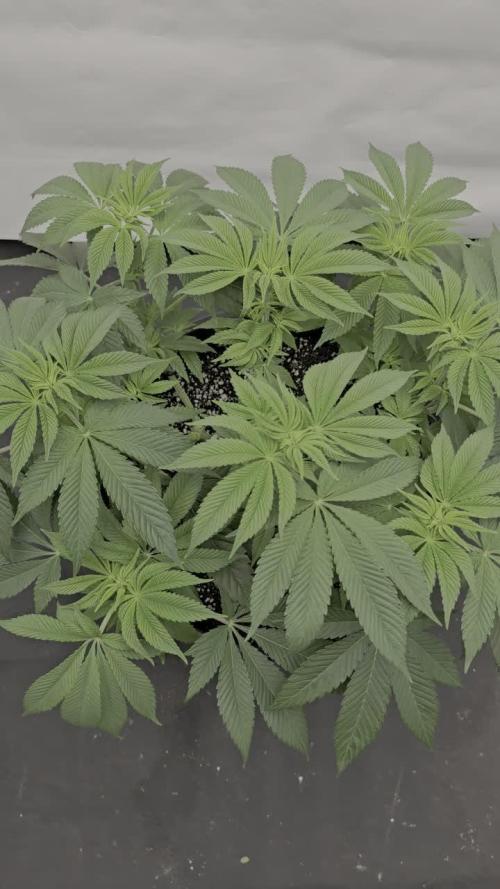
What an amazing girls this 2 are, gave them a “mass” defoliation and lollipoping and they love it 😍 i know people say dont do defoliating on autos , this and that , bla bla bla , they love it, you just need to pay attention to them and give them the love you fell they need. They are now flowering and they keep stretching af 😆 lets see if they will feet the place i have for them 😅💚
Loving this autos world and how fast it all happens 🤩
Girls 2# Magnum Autos from @buddhaseeds
All i grow is medicine for myself, nothing to sell
So don’t even ask 😆
💚If you put your heart in to it, you will get love out off it 💚
Growers love to you all


Likes
10
Share


@Mr_nugs_lover_David
Follow
This lady has been Transplanted after 34 days since planted on may 5th, she's gonna be grown with FLO Living soil blend only, sorry for not having more pictures of this week but I had too many things to do and couldn't find time, stay tuned everybody!!

Likes
116
Share


@AsNoriu
Follow
Day 43 since seed touched soil. Hard week past. Those long not drinking days when cycle was taking 8 days to dry out made damage, i still see magnesium, but now added some rusty spots and i cant understand is it calcium or my spraying of Leaf Coat and burn. No spray this week, will check if new will appear. Because of troubles i postponed flip and top up till next watering. It should be in 4-5 days.
Done huge clearing, a lot new ties added.
3.5 liters of 6.3 phed dechlorinated water went in after training.
Twins grow okeish, but i see some damage on them too, canopy forms very nicely tho, thin, but very well spaced.
Planning to create scrog this week too.
Mars Hydro TSL2000 is on 70% output, thinking to increase it with flip to 75. Light is working fine , really covers all space , great affordable light for colder climate.
Day 45. Girls recovered from training very nice ! In few days flip .
Day 47. Girls got top up. Put first level of scrog. Flipped to 12/12, tent is rammed ;) light output on 75%, 4 liters of 6.3 phed water went in.
Top up was dosed, mixed well and laid on top, then i rough and mix top lair of soil with top up and only then i water.
All pots are 30 litres ( grams and ml , have in mind ) :
Ecothrive - Biosys - 5 ml / pot
Ecotrive - Charge - 120 ml / pot
Ecothrive - Life Cycle - 60 g. / pot
Ecothrive - Bio Blend - 200 ml / pot.
Think this will be my standart top up, i run out of Great White, have for one top up, will do it in 2-3 waterings seperately from all.
Planning to repeat same top up at begining of week 4 of flower. Girls look better without spraying, most prob burn from too intense light, despite me giving 30-60 min of reduced to minimum after spraying. From now on - only when lights off. Will apply in few days, think Saturday.
Happy Growing !!!

Processing
Likes
4
Share


@Green_Thumb
Follow
Added some CO2 to help with photosynthesis while at higher temps. These ladies really blew up at the end of last week and this week! The smell has really starting to be noticeable and pistols / flowers are finally showing! Side note I finally got more seeds to replace the one I lost early on. These ladies are really starting to become a treasure. Ended my LST this week.
Likes
11
Share


@adam_pawloski87
Follow
Such an amazing flower, really great especially a phenomenal hash producer yall will be super satisfied with this one!! She’s a shorty but Make sure you top 4 to 6 times or even more to have all them gooey bud producing heads , Dirtyblonde is absolutely an amazing plant!!

Likes
6
Share


@420Undergrow
Follow
Noch keine Ideen. Es gibt aber einige Gedanken und Erfahrungswerte, die definitiv folgen werden.
Einige Dinge haben mich sehr enttäuscht und in zwischen weiß ich auch warum.

Likes
2
Share


@CannaIGrow
Follow
Plant is growing good. Still really pretty to me. Hoping to flip around day 60


Likes
45
Share


@Mosquito_Haarlem
Follow
Heerlijke harde volle toppen en voor het eerst dat ik harsdruppels zie.
Een heerlijke strain om te growen.
De plant wordt in zijn geheel opgehangen en ik zal het droge gewicht wegen.

Likes
3
Share


@JNSGenetics
Follow
Day 15 and they were watered 2 days ago. They all got around 3 - 4 liters of water and they are drinking alot now. The lemon tree is the winner so far. The permanent jealousy auto is ahead in flower. The slurrups clones from in house genetics are starting to flower as well in their 6 liter pots. I just make them for fun. Was hoping for a male plant.
Still early flower. So far so good


Likes
4
Share


@ZweetZkittlez
Follow
Crece a una velocidad increíble, semana a semana el cambio es hermoso. Más rápido que en tierra sin dudas 😊

Likes
35
Share


@bypado_farm
Follow
Days until seeds have all germinated: 3 days
Lights at 25%
Temp - 21/22º
Humi - 70/85%
Day 4:
Watered the plants 0.2L without nutrients.
Likes
4
Share

@IslandTerps
Follow
Strain: Fast Buds – Gorilla Melon
Grow Type: Indoor
Pot Size: 5 Gallon
Medium: Peat Moss & Perlite
Nutrient Line: Athena (Bloom)
Week 7 Update
She is such a beautiful plant I really outdid myself with this 8-manifold. Her structure is everything I was hoping for! She shot up nicely during this first week of flowering and looks strong all around.
No deficiencies or signs of stress she’s taking her nutrients perfectly. I’ll be clipping any big fan leaves that block bud sites we’re looooooking for full coverage 😎.
Feeding
1.9 L Athena Bloom nutrient mix (steady from this point).
Indoor Climate Conditions
Temperature: 18–26°C
Humidity: 45–55%
VPD: ~1.3–1.8 kPa
See y’all next week! And don’t forget to use my discount code ISLANDT for 15% off your next order at Fast Buds!

Likes
5
Share


@84ruk
Follow
La planta ya tiene al rededor de 76 días mientras el banco sugiere cosechar de 70-74 días, estamos atentos a que los tricomas comiencen a tornearse cafés, el 10% para cosechar, al parecer está a menos de una semana.

Likes
14
Share


@ConspiracyFly
Follow
It is growing sideways :) more leaves are appearing
18 hours - Daytime from 19:00 to 13:00
6 hours - Evening Time 13:00 to 19:00
It was necessary to buy another heating blanket the temperatures dropped a lot around here
I already had a blanket keeping the girl company
Warming Blanket 35x20cm 15W
I put another blanket under the vase
Heating Blanket 55x35cm 30W
(A)
Suggestions:
-You can also buy tent heaters
-And if you prefer, there are also electric towel dryers, they say they work!
(B)
The Analog Timer serves for lighting, ventilation and heating blanket
Note:
- They say that ventilation must be continuous so as not to harm the plant!
😲10 washed worms dropped in the pot let's see if they work well or destroy the roots of the plant


Likes
2
Share


@I_Identify_As_A_Dan
Follow
Day 21
Shes looking a little better as her new growth is much better but shes still lacking some colour hopefully soon she will full take off.
Turned the auto-pots + air-domes on to get water and oxygen directly to the roots 3 days ago.
Feeding Cropsalt at 5.8ph, really enjoying it atm just look at their colour😍
Likes
24
Share


@Lycheegrow
Follow
They didn't show any transplant shock after the transplant to their final pots. They do all show increasingly bad signs of calcium deficiency though. I'm going to give them a feed consisting of at least 0.5 ec of calmag in the next week.
At the end of the week, I moved them to the flower tent in preparation of flipping them. They are now on a 18/6 light schedule. First days didn't look too great, seems like the humidity in the room was off.
