


Likes
307
Share


@Ju_Bps
Follow
Hello growmies 👩🌾👨🌾🌲🌲,
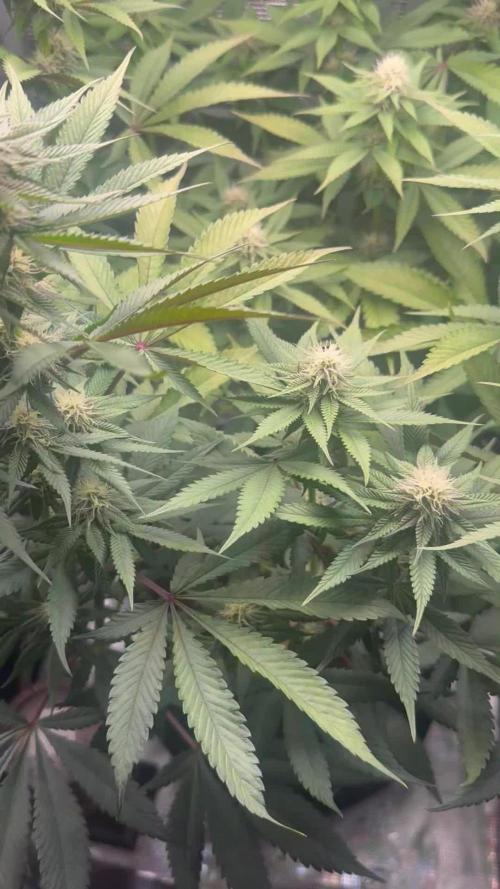
👋 End approaching, Started Flush, need one more week to harvest, Trichromes not yet ready.
💧 Give water each 2/3 day
2 l Water + Flash Cleaner (3 ml/l)
PH @6
💡Mars Hydro - FC 3000
50% 28 cm
Mars Hydro Fan kit
Setting 9
Have a good week and see you next week 👋
Thanks community for follow, likes, comments, always a pleasure 👩🌾👨🌾❤️🌲
Mars Hydro - Smart FC3000 300W Samsung LM301B LED Grow Light💡💡
https://www.mars-hydro.com/fc-3000-samsung-lm301b-led-grow-light
Mars Hydro - 6 Inch Inline Fan And Carbon Filter Combo With Thermostat Controller 💨💨
https://www.mars-hydro.com/6-inch-inline-duct-fan-and-carbon-filter-combo-with-thermostat-controller
Anesia Seeds - High Mars 36% THC🌲🌲
https://anesiaseeds.com/product/high-mars/

Likes
1
Share


@Scrap
Follow
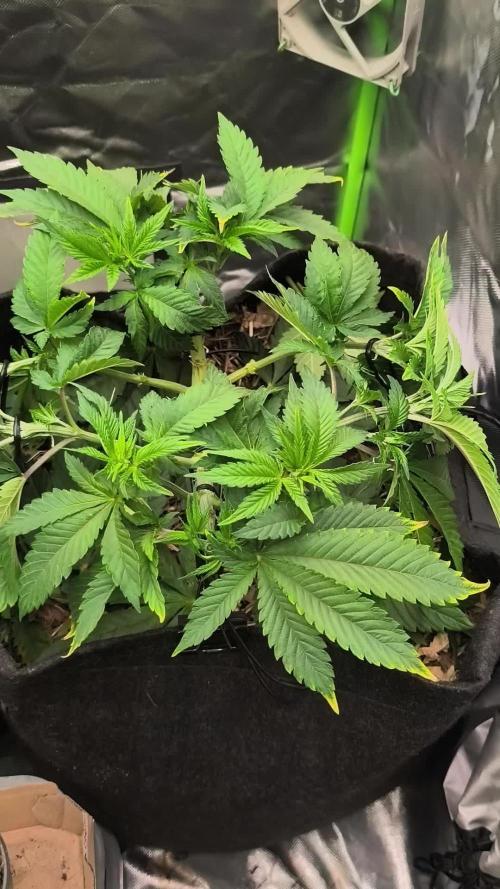
August 28 is officially day 1 for me.
Every single one of these popped easily and came out of the soil with zero issues. The seedling stage stresses me out so I’m glad things are already off to a good start.
Toking one down for good luck *puff puff pass*.
Likes
40
Share


@BudXs
Follow
Here we go, my first attempt to be blown away by the most designer genetics I could find. Spoke with GreenMachine back in November 2019 on getting these, watched him do it first in his version of hempy buckets (do check him out, quite unique)
6 plants run in 4 gallon hempy buckets 30% perlite, 70% coco. Top feed twice daily till resevoir spills out of the buckets. Will up it in flower to at least 3 feedings. All drains to waste
Room is dialed in. See my build journal, this space is in a non climatised garage. Insulation and air conditioning are key, as well as odor control for my neighbors sake.
Growing out 4 phenos to look for the frostiest nuglet and will then clone it over the winter for next years run.
Follow my son on his first Grow Diaries adventure - Budxless
I go live on insta Sunday nights from the garden at 9:30pm EST - Budxsmedical

Likes
10
Share


@tokesly
Follow
More Flowering! The rest of the strains started to catch up, but nanners started showing in the hermies and TP started to overripen with orange hairs. I would've gone extra days if there were no nanners, but it wasn't worth it to risk seeding the nugs, I'll just have to settle with more larfy buds. Going to start flushing next week.

Likes
12
Share


@Bread_n_Buds
Follow
The purple Urkle had a great start, the plant was born well despite the cold and is doing better and better since she is taking the fertilizers. For now I have put the fertilizer to root and some special enzymes that transform the residues of previous plants into nourishment....perfect I would say to renew the soil as best as possible.
Never stop at the first good results guys, always improving is fuel for the next day, to keep the passion alive and have results.
Growing Projects ----- I will follow this procedure, it has given birth to a plant before that will be worked with topping x16 buds and various LST and I have just germinated the second plant that will be born about 13 days after the first and will go straight to the conclusion with the main cola. I must tell you in the past I was a maniac of the topping, then I felt nostalgic for the main cola. It is always a major sacrifice to give up the Main Cola. To avoid depression and to give a better vision to our super trusted breeder, home breeder and Zamnesia heart breeder we make a plant in topping and a straight one preserving the main cola. Those videos with the rotating Main COla were liked and we produce the best Maincola of the situation-
The first week went only with Power Roots 1 Ml/l and Pure Zym 1ml/l from now on we start with ALga Grow. The plants were transplanted shortly after germination because the biodegradable pots were very small. The soil is Plagron Pro Mix 100% organic renewed with 30% new soil and 20% Perlite added. (Pro mix don't have perlite but is airy we added anyway)
Plagron fertilizers are available on Zamnesia in convenient Pack formats for all growing styles. I used this with a simple search you can find the other products.
---- https://www.zamnesia.io/en/12119-plagron-top-grow-box-100-natural.html
Try a seed of this strain that drives us crazy...
---- https://www.zamnesia.io/en/11168-zamnesia-seeds-purple-urkle.html
Zamnesia Description // / A direct descendant of a Mendocino Purps phenotype, Purple Urkle is a high-performance cultivar from Zamnesia Seeds. This feminized, indica-dominant strain is sure to win over any cannabis grower. With a THC content of 20%, Purple Urkle has a lot to offer from seed to harvest and beyond. A grape-flavored adventure, Suitable for indoors, outdoors or in the greenhouse, Purple Urkle is a very resilient strain. Growers will be impressed by how easy this cultivar can be managed. Purple Urkle can reach 120cm indoors and 160cm outdoors, but if you want more control over the height you can use the LST technique.
Purple Urkle has fantastic flavors and aromas that intensify during the flowering phase. Regardless of the method of consumption, Purple Urkle offers tangy, fruity flavors that lean towards notes of grapes, berries and plums. The effects of this strain are soothing and relaxing, with uplifting sensations that make the experience suitable for any occasion, whether in a social setting or alone.
Growbox and Air System - Secret Jardin DS120w + fans + Exhaust fans and filters DF16 kit ---- https://www.secretjardin.com
All the best that mother nature can offer is on ----www.zamnesia.com
Call for collabo: I am available for collaborations with companies of Lights and various equipment for growing (No Seeds and Nuts company please) I would like to renovate my 120x120 space that has slightly obsolete lights, and I would like to try some controllers. If you have proposals available.


Likes
22
Share


@valiotoro
Follow
Hello everyone 😎
Week 1 of flower for the Strawberry🍓
She is doing very well,growing at fast pace and with a beautiful green colour on the leaves.
For the nutrient 2ml/L terra bloom + 1ml/L power buds🔥
Likes
48
Share


@Roberts
Follow
Started the flush about 5 days ago and been working on using up nutrition in plant. Plant showing signs of nitrogen level lowering and working on closing out in next 7 to 10 days. 1 more update prior to harvest. Thanks again for likes and follows. Special thanks to fastbuds. Happy growing
Likes
4
Share

@meepxix
Follow
Week 3 flower thinking I have a water ph issue out maybe I should let the bottom dry out more before refilling the reservoir due to the rust colored spots coming in on the leaves
Best grow I’ve had so far (this is try 4 I believe) I had defoliated a few days ago and when I rubbed the little buds I got deep sweet blue raspberry candy like a blue jolly rancher so I’m super excited for this one to finish out.

Likes
25
Share


@pifflestikkz
Follow
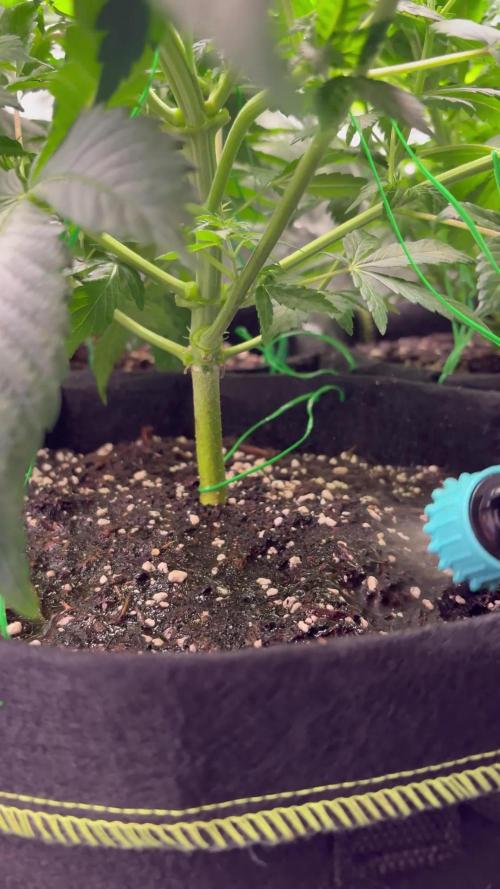
Day 29
29/07/24 Monday
Nice feeding today with De-chlorinated tap water pH 6.
Gave her 300 ml and she had a small run off.
Getting chunky in the stem now 💪💚
Day 31
31/07/24 Wednesday
De-chlorinated water pH 6 today with Plagron pk13-14 5ml to 5L
Plagron power buds 5ml to 5L
Used 300ml of the 5L solution.
I will be using these on water days from now on as they are advised to be used every irrigation.
We'll see how they perform 💪💚
Day 32
01/08/24 Thursday
Another feed today using de-chlorinated tap water pH 6, there now taking 300ml every evening.
Day 35
04/08/24 Sunday
END OF WEEK 😁
De-chlorinated tap water pH 6 today with Plagron products. 300ml each.
Had a issue with leaf invaders this week, I have treated and am checking every 48 hrs so far seems ok and not progressive.
All plants look great, very healthy, one of the Overdose is way behind and due to space maybe culled at flower I'll see how she gets on.

Likes
8
Share


@FrostyAutoflowersTV
Follow
I continued to renew the stakes, every 3-5 days and watered when dry.
Btw I don't water every day, more like every 2-4 days, when the soil dries out.


Likes
1
Share

@Dgdude
Follow
Pics from day 68. Anyone know why the left side is so much more developed?? I’m beginning to think there is no way I’ll be able to harvest everything at the same time.. Took a week long vacation and had a buddy watching the plants for the last 7 days. Everything is still looking good. Back left has some slight lockout that’s occurred. I have cleaned all the salts out of the reservoir. Tomorrow will be a defoliation day on the right side of the tent.
Likes
12
Share


@viriato0811
Follow
I am loving how strong this sativa strain is. I keep defoliating her to expose as many bud sites as possible. At the same time, I am trimming those side branches with low chances of making it to the top. 🌱🌱👍🏻👍🏻

Likes
26
Share


@Cultivomedellin
Follow
26 días de vida para estás darkdevil auto hay vamos mi gente hay una que ya tiene los cálices morados las otras aún no
Likes
6
Share

@gukmalgrow
Follow
Woche 6 des Grows ist abgeschlossen🏻
In Woche 6 wurde immer weiter versucht die Triebe ins Netz einzuarbeiten was sehr gut gelungen ist und das Netz ist schön voll. Mitte der Woche 6 gab’s dann einmal eine schöne Entlaubung und der Switch zu 12/12🌸
Als Vorbereitung für die Blüte wurde einfach nur auf jede Pflanze 51g Greenhouse BioBloom als TopDressing gegeben und etwas angegossen, damit sollten die Ladys die ganze Blüte versorgt sein. Ansonsten steht alles gut da nur die Luftfeuchte macht jetzt langsam Probleme, aber bis dahin super happy und zufrieden. Gespannt was der Stretch mit sich bringt!
Happy Growing!💚
Likes
53
Share


@DogDoctorOfficial
Follow
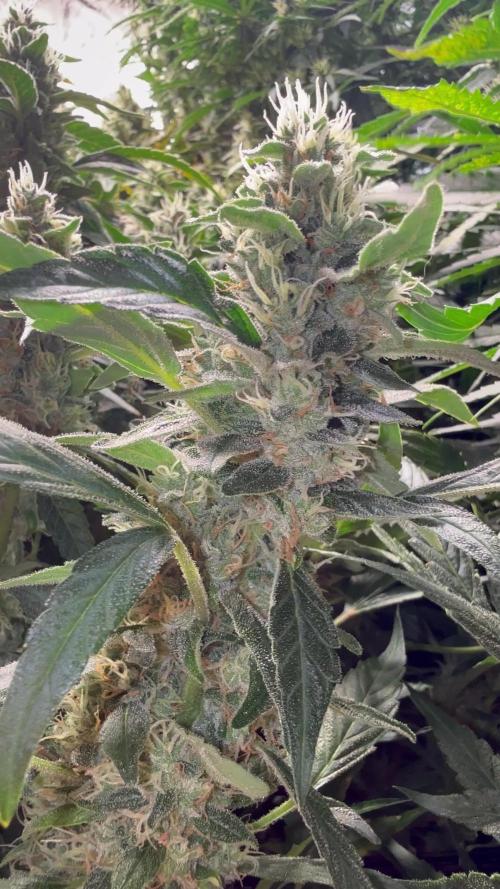
Ladies, gentlemen, and all the wonderful beings following this journey, I am thrilled to announce that we have reached the highly anticipated harvest week for our beautiful PCRs. This has been an incredible journey, and now it's time to reap the rewards of our hard work and dedication.
The PCRs are nothing short of perfection. Their frost-covered buds are a sight to behold, glistening like they've been kissed by winter's breath. The trichomes are abundant and sparkling, making these ladies look absolutely stunning. The aroma is intoxicating, a true testament to their strong genetics and the care they've received.
Upon taking them out of the tent, I was amazed by their strength and resilience. Despite my best efforts to make them dance, these ladies stood tall and proud, requiring no support at all. This just goes to show the exceptional quality and sturdiness of the PCR strain.
Aptus Holland's Enzym+. This product is a game-changer, breaking down dead root material and turning it into usable nutrients, ensuring our soil remains rich and fertile for future grows. Speaking of which, I do plan to reuse the soil, thanks to the amazing benefits of Enzym+. This enzyme product not only helps with nutrient uptake but also keeps the soil ecosystem healthy and thriving.
Here's the final stats for this week:
TDS: 130
PH: 6.8
Temp: 21°C
A huge shout-out to Aptus Holland for their incredible products that have consistently supported my plants' growth and health. Also, a massive thank you to Art Genetix for creating the phenomenal PCR strain that has brought so much joy to this grow.
To all my fellow growers, followers, and the entire community, your support and encouragement mean the world to me. This journey wouldn't be the same without you. As we move forward, let's continue to spread love, positivity, and the joy of cultivating these amazing plants.
Stay tuned for the final results and more updates as we dry and cure these beautiful buds. Until then, keep growing, stay positive, and never stop believing in the magic of cultivation.
Peace, love, and happy growing!
Genetics - P.C.R. @Art_Genetix_Team https://artgenetix.world/
Nutricion @aptusholland https://aptus-holland.com/
LED Power @Lumatek and @viparspectra
As always thank you all for stopping by , for the love and for it all, i fell blessed to have you all with me for one more love journey Thank you Thank you Thank you , you guys are great and have been amazing , thank you for everything !
#aptus #aptusplanttech #aptusgang #aptusfamily #aptustrueplantscience #inbalancewithnature #trueplantscience #dogdoctorofficial #growerslove
With true love comes happiness , Always believe in your self and always do things expecting nothing and with an open heart , be a giver and the universe will give back to you in ways you could not even imagine so !
Friendly reminder all you see here is pure research and for educational purposes only
Growers Love To you All
Discount Codes :
@thecannakan DOGDOCTOR 15% off
@theneutralizer PORKIT5-DOG 15% off
@kannabiaglobal DOGDOCTOR 30% off
@seedsmangenetics DOGDOCTOR 10%off
@terpyz.mutant.genetics DOCTOR 15% off
Have a fantastic week!

Likes
33
Share


@PEAKYPLANTERS
Follow
hi all, brothers of the old weed!
Welcome back for a new adventure in the PEAKY gardens
These beautiful little girls loved the scrog treatment and appear to be in excellent health
The MSNLs are the front and back ones while the Barneys are the central two
Good nuggets look forward! 🤗🌱
