


Likes
12
Share

@carlitospiratahaze
Follow
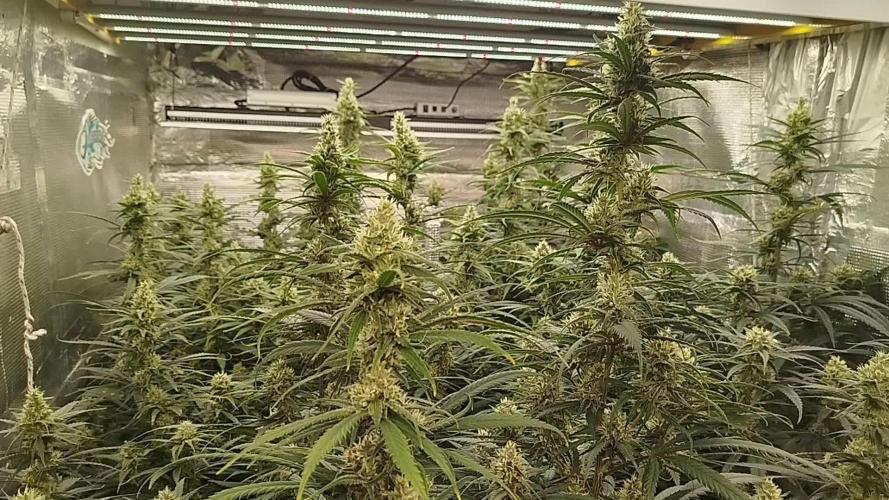
Seguimos otra semana más de avance de este rincón de amnesias!
Todo se ve en orden alguna que otra saturada de abono otras perfectas y otras un poco estresadas,por qué las mantuve cerca del foco pensando que al ser pequeños y de 100 w necesitarían estar más cerca pero de todo eso equivocado.. en el siguiente ya sabemos.
Estamos ya con 58 días de floración y estimo que estaré con ella hasta el día 78.
Está vez la dejaré madurar al punto de conseguir el mejor sabor posible y un efecto relajante nada paranoico.
Seguimos metiendo abonos esta semana pero vamos a combinar un riego libre de solo agua y azúcares.

Likes
12
Share


@Chubbs
Follow
These two little ones are really close. One took a beating on the leafs when the power was out for a couple days but over all both look great. Super stacked and frosty. They'll be getting chopped this week and really excited to get them dried and cured to sample some. Happy
Likes
11
Share


@DuckeedWizard
Follow
Heyo! Morning everyone!
I don't even think i need to say, look at her!
The smell is not as strange anymore, but still STRONG. Herbally spicy!
Also, i removed some lower buds to improve light penetration and distruibution, she seems to answer well to that!
Pistils slowly turning orange, as you can see in my failed-ish attempt to take a pic lol
Likes
3
Share

@KannaGrowing
Follow
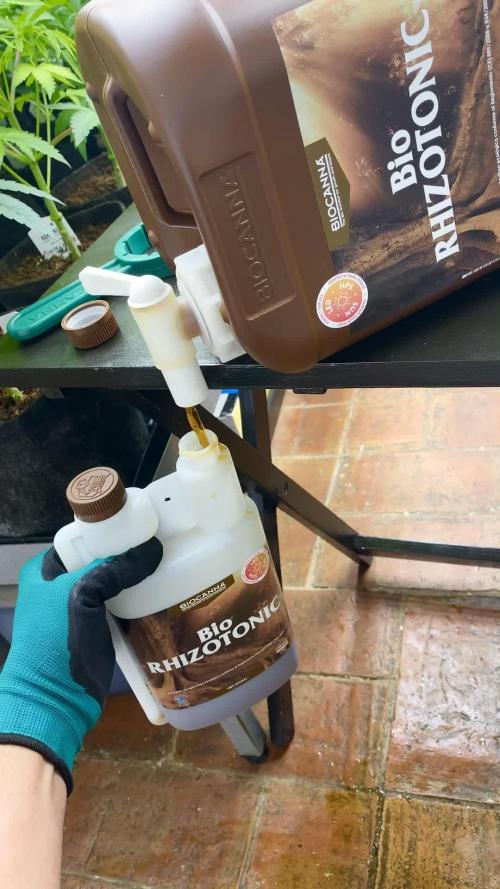
Esta será la última semana donde incorporamos Bio Vega a la dieta de alimentación.
La potencia de las luminarias al 75% y regamos cada tres días aproximadamente alternando entre fertilizante y agua.

Likes
8
Share


@QQNPK
Follow
Big purpz, in the video - its only the purple plant thatrs a purple punch,
and god damn it has purple trichomes !!

Processing
Likes
28
Share


@No_Clout
Follow
27/02/19 - This one is great, I popped the seed 24hrs after the gelato and this one seems to be developing its leaves a lot faster than the rest, so far really happy with DNA and with mills nutrients, it’s a lot easier to mix and I no longer have to use ph down because once all mixed it’s at a 5.8/5.9. 👌🏻
02/03/19 - Just transplanted all into their final pot, just in time I think as it looked like the roots were starting to circle at the bottoms of the pot, sprinkled half a tea spoon of Mykos on each hole prior to the transplant & fed them 2.5 litres each. I was going to saturate the whole pot but I’ll do that next feeding.


Likes
23
Share


@HideAndFly420
Follow
Day 71👋🌱
I started flushing some days befor. I think I’ve got 20 days left but this lady eat a lot of feeding this last weeks so I give some more flushing. Buds looks full of all
What they needs also if now they need to get fat and fat. :) let’s see what’s happen.
Giving ph controlled water at 6.2/6.5, I check TDS to water owerflowing from pot, bringing it to 50ppm from 400.
Now I’ll start checking trichomes every three days, I’d like a 60% white and 40% amber
Day 72👋🌱🌱
Hi all growers, how is going? 😊
I'm at my first real flush for this Orange, i gave 10 lt of ph controled water and was checking ppm from water coming out. i gave water unitl it reach 400 ppm, my water is 200 ppm, i hope i'll bring it to 50 ppm for next flush in 3 days.
i think bud are going to bloom nice this last days befgore harvest, i can feel it :D
Day 74👋🌱🌱🌱🌱
Soil is already quiet dry, smell is increasing rapidly. Today I’ll give another e 1 lt of water and Sunday I’ll do another flush. I think will go up to 90 days. Bud will get fatter and fatter🏆.
Maybe I could have fertilise two times more, but anyway I’d not a big problem, I’ve been feeding them a lot since the beginning so a more long flush won’t be a problem at all.
Can’t wait to the harvest.
Day 77 🌱🌱🌱🌱🌱🌱🌱
Just posting some trichome pictures, waiting to some changement before publishing some new pic of the lady.
Keep washing it with ph controleed water that looks always cleaner, i think i'll be cutting the most high bud some days before the rest of the plant.
Can't wait anymore
Let’se go! ❤️🌱
Any suggestion is really welcome :)😋🌱🌱


Likes
3
Share


@Luke_Lee
Follow
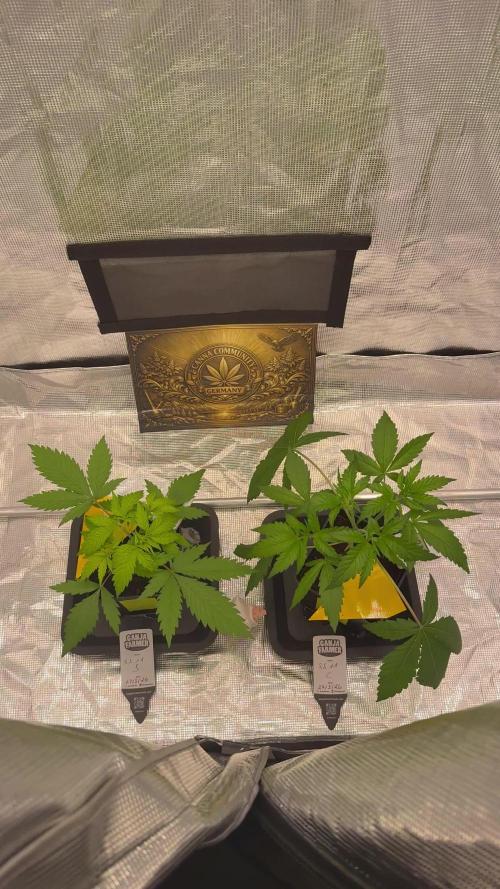
—————————————————————
WEEK 4 / DAY 22-28
Mars Hydro FC-E3000
Floragard Professional GrowMix
11L Plant bag made of fleece
Light: 55cm / 50%;
Schedule: 24/0;
PPFD: 592 umol/m2/s
20° C - 75 RH
300ml per Plant every 2-3days
PH 6,5-7
1ml BioGrow; 0ml TopMax ; 0ml BioBloom
1ml CalMag
#1 Royal Critical Automatic
#2 Royal Critical Automatic
Fan, extractor and pump ON 24/0.
—————————————————————
-10.02.2025
The third vegetation week begins, the ladies look really good.
The lamp has been set to 55cm and is running at 50%.
The lowest leaves with the rust-colored spots have been removed.
-13.02.2025
The GrowBox was cleaned and disinfected once.
The lowest/oldest leaves were cut off. As the soil had settled after a few weeks, the pots were filled with fresh soil.
-16.02.2025
Today is the last day of the third week of vegetation.
The plants look good, so far everything is quite unproblematic.
Total Time: 701:00h
Total Energy: 107.07kWh
Likes
7
Share


@Nikkov
Follow
well, another week has passed and they are already quite fat, a pity that they could be bigger but I will thank you for the experience and learning for the next cycle, as I said before I ordered a starter kit from advanced nutrients and I will test it on these same ones strains and let's see what happens! =D
Likes
6
Share


@Elfasitoencasa
Follow
Semana 7 Floración.
Día 82(25/09): Ayer 24/09 regamos con Heavy Bud Pro, y como todos los minerales, absorbió muy rápido la comida. Se notaron varios pistilos mas, y un crecimiento en otras colas que no llegaban a la altura de las principales. En las fotos se puede apreciar el crecimiento. 7ma semana, Abby.
Día 87(30/09): A partir de ayer ya empezamos a regar con agua, hacia calor así que probé con agua un poquito mas fría, y no se si será por el frío o por la etapa pero demostró mas tricomas de los comunes, una evolución grande a pasos lentos.

Likes
25
Share


@Kush_queen
Follow
The buds are getting fat and there are plenty of bud sites and they are nice and frosty now the 2 that were lagging behind certainly aren't that far behind.
I have bamboo canes ready to go in soon as the side branches are getting heavy and i don't want them to get snapped or anything now I come this far 40 days on 12/12 today
Thanks for taking the time to read my update 🙏💚


Likes
3
Share


@JardineiroBr
Follow
A Mandarim está muito linda e perfumada, acho que mais umas 3 semanas deve estar pronta, mas vamos esperar os tricomas estarem num ponto mais âmbar. Ainda falta um tempinho .


Likes
518
Share


@yan402
Follow
🌸🍏✨🍭🌸🍏✨🍭🌸🍏✨🍭🌸
Hi and welcome to another Kannabia grow!
This time I’m running their Apple Fritter (feminized photoperiod). She’s going to veg under 24hr light and be manifolded.
Still cleaning the rest of my Candy Cream GF (11.04.25) — going to sow the seed tomorrow (12.04.25)
*been lazy, sowed on 14.04.25
🌸🍏✨🍭🌸🍏✨🍭🌸🍏✨🍭🌸
---
💭❗💭❗💭❗💭❗💭❗💭❗💭
❗Events & thoughts worth noting❗
💭❗💭❗💭❗💭❗💭❗💭❗💭
12.04.25 (GW1) – Cleaning + flushing the old coco coir. Might need to add another brick. *No new brick needed ✅
This is how I recycle my coco coir — fast, cheap, no BS.
🌿 Harvest plant
✂️ Chop roots small — they stay in for structure (organic perlite)
💦 Hot water rinse — remove salts & dust
🍶 Pre-soak with light feed:
Micro 10ml
Bloom 0ml
GreenBuzz 10ml
Cal-Mag 60ml
FFJ/FPJ 10ml (new disgusting batch)
pH down (citric acid)
♻️ Media stays — Roots stay — Back in service.
14.04.25 (GW1) – Planted seed in final pot ✅
16.04.25 (GW1) – Did last tent clean up + setup ✅📸
17.04.25 (GW1) – Seed germinated 🎉📸 — roughly 48hrs in final pot. Solid start👌♥️
23.04.25 (VW1) – Minimal burnt tips 📸 — not progressing, not a concern.
26.04.25 (VW1) – Started using the new batch of FPJ/FFJ
https://growdiaries.com/diaries/266849-grow-journal-by-yan402
30.04.25 (VW2) – Increased TriPartMicro & GreenBuzzBloom 10ml → 15ml
03.05.25 (VW2) – Increased TriPartMicro again 15ml → 20ml, topped the plant, and added final layer of clay pebbles around the base, trimmed side branches and did LST in preparation for "manifold" 📸
08.05.25 VW3 finished manifold📸
13.05.25 VW4 Increased TriPartMicro to 30ml and GreenBuzzBloom to 20ml.
15.05.25 VW4 Done defoliation and LST 📸
18-19.05.25 VW5 pruned all the shoots bellow my "mains" and did a full defoliation📸
24.05.25 VW6 increased GreenBuzzBloom to 30ml
04.06.25 VW7 did a cleanup📸
11.06.25 VW8 increase TriPartMicro to 40ml
17.06.25 (VW9) – Final structure pass 💈🌿
Did a clean perimeter prune + removed weak shoots. Ended up with 12 tops, was aiming for less, but she made the call
Didn’t fight it, just shaped it the best I could
Airflow’s good, structure’s stable
🛑 No more cuts until post-stretch
Pics coming shortly 😘
Flip coming soon — we’ll see how she handles it.
20.06.25 VW9 Switched lighting to 12 hours, may the stretch begin 🤞
22.06.25 VW10 Did a good LST session,made some pics, and came to some conclusions and a small change of plans:
Originally planned for 8 mains — long, spaced colas and maybe a couple stronger “titans” if she wanted to go that way.
But she’s showing me something else, and I’m not here to fight her — just guide her.
Now after stretch, I’m keeping side shoots only if they: Fill real canopy gaps
Don’t crowd neighboring tops (minimum 15cm spacing)
Aren’t growing into walls or toward the next plant
Anything too close, too low, or heading into shade gets removed. No point forcing it.
Looks like I’ll finish with 14–16 solid tops, depending on how she settles.
I’m just trying to give each one enough light and space to stack properly.
No overcrowding, no larf — just letting her do her thing with a bit of structure.
Increased Tri Part Micro to 50ml as well.
28.06.25 VW11 one week since I flipped to 12/12 and she is stretching nicely, a bit shy in showing pistils compared to the Fantasy Feast regulars I have in the same tent.
29.06.25 VW11 increased GreenBuzzBloom 30→ 60ml
06.07.25 FW1 TriPart Micro: 50→ 30ml
TriPart Bloom: 0 → 20ml
Home-made FFJ/FPJ (Watermelon + Pumpkin): 10 → 30ml
12.07.25 FW1 GreenBuzzBloom 60 →40ml, TriPart Bloom: 20 → 60ml, fpj 30→60ml
19.07.25 FW3 Got some bleached tops, been out and about at job interviews and didn't notice a last minute stretch spurt 😭, should recover fine though plenty of time left 😁
22.07.25 FW3 TriPartMicro 30→20ml , TriPartBloom 60→80ml , GreenBuzzBloom 40→50ml
24.07.25 FW3 Cal-Mag 60→40ml
26.07.25 got thrips but handled them with extra airflow and defoliation.
29.07.25 FW4 GreenBuzzBloom 50→20ml, Home-made FFJ/FPJ (new batch) 60→120ml
31.07.25 FW4 Home-made FFJ/FPJ (new batch) 120→200ml
🌱💦🌱💦🌱💦🌱💦🌱💦🌱
🌿 Day to day tasks & actions 🌿
🌱💦🌱💦🌱💦🌱💦🌱💦🌱
02.08.25 FW4 – Fed 5l of #1 → 2l runoff
03.08.25 FW5 – Fed 5l of #1 → 2l runoff
04.08.25 FW5 – Fed 5l of #1 → 2l runoff
05.08.25 FW5 – Fed 5l of #1 → 2l runoff
06.08.25 FW5 – Fed 5l of #1 → 2l runoff
07.08.25 FW5 – Fed 5l of #1 → 2l runoff
08.08.25 FW5 – Fed 5l of #1 at 75%→ 2l runoff
09.08.25 FW5 – Fed 5l of #1 at 50%→ 2l runoff
(*RUNOFF reused for tomato plants)
🍶💧🍶💧🍶💧🍶💧🍶
💧 Nutrients in 30L #1
🍶💧🍶💧🍶💧🍶💧🍶
💧 TriPart Micro:
10 → 15 → 20 → 30 → 40 → 50 → 30 → 20ml
= 0.67ml/L
🍶 TriPart Grow:
0ml
= 0.00ml/L
💧 TriPart Bloom:
0 → 20 → 60 → 80ml
= 2.67ml/L
🍶 GreenBuzz Bloom:
10 → 15 → 20 → 30 → 60 → 40 → 50 → 20ml
= 0.67ml/L
💧 Cal-Mag:
60 → 40ml
= 1.33ml/L
🍶 Home-made FFJ/FPJ (new batch):
10 → 30 → 60 → 120 → 200ml
= 6.67ml/L
💧 pH Down:
Citric acid (BuxXtrade) — adjust to ~pH 6.0
📦 TOTAL:
360ml per 30L
🔬 12.00ml/L
🍶💧🍶💧🍶💧🍶💧🍶
⚙️✂️⚙️✂️⚙️✂️⚙️✂️⚙️
✂️ Tools & equipment ✂️
⚙️✂️⚙️✂️⚙️✂️⚙️✂️⚙️
✂️ 2× MarsHydro SP3000
⚙️ MarsHydro 150mm ACF Ventilator
✂️ Trotec dehumidifier (big unit)
⚙️ Mini no-name dehumidifier
✂️ Kebab skewers (LST – stainless)
⚙️ Wire + roast skewers (LST assist)
✂️ Scissors (HST)
⚙️ Vacuum (for spills & cleanup)
✂️⚙️✂️⚙️✂️⚙️⚙️✂️⚙️✂️⚙️✂️⚙️
---
🍏🍪🌬️🍬🍏🍪🌬️🍬🍏🍪🌬️🍬
Apple Fritter (Kannabia Seeds)
🍏🍪🌬️🍬🍏🍪🌬️🍬🍏🍪🌬️🍬
Species: 50% Indica / 50% Sativa
Genetics: Sour Apple × Animal Cookies
THC: Up to 25%
Effect: Euphoric, relaxing, creative
Flavor: Sweet, fruity, pastry notes
Flowering: 56–63 days
Resistance: High
Indoor yield: 450–500g/m²
Outdoor yield: 600g/plant
Structure: Strong, bushy, dense buds
Likes
19
Share


@Happygrowing
Follow
Piante grandi ed in forma mia aspetto molto da loro
NL è indietro di una settimana e mezza in confronto a slh#2
Grandi soddisfazioni 🔥🔥💪💪
