


Likes
5
Share


@Deltatigrou0169
Follow
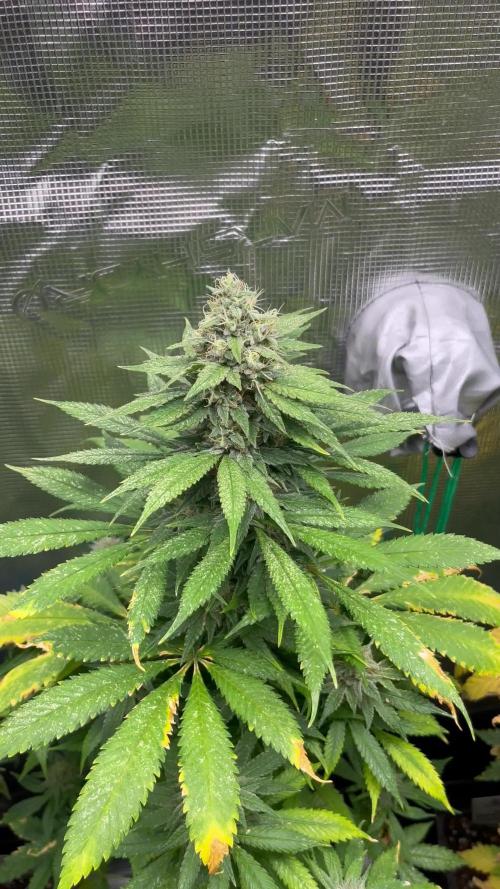
Bonjour à tous
Voilà les petites photos et vidéos d'aujourd'hui, elles n'arrête pas de s'épanouir de jours en jours je m'émerveille devant mes fifilles.
Mes petites Mutantes commencent à s'acclimater.
Bonne journée à tous et à très bientôt 😊 les amis


Likes
55
Share


@Ganjagrandaddy
Follow
Hi all . Here we go again on some Fast buds auto genetics from one of the markets go to for autos. Having been a long term grower of fast buds and some of their tester fast flowering photoperiods too , I expect great things .lol
My choices of strain came from hours of deliberating and looking through their extensive auto range. so tempting to hit the "classic" series and go with what I know but being ever curious , that was soon surpassed by some new kids on the block and here we have it.
Their rise to the surface was only 3 days total for husks off and opening coty leaves. Now a week on from seeding , they are ready to get busy. They all look as they should and are at present in subdued lighting to get them rooted first. I will be moving them under their own light soon but want them to get comfortable in the soil mix first too.
So day 1 is under way and we are in for some beautiful buds no doubt. Thank you Heather @Fastbuds . lets get this going now.

Likes
5
Share


@GrowLegend
Follow
Hola a todos, En esta semana 3 de floración la planta sigue engordando sus cogollos purpuras. Ha dejado de crecer para centrar su energía de producir sus flores, que presentan buenos tricomas.
Likes
27
Share


@Salokin
Follow
Nothing to be mentioned, the plants reek like crazy, I cannot keep tent open for too long without stinking up the entire house. Other than that, they are freaking amazing. Will probably start flushing next week, if the trichomes start turning brown. Loving this strain, sooooo strong and tasty and this clone looks even better than the plant.


Likes
21
Share


@gr3g4l
Follow
Esta semana a los 73 dias de floracion decidí que ya tenia que cosecharlas. No podia dejar pasar mas dias puesto que se corria mucho riesgo de botritis y los tricomas estaban ya suficientemente maduritos, igual demasiado.
Jamás me habia encontrado con unas jack con tanta cola de zorro pero de oler huelen a gloria.
hasta el último dia estubieron siempre dentro del armario y posiblemente por la extracción no pude percibir el olor tan agradable que desprenden, intenso . Algo mas terroso de lo que pensaba.
Cogollos duros como piedras, algo exsagerado.
Con 74 dias al secadero, calefactor 80w más un par de ventiladores con ventilacion indirecta, extraccion, intraccion pasiva

Likes
46
Share


@Mr_Motalovah
Follow
Hello growers and tokers! 👋 👩🌾 🧑🌾.🔥💨
Well! Their time has come, this was their last photo shoot after week 10 of life cycle and right before harvest.
We've come to an end of this balcony experiment.
Had loads of fun watching these two ladies grow in my balcony.
They only received 5 hours of direct sunlight each day. (09h - 14h)
So to be honest I wasn't expecting this size and density with such little hours of direct sunlight.
This strain is easy to grow and doesn't need much attention.
Chopped them on day 73 of life cycle (day 52 of bloom)
Both have a nice dense cola, one is thicker while the other smells much more potent.
Decent amount of trichomes given the circumstances and blazing heat these past weeks.
All in all they look gorgeous, smell great and I'm satisfied with the results.
Now to dry and get cured.
Then comes the taste testing.
I'll update this diary with final weight, photos and all that good stuff as soon as they're done.
Stay tuned, stay safe and happy growing! 😃

Likes
6
Share


@cdxxbuds
Follow
Plants came down at day 53. Nice weight and drying commenced. More purple coloring and smell is amazingly fruity

Likes
47
Share


@KA_LE
Follow
- Been flushing for 3 days now. Still showing more purple tones, not much yellowing yet.
- This will be my last post before harvest! Can't wait!


Likes
32
Share


@biggreens420
Follow
bubbas doing well fading out and she smells kind of earthy berry at this point it's nice she's getting covered in trichs and some nice colours coming through on the buds . removed faded leaves as they fade and she's nice and sticky when touching will be giving a feed with bactrex 1g into 1l to help use what's left in the soil thanks for reading happy growing guys

Likes
28
Share


@Felloffthegrid420
Follow
Went on a two day camping trip it was some beautiful stuff out there all is good off the grid top broke putt one
Likes
1
Share


@Dabcik
Follow
Piante sane, stretch energico ma cerco di tenerle sotto la rete, temperatura un po’ alta ma sto già risolvendo per abbassarla. Iniziano a spuntare i primi pistilli e a formarsi i primi calici


Likes
6
Share


@Va_smoking
Follow
I accidently let this one dry out TWICE... so she took a while to sprout. Glad I didn't kill her

Likes
35
Share


@Fatnastyz
Follow
Super glad I got to finally run her again! Wanted to for a while, but then ol' Personalsmok3s had to call me out! 😂😂Which just ensured it was next! 🙏
Love this thing and I could grow a tent full at once!
😻😁🤘

Likes
16
Share

@eldruida_lamota
Follow
Que pasa familia, vamos con la séptima semana de floración de estas Mental Rainbow F1 de Sweetseeds.
Vamos al lío, las plantas se trasplantaron a macetas de 7 litros.
El ph se controla en 6.5, la temperatura la tenemos entre 24/21 grados y la humedad ronda el 50%.
El ciclo de crecimiento puse 12h de luz, el foco está al 100% de potencia.
Tengo visitantes, trips que combatiremos con control biológico.
Me gustaría estar más encima este cultivo pero la salud me está impidiendo un poco este 100% con el proyecto.
- os dejo por aquí un CÓDIGO: Eldruida
Descuento para la tienda de MARS HYDRO.
https://www.mars-hydro.com
Hasta aquí todo, Buenos humos 💨💨💨


Likes
33
Share


@NuggetPawn
Follow
Howdy,
This week has gone well, plant seems healthy with no noticeable deficiencies. My res leaked because a tube I had in the back was in the wrong place but all is sorted now. Thinking it was a crack in the tub, I drained it... So I had to replenish with a new set of nutes which I'm going to drag out for another 5/6 days.
PPM's are steadily dropping and PH is increasing so shes definitely ready for a richer feed.
Also learned about different TDS with the whole 0.5/0.7 conversion rate.
When topping for the 3rd time, I was a little too rough with one of the colas and it snapped without me realizing. I noticed about 2 hours later by which time it had already dried out a bit, its still alive but the growth is stunted.
Added a bit of PK as I noticed a few fan leaves had purple stems, cleared up within 2 days and back to lime green 🙃🌱
Update 22/08 - Day 30 from Sprout.
Changed out res as PH kept dropping and leaves started to go very slightly yellow. New nodes are already growing well, 3 times bigger than 2 days ago.
I think I'm going to flip on or around the 6th of September, which means a total of 45 days veg, or 6 and a half weeks. Next couple of weeks will just be about pruning lower leaves and some HST/LST. Might get a scrog net, tried using a tomato hoop but the one I have is shit...
Going well so far anyway!
Likes
17
Share


@420DeepGrow
Follow
Gracias al equipo de Seedsman Marshydro XpertNutrients y Trolmaster sin ellos esto no sería posible.
💐🍁 Tangerine Snow F1 Fast:
Esta gran cepa es un cruce de cuatro vías 75% sativa de (Boost x Tangelo) con (Lavender x Power Plant). Este híbrido Fast F1 proviene de la genética Cali y cuenta con excelentes terpenos cítricos, alta producción de resina para extractos, altos niveles de THC, muy buenos rendimientos y excelente resistencia al moho. Tangerine Snow F1 Fast se puede cultivar tanto en interior como en exterior. Los tiempos de floración en interiores son de entre 8 y 10 semanas, mientras que el tiempo de cosecha en las latitudes del norte es en septiembre, mientras que en el hemisferio sur los productores cosecharán durante marzo. Las regiones climáticas recomendadas son cálidas, secas, húmedas y cálidas. Se trata de plantas altas, semiramificadas, que superan los 200cm y que presentan un alto vigor con muy buena uniformidad. Al igual que muchas otras variedades con fuerte dominancia sativa, Tangerine Snow F1 Fast ofrece una excelente resistencia al moho, así como a las plagas y enfermedades de las plantas. La combinación de terpenos cítricos y mucha resina la convierten en una cepa de muy buen extracto, cuyo método de "lavado" produce muy buenos rendimientos de hachís. El perfil de terpenos cítricos recuerda a las mandarinas y mandarinas y también tiene notas dulces. La producción de THC ha sido verificada en laboratorio en un fuerte 24%, mientras que el CBD es bajo. El efecto es edificante y energizante, perfecto para usar durante el día y las primeras horas de la noche.
🌻🚀 Consigue aqui tus semillas:
💡TS-3000 + TS-1000: se usaran dos de las lámparas de la serie TS de Marshydro, para cubrir todas las necesidades de las plantas durante el ciclo de cultivo, uso las dos lámparas en floracion para llegar a toda la carpa de 1.50 x 1.50 x 1.80.
https://marshydro.eu/products/mars-hydro-ts-3000-led-grow-light/
🏠 : Marshydro 1.50 x 1.50 x 1.80, carpa 100% estanca con ventanas laterales para llegar a todos los lugares durante el grow
https://marshydro.eu/products/diy-150x150x200cm-grow-tent-kit
🌬️💨 Marshydro 6inch + filtro carbon para evitar olores indeseables.
https://marshydro.eu/products/ifresh-smart-6inch-filter-kits/
💻 Trolmaster Tent-X TCS-1 como controlador de luz, optimiza tu cultivo con la última tecnología del mercado, desde donde puedes controlar todos los parametros.
https://www.trolmaster.com/Products/Details/TCS-1
🍣🍦🌴 Xpert Nutrients es una empresa especializada en la producción y comercialización de fertilizantes líquidos y tierras, que garantizan excelentes cosechas y un crecimiento activo para sus plantas durante todas las fases de cultivo.
Consigue aqui tus Nutrientes:
https://xpertnutrients.com/es/shop/
📆Semana 12:
Definitivamente ella está en fase de floración, cambio el abono de crecimiento por abono de floración, está cargadisima de resina.

Likes
10
Share


@CVK31
Follow
Went back through my calendar and found that today is first day of week 11 above the soil. Plant is doing really well, som3 of the large lower leaves are getting crispy-curly. Buds are very dense, mostly orange curled up hairs. Mostly cloudy with a lot of amber trics on sugar leaves. Hardly any amber on upper buds. Started flush a week ago but just couldnt bare the thought of stsrving this poor plant so I added a little cha-ching back. Shes super stinky, the most beautiful stinky Ive ever experienced. Ive found that its almost impossible to wash the smell off of my hands! Made a little slide show this morning while drinking my tea. Hope you like it!
