Likes
Comments
Share


@Marihuanacali89
Follow
Bueno familia ya por lo menos paro el crecimiento y están empezando a engordar..ya no pasarán más la altura del foco .. bastante bien y cogiendo resina desde muy temprano... La verdad que los fertilizantes van muy bien y me adapto rápido a ellos porque ni carencias ni excesos..
@marshydro_amazonled @130.devin_mars
@marshydroled_amazon @coco_pan2022 @marshydro_amazon @co.ol9055 de 120x120x200 con el Fce-6500 con 650 w
Con humidificador
Dos ventiladores
Extractor con filtro y intractor
Y controladores de @wifiindoor mediante WiFi desde app movil
Todo con la gama mineral de @intensenutrientsspain @lidiacomercial


Likes
17
Share


@HowtoBubatz
Follow
We’re in the second week of flowering, and the plants are really starting to stretch! 🌿
They’ve gained good height, especially the one without LST, which has grown tall very quickly.
It’s been exciting to watch them reach upward as they prepare for the bud development phase.
Everything is looking good overall, and I’m happy with the progress so far. I’m really looking forward to seeing how the buds will start forming in the next few weeks! 😁✨


Likes
2
Share


@Fireproof
Follow
Ich habe die Erde von meinem Outdoor Grow wieder verwendet: Das war in einem 12l Stofftopf als Basiserde BioBizz Light-Mix mit Bio Tabs 50g Startrex und 5g Mycotrex wie in der Anleitung angegeben. Dann habe ich zwei neue Langzeitdünger Tabletten ca. 10cm tief in die Erde eingebracht. Anschließend mit 1g/l Bactrex und 10ml/l Orgatrex in 1l Wasser aufgelöst und gegossen.
Lampe zunächst auf 30cm Abstand zur Erde. Nachdem der Sämling etwas gespargelt hat, habe ich die Lampe auf 15cm gehängt.
Die beiden Umluftventilatoren laufen meistens 10h pro Tag, da sie mir aktuell im Home-Office noch zu laut sind.
Die Lampe ist auf 40% gedimmt. Die Abluft ist noch aus.
Temperatur liegt bei 24 Cº, bei 60-80% Luftfeuchtigkeit.
Details:
15.10.24: Samen in Wasserglas
21.10.24: Samen ist gekeimt, direkt in großen 12 l Topf mit BioTabs Erde vom Outdoor Grow, 12l Stofftopf auf Fensterbank
22.10.24: Topf ins Zelt gestellt
23.10.24: 2xBioTabs Langzeitdünner in Erde gedrückt. Mit 1l Wasser gemischt mit 1g Bactrex + 10ml Orgatrex gegossen
24.10.24: Geschlüpft
25.10.24: 09:30: Scheint etwas zu spargeln, Lampe von 30 auf 15 cm geändert. / 17:00 Höhe Stamm: 30 mm
27.10.24: 09:30: Höhe Stamm: 35 mm / Abstand Lampen zu Blattspitze: 10 cm
Habe mich gefragt, ob der Abstand der Lampe nicht zu gering ist. In https://www.weed.de/wissen/anbau/hanf-wachstumsphasen steht folgendes zur Sämlingsphase.
✅ Lichtquelle positionieren: Positioniere die Lichtquelle etwa 5-10 cm über den Pflanzen, um das Wachstum zu fördern und ein Ausdünnen (Stretching) der Sämlinge zu vermeiden.
✅ Luftzirkulation: Eine leichte Brise, erzeugt durch einen Ventilator, stärkt die Stängel und verhindert Schimmelbildung. Stelle sicher, dass die Luftzirkulation sanft ist, um die zarten Sämlinge nicht zu beschädigen.
✅ Eintopfen: Wenn die Wurzeln der Sämlinge das Anzuchtmedium durchdringen, ist es Zeit, sie in größere Töpfe umzupflanzen. Verwende ein gut durchlüftetes, nährstoffreiches Medium und sei vorsichtig, um die empfindlichen Wurzeln nicht zu beschädigen.

Likes
3
Share


@Drtomb
Follow
Had an issue this week with a fsn getting unplugged and the tent was extremely hot for several hours. Some of the top buds even got cooked. I took off thendesd material at the top and I'm hoping for a speedy recovery.


Likes
11
Share


@Hempshire_Empire
Follow
Shes really doing her thing. I have had so much fun growing this and learning, It's exactly what I hoped for in a first grow, and better yet one of my favorite classic strains. So excited for real buds to fatten up.


Processing
Likes
4
Share


@Grow_of_Leisch
Follow
-Bagseed from Breeder (Friend)-
•Cherry Cream
Genetics:
•Ice Cream Man (mother)
x
•Cherry Wine (CBD) (father)
Ratio 1:1
Likes
6
Share


@midnitrtoker
Follow
Been a slow week. Been trying to fill out as much of the Scrooge as I can. I will be defoliating in a couple days. I still want to see if any more sites will reach above the trellis. The feeding is still the same 4g B1/B2 of Floraflex and 2gs of Bulky B per gallon. Thank you all again for tuning in to my diary see you all again next week.
Likes
7
Share


@Nikkov
Follow
Well, another week has passed and the end of the second week has come and the pistils have already shown themselves and I continue watering with top crop bloom, first time testing this fertilizer and I'm only using two of them, top veg and top bloom, next cycle I'm going to use General Hydroponics fertilizers because I have a friend who uses them and he's having great results, I still want to talk to my friends about this strain because I think it hasn't grown as it should, but anyway we're studying to improve ourselves for the next ones, the rest is all experience for the next ones it grows. =D
Likes
2
Share


@Janerussel
Follow
FW 4. I made a light defoliation. Now I have some problems with the space😅


Likes
42
Share


@Only4passion
Follow
🍀42fastbuds🍀
Guava auto x3: 57/63 days flow
Papaya sherbet x3: 70 days flow
Gorilla melon x2: 70 days flow
Likes
9
Share


@pzwags420
Follow
At the end of week 6 the buds are bulking up and the trichomes are going milky with red hairs pulling in will wait for more amber trichs before harvest which I anticipate around week 8-10.

Processing
Likes
25
Share


@Xanthur
Follow
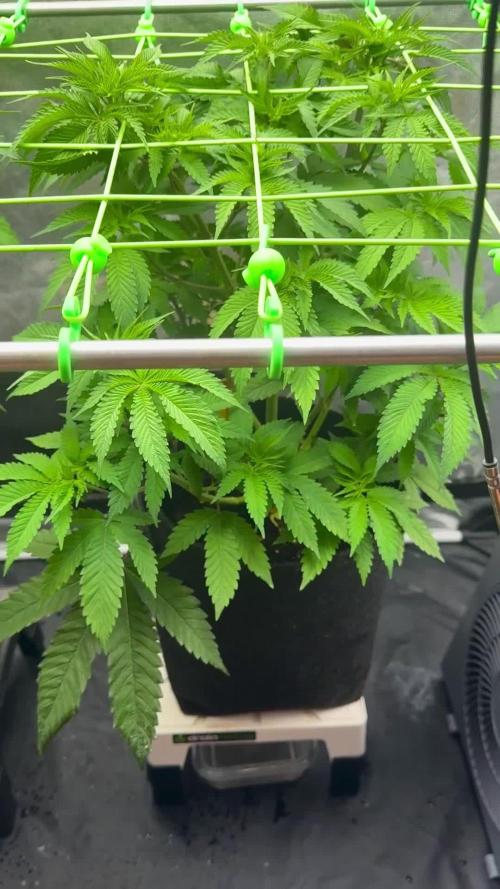
This week stretching is done. One of them had a late growth spurt, and is now only 16 inches below the light. It doesn't feel too hot. Leaf temps are 78 right under the light. I'll leave it unless it starts to show signs of stress. You can clearly see her in the pics and video.
I have a problem with controlling smell. My house has an entryway that is open to the basement but separated from the main floor, so the entryway smells like the basement. I know what you are thinking... But it is not flower smell. It smells too clean! The massive fan and filter are running at high power to control humidity, and that makes the whole basement smell not normal.
Other than that, the tent is on autopilot for now. Not much work needed other than adding 5-10 gallons of plain water every day.


Likes
6
Share


@GoldenWeedGrower
Follow
Legend
Timestamp: 📅
EC - pH: ⚗️
Temp - Hum: 🌡️
Water: 🌊
Food: 🍗
pH Correction: 💧
Actions: 💼
Thoughts: 🧠
Events: 🚀
Media: 🎬
D: DAY, G: GERMINATION, V: VEGETATIVE, B: BLOOMING, R: RIPENING, D: DRYING, C: CURING
______________
📅 D22/V18 - 07/05/24
⚗️ EC: 0.7 pH: 5.3
🌡️ T: 22 °C H: 50%
🌊
🍗
💧
💼
🧠
🚀
🎬 1 TL video
______________
📅 D23/V19 - 08/05/24
⚗️ EC: 0.7 pH: 5.3
🌡️ T: 22 °C H: 50%
🌊
🍗
💧
💼 Topping and LST
🧠
🚀
🎬 1 TL video of grow and one of the topping
______________
📅 D24/V20 - 09/05/24
⚗️ EC: 0.9 pH: 5.4
🌡️ T: 19 °C H: 50%
🌊
🍗
💧
💼
🧠
🚀
🎬 1 TL video
______________
📅 D25/V21 - 10/05/24
⚗️ EC: 0.9 pH: 5.4
🌡️ T: 19 °C H: 50%
🌊 12 L
🍗 Calmag, Grow A-B, B52, Hydroguard, Rhino Skin, Bud Candy
💧
💼
🧠
🚀
🎬 1 TL video
______________
📅 D26/V22 - 11/05/24
⚗️ EC: 0.9 pH: 5.4
🌡️ T: 19 °C H: 50%
🌊
🍗
💧
💼
🧠
🚀 Out of Home
🎬 1 TL video
______________
📅 D27/V23 - 12/05/24
⚗️ EC: 1.0 pH: 5.3
🌡️ T: 20°C H: 50%
🌊
🍗
💧
💼
🧠
🚀 Out of Home
🎬 1 TL video
______________
📅 D28/V24 - 13/05/24
⚗️ EC: 1.0 pH: 5.2
🌡️ T: 20°C H: 50%
🌊
🍗
💧
💼
🧠
🚀 Out of Home
🎬

Likes
31
Share


@Neo09
Follow
What can i say? 👌😀🤷🏻 ...this round compare with first round 10K watt heaven - you/me cant compare.. we do just less mistakes and and this is result :)

Likes
Comments
Share