


Likes
2
Share

@All_about_420
Follow
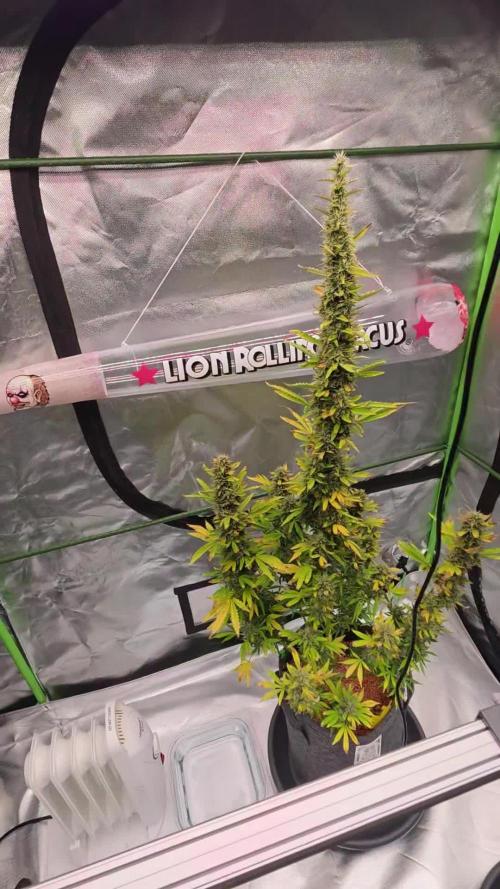
Und sie wächst und wächst und wächst...
Ich weiß gar nicht, wo sie noch hin will.
Macht aber nix, die Nähe zur Lampe scheint ihr nix auszumachen.
Seit dem 03. Jan darf sie jetzt auch das komplette Licht ganz alleine ausbeuten,
da die beiden fast buds, wie der Name schon sagt ;)
früher fertig waren.
Likes
14
Share


@Wenz004
Follow
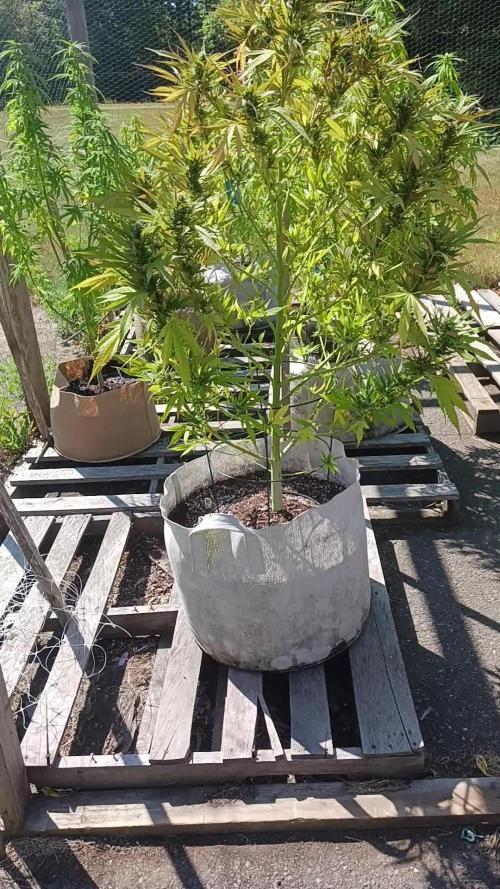
my first coco grow...2 plants
1. northern light auto untopped in spider farmer tent 150x150 cm (5×5) with Aptus nutrients...this one goes out of control...let see if I can repeat this crazyness
2. northern light auto topped in spider farmer tent 70x70 cm and mainly TA nutrients
Nutrients mentioned above are for NL topped (2.) in smaller tent (pictures follow)
NL untopped (F-MILF) got this week the following:
Aptus Topbooster 6 drops/l
Aptus P-boost 12 drops/l
Aptus K-boost 6 drops/l (this week added new)
Aptus regulator 3 drops/l
Aptus All in one 0.6 ml/l
Aptus CaMg 0.6 ml/l
TA Silicate 0.4g/l
End of week 10 installed some self-watering (3 days off)...with coco problematic let see...final two weeks will be completely without any manual influence (2 weeks off)...hopefully staying alive

Likes
11
Share


@Skinnytalls420
Follow
Just as difficult to grow as the first time I done Afghan kush but still managed to get some nice purple bud out of it!!!
Likes
16
Share

@masterofsmeagol
Follow
8/23 I WATERED THE NATURAL MK ULTRA AND THE 10TH PLANET IN THE BACK WITH A GALLON AND THE TWO TENS SPLIT A GALLON. It's hotter today and the wind is picking up. I wish I had gotten rid of that plant when I thought to. Oh well. I'm going to have to bite the bullet and treat things. Smell is increases as well as flower size. However I'm noticing more leaves that are yellowing and falling off. Smell has intensified. The special kush in late flower doesn't seem to be producing trichomes like it should. Or maybe it's still early. I see some but by this time I would think it would be frosty as hell! It's rained like once this summer. I've put tons of work into defoliating. I'm not sure if I'll try a controlled spray trying to avoid buds or if I should use a sponge and just hit every leaf. At least I'm seeing that the buds are still expanding and smelling despite these invisible Bastards. It's not like I see them. Even my traps only caught like one. I'll update as I go.
EDIT: WATERED THE TENTH PLANET AND THE LATE SOECIAL KUSH 1 GAL. PLAN ON FEEDING TOMORROW. I DID A SHIT TON OF DEFOLIATION. I DONT SEE ADULT THRIPS BUT I SEE THE EGGS AND SHIT IN THE CREVICE AND SOMETHING IS COMING AND EARING SMALL LOWER FOLIAGE. I RIPPED TWO INTERIOR BRANCHES OFF THE PLANTS I TREATED BEFORE WITH CITRIC ACID BECAUSE I FOUND A COUPLE STOPS OF MOLD ON THE STEM. AFTER RESEARCHING THRIPS WITH A.I. UNTIL IT LITERALLY CHANGED PROTOVAL AND STOPPED HELPING ME SAYING IT DANT HELP CULT8VATE CANNABIS AFTER GIVING ME SEVERAL DIFFERENT INSTRUCTIONS AND OPTIONS. I SCREENSHOTTED THEM THOUGH. I USED THE SAME MIXTURE OF CITRIC ACID AMD DAWN ONLY HALF STRENGTH AND HIT THE 10TH PLANET AND PINK KUSH THAT ARE PATIENT ZERO. THEN I TOOK A SPONGE AND EITHER DEFOLIATED OR WIPED THE LEAVES WITH A SPONGE AND SAME CONCOTION ON THE SPECIAL KUSH IN THE TEN. I DEFOLIATED MORE AND THEN "SPOT TREATED" A FEW LEAVES ON A BOTTOM BRANCH OF THE 10TH PLANET WITH MITE X. I'M WAITING UNTIL THE MORNING TO SEE THE RESULTS AND BEFORE I MOVE FORWARD. I HAVE ORGANOCIDE BEE SAFE AND I KNOW IT WORKS GOOD BUT IT SMELLS LIKE SHIT. IM HOPING ILL FIGURE THIS OUT.
8/24 Didn't have time to do a video or take any pictures. I pit a lot of work in the garden yesterday. I removed a couple small branches that had mold on the stem. If I had listened to my intuition and moved that plant (instead of listening to my dad) I probably could've negated this mess. Windy as hell yesterday. Maybe that's why I don't see mich damage from the thrips. The runt in the 50 has some silver ingredients on it. I'm considering using spinosad. Those are way earlier in flower and that shit WORKS. WATERED TODAY;BIG MK ULTRA 1.5, THREE IN THE BACK ROW, CHEMDOG AND TENTH PLANET ALL GOT 1 GALLON. THE TWO TENS SPLIT A GALLON. I THEN FED EVERYTHING WITH A QUART OF FOOD. I'll keep an eye out on the dosage and see what the can handle. I left out plant doctor as I'm dealing with thrips. Took a leaf that looked like sep off the pink kush in the 50 with half used soil. I didn't have much time to look around but I will when I get back and I'll put some vids/pics up. The plants that I treated with citric acid looked no worse for the wear and actually BETTER than they hadcthe day before. The other 10th planet and the Pink kusg in the ten are the worst. If I can't beat it I may junk them. I'm planning on treatingvtge plants I didn't yesterday tonight. I may use a different treatment I'm not sure.


Likes
6
Share

@SkullRipper
Follow
Flushed all week with RO water at 6.2
Humungous big fat bitches are falling all over the place!
Will be harvesting next week.
TTfn Skully

Processing
Likes
6
Share


@Shellshocked
Follow
Clones took out of dome 5 days ago soil was made 2 hot and got a bit of deformed leaves not looking so good as there fresh clones just rooted let's see what they look like in a week
Likes
15
Share


@Waveform
Follow
Instead of pictures showing a dying lady: A timelapse video of their whole life.
Had lady #2 run under continuous light for the last days. Probably went one day too far, which caused her buds to become somewhat fluffy too, but full of resin as well.

Likes
12
Share


@BeHappyNtoke
Follow
She is so beautiful her colors are coming in so nicely not to mention the pungent smell of gas that smells just how it did out the bag sheesh buds are nice and dense Im sad to see her coming to an end 😂 soon need to definitely try my hand at a reveg once she is done will continue to update as the weeks follow
Likes
17
Share


@420DeepGrow
Follow
Gracias al equipo de Seedsman Marshydro XpertNutrients y Trolmaster sin ellos esto no sería posible.
💐🍁 Tangerine Snow F1 Fast:
Esta gran cepa es un cruce de cuatro vías 75% sativa de (Boost x Tangelo) con (Lavender x Power Plant). Este híbrido Fast F1 proviene de la genética Cali y cuenta con excelentes terpenos cítricos, alta producción de resina para extractos, altos niveles de THC, muy buenos rendimientos y excelente resistencia al moho. Tangerine Snow F1 Fast se puede cultivar tanto en interior como en exterior. Los tiempos de floración en interiores son de entre 8 y 10 semanas, mientras que el tiempo de cosecha en las latitudes del norte es en septiembre, mientras que en el hemisferio sur los productores cosecharán durante marzo. Las regiones climáticas recomendadas son cálidas, secas, húmedas y cálidas. Se trata de plantas altas, semiramificadas, que superan los 200cm y que presentan un alto vigor con muy buena uniformidad. Al igual que muchas otras variedades con fuerte dominancia sativa, Tangerine Snow F1 Fast ofrece una excelente resistencia al moho, así como a las plagas y enfermedades de las plantas. La combinación de terpenos cítricos y mucha resina la convierten en una cepa de muy buen extracto, cuyo método de "lavado" produce muy buenos rendimientos de hachís. El perfil de terpenos cítricos recuerda a las mandarinas y mandarinas y también tiene notas dulces. La producción de THC ha sido verificada en laboratorio en un fuerte 24%, mientras que el CBD es bajo. El efecto es edificante y energizante, perfecto para usar durante el día y las primeras horas de la noche.
🌻🚀 Consigue aqui tus semillas:
💡TS-3000 + TS-1000: se usaran dos de las lámparas de la serie TS de Marshydro, para cubrir todas las necesidades de las plantas durante el ciclo de cultivo, uso las dos lámparas en floracion para llegar a toda la carpa de 1.50 x 1.50 x 1.80.
https://marshydro.eu/products/mars-hydro-ts-3000-led-grow-light/
🏠 : Marshydro 1.50 x 1.50 x 1.80, carpa 100% estanca con ventanas laterales para llegar a todos los lugares durante el grow
https://marshydro.eu/products/diy-150x150x200cm-grow-tent-kit
🌬️💨 Marshydro 6inch + filtro carbon para evitar olores indeseables.
https://marshydro.eu/products/ifresh-smart-6inch-filter-kits/
💻 Trolmaster Tent-X TCS-1 como controlador de luz, optimiza tu cultivo con la última tecnología del mercado, desde donde puedes controlar todos los parametros.
https://www.trolmaster.com/Products/Details/TCS-1
🍣🍦🌴 Xpert Nutrients es una empresa especializada en la producción y comercialización de fertilizantes líquidos y tierras, que garantizan excelentes cosechas y un crecimiento activo para sus plantas durante todas las fases de cultivo.
Consigue aqui tus Nutrientes:
https://xpertnutrients.com/es/shop/
📆 Semana 4:
Continuamos la etapa de vegetación, ella se desarrolla muy bien 😎, comienza el buen tiempo, temperaturas agradables para todos.
Esta semana se aplica una solución de trichodermas para una mejor adaptación aunque realmente va genial.
Se mantiene 1/3 de nutrientes Master Root y Master Grow

Likes
54
Share


@AsNoriu
Follow
Day 115 since seed touched soil. What a pain to trim it was , almost 5 hours wasted
and still see yellow ;(((( .... Journey is almost over ...
This girl taught me few things for sure ;)
Few month later : very important and lovely news, Seeds Mafia just transfered promised money for diary, so one more huge respect to them !!!! Great house, strong genetics and most important - they follow theirs promises !!!! Highly recommend !!! My first earned cash for growing , it was lovely !!! Check germination week if you dont get it ;))))
Happy Growing !!!


Likes
13
Share


@Growyourownathome2x2
Follow
7th of May Day 59 day 11 of 12/12 4 plants are looking healthy the stretch has started and and the canopy is starting to get a bit dense I may rom I’ve some large fan leaves on day 14 of 12/12 to give better airflow and allow for the lower growth to get more light, I can picture the colas already 😁🍁 ppm still going in at 650 ph 6.5, i top dressed each plant with fish blood and bone mean 3 table spoons to each 3gal pot on day 1 of flower

Likes
20
Share


@Stickybudz420
Follow
Just hoping she fattens up with a bit more frost, overall I’m happy with how she’s growing! 😄🤞🌲

Likes
77
Share


@Roberts
Follow
FBT2309 is doing okay. She is running high in nitrogen. But with this being a organo-mineral dwc I have been having issues in past dialing in the right amounts. She is still growing great overall. Starting to develop some frost, and progressing with her Cola development. If toxicity gets worse I will change the solution soon. I diluted it down some, but it doesn't always work. Thank you Gen1:11, Medic Grow, and Fast Buds. 🤜🏻🤛🏻🌱🌱🌱
Thank you grow diaries community for the 👇likes👇, follows, comments, and subscriptions on my YouTube channel👇. ❄️🌱🍻
Happy Growing 🌱🌱🌱
https://youtube.com/channel/UCAhN7yRzWLpcaRHhMIQ7X4g
If anyone needs to purchase fastbuds here is a link for my affiliate program
https://myfastbuds.com/?a_aid=60910eaff2419
Likes
37
Share


@Wrongholn519
Follow
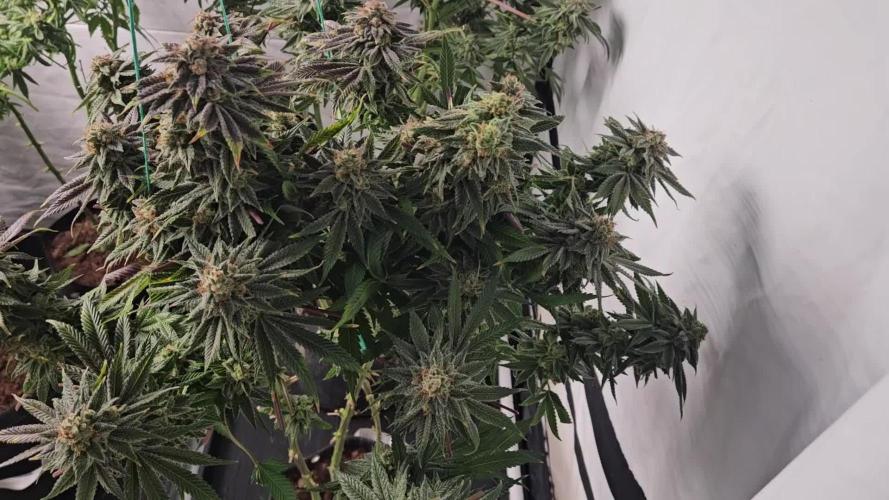
This is a seriously hard plant to take photos of, it's so big and lanky. She's on about a 20 degree angle at this point too, she's very top heavy 🤣
Very impressed with this girl. I almost tossed her out as a seedling due to her mutation; I've included a seedling photo to show the reader how far this plant has come.
She has produced very dense and sticky buds with extremely strong aromas. She smells like candy and gas, just like a zkittles female would smell late in flower.
It's been an easy grow. I'm expecting about 4 oz of high quality flower after dry and cure stages. I intend to press at least half of my yield with my rosin press. This seems like the perfect strain to make concentrates with due to the high terpene/trichome levels.
I just added a photo of the Forbidden Runtz i grew in round 1 directly above round 2 flower for a comparison between the two. Round 1 is the two top buds that have more brown/red tone in colour. Round 2 are the lower two buds...a bigger, danker, and better version of the Forbidden Runtz I grew the first time. Please leave a comment to tell me what you think of the photo comparison.
I will be planting one outside for round 3 shortly.
Thank you growdiaries.com
Thank you Fastbuds
Thank you to all the growers who helps offer me advise when I needed it
Likes
6
Share


@IQuSX
Follow
#frozen
Всем привет, снайпера!
Вот обморозил кончики малыш ZZ, а мог бы быть уже…
Хотя такое ощущение, что просто обмерзли корни…
Посмотрим>>
Likes
10
Share


@asstonmartian
Follow
Ok so I put a significant amount of time into this grow. Learned a ton (everything lol) as it was my first. After the final week, I decided to harvest when the trichs were milky and clear. Few amber here and there but time constraints meant I had to chop a bit earlier than I’d have preferred.
I do prefer a more uplifting cerebral effect yet realize with an indica leaning strain, having all cloudy and maybe 25% amber would have been 👌🏼.
My drying process began by chopping a plant at a time, I washed the buds to get the PM or traces off (also grime from outdoor city air). I used a big bucket and did hydrogen peroxide. In heindsight I would have used baking soda as well and did a two step wash.
After washing them, I hung to dry with a fan until they stopped dripping then into the tent they went for drying at roughly 68 degrees and 55% humidity.
I staggered the harvest and wet trimmed about 70% of the time with the latter 30% dry trimmed. This was done for convenience and to try both ways.
I dried everything for about 12-13 days until the smallest stems snapped and the larger ones were borderline cracking. I started jarring everything with humidity meters, about a half oz per smaller widemiuth jam jar.
The smell was never hay-like but did vary in strength and scent from plant to plant. Almost no seeds which was pretty great to see. One of the outdoor plants had quite a few seeds so I kept that separate. It ironically had the stinkiest floral smell.
So what’s the total!! After curing in jars for about a month, I weighted everything and came out with 10.5oz of cured trimmed flower and about 2 oz of sugar leaf trim which I am making canna butter with and cooking. Made some reduculously strong cookies: 11 cookies from about 10 grams of trim. Ate two and was medicated for about 24hrs 😂.
Some of the buds were super dense and cured down to 58 RH easily. There were a few of the large big buds that had mass but less density and fewer trichomes. These were more red-hair visually than the others.
The smoke: surprisingly smooth. The effect is energizing and uplifting at first, with a nice sedative body feeling on the second half of things.
Overall, I’m super happy with the result. Learned a TON and will be modifying my approach a bit next go-around this spring. Stay tuned!!!