
Likes
Comments
Share


@Grow_N_Smoke
Follow
I went ahead a flipped into flower and the girls have responded really well!
I had some issues last week but I think adjusting the PH down to 5.9 helped and diluting my nutrient solution to bring down my EC levels helped as well


Likes
3
Share


@Budz420
Follow
Great start for week 8, did some defoliation and removed some low leaves, did not feed Floragro since I don't want them to grow more ( No space ) after stoped feeding them Flora grow, they focused on blooming. Interesting week so far.
Processing
Likes
20
Share


@DrGanj
Follow
budding up nicely now. One pheno looks to be growing different bud formations and is much more frosty. O stupidly didn't take a cut of this in veg so I've taken a flower cut to reveg and try monstercropping.

Likes
13
Share


@GanjaFarmar
Follow
Day 57 from seed and these BCN’s are smelling the best so far. Very citrusy smell! I think this is my last week of feeding these girls, and straight to flushing the plants next week. Im going to give them an extra week or two and see how it goes!

Likes
18
Share


@NMGDOC
Follow
6 week started in July, 8.
In this week i incorporate some CO2.The plants look great.The tallest plant is a syrup buddha, its weird because she is one week younger.I know that i said that i will do another diarie for the younger plants but im lazy, and the other plants are faster than the Lemons, so they are kind of in the same week.
I keep feeding them with 1/2 of the snoop's premium nutrients bloom and the other half with snoop's premium nutrients grow, following the recommendations of the product. Also i incorporate Genesis from Agrobeta (pictures in the 5 week).


Likes
2
Share


@Gulliver
Follow
Итог :
6 автоцветов
Палатка 1.2 х 1.2 м
Свет 600 Ват
775г общий урожай 1.3грамм на ват
Прошло все очень хорошо 👍
Запах шишек просто райский!
Likes
209
Share


@BioBuds
Follow
It was finally time to harvest her, what good times we had with her. Amazed with how beautiful this plant is, how easy to manage and train and how rewarding Orange Hill Special is.
So we said our thanks and goodbye, thanked her for all the joy she gave while growing her. I realize more and more how I love growing them even more than the end-product.
It takes my mind of all going on for a while, in my miniature jungle world in the attic.
Im sure all of you just sometimes sit there and watch them, in wonder, dreaming away with a good buzz on, watching them wave in the wind of the fans.
So with a heavy hart I apologize, play them their last music, sit with them and feel them and smell them, watch the glistening of the cristals.
In the end we had 209 gram dried Orange Hill Special, I will know the total of the grow, in a few days, since the final big whopper still has to dry: my XtraKush, be sure to check the harvest of that one *in couple of days) and see a one-dollar seed outperform two 10 dollar seeds.
I probably go over 500 grams for the total grow, which would be 1.6 grams per watt. Big success!
Consider an SP-3000 for your next light, you won't be disappointed! Check www.mars-hydro.com for the latest discounts!
Thank you @MarsHydroLED for letting us try out your light, it made this successful grow possible!
Greetings and all the best! Thank you to our friends here, our followers and the whole Growing Diaries community for just being there.
Big Hug,
Sunshine and BioBuds


Likes
3
Share

@TerpNoobster
Follow
Week 4
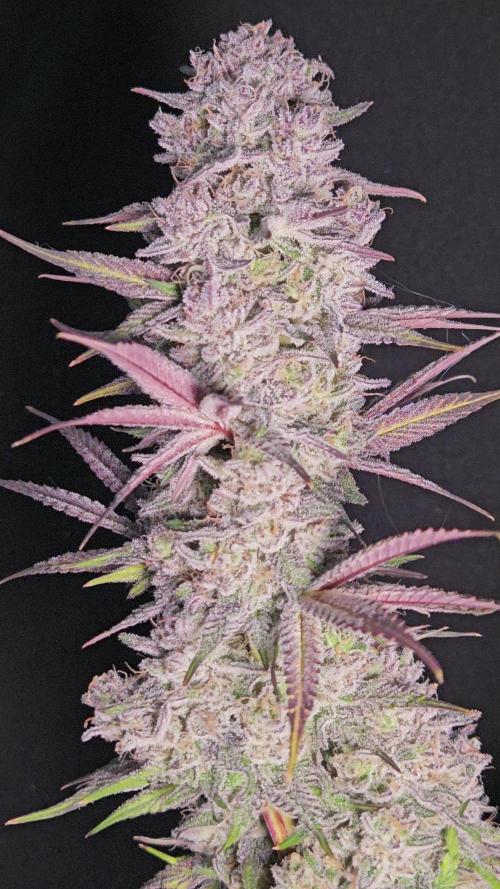
Fattening up. Smell is strong, straight candy. Purple coming through already. Final defoliation in a couple days. Now it's time to pack on some weight.
Likes
24
Share


@PrairieFrostGrow
Follow
***** Week 4 Veg - December 26/20 to Jan 1/21 *****
The girls were transplanted on Christmas day, after three weeks in the solo cups from seed. They had been growing well in cups but I must admit that I feel the root mass should have been larger after that time period. I am working with a new nutrient line that I have not used before and have not been adding microbes to the feed schedule thus far.........or hardly any. I feel this is why the root system, while looking healthy, is looking too small. Over the next couple weeks will ensure they get lots of microbes in the 1 gal pots to fill those up with roots before moving to 5 gal pots.......the last upsize for this girls. Counting my weeks for finish I am wishing that I had started these girls a couple of weeks sooner so they may not get to veg in the 5 gal pots for a couple of weeks before flipping to flower.
For these girls it is still pretty early on in their lives and not many exciting things to happen the first month of seedlings. We have done one upsize and another to go. Keep the feeding in line and follow the week 1 veg feeding for these girls, bringing up the ppm closer to 700ppm range.
Overall, happy with first couple of weeks of veg. Need to get more roots going, we will, but otherwise just give them the time to mature and take it easy......they will come along😀 She is looking very nice and even so far and keeps catching my eye when I open the tent😂😎
Little more detail.......
Dec 26/20, Day 22 Veg
- Dry out day after being transplanted yesterday.
- Pots were still heavy.
- Let the microbes in the media do their thing and start pushing root growth harder than what has been happening.
Dec 27/20, Day 23 Veg
- Gave the girls a little splash of the left over nutes from two days ago to add a little oxygen and they can take the extra microbes and bacteria right now😀
- 200ml with Microbial Mass and Piranha @ 2ml/L = 650ppm and 5.7pH
- They are really happy today!!!! Loving the bigger pot to let those valuable roots expand into nice fluffy new coco and soak up the nutrients👍
- This girl has always had wider fan leaf blades than the other two girls. She is shorter but wider.......hell, kind of like me
Dec 28/20, Day 24 Veg
- feeding day today with more water to get some runoff from the 1 gal pots. They have not been watered to runoff yet.😀
- 0.5L each girl with the full line for this week. No other additives, just the IPP line = 700ppm and 5.7pH
- seems a little high to jump from around 300ppm to 700 but will follow the companies recommendations👍
Dec 29/20, Day 25 Veg
- Dry out day.
- they are happy today......not much to add otherwise today
Dec 30/20, Day 26 Veg
- going to give them another day without watering.
- I feel like I should be watering today but I am not as I am not sure how much moisture they will have consumed and the roots need some air to breath so holding off.
- think it is a CalMag only feeding tomorrow.
Dec 31/20, Day 27 Veg
- feed day today since it has been a couple of days.
- 500ml with CalMag @ 2ml, Gold Storm @ 7ml, Sea Storm @ 5ml, Blackstorm @ 2ml, Vitamin B @ 0.5ml = 525ppm and 5.7pH
- keeping the humic and fluvic acids going in, plus Kelp and CalMag👍
- the girls are happy and seeing forward movement everyday, looking for more aggressive though from the girls.
Jan 1/21, Day 28 Veg
- doing very well......like really well💪
- didn’t push them today and left them alone for watering, pots of course still had some weight and I didn’t expect them to need today.
- Optic Folier Overgrow given today. Folier spray to give them just an extra boost since everything is otherwise dialed in👍
Finishing off the week very strong!!!!!! They have been looking very healthy and perky everyday. The roots are a concern and will be taking it easy on the nutrients for another week yet and keep up the microbes and beneficials. Will get them in line......my hope is too keep their time in the 1 gals down to two weeks max......maybe 10 days??
Looking pretty good ETS as we move through the first upsize and get veg going here. She has been very steady right from the start and continues with steady growth in early veg. Her branching is growing laterally and keeping short node spacing in her growth, perfect!......again, still pretty early on but its all good so far😎
Processing
Likes
13
Share


@kevgrow
Follow
Hey Growers, End of week 10 from seed
Earlier in the week I began noticing an orange color on some leaf tips, I probably overfed them nutrients so I fed them just water with a ph of 6.0 on the following feeding schedule and the leaves are looking better now.
Last week a weird smell was coming out from the colas, its slowly changing. Its now starting to smell like 🍃 🍋 ⛽️
Noticed a small Increase in orange pistils
I want to increase light intensity but I am worried the red stems on the top of the plant will get worst and then affect the whole plant. Only the top part of the plant has some red stems, the rest are all green.
QUESTIONS
How close am I from Harvesting?
When should I begin flushing?
Processing
Likes
9
Share


@Divs_darkroom
Follow
She is a strong and resinous plant. I am seeing some kind of deficiency but I'm too far into flower to care about fixing it. Same thing happened to my last bluetoof. Same nutrient mix as the toof decay and that plant looks great. She smells sweet :)


Likes
11
Share


@Fyno_TH
Follow
✂️ Harvest — From Chop to Bubble Hash (Final Review) 🌿❄️
Harvest completed with dense, resin-heavy buds and fully swollen calyxes. Trichomes were mostly cloudy with a touch of amber, and the aroma at chop was loud — sweet, citrusy, and greasy, filling the room instantly 🍊🔥
After harvest, the plant was air-dried for ~5 days at 16–19 °C, keeping conditions cool to preserve terpenes and trichome heads. Instead of a full flower cure, I chose to process the harvest into Bubble Hash, focusing on resin quality and terpene retention ❄️🌿
The wash went very clean — trichome heads separated well, showing strong resin production despite earlier challenges during the run. Smell stayed fresh and powerful throughout the process, confirming the effectiveness of the environment control and flush.
This grow was a big learning experience. From training in veg, managing powdery mildew in early flower, switching to RO water, and finishing with Flawless Finish, everything contributed to a clean and satisfying result. Ending with one plant proved that quality and consistency matter more than numbers 👑
Overall, very happy with the outcome — solid resin, loud terps, and valuable lessons gained for the next run. Looking forward to applying everything learned into the next diary 🌿🔥

Likes
17
Share


@Fitzwell
Follow
2 Gallons every feed
PH to 6.2
So far im liking trainwreck.
I did a ton of trimming i wanted more light to hit my bud sites. As they say we ain't growing leaves.
Think I need to add more cal-mag might be turning into a cal-mag whore? We will see......

Likes
8
Share


@RdSkM
Follow
Día 54. A pesar de todos los problemas e inestabilidad con esta planta, parece haberse quedado pequeña, no obstante sus flores fueron engordando y compactándose y se ven una delicia de colores y cristales blancos encima como pequeña montañas.
Ya falta poco...


Likes
13
Share


@DOOBS_N_BREWS
Follow
10/14-its clear these babes want to flower. HULK A,C, and D are doing fine/bouncing back from my error in week 5. HULK B seems to have been affected the most and is trying to recover.
-Im not going to neut feed until the middle of the week depending on how the plants look!
10/15- Watered with Rhizotonic to aid the plants.
10/18- Plants are growing again! and looking happy! all is well.
10/20- Last day of the week but I decided it was time to feed. I started the first round of bloom feed.
P.S sorry about the purple light in all my photos! I broke the zipper to my grow tent so taking them out is super hard! I will try and take better photos here on out!

Likes
17
Share


@420DeepGrow
Follow
Gracias al equipo de Seedsman Marshydro XpertNutrients y Trolmaster sin ellos esto no sería posible.
💐🍁 Tangerine Snow F1 Fast:
Esta gran cepa es un cruce de cuatro vías 75% sativa de (Boost x Tangelo) con (Lavender x Power Plant). Este híbrido Fast F1 proviene de la genética Cali y cuenta con excelentes terpenos cítricos, alta producción de resina para extractos, altos niveles de THC, muy buenos rendimientos y excelente resistencia al moho. Tangerine Snow F1 Fast se puede cultivar tanto en interior como en exterior. Los tiempos de floración en interiores son de entre 8 y 10 semanas, mientras que el tiempo de cosecha en las latitudes del norte es en septiembre, mientras que en el hemisferio sur los productores cosecharán durante marzo. Las regiones climáticas recomendadas son cálidas, secas, húmedas y cálidas. Se trata de plantas altas, semiramificadas, que superan los 200cm y que presentan un alto vigor con muy buena uniformidad. Al igual que muchas otras variedades con fuerte dominancia sativa, Tangerine Snow F1 Fast ofrece una excelente resistencia al moho, así como a las plagas y enfermedades de las plantas. La combinación de terpenos cítricos y mucha resina la convierten en una cepa de muy buen extracto, cuyo método de "lavado" produce muy buenos rendimientos de hachís. El perfil de terpenos cítricos recuerda a las mandarinas y mandarinas y también tiene notas dulces. La producción de THC ha sido verificada en laboratorio en un fuerte 24%, mientras que el CBD es bajo. El efecto es edificante y energizante, perfecto para usar durante el día y las primeras horas de la noche.
🌻🚀 Consigue aqui tus semillas:
💡TS-3000 + TS-1000: se usaran dos de las lámparas de la serie TS de Marshydro, para cubrir todas las necesidades de las plantas durante el ciclo de cultivo, uso las dos lámparas en floracion para llegar a toda la carpa de 1.50 x 1.50 x 1.80.
https://marshydro.eu/products/mars-hydro-ts-3000-led-grow-light/
🏠 : Marshydro 1.50 x 1.50 x 1.80, carpa 100% estanca con ventanas laterales para llegar a todos los lugares durante el grow
https://marshydro.eu/products/diy-150x150x200cm-grow-tent-kit
🌬️💨 Marshydro 6inch + filtro carbon para evitar olores indeseables.
https://marshydro.eu/products/ifresh-smart-6inch-filter-kits/
💻 Trolmaster Tent-X TCS-1 como controlador de luz, optimiza tu cultivo con la última tecnología del mercado, desde donde puedes controlar todos los parametros.
https://www.trolmaster.com/Products/Details/TCS-1
🍣🍦🌴 Xpert Nutrients es una empresa especializada en la producción y comercialización de fertilizantes líquidos y tierras, que garantizan excelentes cosechas y un crecimiento activo para sus plantas durante todas las fases de cultivo.
Consigue aqui tus Nutrientes:
https://xpertnutrients.com/es/shop/
📆 Semana 5:
Definitivamente se ha adaptado muy bien a su hábitat natural, voy con dosis muy suaves de nutrientes ya que ellas tienen prácticamente todo lo que necesitan. El canto de las aves la pone feliz.
Poco que agregar, buen sol y buen tiempo 😍

Likes
4
Share


@metamon3y
Follow
It’s been a long week.. all good, just a little stressed for heat and they were absolutely of that NPK boost. Pistils are more visible now.