
Processing
Likes
Comments
Share


@GrowingisFunkO
Follow
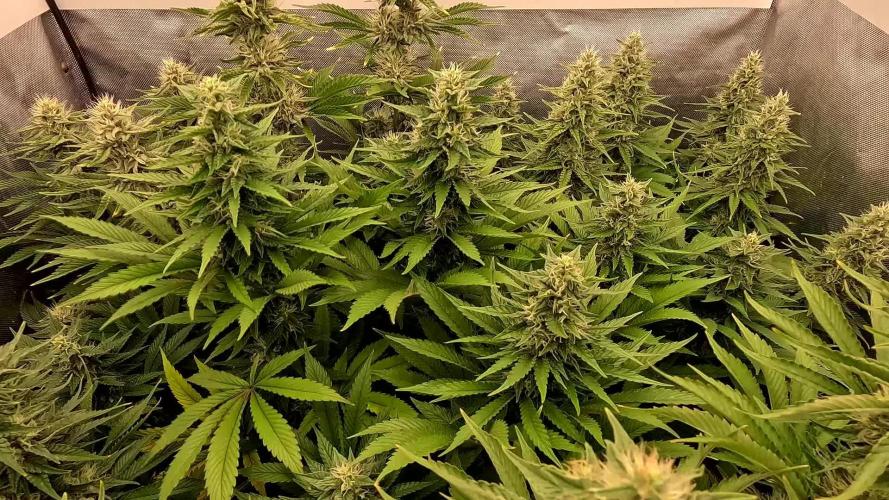
Plant are looking healthy. The WW that I had to transplant from hydro to coco is fully recovered and roots are already coming out the bottom of the airpot. All three clones are growing healthy and keeping up with the top of the canopy. Ran a mini flush at the end of the week to start the new week out with fresh nutrients.

Likes
38
Share

@gr3g4l
Follow
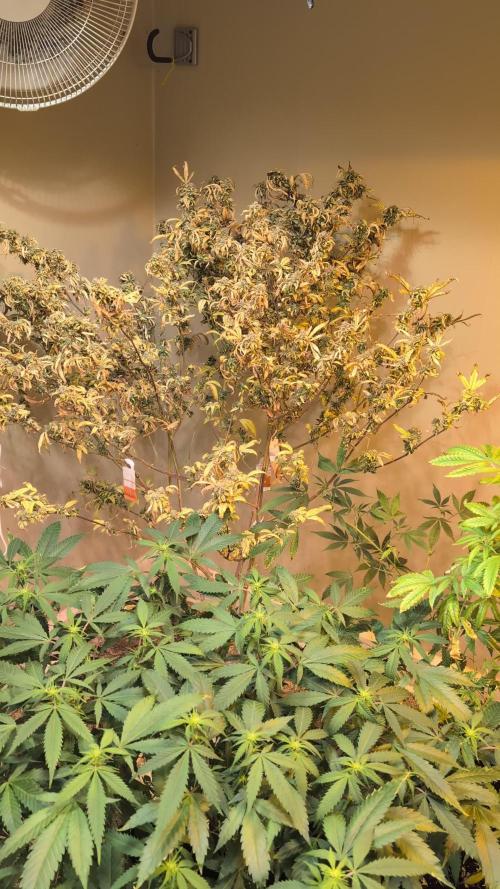
This week the buds continued to fatten, but there was leaf loss and a loss of color. In late flowering, some chlorosis in older leaves can be completely normal because the plant is redistributing nutrients towards the buds.
I generally understand that this week should be the last, but for whatever reason, it could easily take another week or two. The structure and formation of the buds and their pistils still need more time.
I will continue fertilizing for another week and possibly do a root wash the following week.
Semana en la que los cogollos siguieron engordando, perdida de hojas y perdida de color. En floración avanzada, una cierta clorosis en hojas viejas puede ser completamente normal porque la planta redistribuye nutrientes hacia los cogollos.
Por norma general entiendo que esta semana deberia de ser la última pero por lo que fuera le quedan bien bien una o dos semanas más. La estructura y formación de los cogollos y sus pistilos siguen pidiendo más tiempo.
Seguiré abonando una semana más y la siguiente posiblemente el lavado de raices.

Likes
26
Share


@iiTzToasty
Follow
More indica leaning than I personally like. Definitely a late afternoon nighttime smoke. Have about 4gs of larf I’m making hash out of; she is very resinous.

Likes
21
Share


@BB_UK
Follow
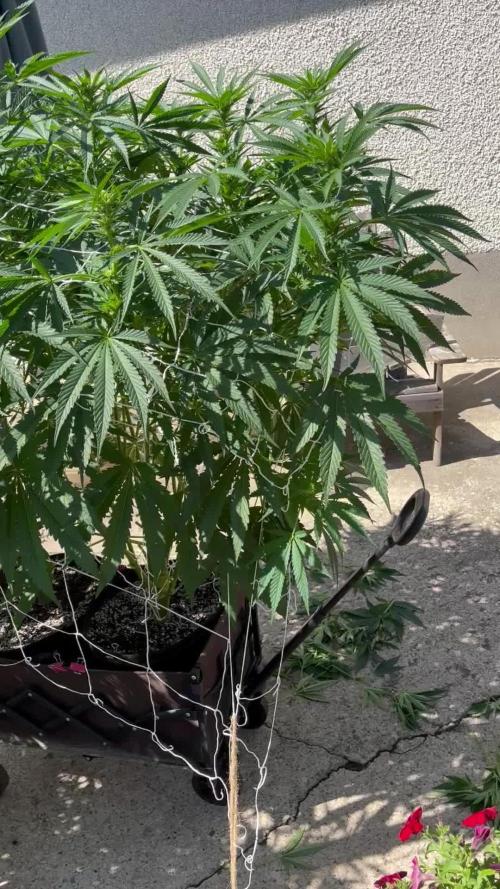
She’s a total beast! Gave her a little defol to remove some fan leaves blocking light to the lowers, also removed her from the block she was standing on as it wasn’t necessary anymore because she reached height. Now to see some flowers develop! 😊
Likes
11
Share


@Sawyer_grow
Follow
Hello guys,
Hope you are doing good.
Second week of flowering and what a beautiful stretch she got almost 20 cm ! but it's now over since 1/2 days.
Before starting the third week of flowering I like to defoliate a bit as you can see into the pictures. Not big defoliation but enough to keep that energy on the flower and enough leaves to power that beautiful machine.
I also started to use the PK BOOSTER following the recommandation by GHSC.
She start to smell as well, when I was cutting her leaves that smell was playing with my nose and let's be honest it kinda made my day.
Hope you like it, don't hesitate to follow the tutorial and update on my IG.
Take care
Sawyer

Likes
13
Share


@TheeLemon
Follow
Left it alone since flipping. Nice amount of stretching. Almost covering the netting now.
Getting a little crowded, I should have done more defoliation

Likes
18
Share


@Earthsower
Follow
She received 100ml of made solutions of an E.C of 1.7 before I repotted her she has received no water. She is about 10 cm with long internode spacing. Another set of five fingered leaves coming through the peak. Maturity is on the horizon. The next feed signs of wilting!


Likes
2
Share


@Saintvicious
Follow
She's unstoppable. Looks like we are about to be in pre flower. It's show time.
Likes
14
Share


@AlpAge_Cino
Follow
2024/01/20 : as it survived, shiva skunk got a decent pot (1 gallon smartpot 50% canna coco pro / 50% hydroton) and 3 others are going on LST...
3 days growth :
afghani #1 - 19.0 cm (+3.0)
sensi skunk - 17.5 cm (+4.5)
hindu kush - 16.5 cm (+3.0)
shiva skunk - 11.5 cm (+2.0)
2024/01/23 : shiva skunk looks bad, with leaves going down and yellowing... it didn't like its transplant.
The others are looking OK. I may have seen first pistils...
The heights are :
afghani #1 - 22.0 cm (+3.0)
sensi skunk - 18.5 cm (+1.0)
hindu kush - 18.5 cm (+2.0)
shiva skunk - 11.0 cm (-0.5)
2024/01/24 : spayed with Foliar Spray from B.A.C. last night, don't know if it was OK for shiva skunk, we'll see.
3 others are preflowering without a doubt now.
afghani #1 - 24.0 cm (+2.0)
sensi skunk - 20.0 cm (+1.5)
hindu kush - 21.0 cm (+2.5)
shiva skunk - 11.5 cm (+0.5)
2024/01/25 : shiva skunk is struggling but it's not done yet. And I think stretch began for others.


Likes
56
Share


@MrGrow
Follow
05.09.2022
🌱 75 giorni dal seme
🌻 5 giorni fioritura
💧 1.5 l/48 h
ph 5.8
ec 1.35


Likes
107
Share


@MrJones
Follow
Mr-Jones Strawberry Pie Auto by FastBuds
🍓╰⊰🍓´🍓⊱╮🍓╰⊰🍓´🍓⊱╮🍓╰⊰🍓´🍓⊱╮🍓╰⊰🍓´🍓⊱╮🍓
🌞Environment - Contenu to work on ensuring that the Humidity stays above 45%
💧 Feeding - Using "Super Coco" amended soil. compost teas, Dechlorinated H20 PH/6.5 Fish Fertilizer
🍃Training / None just keeping things defoliated.
🕷️ IPM - Will be using Green Cleaner" 1 OZ per Gallon, and CannControl from Mammoth alternating between product each month for Integrated Pest Management.
💡"960 Watts of LED's 4x8x8 Custom Grow Closet"💡
🍓╰⊰🍓´🍓⊱╮🍓╰⊰🍓´🍓⊱╮🍓╰⊰🍓´🍓⊱╮🍓╰⊰🍓´🍓⊱╮🍓
Rambling - Completing Week 10 here, and this girl continues to do much better, stacking on the bud weight.
🍓╰⊰🍓´🍓⊱╮🍓╰⊰🍓´🍓⊱╮🍓╰⊰🍓´🍓⊱╮🍓╰⊰🍓´🍓⊱╮🍓
▶️Monday 01.18.21 / Watered w/ Dechlorinated H20 PH 5.8 / 6.2
▶️Tuesday 01.19.21 / Watered w/ Dechlorinated H20 PH 5.8 / 6.2
▶️Wednesday 01.20.21 / Watered w/ Dechlorinated H20 PH 5.8 / 6.2
▶️Thursday 01.21.21 / Watered w/ Dechlorinated H20 PH 5.8 / 6.2
▶️Friday 01.22.21 / Watered w/ Dechlorinated H20 PH 5.8 / 6.2
▶️Saturday 01.23.21 / Watered w/ Dechlorinated H20 PH 5.8 / 6.2
▶️Sunday 01.24.21 / Watered w/ Dechlorinated H20 PH 5.8 / 6.2
🍓╰⊰🍓´🍓⊱╮🍓╰⊰🍓´🍓⊱╮🍓╰⊰🍓´🍓⊱╮🍓╰⊰🍓´🍓⊱╮🍓
SOIL MIX
COCO - 70/30% Tupur Royal Gold 30 GALLON
WORM CASTINGS 5 GALLON
LOBSTER COMPOST 5 GALLON
PERLITE 6 GALLON
INSECT FRASS 2 CUP
ORGANICALLY DONE GROW 5 CUPS
BUILD A SOIL COCO MINERAL MIX 6 CUPS
Likes
15
Share

@Wilstang
Follow
IPM
https://www.arbico-organics.com/product/mite-predator-phytoseiulus-persimilis-plus-sachets/mite-predators
https://www.arbico-organics.com/product/spidermite-destroyer-stethorus-punctillum-adults-larvae/pest-solver-guide-mites
Likes
6
Share


@Mr_nugs_lover_David
Follow
Brutal genetic! Just like that BRUTAL. Tons of resin, super strong woody pimey smell, very beautiful strain to grow, beautiful indica leafs, I know that this is one of those indicas that once you smoke that dense smoke you won't be able to get up from the couch, very strong genetic, I'm so fortunate to have this lady in my garden man! Definitely want to grow her again next season and make a big nice bush.peace!✌️🙏❤️🌱👨🌾

Likes
12
Share

@Northern_Ent
Follow
Aug 9: Mimosa Shot is doing fine. She was slower starting than her wagon partner Sunday Punch EV, but she is liking the warmer weather.
Got UV led lights from AC Infinity going today. These are designed for indoor so I can only put them out on nice weather days. Did this last year and seems to work. The UV lights make Edmonton in the fall feel more like California in the summer, or at least that’s the idea. UV is critical for trichome production so it’s a good way to boost THC percentage.


Likes
15
Share


@NSCanna
Follow
Compost tea turned out well, let it go for 26 hours total and geared it towards fungal. Also took some soil samples several days later around the stalks and found a lot of nematodes and protozoa which is what you want to see. Lots of different types of nematodes so what your looking for are the bacterial feeders (there are charts online that show you how to identify them). Mycorrhizae can be identified by it's dark colour, uniformity and segmented nature. Testate amoebas live in a translucent shell like a snail and are easy to spot but hard to spot moving due to my shitty microscope, but look for the tentacles. Also found some eggs with movement inside, no idea what they are but they have vacuoles and flagella.
She is really getting sticky and smelly now; berries with herb notes. You can see the resin stretching over the trichomes in the last pic.
No signs of senescence yet so I'm not going to feed them, they should have plenty of food anyway as this is a second run of the same soil.
Likes
21
Share


@Mrs_Larimar
Follow
2024-05-09
Directly after the Photoshoot, i topped them.
they had a super progress and you can watch them growing
big steps every day.
All will started Indoors under SANlight Flex 25, and move Outdoors.
Only one Plant stays indoors, to see the performance under best Conditions
because my Outdoor Garden is hard^^
So i started with letting them soak, and then the seeds will move under a humid Kitchensponge
unil i see a sweet Taproot.
then they will go into the Final Pot, filled with lovely TerraPreta mj mix
the grow will be supported with Biotabs fertiliser
Breeder Information
Fatso GMO F1 Auto is a feminised hybrid strain that is the result of crossing two autoflowering strains,
viz. Fatso Auto and Cotton Candy Auto. This Cali-derived, slightly sativa-leaning,
easy to cultivate strain will please growers with its big yield, solid THC content and its sweet, candy and fuel palate.
Fatso GMO F1 Auto will grow well both indoors and outdoors. It has an above-average resistance
to mould but will still benefit from good ventilation, especially where humidity levels are quite high.
Resistance to plant pests and other pathogens is excellent. While plants will remain quite short at around 100cm
or less indoors, they can grow a little taller, reaching a height of 130cm, outdoors in open ground.
The entire cycle is completed in a maximum of 75 days from germination through to harvest
and although yields are said to be average this is still pretty impressive for an autoflowering strain.
The combination of high resin production and high terpene levels make Fatso GMO F1 Auto a very good strain from which to make cannabis extracts.
The terpene profile is sweet and funky with savoury scents of Skunk with pine and floral notes.
The taste is like sweet candy with hints of fuel. THC production is high, reaching 24% while CBD is low. The effect is uplifting and well-balanced.
Likes
35
Share


@Kellykush420
Follow
Being my first ever grow I did not know what to expect. This plant was a great choice. It was easy to grow. It handles mistakes with grace. I had a lot of fun learning and can’t wait for the next grow! Thanks everyone for stopping by and reading this diary.

Likes
2
Share


@GhostBlvckPhant0m
Follow
Week 2 of flower and the ladies are starting to frost up! Watering every 3 days about 2 liters each. The monster in the 7 gal gets about a gallon every 3 day or 4 days and takes it all in with no problem. The light is about 19-22” from the tallest plant. Still dimmed to 80%