
Likes
Comments
Share


@Daddyhancocc74
Follow
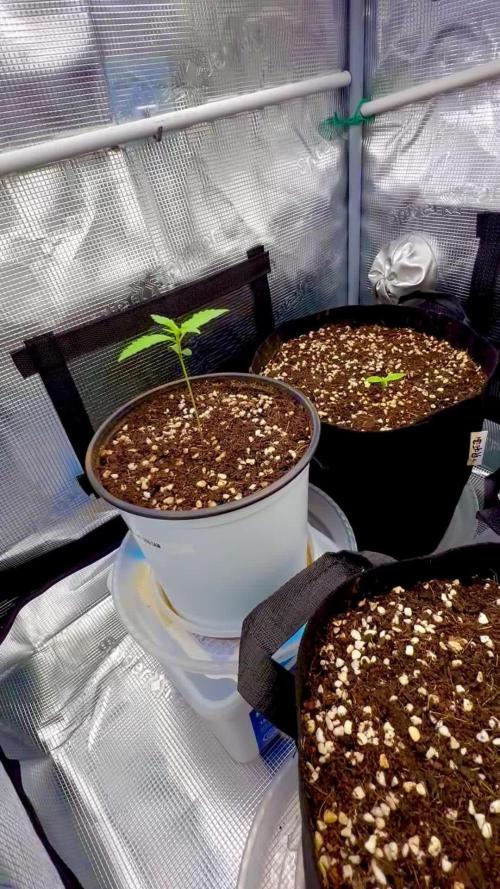
I'm using a 2x2x5 spider farmer tent and technically I start germination on 1/17/23 at 9pm and in the picture I'm using Rockwool but also a small pot with fox farm soil to hold it upright

Likes
16
Share


@VeggieTales
Follow
Day 49 of this grow and I wish I could be taking better care of these girls but am doing the best I can.
Throughout the grow I have done nothing but water once a day with calmag. I will be adding a compost tea in the coming days. I have been dealing with a nasty fungus gnats problem and after changing the environment and spraying. Neem seed oil they are under control. Hopefully things go well from here on out and it’s some 🔥 it smells wonderful already and each having its own unique quality to them!
Happy Growing Cheers! 🌱🎄🔥


Likes
2
Share

@CalGonJim
Follow
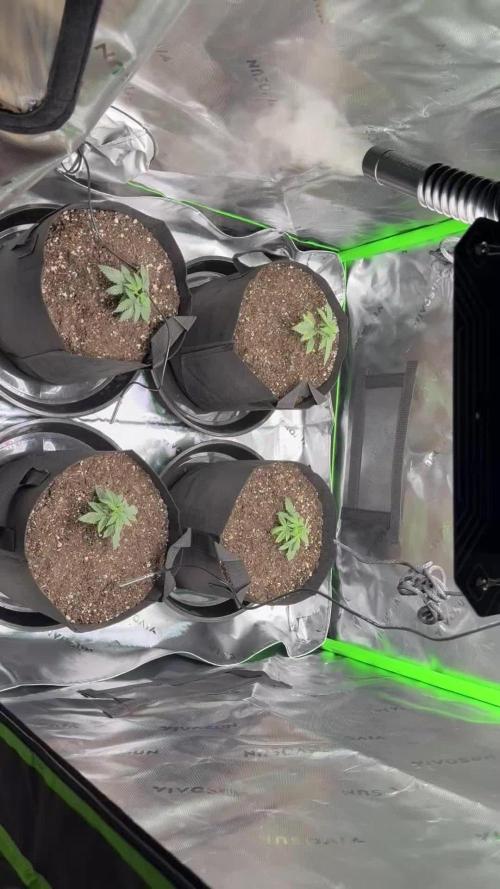
7/20 3AM MONDAY . looks good EC 900 Grow. little Cal.mag
7/23 3:05AM Something, something, deeply offensive and or racist or retarded comment here, something, something, dark side!
7/23 4AM PPDF 360 TWO TS-1000's at 29W each.
Processing
Likes
11
Share


@A1420
Follow
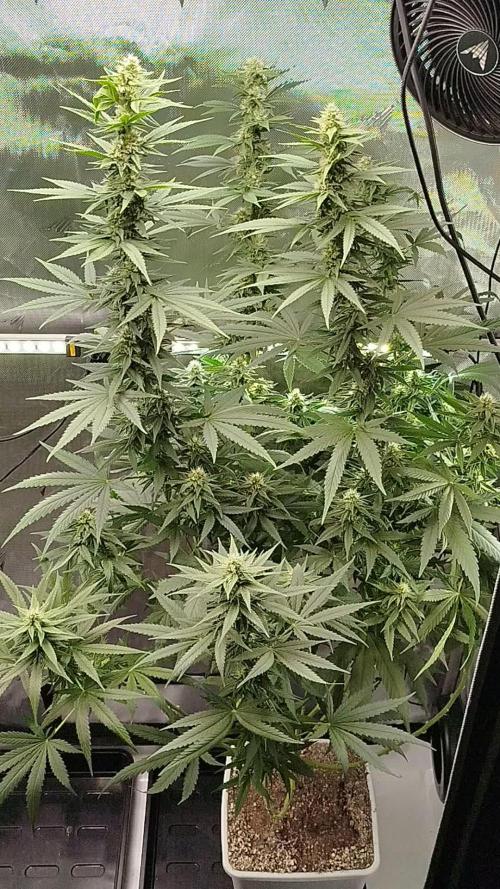
Plant is 6 weeks from seed tomorrow, I have upped nutes to 3ml per litre of both A +B Canna coco nutrients for a couple of waterings but she's soon started showing nute burn again so i've lowered to 2.75ml . Stretch has slowed right down and I'm hoping will stop very soon

Likes
15
Share


@SmokingBrownAndTalkingBrown
Follow
Had to cut some top buds due to getting crispy from the light - no bueno.
The rest of the buds are all good.
This is the end of the grow I don't have any more content unfortunately.
I have plans for some amazing grows soon with living soil! :)
Total harvest from this one was 1683g.

Likes
71
Share


@DogDoctorOfficial
Follow
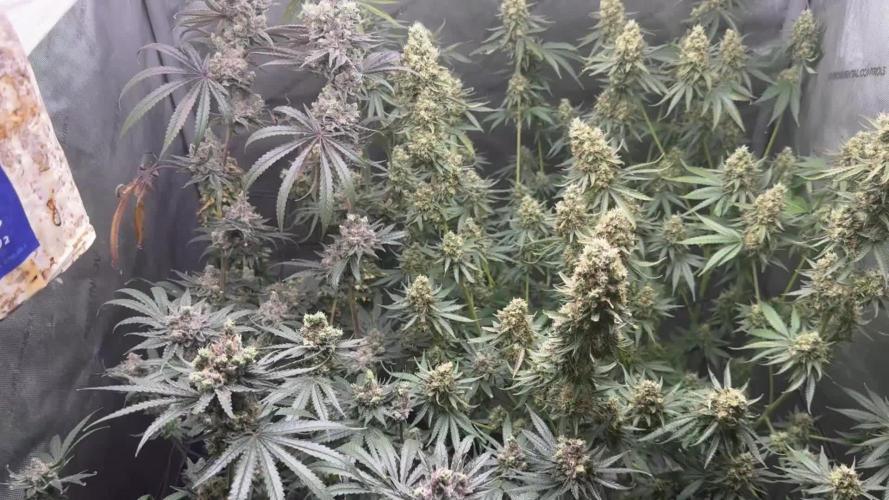
🌸 Week 7 Flower — Eternity Grow Cup Update 🌸
📍Week 18 from seed
📸 +150 high-quality photos & videos provably more ups but they are shining and they deserve the attention
EC 2.5 | pH 6.2 | Full spectrum + under canopy light tuning
Welcome back to one of the most breathtaking updates so far in the Eternity Grow Cup. Week 7 Flower has arrived with a storm of frost, color, aroma, and structure — this is the beginning of the final masterpiece, and it’s nothing short of spectacular.
Each of the five phenotypes is shining in her own unique way, and the individuality of each plant is now in full display. From deep fruit tones to dense stacking, this week is a celebration of what happens when genetics, environment, and love come together in harmony.
💎 Standouts of the Week
• Pheno #1: Still holding the crown for the most intense fruity profile — bursting with sweetness, almost candy-like, and surpassing all expectations week after week.
• Frost levels are skyrocketing across the board. These buds are starting to look snow-covered, shimmering under every light source.
• Bud structure is really starting to swell — you can see the shift now as things gear up for ripening. We’re talking weight, mass, and beauty.
🔬 What’s Working
This is a week where everything is clicking:
• The mix of Plagron and Aptus nutrition lines is showing insane synergy. The balance of strength and finesse is just right, and the girls are loving it.
• ICL 300 under-canopy lights are performing beyond expectations. They’re lighting up every shaded spot, helping buds form from bottom to top with full integrity. You can see the results in the side buds — tight, frosty, and reaching up.
• We’re holding strong on spectrum tuning and DLI, hitting the right numbers at the right time, and that precision is paying off in how fast these ladies are moving forward.
• Temperatures and airflow have been key — we’re still running the vortex-style air movement, and it’s doing wonders for the microclimate around each plant.
🌿 Just 2–3 Weeks From Harvest
It’s starting to feel real. We’re entering the final arc. The finish line is not far, but right now, it’s all about patience, observation, and letting nature complete its masterpiece. Every moment counts now.
🎥 We’ve documented everything in full 4K and high-res stills. This is a week for the books — every trichome, every pistil, every sparkle. Be sure to head over to YouTube for the full experience and follow the journey with us.
🤝 Special Thanks
To all the growers, new followers, silent watchers, lovers, haters, and everyone in between — thank you. This journey is built with you, and this cup wouldn’t exist without your energy.
To all the participants in the Eternity Cup — congratulations. Every diary, every tent, every effort is valid. We’re getting close to the finish line, and it’s now in the judges’ hands. But no matter what happens, you’re all already legends for growing with intention and passion.
📲 Don’t forget to follow us on Instagram for sneak peeks, unseen content, and special behind-the-scenes looks. Every plant has a story, and we’re telling it together.
With deep gratitude,
Grower’s Love
DD
Reporting directly from 🌍 Eternity Grow Cup to You 🙌
--------------------
Genetics - Runtz https://www.zamnesia.com/6000-zamnesia-seeds-runtz-feminized.html
Nutrients - Plagron https://plagron.com/en/hobby
- Aptus Holland https://aptus-holland.com/
Controls - Trol Master https://www.trolmaster.eu/
LED - https://www.futureofgrow.com/en
LED - https://www.thinkgrowled.com
Soil - https://www.promixgardening.com/en
Germination - Cannakan https://cannakan.com/?srsltid=AfmBOopXr-inLXajXu3QFgKXCXXos4F1oEvScjMKIB5MR5dk8-GJ-F49
DOGDOCTOR 15% off
Smoking Papers - https://ziggioriginal.com/
Terpene saver - https://grovebags.com/
As always thank you all for stopping by, for the love and for it all , this journey of mine wold just not be the same without you guys, the love and support is very much appreciloved and i fell honored with you all in my life
With true love comes happiness Always believe in your self and always do things expecting nothing and with an open heart , be a giver and the universe will give back to you in ways you could not even imagine so
As always, this is shared for educational purposes, aiming to spread understanding and appreciation for this plant. The journey with nature is one of discovery, creativity, and respect. Let’s celebrate it responsibly and continue to learn and grow together!
Growers Love To you All 💚
#EternityGrowCup #RuntzHunt #GrowersLove #CannabisCommunity #AptusHolland #ProMixSoil #TrolMaster #Zamnesia #Plagron #ZiggiPapers #Grovebags


Likes
9
Share


@Kushizlez
Follow
Harvest:
Everything dried up to 347 grams + 96 grams of super high quality trim. Overall I am not too pleased with the smoke of the product. Although the bud size, bag appeal, smell and taste are pretty much all there, the shitty burn is a deal breaker for me and the majority of this weed is quite frankly useless. Another downside is while smoking I’ve found 4 seeds in an ounce from almost every strain. Light leaks? At least I learned a ton, including how to get super good burn for my next crop. I’m hoping that curing for a month or so will improve the burn but I wouldn’t really count on it. I have seen weed dried for 4 days with no cure and no flush smoke clean and not go out once. I have been told that the key to white ashes/clean burn is proper mineral content in the soil and there is tons of scientific studies on cigar ash going back 100 years. Plants grown in a medium with high levels of decomposing organic matter, phosphorus, magnesium, chlorine and heavy metal ratio tend to produce black/grey ash. Whereas plants grown in a medium with a higher ratio of trace minerals like calcium carbonate and potassium in the form of wood ash, rock dusts, oyster shell flour and lower levels of decomposing organic matter will produce a dense, uniform white ash that rarely goes out. But this is still all theory until I test it to confirm for myself a few times. My last few outdoor harvests did not improve with curing at all so I’m hoping this will be the missing link. Plain peat moss and coco clearly lack essential minerals that help burn. If said theory is correct I should find a synthetic nutrient line with more trace minerals. Makes me wonder if growing if rockwool/basalt rock could improve burn in a hydro setup.
I think I did a fairly decent job for my first grow. I went wrong in a million different places but I still stuck it out and got some decent herb. Things went wrong early when I got black spot mold, nitrogen/magnesium deficiencies and powdery mildew. I corrected most of it but things didn’t get really bad until mid veg when I intentionally skipped a few feedings and defoliated quite heavily stunting the plants. I also didn’t even top or start LST until the 6-9th node which was really stupid and hurt my yield. My temperatures were all over the place from the learning curve. I was severely overwatering without realizing it. 100% peat moss is a shitty medium. I also fed way too late in flower (not what caused shitty burn). I also used synthetic nutrients in soil.
Zkittlez bonsai
Yield: 1.9g
Smell: 7/10 - sweet, candy, berry, gassy, piney hints
Bag appeal: 7/10 - slightly leafy/stemy
Crystal coverage: 7.5/10 - very impressed
Ash: 6/10 - flaky, mostly white/grey
Fire holding: 4/10 - stays lit for 10-30 seconds
Smoke: 6/10 - taste is decent, needs curing
High: 6/10 - indica dom
Comment: looks nice, smells nice, tastes nice, burns like shit.
43.5/70 = 62% 👎🗑️
Black Garlic #1
Yield: 53.6
Smell: 8/10 - gassy, piney, earthy, skunky
Bag appeal: 7/10 - slightly leafy/stemy
Crystal coverage: 7.5/10 - very impressed
Ash: 8/10 - thick, uniform white ash
Fire holding: 7.510 - stays lit for 45+ sec
Smoke: 7.5/10 - taste is good until the end
High: 7/10 - sativa dom
Comment: looks nice, smells nice, tastes nice, burns great but quite leafy.
52.5/70 = 75% 👍🔥
Black Garlic #2
Yield: 42.3
Smell: 7/10 - woody, earthy, tea
Bag appeal: 6.5/10 - slightly leafy/stemy
Crystal coverage: 7/10 - impressed
Ash: 6/10 - flaky, mostly white/grey
Fire holding: 4/10 - stays lit for 10-30 seconds
Smoke: 6/10 - taste is decent, needs curing
High: 8/10 - sativa dom
Comment: looks nice, smells nice, tastes nice, burns like shit.
44.5/70 = 63% 👎🗑️
Zkittlez
Yield: 39.4
Smell: 7/10 - sweet, candy, berry, gassy, piney hints
Bag appeal: 6.5/10 - slightly leafy/stemy
Crystal coverage: 7.5/10 - very impressed
Ash: 8/10 - thick, uniform white ashes
Fire holding: 8/10 - stays lit for seconds
Smoke: 7.5/10 - taste is decent, needs curing
High: 7/10 - indica dom
Comment: looks nice, smells nice, tastes nice, burns great but smalls didn’t fill out.
51.5/70 = 73% 👍🔥
Blackberry Breath #1
Yield: 57.5
Smell: 9/10 - sweet, grape, berry, gassy, earthy, hashy
Bag appeal: 8.5/10 - dense, sparkly buds
Crystal coverage: 9/10 - super impressed
Ash: 5/10 - flaky, mostly grey/blackish
Fire holding: 4/10 - stays lit for 10-30 seconds
Smoke: 5/10 - tastes like chalky shit
High: 6/10 - indica dom
Comment: looks amazing, smells amazing, tastes like shit, burns like shit.
46.5/70 = 66% 👎🗑️
Blackberry Breath #2
Yield: 76.1g
Smell: 6/10 - musky, tea, berry, herbal
Bag appeal: 8/10 - slightly leafy/stemy
Crystal coverage: 7.5/10 - very impressed
Ash: 5/10 - flaky, mostly grey/black
Fire holding: 4/10 - stays lit for 10-30 seconds
Smoke: 5/10 - taste is shit
High: 6/10 - indica dom
Comment: looks nice, smells shitty, tastes shitty, burns like shit.
41.5/70 = 59% 👎🗑️
Slurricane #4
Yield: 34.5g
Smell: 8.5/10 - gassy, deep piney, fuel, earthy,
Bag appeal: 8.510 - slightly leafy/stemy
Crystal coverage: 7.510 - impressed
Ash: 6/10 - flaky, mostly white/grey
Fire holding: 4/10 - stays lit for 10-30 seconds
Smoke: 6/10 - taste is decent
High: 6/10 - indica dom
Comment: looks amazing, smells amazing, tastes nice, burns like shit.
46.5/70 = 66% 👎🗑️
Badazz OG Cheese
Yield: 43.5g
Smell: 6.5/10 - musty, woody, cheesy, piney hints
Bag appeal: 6/10 - slightly leafy/stemy
Crystal coverage: 6/10 - very impressed
Ash: 5/10 - flaky, mostly white/grey
Fire holding: 4/10 - stays lit for 10-30 seconds
Smoke: 6/10 - taste is decent
High: 6/10 - sativa dom
Comment: looks like shit, smells decent, tastes decent, burns like shit.
39.5/70 = 56% 👎🗑️

Likes
16
Share


@dubby_m
Follow
Trichomes are:
10%/80%/10% - clear/milky/amber
Wet trimmed:
70gr (buds + stems)
I hope for 15gr dry buds :)
Drying them in a paper box with pc fan as output ventilation (around 24 degrees Celcius / 55-60 % RH)
Likes
4
Share


@Strife957
Follow
Things went as normal this week.
I didn't water or feed the girls since i have been sick lately, all I did was push them back under their net.
Sometimes their stems pop/snap but i don't worry anymore, the next day they recover nicely. (its more like an internal pop i hear)
The weather isn't as sunny as I would like yet, but i can't do much about that.
With all the foliage bug hunting has been reel tough, although I found a baby cutworm witch i quickly eliminated.
slow and steady the girls keep climbing
I just manage the light space 4 them. I only go in on the weekends 4 their training and that seems to be good enough.
The girls in the back are just exploding, compared to the others.
I dont know if maybe some good soil back there or just some magic beans.
Maybe because they are closest to their nightlight?

Likes
5
Share


@Originalgrower051
Follow
Lst e troca de fotoperiodo para 12 horas de luz e 12 horas de Escuro

Likes
10
Share

@Darfman
Follow
Zdarec
Jedna kytka byla hermáč ,tak jsem ji skosil a ze dvou holek zbyla pouze jedna😭 . Díky Hombre za radu, mě to vůbec nedošlo, že ta pálka je už oprcaná.🤦 Ještě před tím než jsem tu kytku zlikvidoval, tak jsem ji na ukázku natočil - viz video. Škoda jí, byla pěkná a mohla mít pořádné štangle. Zbylá kytka už má za sebou čtvrtý týden květu, tak už dostává také PK v podobě Hammerhead od Advanced Nutrients. Snad už nebudou žádné problémy a dojedu tenhle grow v klidu do zdárného konce. No nic to je zatím vše, tak zase za týden zdar a ať to roste 🌿😎


Likes
48
Share

@DogDoctorOfficial
Follow
This girl is so much bigger than she looks, she is so compact and unique , cant yet identify any of her afranceses but she smells fresh thats for sure <3 <3 <3
she is on the way to become some not dark at all weed covered with resin and amazing for the extraction lovers thats for sure, but lets see how it all goes .
with the week coming to an end she starts to get closer to the harvest day and is showing some pinks and a few more light colors on her fruits, this is a romantic medicine that will fill the heart of those that have the luck to grow her, once again Fast Buds showing what they are capable of , shout out to them and the great team they have <3 <3 <3
added a short edited week 9 update , hope you guys enjoy and have fun with it <3 <3 <3
As always thank you all for stopping by and for supporting me on this journey, i am super passion about growing and fell blessed to have you all with me on this new journey <3 <3 <3
Genetics - Fast Buds Tester 2310
Ligth - LUMATEK ZEUS 465 COMPACT PRO
Food - APTUS HOLLAND
#aptus #aptusplanttech #aptusgang #aptusfamily #aptustrueplantscience #inbalancewithnature #trueplantscience #fastbuds #dogdoctorofficial #growerslove
With true love comes happiness <3 <3 <3 Always believe in your self and always do things expecting nothing and with an open heart , be a giver and the universe will give back to you in ways you could not even imagine so <3 <3 <3
All info and full product details can be find in can find @
https://2fast4buds.com/ wen released
https://aptus-holland.com/
https://autopot.co.uk/
https://lumatek-lighting.com/
<3 <3 <3 Growers love to you all <3 <3 <3


Likes
5
Share


@hiddininthemist
Follow
Under new light 1000w phlizon and loving it started flower around day 28

Likes
5
Share


@crouch74
Follow
Unfortunately, this week I have overwatered her as I was going on vacation and a bit over protective and because of that I can see wilted leaves and brown spots.
I left it to dry for 3-4 days and now I can see some new green leaves showing up.
Sep 2nd: I can see that she is becoming healthier now and the green leaves are taking over

Likes
141
Share


@GERGrowDesigns
Follow
Harvest Time of Fast Version B Strain and Welcome to :
-Designers Club -
Special Thanks to John for hopping through my Messages to Join The SSSC/DP Photo C8ntest
The Project was Supported by Narcos Seeds to give the Strain the Perfect lifespan it could Deserve .
Light used for The Contest Grow :
Tenty Pro x4 200w in a space of
60x60 Homebox Ambiente Tent.
Preparation Before Harvest :
5 Days without Feeding / 2 Days of them Complete in the Dark .
Enough Talk from me , just Enjoy youre Seats and be a part of The Designers Club .
Good Luck to Everybody and Keep up Growing !

Likes
4
Share


@ValtripOG
Follow
Muchas gracias espero que les guste este Harvest acá me estoy fumando un porro de Big Bud y la buena vibra ⚡️🤝💚

Likes
109
Share


@Prototype0181
Follow
Issue with my stretchy Cookie has been resolved, gave her a little bit to much food.
Apperantly she is more a sativa pheno.
Gonna resume feed next watering @ 1/2 strength on her and build up from there. The rest of the girls are in perfect condition👌 and yeah i know i need to defol😉 gonna do this bit by bit this week ( low stress defol )
Rock on Dr Greenthumb's👍
