
Likes
Comments
Share


@MrGrowthSpurt
Follow
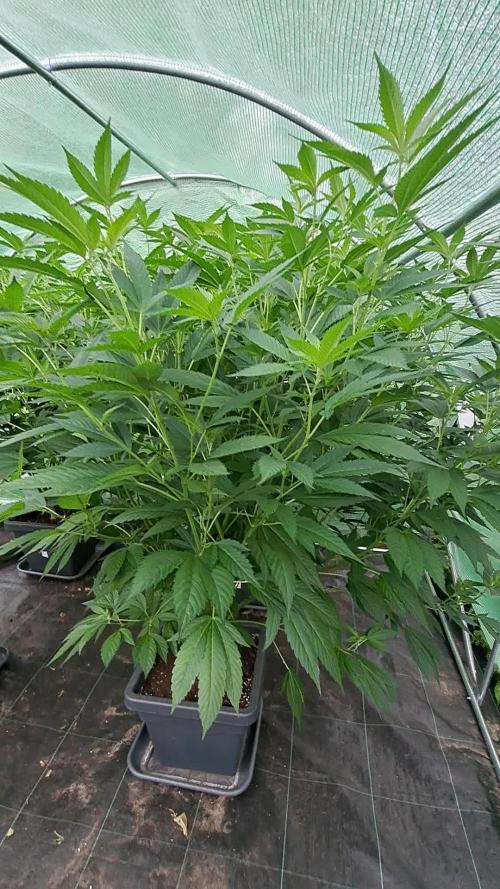
What's up Growmies🤟🏽. Week # 8 is in the books🙌🏾
Hello week #9💪🏾
I went a little overboard on pictures this week, they are so happy and healthy that I got carried away. I know we are supposed to post pictures with the lights off, however it's something about the contrast it gives with the lights on that makes it look sexy to me😁.
I have had to tie the stalks of both White LSD plants due to heavy sagging. I'm noticing with this strain the stalks seem to topple over even though the buds are far from fully developed. A trellis net probably would be ideal however I hate them. They are easy to put on but very difficult to take off come harvest. I use garden wire and string them as if they are puppets being controlled by the puppet master🤪.
I continue my feeding schedule with the recommended "bloom" concoction using general hydroponics Flora series trio. I give them 1 liter every 3 days. I have them on a 2 to 2 cycle (feed them twice with nutes and then twice with plan water) I keep the p.h. around 6.1 to 6.6.
Temps and humidity are in the perfect range I'm enjoying it while it last because spring and summer in VA makes it difficult to keep the humidity in check.
All in all everything is going well for me and my ladies. I hope the same for all of you.
Until next week my friends Happy Growing 🤟🏽 and may the grow goddesses bless you all with a bountiful harvest 💪🏾

Likes
23
Share


@CannabisCultivate
Follow
And the winner is….. Divine Kush! To say the least, she fought the most and she really shined through. If you see the video above 👆 you can see how wowed we are by her, not only because she sprouted her own seed within herself but also because it shows how much moisture she had to deal with and she sort of found an interesting way to disperse of it! We did try to plant her seedling but unfortunately it did not survive but we are still in awe of it happening before our eyes. Nature is amazing and Our Kushy girl is very much appreciated, she has taught us quite a bit this year. WOW 🤩💚✌️
Plz note, we totally forgot to weigh her.

Likes
286
Share


@JamMAKEcan
Follow
Well moving as planned kept her in only 6hr of direct sun rest of day in shade tgen night.. And sge flowered.. In middle of summer full sun cycle and im still able to prove WITHOUT DIRECT sun/light cannabis will flower ( photoperiods ) ..i cant afford her to get too tall... She grows very fast topped twice now sge has branches on top of brancges.. Only thing to do now is take some of her leafs but not now.. Love this genetics.. Very stable grows with no issues none...perfect thru her stages . now the stacking of flowers..

Likes
18
Share


@SpotWeed420Original
Follow
Bueno Fumetillaas ! Acá ya vamos con nuestras primeras hojitas ! Logrando obtener un crecimiento óptimo y esperando tener las mejores condiciones ... Tenemos un buen sustrato aún no fertilizamos ya que el sustrato tiene el alimento necesario.
Por este a la semana 2 o 3 haremos el primer riego de fertilizantes no se preocupen el reporte y el proceso lo subiremos para que vean cómo aplicarlos o diluir con eso llevamos el reporte.
De esta linda semana un saludo y un abrazo ! Dudas o consultas dejarla en los comentarios para ayudarnos mutuamente
Abrazo !

Likes
5
Share


@ChitownCannaChica
Follow
Easy to grow— smells like citrus gas.
Really enjoy this smoke and the plant.

Likes
20
Share


@ukterpdoc
Follow
Been going so well plants looking amazing they're going to find bigger pots by next weeks update and be in the veg room under there new lights and out of the tent lots more space and lots more light

Likes
Comments
Share

@Oyziphar
Follow
Glorious summer sunny days 🌞🌞🌞
I topped the plants, to limit their growth, because they are becoming too big 😏. Soon, I will have to move them to my other greenhouse which has a higher ceiling 🔝
Once a week I give the plants some water with OPF 7:2:3 ; Fulvic 25 ; Yuccah ; Biovin liquid ; Earthworm compost extract.
Big Thanks to Luc from Plant Health Solutions / Bioplantenvoeding dot nl 🙏🙏🙏

Likes
105
Share


@BioBuds
Follow
Another week has passed. An eventful week in our lives, but the plants came back on track. Some regular water and defoliating made them happy again.
I see lots of similarities between the two strains. Where the XL Runtz ae a true XL and sees to adapt a little better to the conditions than the Forbidden Runtz.
But the fight isn't over yet. We still have weeks to go and the forbidden Runtz might recover, my two cents is this: Fastbuds are just a little bit less heat resistant and temps went up last weeks with the SP -3000 on high.
Also the XL Runz are closer to the intake of cooler air. So it would be fair to trade places what I do coming week.
Thanks again, see you next week!
Likes
28
Share


@Bread_n_Buds
Follow
Our issue #6 is the revelation of grow. It didn't look like much of her at the labori so much so that we put her in a 6.5 pot. Never underestimate a bomb never guys has unlined flowers and cm and she can be seen going to fill. In a bigger pot she would have been frightening.
https://seedsmafia.com/en/
https://www.mars-hydro.com/
Likes
26
Share


@gottagrowsometime
Follow
Both phenoe are pushing on nicely. Really good growth from both phenos from 1 seed, 1 had more girt. So, there wasn't an exact even growth ratio. But no pheno was hammered in any way that affected its push through pre fower and into mid fattening. I expect another 3-4 weeks and I'll harvest. Atm there's a nice Lemon exotic smell. Really dank. Musky (earthy). And popping off fruits. Really lovely set of plants.
Xpert nutrients are bringing out the best in my grows. They smell, taste and pretty much everything in that regard has improved. These are my new nutrients. As hard as I've been strain hunting. I've always used a different line of Nutrients per crop. And I'm glad to say. These are by far THE BEST nutrients I've used to enhance my crop.
Feeds
Are pretty much a week in week out with change (all explained with my weeks, DLI and other factors), master root/enzymes have been pult. Master Root no longer needed. Enzymes are all gone.
Maintenance
This wk, i applied LST bamboo sticks are have done some basic node bending to get the best out of the space in the area above and around its base. Some nodes where tied back to the sticks..
Shout out to my sponsors and all who stop by.

Likes
58
Share


@Mr_Motalovah
Follow
Hello growers and tokers! 👋 👩🌾 🧑🌾.🔥💨
There has been much change this week!!
First there was a big defoliation done, I cleaned the bottom of the plant.
All the growth that wouldn't amount to anything because the light doesn't penetrate that low.
Also took off the biggest fan leaves to give more room for light.
Then finally switched to 12/12..
After just 36 hours after the defoliation there was a major change.
New growth everywhere, colas started stretching upwards fast.
It's like she already knows it's flowering time.
Great reaction to the defoliation and 12/12 switch.
I'm still watering every other day, After the defoliation I watered with only Enzymes 2ml/L to clean the roots a bit then started with the nutrientes again.
I dropped the amount of grow nutrients from 3ml/L to 1ml/L and started adding bloom nutrientes 2ml/L for now.
I'll slowly be upping the bloom nutrientes and after week 2 I'll no longer add grow nutrients.
That's it for this week. Stay tuned to see how she flowers.
Stay safe!
Likes
13
Share


@StickyFingah420
Follow
Día 75 y último de vida para esta hermosa nena.
Me encuentro disfrutando de la manicura y hermosa cosecha que estoy obteniendo con esta planta, mi casa está impregnada por una fragancia dulce con toques tangie.
Ahora cortaré por ramas y colgaré en la carpa de cultivo donde se secará por aproximadamente 10 días con humedad y temperatura controlada.
Esperaré a curar y probar bien todos esos terps para poder dar un buen informe de cosecha pero hasta ahora todo se ve muy bien!
Buenos Humos 👽
Likes
9
Share


@Just_Weed
Follow
Day 1 - 7 L watering with around 1000 ppm and 6.5 ph
Day 3 - 7 L watering with around 950 ppm and 6.4 ph
Day 5- 7 L watering with around 850 ppm and 6.3 ph
Day 7- 7 L watering with around 850 ppm and 6.3 ph
During this and last week plants got a few burn tips so I am starting to reduce nutrients gradually and will finish of with 1-2 weeks of R/O water.
First Peyote is getting big and is growing new sets of white hairs, Both Cheeses is much smaller and less frosty while Second Peyote is having lots of orange hairs and by the looks of it is only a few weeks away.
Still Hoping to harvest all at the same time and will try to time the harvest in that timeframe so all plants are ready. So around 3-4 more weeks seems to be the case.

Processing
Likes
14
Share


@Fre_84
Follow
Northern: 12/13 cm. Grow very fine!
Fat banana: 7/8 cm! Come on Babies!
Light: 40 cm - Veg Mode


Likes
62
Share


@Reyden
Follow
Nella tenda Iniziano a sentirsi odori floreali e alcune delle signorine stanno prendendo colore sulle foglie della parte apicale 💜
Sto innaffiando le piante 🌱 a giorni alterni perché ho diverse tabelle da seguire, le Gorilla 🦍 di RQS e Zamnesia sono a circa 1.9 EC mentre quelle di Seeds Mafia a 1.8, le altre 2 di Anesia invece sono a 1.7 e andranno ad aumentare a 1.8 alla prossima settimana…cerco di cambiare ogni giorno posizione a farle girare nel box perché almeno riescono a prendere luce da tutti i lati…sono molto soddisfatto della SF2000 di Spider Farmer sta facendo un ottimo lavoro e le bollette non ne risentono come pensavo 😆 oltre che avere un ottimo spettro che aiuta le piante a essere in salute il più possibile 😎
Ci vediamo con altri aggiornamenti tra qualche giorno!


Likes
11
Share


@Ninjabuds
Follow
Blackberry moonrocks both plants are still some of the best seedling in the tent so far. The better if the 2 is for sure the #1 plant in the tent. It has had the best start of a seedling i have seen in a wile. The leaves are angled like an airplane and they just seem thicker than the average leaf. They both seem like there going to have middium to longer indernode spacing.
It's looking like a good start to a week the plants are strong they are getting to the point I can let the dried dry out completely. I'm thinking by the end of this week the plants will be starting to be sold.
Last week I put all the plants into my bigger 2x4 tent with my medicgrow mini sun 2 the 500w version. Only a few of the plants were ready for that light. Seems like the only plants that really have good resistance and have a strong start are the weedseedsexpress.com seeds. Shout out to weedseedsexpress.com for the strong plants.
I ended up putting all the plants back into my 2x2 tent with the 55w amazon light it has alot more blue light in its spectrum. It's kinda weird b4 I switched the plants to the 2x4 tent they were getting 220umol under my amazon 55w led then when I put them under the 500w light 25% strength about 50in from plants and they were getting only about 195umol in that tent but it was stressing most the plants. I assume a larger light has more side lighting hitting the plants. I think when useing larger lights it's good to measure umols from the top but also coming from the sides. I think durring seedling stage they only need about 50% the umols coming from the side the plants as the top is receiving.
When I put the plants back in the small tent about the same umols as they were getting b4 the switch and they were still a little stressed. So for a few days I put the small light at the top the tent giving them 100umols for a few hrs then 130umols the rest the day.

Likes
37
Share


@OrganicPower
Follow
It’s warming up outside so the a/c and dehumidifier are working a bit. Got the lights on during the night so just a few hours at lights on they work a bit hard. Cleaned up underneath removing any sucker shoots and leaf that was near the soil. Not much really. Mostly on #3 as I didn’t train out the branches as much and she grew tighter together, so I removed mostly all inner growth blocking light and that allowed a lot more penetration and flow. Left a few leaves below to die off naturally…more the better. Gonna put some Grub Grenades in the pots with some yellow sticky cards. Not because I see anything, just being cautious. I do see what looks like Springtails but don’t seem to be an issue yet. Still looking green and healthy so I’m happy!
Grow on!
Update
Made a few adjustments. I let the tops grow into the tsw2000, 18” to tops. I didn’t like how they looked so I raised it back to 24” where I’ll keep it. The “Kind LED” I know from previous grows that it can’t get closer then 24”. But this is my first run with “Mars” so I’m still figuring out the distance for my setup with additional overlapping light intensity from other lights. With that being said another pod failed so I’m down 2-Kind LED’s now. Gonna remove all old tech and use all newer TS series lighting. All Mars moving forward. Seems to be a great light and when compared to other quality lights you can’t beat the price!

Likes
37
Share


@NewbieLearner
Follow
A great heavy yielding strain. An awesome smoke. Loved the purple at the end and the taste is great too. Got a cerebral high with no strong negative effects.


Likes
5
Share


@HighOhioAn
Follow
Loving the buds on two of the strains I’ve only had black buds one time before, and it was some of the best, but I’ve ever had super excited for this grow🔥💯