
Likes
Comments
Share


@grundoh
Follow
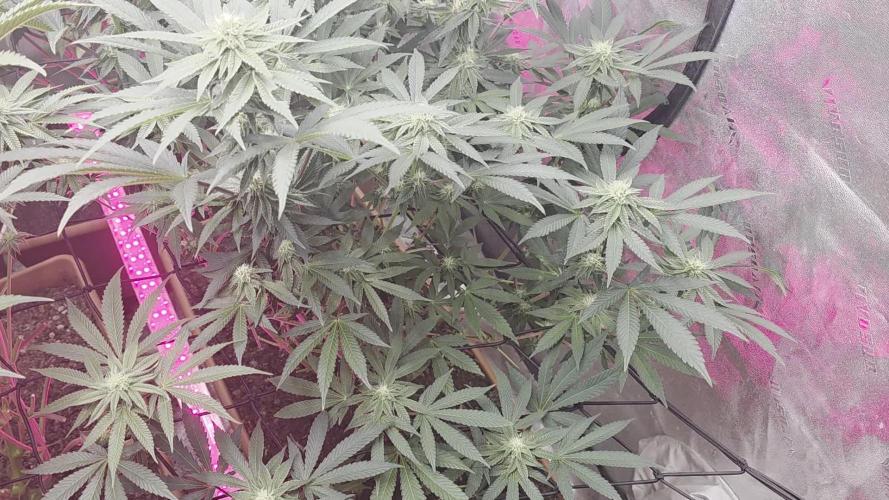
As of the afternoon of May 15th, I have begun some LST with binder clips/safety pins and some soft pipe cleaners. With the exception of the Critical Jack, I think most of the plants are showing some signs of excess Calcium and Nitrogen so I am going to take CALiMAGic out of their feeding regimen and cut the nutrients down to 1/4 strength as of this afternoon. The Dinafem Critical Jack Auto is now the tallest plant and seems to be the healthiest one of the bunch at this point, she keeps amazing me every day. The Seedsman White Widow Auto is not very tolerant to feedings and its stems & branches seem to be weaker than the others; very bushy. Both the Dinafem Industrial Plant Autoflowering CBD and the Mephisto Ripley's OG are very healthy but are growing very squat and bushy -- which made trying some LST for the first time a bit more challenging!
As of the evening of May 17th, I noticed pre-flowers on both the Critical Jack and the Ripley's OG. The Critical Jack is certainly stretching out right now! The White Widow and the Industrial Plant CBD look like they should be getting pre-flowers by the end of the week. The Critical Jack has taken to being under the ViparSpectra 600 light more than the MarsHydro Mars II 1200 light -- something to keep an eye on?


Processing
Likes
20
Share


@Mosquito_Haarlem
Follow
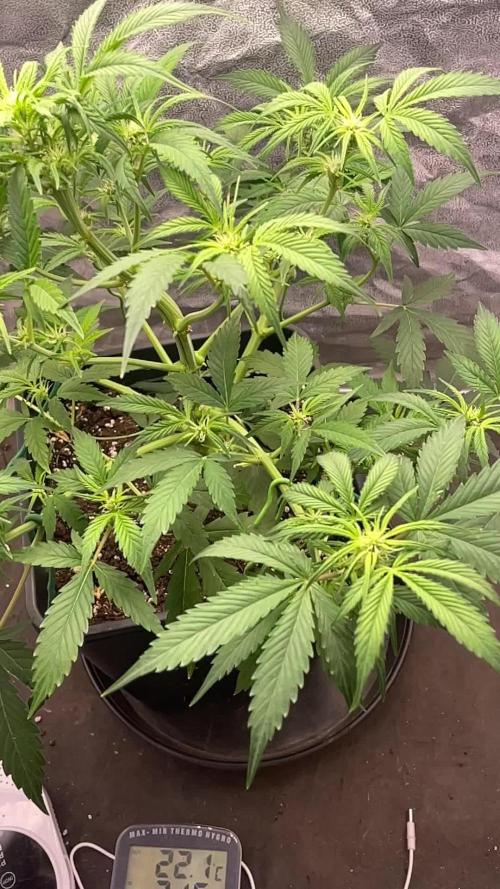
Ik heb wat slechte blaadjes gesnoeid.
Ze groeit, maar er hangen sinds vandaag een paar slappe bladeren bij die naar beneden hangen.
Misschien heb ik haar teveel voeding gegeven met de green sensation en had ik het langzaam moeten opbouwen.
Even afwachten hoe dit zich voortzet.

Likes
39
Share


@valiotoro
Follow
Hello everyone 🤩
she grew fast and with a beautiful green colour on the leaves!
She has responded superbly to low stress training and topping & i defoliated her aswell and seems didn't even notice 😎
Wish you all a good day and happy growing


Likes
77
Share


@Puffdamagikchillum
Follow
Day 56) 11/18 is the end of another week. I measured her today and she's 15” but not done stretching yet. Week 8 day 56 pic 2 btw is a pretty good indication she's a she. I had some bumps along the way this week. My work schedule changed a bit all of a sudden and I lost touch with this girl and she suffered some drought time. Then if that wasn't enough I was shooting video of her and turned the fan system off so it wouldn't record the noise and accidentally left it off (just took a hit of gelato #33) for around 30+- hrs and wife told me the ceiling of the tent was sweating big droplets when I called her from work. Came home/ next day off / cleaned it all up/ wiped it with a light bleach water/ aired it all out and now she is very happy and my schedule is back on track 😅👍
Happy Growing and
Happy Harvesting
Likes
45
Share


@masterofsmeagol
Follow
LAST WATER 6/4
6/5 The sun has been relentless and has caused some bleaching and burns on some older leaves. It seems that the gmos ate having the hardest time (except one). It's been extremely hot though. It's overcast and we are supposed to have thunderstorms and a few more mild days. Plants loved tje water yesterday. I hope it does rain. Plants are growing and seem to be surviving. Burns are on old growth. If I notice more I'll put my back tarp up which will block the sun in the afternoon and put them in shade. I wish I had done that earlier. Oh well. With what these girls have encountered and overcome I think I'll be OK.
EDIT: IT WAS IN THE 80'S TODAY. PROBABLY HIT 90. I HAD TO GET MY CAR INSPECTED AND WAS GONE EXPECTING IN THE MORNING THAT THE THUNDERSTORMS WOUKD START. INSTEAD WE HAD A VICIOUSLY SUNNY HOT DAY UNTIL 4PM. AT 4PM SHIT HIT THE FAN AND IT RAINED SO HARD I WAS UNABLE TO DRIVE. I LIVE IN MAINE SO I KNOW HOW TO DRIVE IN INCLIMENT WEATHER. THIS WAS ANSOLUTE ZERO VISABILITY. I WANTED TO PUT A TARP UP TO SHIELD THE GIRLS FROM THE SUN BUT I WASNT ABLE TOO. WHEN I GOT TO THE GROW RIGHT BEFORE THE STORM IT HAD RAINED A LITTLE AND IT SMELLED SO GOOD. LIKE SOIL. I THINK THIS DOWNPOUR WILL REALLY HELP THE GIRLS. ONLY TIME WILL TELL.
6/6 Plants faired ok through the storm. The 3 earliest transplants and what WERE the nicest looking gmos are getting some burns and bleaching. It's all on old leaves though. I think they're pulling out of it and will grow through it. Some plants seem to not be stressed at all. With tje elements being the way they have I'm suprised they aren't far worse. I was going to put up my back tarp to block sunlight later in the day but I didn't. The burns are on the other sides of the plants and it's supposed to be overcast with showers for a full day. It's clear right now but the new growth and tops of the plants seem fine now. When I got there a few were limp. As soon as the sun came up though they all perked back up. Only time will tell.
6/7 Showers today. It's good to have a break from that horrific 80-90 degree weather with 90% rh isn't run for me or the plants. Plants are recovering from the burns quite nicely. Obviously the burnt leaves won't repair but they did a good job of shielding some of the others. Things are going.
6/8 Still overcast with showers. I removedc a couple burnt fan leavesxand accidently ripped off a bud site.
6/9 Another overcast day. Rained last night. Soil is saturated from all the rain we've gotten. Plants seem to be settling in nicely. The 3 GMOs that WERE the best looking plants are the ones in the worst shape. The got transplanted a day earlier in a lot of sun and wind. They're coming back though. I've noticed that after it rains and they get even a little sun they grow significantly. Those event horizons are tough. The toasted toffy is a reveg but it looks like its going to be a huge plant. I have the 3 seedlings still in small pots. I'll transplant them soon.
6/10 Overcast and a chance of showers. I removed a few bleached fan leaves on a few of my GMO'S that strain took the most damage. They are bouncing back though. We've had a few dayscof rain and milder weather. Few more days with a chance of showers then back to the sunny days. Plants seem to have come out of shock and out grown the light burn. After the rain, when the sun comes out they grow a noticeable amount. Things are still going fairly well.
6/11 Rained and I didn't do

Likes
5
Share


@fadedgreentaurus
Follow
This next week should be the bounce back out of the stunt I have really been waiting for. Went with a heavy decomposing to dress instead of the teas I been brewing. Might add more castings other then that I introduced slow burning phosphorus and potassium to start breaking down into July August so it will be available to the plants then.
Likes
6
Share


@Mr_Height
Follow
All and all good, lots more growth. Flip the switch soon and see how much more they stretch in flower.
Definitely has monster genes. Some fan leaves are bigger than a hand span. Watering sensitive but makes a quick recovery of over/under watered.
Not long left now, happy growing peeps 💚🌿🌱

Likes
5
Share


@dauntless
Follow
Week 5 started July 24, 2022
Growth is still strong into week five, I see no pre flowering, I think that is because she started really slowly due to me getting used to this new light, etc.
July 27, 2022
Smells like lime sherbet up in here. LST, light defoliation to get some light on the lower colas. Really watered in today for the first time soaking the media, she is stretching and I see maybe some hairs for pre-flower - hope not too too soon though, I'd like more height than nine inches before she fully stretched
Likes
71
Share


@DogDoctorOfficial
Follow
Week 2 Veg Update: Thriving and Surviving!
Hey there, fellow plant pals! It's time for another juicy update on my Anesia phenohunt adventure. Buckle up, 'cause things are getting seriously green around here!
First things first – let's talk survivors. Remember our shy friend, Red Banana Pudding #2? Well, against all odds, it's the last one standing, and let me tell you, it's stealing the show! With its tenacity and charm, it's quickly becoming the MVP of this green extravaganza.
But hey, let's not forget about the rest of the gang. Future#1, Zoomiez, and Apricot Oreo are all flexing their leafy muscles and reaching for the sky. Each one is a unique masterpiece, showcasing its own personality and potential. It's like having a botanical art gallery right in my grow room!
Now, let's talk stats 'cause we love a good data dive. TDS is sitting pretty at 420, temps are a cozy 21 degrees, and pH is a sweet spot at 5.9. It's like Goldilocks and the Three Bears – everything's just right for optimal growth.
Feeding time is where the magic happens, and I'm sticking with my trusty Aptus Holland veg mix. This stuff is like plant fuel on steroids, giving my babies the nutrients they need to thrive and shine. From root to leaf, it's a symphony of growth and vitality.
Now, let's spread some love and gratitude. Huge shoutout to Anesia Seeds for crafting these genetic wonders. You guys are the wizards behind the curtain, and I'm just grateful to be along for the ride.
Big thanks to Grow Diaries for being the stage where this green drama unfolds. To the community, your support and camaraderie keep the vibes high and the spirits lifted. You're the heart and soul of this journey.
And let's not forget my sponsors – Aptus Holland and Future Of Grow LED. You guys are the backbone of this operation, providing the tools and nutrients for success. Here's to a partnership that's blooming brighter every day!
That's a wrap for Week 2, folks! Stay tuned for more green goodness, and until next time, keep on growing!
Genetics Red Banana Pudding = RBP
Apricot Oreoz = AO
Zoomiez = Z
Future#1 = F
https://anesiaseeds.com/
Plant nutrition - Aptus Holland - https://aptus-holland.com
LED Photons - Future of Grow - https://www.thefuturofgrow.com/
Controls - Trol Master - https://www.trolmaster.eu/
Watering - Autopot - https://autopot.co.uk/
Tent - Mars Hydro - https://marshydro.eu/
Love and attention - Me, myself and i
As always thank you all for stopping by, for the love and for it all , this journey of mine wold just not be the same without you guys, the love and support is very much appreciated and i fell honored and blessed with you all in my life, With true love comes happiness. Always believe in your self and always do things expecting nothing and with an open heart , be a giver and the universe will give back to you in ways you could not even imagine so
More info, the ocasional give-away and exclusive updates from all my adventures can be found - links in the profile description
Friendly reminder all you see here is pure research and for educational purposes only
Growers Love To you All 💚

Likes
4
Share

@burnout
Follow
Flower day 28. Buds starting to stack well on the Neon Icon plants, could be a little better on the Caddie Runtz. Had some very warm weather over the last week and was struggling with keeping the humidity down, VPD was peaking at 2, way too high. Temps went down so looking good at the moment.

Likes
15
Share


@Insaniac_0
Follow
Flower Week 4 Day 28 to 34 - 3/12 to 3/18
Just monitoring now. All seems okay so far, just a few minor adjustments of the rings
Feed this week was 1.25 gallons two times with about 4 days between. 750ppm total before add-ins. I used 750ppm Bloom concentrate mix (recipe week 5). However, I also added 1ml/gal of CaliMagic (General Hydroponics 1-0-0) to all feeds. PH balance this week was 6.5.
I plan to feed the same amounts again next week and 6.5ph and 6.6 by week 7, when I also plan to start flushing with reduced nutes and HP2 again.
Likes
25
Share


@gottagrowsometime
Follow
Welcome to my Purple Haze Autoflower Diary sponsored by MSNL & Xpert Nutrients.
Days 36-48 weeks 6-7 of pre flower day 2-15
Plant is responding really well having 14hrs of light under my FC3000, and I've been using IR to give my fems extra flowering time & this has suited my Autoflowers really well. New nutrients i see huge improvements in all of my Autos not only from MSNL but crop wide. Root Zone increased 3x easily. Been organic/mineral you need to PH to 6.7 for soil. Are ideal 6-6.1 ph in-between coco/soil and you adjust as needed. Really happy with their push for my plants. She has put on a nice bit of height. Her smell is very new to my grows, as I've not grown a purple haze or smoked it in years. Fruity, like a soda, typical PH, can't wait to taste this girl. (She's currently just been taken out of my tent into dry room, I'll hang her in a few hours)
FEEDINGS/DLI
DLI is around 40-41 700-730 ppf over 14hrs with UV-A calculated in. Core NPK feeds have been only 1x every 5-7 days 450-550 ppm, next week I'll start adding there pk /bloom booster. Master root & everything else brings the general ppm per day 7-1000 with enzymes & master root having huge EC change to water. (Note? This is a different kind of EC, bacteria/enzymes & amino acids have a high EC input but aren't counted as core NPK feeds, which have been 450-500 "master bloom parts A+B)
Thanks to MSNL & XPERT NUTRIENTS for their support & sponsorships. Much appreciated.
Shout out to yall for stopping by. I look forward to seen your diaries. Either way thanks for dropping by.

Likes
20
Share


@scooter112
Follow
Moving right along, each girl is on her own pace. Tent was so crowded I had to remove the heater therefore I bought a bigger tent and will use use this one for drying.
Thanks for looking..
Likes
26
Share


@Hansgrube
Follow
😎 Weekly Update: The plant has growth to 70cm height at day 36 :)
🔪 Most of defoliation and lollipoping has been done - trying not to stress the auto too much.
🌹 LST Update: I do branch a day - so I began 5 branches training by now.
Weekly thought 💭 : I think I do not know much about auto's - considering to do some HST, the upper leaves are really big, watery and makes a lot of shade.
I took very little off. Do you think its ok to remove them all?
😮 Day 38 Update: She has grown 10cm / 4" in 48 hours. I hope she’s done stretching because I have no power left to lift my lights every other day 😷
Day 36: 69Cm/27.1" ---> Day 38: 79.5 Cm/31.3" 💥 🥊
First cloning attempt ever seem to be a success :)
P.s
She drinks almost a gallon per day - never seen anything like that before. Luckily I am using DWC otherwise I would never dare to water one gallon every day.
See you next week - Stay tuned 💥 😝


Likes
47
Share


@terpproducer
Follow
We have day 61 today, next update harvest 💪
---------------------
👇 Week 8 (Pictures are from day 57+58 after 12/12, Trichomes pictures from day 60)
- Just watering 1l / plant with calmag for the last 2 days.
- PPFD at canopy height is approximately 750, with VPD around 1.3
- Harvest is around the corrner
---------------------
Happy growing, and thank you for checking out my report! Your support means a lot to me! 🙏
---------------------
I appreciate every like and comment 👍👊😃

Likes
5
Share


@GrowLegend
Follow
Bien aquí esta el día esperado la cosecha, es mi primer cultivo y considero que lo logre. En muchos medios de lectura y en especial en vídeos mencionan que no puedes esperar mucho es tu primer cultivo. En mi caso es falso y lo demuestro ya que si aprendes, investigas por cuenta y lees lo suficiente, obtendrás un alto porcentaje de que los resultados se den. Muy contento con mi plantas y sus tonos morados. Puntos a mejorar tener una carpa de cultivo y por su puesto un extractor de humedad para que baje la humedad preferiblemente a 45 grados
Vendrán mejores contenidos y cosechas mas abundantes. Gracias a todos por su vistas y comentarios. Saludos y bendiciones!