The Grow Awards 2026 🏆
Likes
Comments
Share
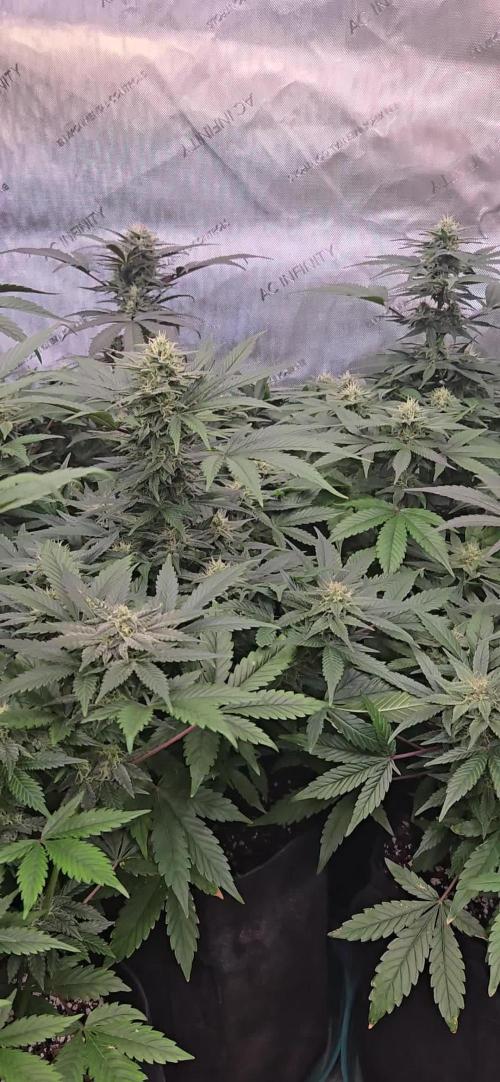
18 weeks from seed to harvest. Love 34 street seeds, quality genetics for a fair price. These garlic cookies showed no disease or pest issues, no mold or powdery mildew. Easy enough to grow, no surprises, no super stretch in flower, but I would recommend training or SCROG to control them. Pungent Pine is what I am callling this smell, over 800 grams wet weight. They are hanging to dry in my tent as I write this, 60 %RH and about 71 degrees of freedom units! Can’t wait to try it out 🇨🇦❤️🌱😎💨
Likes
34
Share
Awesome growth! Topped above the second node, then Mainlined to have 6 main nodes total through lollipopping. She was trained using LST, until week2 flower.
Likes
15
Share
First off I want to give a big thank you to Zamnesia and Plagron for the awesome package right before Christmas 🎄.This may be one of the best gifts I will receive this year 😊.I will germinate these 5 seeds on New years and get the New year started off right.Well had a few things to wrap up but finally Jan 21st all 5 and added one extra Zamnesia Runtz bean so I will have a 6 plant auto run in the 5x5. Day 1 Jan/20/2025 the Runtz have sprouted :)
Likes
52
Share
I gave Isopropyl alcohol 70% equal parts water, 1 tsp cayenne, and kept enough for multiday application, what little population of aphids is left I shall catch them the next morning, opening the tent 10 min before lights on the clovers have yet to open, all the aphids hiding on undersides are easily visible, still none ever went near cannabis plant. Clovers are far tastier it seems. The alcohol kills on contact, the idea was to saturate the leaves with a light foliar application, and once I was done I ran it through the canopy with my hands making sure as much of the clover surface came in contact with the iso, once done turned on the fans and evaporate it quickly. Beautiful thing about Isopropyl is that it evaporates rapidly at room temperature way below boiling point leaving behind zero residual so nothing seeps its way into rootzones unless you spill it there. It is a magical solvent that leaves no trace that it was ever there. Resonant Frequency: A resonant frequency is the natural vibrating frequency of an object and is denoted as ‘f’ with a subscript zero (f0). When an object is in equilibrium with acting forces and can keep vibrating for a long time under perfect conditions, this phenomenon is resonance. In our daily life example of a resonant frequency is a pendulum. If we pull back the pendulum and leave, it will swing out and return at its resonant frequency. Objects combine to form a system, this system can have more than one resonance frequency. The resonant frequency is termed as the resonance frequency. The phenomena of resonant frequency used in the series circuit when the inductive reactance (XL) is equal to the capacitive reactance (XC). If the value of supply frequency is changed, we can observe that the value inductive reactance (XL) and capacitive reactance (XC) is also changed. Inductive reactance (XL) and capacitive reactance (XC) are inversely proportional to each other. When we increase the frequency, the value of XL increases, whereas the value of XC decreases. When we decrease the frequency, the value of XL decreases whereas the value of XC increases. At series resonance, when XL = XC. The mathematical equation of resonant frequency is: XL = 2πfL; XC = 1/2πfC XL = XC 2π f0L = 1/ 2πf0C ; f0=1/2π sqrt{LC} Where f0 is the resonant frequency, L is the inductance, C is the capacitance How to Calculate the Resonant Frequency of an Object? An object exposed to its resonant frequency can vibrate in symphony with the sound. The wavefronts pushing on the object will arrive at just the right time to push the object with greater and greater amplitude in each cycle. To get a clear idea of this concept one of the best examples is pushing a friend on a swing. If you push the swing randomly, the swing will not move very well but if you push the swing at a specific time, the swing will get higher and higher. Another example to find the resonant frequencies is to place the object next to a speaker and place a microphone attached to an oscilloscope next to the object. Then play the sound in the speaker at a given volume, and then without changing the volume slowly change the frequency. Now observe the oscilloscope, you will observe that at certain frequencies the amplitude of the wave, is proportional to the volume of the sound that the microphone is able to pick up. The frequency that is caught by the microphone will be greater than at surrounding frequencies. These are the resonant frequencies and are detectable as the sound energy absorbed by the object is re-emitted more efficiently at these frequencies. The precise moment that constructive interference happens the amplitude of the wave will spike at the precise frequency emitted. Q: Compute the resonant frequency of a circuit whose inductance is 25mH and capacitance is 5mu F? A: Known values are, L = 25mH = 25 x 10-3 H C = 5mu F = 5 x 10⁻⁶ F Formula for resonant frequency is, f0= 1/2π sqrt{LC}1/2π√L f0=1/2 ͯ 3.14√ (25 ͯ 10-3 ͯ 5 ͯ 10-6) = 450.384Hz Why Neodymium? Ferromagnetism is an exciting phenomenon observed in certain materials, known as ferromagnetic materials, that can retain their magnetization even after removing an external magnetic field. Ferromagnetic materials can become ferromagnets and interact strongly with other magnets and magnetic fields. A characteristic of ferromagnetic materials is their magnetization ability, distinguishing them from paramagnetic and diamagnetic materials, where weak magnetism exists temporarily. This unique property allows for making permanent magnets widely used in various applications such as motors, generators, speakers, and data storage devices. The ability to generate and maintain a magnetic field without the need for a constant external source of power makes ferromagnets highly valuable. An alloy of neodymium, iron, and boron discovered in the 1980s is ferromagnetic, yielding permanent magnets over 1000 times stronger than anything ever seen before. The name neodymium comes from the Greek neos didumous, which means "new twin." Neodymium magnets are made of an alloy of neodymium, boron, and iron. This allows them to simultaneously store impressive amounts of magnetic energy while being highly resistant to demagnetization. Because iron oxidizes quickly, neodymium magnets are coated to prevent rust from accumulating. The attraction between two neodymium magnets is so strong that if placed close enough together, they can collide and shatter. Neodymium magnets have an unusually high-temperature resistance, and they can even withstand heat exceeding 200 degrees Celsius. N50UH 1-1/2"OD x 1.065"ID x 3/8"
Likes
13
Share
@Erratico
Follow
Día 22 de vegetación, se realiza poda FIMing a las 4 plantas, que ya tienen 6 nudos, se ven fuertes y de un color verde muy sano, se riega un día con 250 ml. y al otro con 100 ml. se va variando entre agua con calmag, microvida o fertilizantes para mantener baja la EC. No estoy corrigiendo el PH como parte del experimento. Día 25 de vegetación, las plantas se han recuperado bien de la poda FIMing, se riegan a diario y cada riego con fertilizantes diferentes o solo calmag, para mantener una EC bajo los 800. Se siguen doblando las ramas y podando los brotes inferiores.
Processing
Likes
19
Share
Esta es una genética de un olor muy fuerte y pesado se siente intenso desde la vegetación , es una variedad muy resinosa con unos colores morados hermosos , probando las flores cuando terminó el secado y ahora curando las flores se siente un sabor terroso , al principio no me gusto ya que nunca había probado este , pero después al seguir fumando se siente un sabor final muy agradable. Esta genética se conservará para futuros cruces y experimentar algo nuevo. muy conforme con la producción de cada clon
Likes
8
Share
@Chubbs
Follow
Weekly update for these gorgeous girls. They've definitely started taking off and doubled in size over the past week. I started feeding nutes at 5ml/gal of Athena Calmag,Grow A & Grow B. Ppfd still at 350-400 at the canopy level and watered 250-500ml daily. All in all Happy Growing
Likes
7
Share
Eccoci di nuovo qui!!! Super eccitato per questa nuova collab con Spliff Seed, che mi ha dato l’opportunità di testare questa nuova genetica e di condividere i progressi con tutti voi!!! Come sempre partiamo nei bicchieri per poi travasare.. Questa volta verrà svolto tutto sotto la Lumatek Zeus 465 ProC, mi aspetto molto da questo ciclo!! Genetica che inizialmente mi aveva colpito per la resina che aveva ma una volta grindata e fumata mi ha lasciato senza parole: - Sapore intenso con retrogusto dolce sembra uno sciroppo!!! - Effetto devastante corporeo ti manda direttamente sul divano! La consiglio a tutti per la facilità di coltivazione!!! Grazie a tutti per il supporto ❤️🍀🔥
Likes
422
Share
Hi all 😁 Hope everyone keeping well and having a wonderful week! Thank you all for such amazing support on this bananas journey 💚💚💚 Will be updating this week journal daily so please remember to revisit to see full week content. So far this grow it's going great. Girls are stretching by hour. Great health, nice green colours, more and more squares taken on the netting, flowering nicely progressing, I'm very happy 😁 Planning to apply more selective defoliation, especially to Xena. No changes to nutes except few extra drops of calmag just in case and will try to fill the net entirely. Week 7 Nov 27- Dec 3 Nov 27 Selective defoliation applied on Xena. 8-10 mainly small fan leaves. She is still a bit shy to open as much as her sister. No rush my girl. You still doing great! Nov 28 First watering for this week. 7ltr beetwen them both with 4h spread. Runoffs. Xena 300ml PH 6.1 Athena 250ml PH 6.4 😁. So far the largest amount of my magic mixture consumed by my 🍌💜👊 girls. Well done👏 Nov 29-30 Leaves tucking and joyful observation🤓 Dec 1 Selective defoliation and first stage of lolipopping on both girls. Decided to go a bit heavier as tomorrow heading for trip and wont see my girls until Tuesday! They will be all alone without any supervision so hopefully they will behave and I will be nicely surprised of their development on my return. Watered with 2tr mixture and sprayed with water and fish mix solution right after defoliation. Planning to feed them tomorrow as much possible 6-7ltr before heading off to our voyage to Amsterdam 😎 do anyone know ls if any of coffeeshops have Fastbuds strains available? Would love to try 🍌💜👊🤤😋 Dec 2 Girls watered as above and both PH 6.4 on runoffs. Dec 3 Girls are unsupervised until December 5th. Thank you all for such amazing support on this journey 😊 love you all!!, 💚💚💚 Stay tuned for upcoming week update right after my return. Peace and love brothers and sisters ✌️💚
Likes
58
Share
Video quality is so so for closeups with GoPro. Both phenos are super fire 2 more watering and will be flushing for about two weeks should take me near harvest at week 9-10. Mars Hydro FC4800 dimmed at 300w, will help lower temps and bring out those colours.
Likes
1
Share
Day 28 The plant is looking strong and healthy. Gave it a dose of compost tea earlier this week, and it responded well. I will rise the temps again this week as the SBC drying is done.
Processing
Likes
42
Share
Thursday, July16th. Solocup Challenge 2020. @Silky_smooth asked me to Participate. and well why not Iam always open to new Challenges, And I think It will be challengeing. Never grown in a Solocup Before So Iwas thinking a While wich Strains i should take, And i decided to take good growers and resiliant ones. I´ve chosen 3 Strains , 1 Photoperiod and 2 Automatics "Honey Cream" From RQS.... its a vigor Grower, resilant.... maybe toooo bulky.. we will see I started like always in soaking the Seed I took a little Teapot ( around 400 ml) and let them soak. I am thinking about tzthe Drainage Material i should take Claypebbles? Claygranules? Mesh? Perlite=? So Pls tell me what you prefer,,,, thy Friday The Seeds went under a wet Kitchensponge Saturday Nice long Taproot, so tomorrow it will get Planted Sunday Seed was planted. It had a nice long Taproot I took Claypebbles and let them soak and wash them a little then into the Jug and some additional Perlite Filled uo with my Soilmix and " Living Organics" Some drips of water.... done Friday I totally forgot to update... lool,,,,, she is showing up yaaay
Processing
Likes
1
Share
Week 7 and all is going very well with their transition to the tanks. They have begun to weave roots into the matting now so are well anchored. The C Banana has been streching out well and I am continuing the bends and squashing her stem to create a decent knot to hold her down where she is quaded. It always looks so rough but the end results can be amazing for repair strength. The monster zkittelz is a little.more busy and robust. She has some nice thick and hardy stems building and i expect she knows her fruit weight to come . Using the squashing and bending does add a little more recovery time each session but the punishment is no worse than nature would throw their way if wild. Always worth remembering a little stress can work wonders. Dont be afraid to control your grows , YOU put a lot into them , you deserve a reward for the comittment. Be safe and civilised Growmies, one love. WWG1WGA
Likes
20
Share
@DrGanj
Follow
Tapering nutes off for the flush. Also added a small amount of Barley as a top dress to help her finish off.
Likes
7
Share
After 12 weeks of flowering and an incredible fragrance, I cut off the larger top blooms. The smaller ones that were covered will be given another 1-2 weeks to ripen. Incredibly beautiful colors, pink-purple-green colored flowers The larger fan leaves were quickly cut off. The scissors were covered in purple resin. The wet flowers were carefully sorted into the drying net. Now they can be dried in the dark at 19°C and a humidity of 50-55%
Likes
5
Share
@Oldwied
Follow
The smell is so strong that I have to change my ACF. Cream Caramel looks amazing. If the flowers are as solid as they are fat, it will be a top harvest. But I have some bad news. On the peak of 5 from 18 head buds I detected 1 maleflower. They were closed so I cut them out. But I hope that not too many hidden seeds develop. I remain optimistic. Light Power: 100% Day 95 Flower day 48 Photoshooting
Likes
6
Share
Ja die Manderin Cream wächst jetzt am Tag mindestens 5 cm. Es haben sich sehr viele Blüten gebildet. Habe jetzt den Ec wert auf 1200. Die Pflanze trinkt am Tag 0,9 Lieter und ich fülle den Tank jeden Tag mit ca. einen Lieter auf mit einen Ec wert von 1087. Erhöhung von B52 und Big bud und Tasty terp. Habe noch keinerlei erfahrungen mit Automatic und wusste nur , das sie in der Blütephase kein stress vertragen.. Deshalb habe ich die Entlaubung nicht gemacht.. Werde 3 wochen vor der Ernte etwas entlauben... Aber ich muss mich erstmal genauer mit der Blütezeit befassen.. oder es genauer im Blick behalten durch vergleiche hier im netz. Habe hier Züchter gesehen mit der cream Manderin die 14 wochen Blütezeit hatten.. oder Sie so lange Blühen ließen..und nicht wie angegeben 9 wochen und fertig... Aber die ergebnisse wahren echt Top bei den anderen .. schauen wir mal...
Likes
2
Share
@Sammy23
Follow
Bonne semaine, y'en a une qui a stretché beaucoup... Les autres un peu moins, elles culmine à 30cm. Je vais commencer à travailler avec les engrais floraison. Je mettrai l'ajout sur la semaine prochaine.
Likes
27
Share
1/20/2023- So much to do pre grow and over the next 16 days, absolute first order of business is that I have to take down my current Grow---TIMBER-- Then I have a list of things I have to get done in order to be ready to start this grow 1 Feb. With that said T - 2 days until start 48 hour Flush T - 2 days until Start 48 hours of Light T - 4 days until TIMBER!!! Items that need to be done before 1 Feb 2023 1. I need to clean the tent out 2. I need to clean the equipment- Proper Sanitization between grows in Hydro is a must!!! 3. I need to get the hole in the ceiling above my tent repaired- For my last grow I had a deep sink installed in my grow room, to make Hydroponics a little bit easier and have a water source in the same room. The seals on the pipes they were installing broke and leaked through the ceiling causing some damage all the way across my grow room, I was already weeks into my grow and couldn't risk them working above my tent and it would have been very awkward positon for them to be working in as well, so have to get this done quickly between chop and germination. 4. I have to install my new light- I was using a Vivosun 4000 and for this grow I am switching up to a Spider-farmer SF 7000. 1/20/23- For this upcoming grow I am working with M/F photo seeds so I ordered 4 Sex determination kits. I recieved my my 4 Sex determination testing kits from Rimrock Analytics today. I will be using these to test my plants at week 2 of Veg so that when/if I take clones I know I am taking them off females. As well as I don't want to accidently pollinate my tent during this grow I am looking for big beautiful buds not seeded buds. :-) 1/24/2023- Harvest of current grow- Started at 2:00pm and finshed wet trim and firt batch into the freeze dryer. 1/25/2023- Next batch into the freeze dryer and cleaning all my equipment for this Grow. T-1 Day until the workers are supposed to be here to fix the hole in the Grow Room. T-3 days until I instll my new Gorilla Grow Tent and my New Light Spider Farmer SE-7000 for this grow. T-7 Days until Start of Germination 1/26/2023- Harvest is done ran through the Freeze dryer and dry tim completed. 1/27/2023- Grow Room repairs completed. Hole is gone Letting the paint dry before I install the new tent. T-2 days until Install the New Gorilla Grow tent and the new Light T-3 days until I put the hydro equipment in the new tent T-5 days until Germination 1/29/2023- Day 0- Final Pre Germination activities Germination Start T-3 days The paint on the ceiling was dry and it was time to finish prepping for Germination. I got the following items knocked off my list. New 4X4 Gorilla Grow Tent is up and ready New Spider Farmer SE-7000 Light is installed- Thanks Moony Grows for the suggestion and for the Code that got me some money off and free shipping (Moonygrows)!! I turned the lights all the way up to max and set the timer to 18/6 0600-0000. I will keep an eye on the temperature and humidity without my plants and see how hot it gets with the new light. I put my Hydro system back together and put in 40 gallons of water into it, time to monitor for leaks the next few days. I Setup my cloning machine for Germination Days 3-11 1/30/2023 let me break down the situation, ROOM in the TENT.. Enough said.. No really I tried putting my exhaust system up in the new tent with my new light, The light is so big corner to corner that it really didn't give me enough room for the lights be be raised, with the exahust hanging the buckets my plants are Starting in are 2 and 1/2 feet off the ground, great for plenty of room for roots but not so great for upwards space for the plant to grow. In a 6' 11 tent with the exauhst in side and hanging that only gave me a little over 4 feet of grow room to play with. My last grow if you saw my diary, anyone could tell I was struggling to keep the buds off the lights. No good, Since space was such an issue I was running my carbon filter inside on the ground but It really needed to be up sucking the heat out not shooting the cool out. With that setup I was sucking air through the filter and pushing it out the tent at a bottom exhaust hole cold out. Wasn't doing me any good for my heat. I was hitting temps of up to 85 degrees. I bought a portable AC unit and have been running it in the grow room to try and keep temps below 85 and I have had to lower the power on my lights during grow also not ideal.. With that said a friend of mine MoonyGrows (Check out his diary) took the time to look at my issue send me a picture of my grow tent setup with detailed instructions on how to suck the air out from the top but putting my filter and fan on top of my tent so no room issue and I am sucking the air out from the top where the heat is instead of pushing the air out from the bottom where the cool is... THANK YOU MoonyGrows For taking the time to help me get this straightened out.. Now I have room and I have the exhausts working right and now my temps with everything at 100% are topping out at 80 this dropped the temp by 5 + degrees at 100% max. T-2 days until Start of Germination Prepped my seed tray with humidity dome Prepped my Rapid Rooter plugs. I Used RO water, and I added a few drops of Hydrogen peroxide to Oxygenate the water. I then PH balanced between 5.7-6.0 the same that they will be getting in the Cloning Machine and when they get to thier final grow pod. I perfere the 5.8x range and I hit 5.84 for these rapid rooters. If you want to see a complete video on the process HowWeedGrow has an amzing video that shows step by step how to do it and explains it better than I ever could including how to plant the seeds. Which I will cover when I get to that step on Wed. https://www.howweedgrow.com/how-germinate-weed-seeds-cannabis-rapid-rooters/ 1/31/2023 T-1 day until Germination Start All set and ready have my Rapid Rooter plugs ready to go have my seeds out.. Have my seed tray warming up tonight. Tomorrow morning right into the Rapid Rooter then strait into the tray. I will spray the dome to start the humidity in there. 2/1/2023 Germination Day!! Let the games begin! 0600am Put the seeds into the Root Riots. And then put the seeded Root Riots into their first home the Seed tray. I have them under the light 24/7. Sprayed the dome 7:30pm Sprayed the Dome to keep humidity going on the dome. 2/2/2023 Day 1 of Germination Sprayed the Dome in the morning Sprayed the Dome in the evening 2/3/2023 Day 2 of Germination Roots are starting to come out the bottom of the root riot plugs and the heads are slowly popping out of Number 4 just below the surface. Afternoon- Number 4 has popped up Evening- Number 3 has popped up as well. Happy Dance!! 2/4/2023 Day 3 - Germination Surprise Surprise Surprise- all 4 have now poked their heads up.. Happy day!! 100% Germination succeeded. Now major milestone to track is how many are female and how many are male. I will take look at the roots this afternoon/evening and see if they have enough root to go into the cloning machine for the next 7 days before they go into their Hydro Pods. Day 3 - Germination - Evening.. Roots looked good and they were tall enough to make it into the cloning machine. Now that they are all in the cloning machine I have switched the lighting to veg state 18 on 6 off. 2/5/2023 Day 4 - Germination - Morning All the Ladies (fingers crossed) looking great stretching nicely and look nice and green, Photo synthesis underway.... UPDATE!! After a very interesting POD cast on FSTS by Dr. Bruce Bugsbee from Utah University, I have shifted my lighting to 24 hours on through seedling and then I am going to shift to 20 hours on the rest of Veg. 2/6/2023 Day 5 - Germination While Checking on my conditions inside the new tent last night, I found that the Humidity was down to 39 Percent. I added an AquaOasis Cool Mist Humidifier, the reason I selected this humidifier is that I needed one that could be turned on and off utilizing my Inkbird Humidity Controller IHC200 that I have my Pro Breeze Dehumidifier currently running with. Root structures are starting to get there about 1/4 of an inch. 2/7/2023 Day 6 - Germination Everything seems on track more roots poking out of each today. They are each getting a little taller as well. Checked in the evening and number 3 was drooping the Root riot plug on the bottome was dry and the roots were not in the water yet. I raised the water just enough that the longest root that was sticking out is now hitting the water. 2/8/2023 Day 7 - Germination Everything looked good while checking in on them this morning number 3 is now full up and no droop again. 2/9/2023 Day 8 - Germination T-2 days until Plant into Forever Pods and we start week 1 of Veg .. :-) Surprising thing to me is that number 1 and 2 were later in popping then 3 and 4 but the roots are growing longer in 1 and 2. 2/10/2023 Day 9 - Germination Number 1 and Number 2 are definitely ready for transplant today.. Based on how they were yesterday and where they are today I am hoping by tomorrow 3 and 4 are ready. Today they look to me where 1 and 2 did yesterday.. I really hope 3 and 4 catch up by tomorrow since.. T-1 day until transplant to new/ final home for grow. Need the roots long enough to have some clay down in the basket to keep the root riot out of the water and only roots in the water.. 2/11/2023 Day 10 - Germination Today they got placed in thier forever Home, 7 days from Sprout and 7 days until Week 1 Start. PPM- 180 this is water out of the Tap Temp Water: 70.7 Temp Tent: 77 Humidity: 40% I have a humidifier going 24/7 to try and bring this up.. I also have Humidity Domes on each plant. 2/12/2023 Day 11 - Germination Sprayed the domes, all are looking good.. Nothing much to do at this phase but Keep monitoring the PH level in the system and making sure they have a comfortable home. T-6 days until Week 1 start 2/13/2023 Day 12 - Germination Sprayed the domes, They were looking a little yellow today so I moved the light down to assist. Nothing much to do at this phase but Keep monitoring the PH level in the system and making sure they have a comfortable home. T-5 days until Week 1 start 2/14/2023 Day 13 - Germination Sprayed the domes, They were looking a little Florissant yellow today, with what looks like slight burn on the tips, I talked with a fellow grower and we agreed that It was probably that I was drowning them, Yes you can drown you plants even in Hydro, but only early on.. :-) It usually happens with the water being too high, which soaks not only the roots but the medium (root Riot plug in this case). I lowered the water from touching the bottom of the pot to about 1" away. This will probably take 3-4 days to resolve. I will continue my daily monitoring. T-4 days until Week 1 start 2/15/2023 Day 14 - Germination Sprayed the domes, continue my daily monitoring they look a little darker green instead of lime green now that I lowered the water levels in the system, so I think that I might have resolved the issue but it will take a few days for recovery to happen. T-3 days until Week 1 start 2/16/2023 Day 15 - Germination I looked in on them this morning, 3 and 4 look like they are doing well and recovering nicely. Number 1 not so much it has brown spots on the leaves, this very well can still be a side effect of the overwatering but I decide to go ahead and add Nutes earlier than I was planning just incase. I was going to wait until Saturday but I think intervention is necessary now especially after drowning them early on. I added 1/2 what I am planning on adding for week 1 start. I also think I am going to adjust my chart to add 1/2 2 days after plant from now on. I don't think it would hurt it to have some Nutes to pull from. .25ml/Gal Calmag = 12.5ml 1ml/gal GH FloraMicro= 50ml 1ml/gal GH FloraGro = 50ml 1ml/gal GH FloraBloom = 50ml T-2 days until Week 1 start = I will drain the system and start it over on Saturday with Week 1 Nutes. 2/17/2023 Day 16- Germination I didn't even want to post today after looking in on them this morning, 3 of the 4 are now showing signs of dronwing.. Brown spots on the leaves, the water levels were still too high.. I drained about another inch out of the tanks.. Will see how quick they recover.. I start week 1 tomorrow and will have to ensure my water levels are at least 1" away from the basket on this round.
Likes
6
Share
@KcKush
Follow
*Increased PH to 850 *Noticed some yellowing maybe I need to increased feeding. *Starting to push out a weak citrus smell. *did a foliar and burned all the pistils :).
Likes
3
Share