The Grow Awards 2026 🏆 


Likes
Comments
Share
@Grow_for_Happiness
Follow
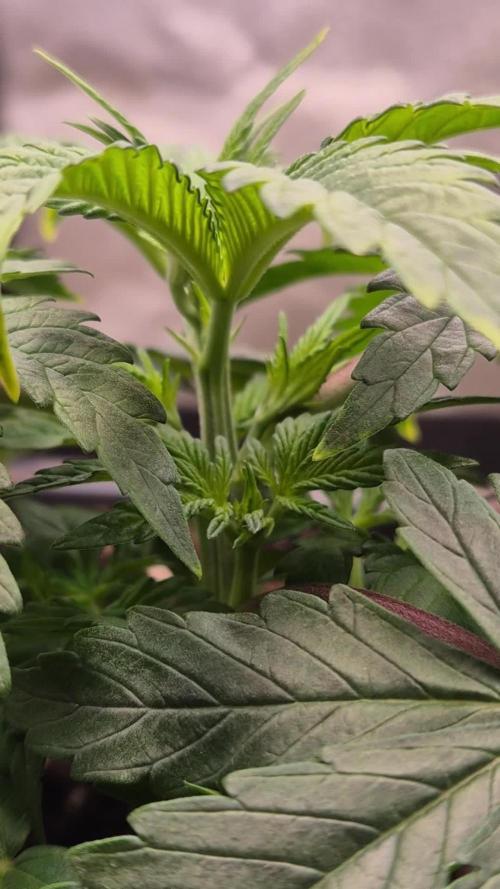
Wow week two of flower is done and I am SO happy with how these four girls are doing.
Day 9F/72S they got their first top dressing of Power Bloom at 75ml right before watering, dug into first few inches of soil like usual. I make sure to top dress the Power Bloom every 3 weeks and the other additives every 4 weeks, seems to keep the plants happy.
Day 12F/75S things are looking healthy but quite bushy and I'm seeing some growth on the low parts of branches and below main canopy level so did a good cleanup at lights out. Helps to keep from wasting energy on bud sites that will get very little light and produce small/larfy buds. Also redirects that energy into the tops for bigger yields 🤞. Took off a good amount lots of airflow down there now.
Day 14F/77S. All the girls are looking happy and healthy. Spending their days praying to the light and packing on bud sites! Looking down on the canopy she is just about full, glad I left some space to start! Oh and there was no noticable shock to the plants from the trim on the 12th day so that's good.
Have been keeping the light at 16" from main canopy (aside from 3-4 extra tall branches) and running 100%. Goal is to let them grow another 3" so they are 13" from light and then will raise daily for the last bit of their growth. Should keep it around 750-950umol/s. Still watering 3L per plant every 3 days with just the slightest runoff from each. Tested runoff and is 6.7, usually don't do this but had enough one watering and was curious so figured why not.
Was a great week can't wait to see next week's changes!

Likes
13
Share
@BrigadeDesTerps
Follow
Nouvelle semaine en intérieur, j’ai du éliminer une grande gotti et la graine inconnue, c’etais malheureusement des mâles.
Je pense que je devrais bientot en éliminer une troisième, la deuxième grande gotti, elle ne sait toujours pas déclarer mais à première vu on dirais un mal, mais faut encore attendre pour en avoir le cœurs net.
Rien a dire de plus, elle commence chacune à bien developper leur pistil.
Frosty est petite mais bien charnue, je ne crois pas qu’elle va donner beaucoup mais elle va donner un bon truc je le sens bien 🙏🏻
Aladdin kush #1 se porte bien, et ce malgré son tronc fendu en deux. Elle se développe très bien, et prends une belle hauteur, je sens qu’elle va me donner de belle chose!
Aladdin kush #2 tous comme sa sœur mais sans le tronc fendu bien sûrs.


Likes
2
Share
@Ninjabuds
Follow
My Purple Kush seedling is the smallest in the tent, and it's been a slow starter. It's finally showing some signs of life, but honestly, I'm not sure if it's going to catch up with the others. I might just cut my losses and focus on the stronger plants. It's a tough call, but sometimes you have to make those decisions. I’m going to keep the plant for sure just because I want to see what purple kush looks like
The weather has been absolutely gorgeous this past week! We've been hitting that sweet spot of 70 degrees during the day, perfect for getting outside and soaking up some sun. Then, it cools down to a comfy 50 degrees at night, which is ideal for sleeping with the windows open. I've been loving all the fresh air!
I finally got around to building that little wooden planter for my windowsill. It was a fun project, and now my regular plants have a nice new home. It really brightens up the room, and I'm thinking of adding some herbs to it soon. Maybe I'll even try growing some basil!

Processing
Likes
142
Share
@MadeInGermany
Follow
Hi everyone 🤗.
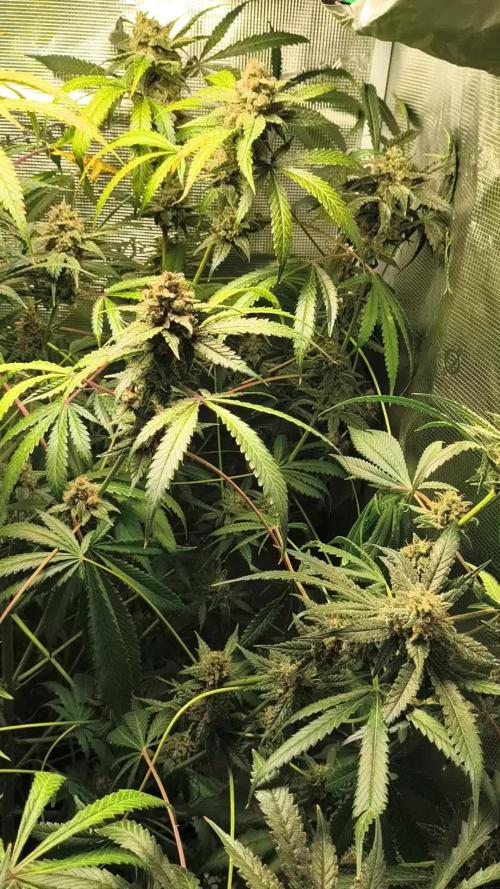
The tent bursts at the seams 😍.
The buds are getting bigger and bigger :-).
The blue chesse pheno 1 is harvested this week 😎.
next week both Tangie Kosher Kush will be harvested :-) everyone else needs something 😊.
I wish you all a nice week, stay healthy 🙏🏻 and let it grow 🌱


Likes
2
Share
@CanarianGrow92
Follow
We placed the clones in 7 liter pots, 1 of the clones looks worse than the other 2, but lets give her some days, she need some nutrients and im sure she will get better

Likes
Comments
Share
@Max_Terpz
Follow
Die Pflanze entwickelt sich insgesamt sehr kräftig und vital. Nach 24 Tagen habe ich sie über der fünften Nodie getoppt. Die Triebe der ersten Nodie wurden zuvor entfernt, sodass sich die Energie gezielt auf die oberen Strukturen verteilen konnte. Einige Tage nach dem Topping habe ich mit dem Low Stress Training begonnen, um die Seitenarme gleichmäßig auszurichten.
Beim Umtopfen in den finalen 25-Liter-Topf habe ich dem Substrat Green House Feeding Bio Grow mit einer Dosierung von 2 g pro Liter Erde beigemischt. Trotz dieser vergleichsweise moderaten Düngemenge zeigt die Pflanze leichte Anzeichen einer Überdüngung. Da bis zum Beginn der Blüte keine weiteren Nährstoffe hinzugegeben werden, ist davon auszugehen, dass sich dies im Laufe der Zeit von selbst reguliert und keinen nachhaltigen Einfluss auf die Entwicklung haben wird.
Durch das Topping über der fünften Nodie und das Entfernen der untersten Triebe verfügt die Pflanze aktuell über acht stabile Seitenarme. Diese werden konsequent per LST bis an den Rand des Zeltes trainiert, um eine gleichmäßige Flächenverteilung und eine optimale Lichtausnutzung zu erreichen.

Likes
15
Share
@Dirty_rich
Follow
Bastante bonita, buen producción a pesar de que le dio botrytis en la copa principal y tuve que cortar por prevención.
Un olor muy original, honestamente me gusto mucho, la considero fácil de cultivar con un plan de nutrientes medios.
Likes
10
Share
@HideAndFly420
Follow
Day 64 my baby is going really well by now, she s been running fast until now and I think that’s enough with fertiliser. From today o start my flush, I will give today my last dose of regulator and from next irrigation just on controlled water until the end of maturation, I want this baby to eat everything .
day 65 started flushing. ph controlled water at 6.0 i think 20 more days at max before m
Day 68 First check with micro today. The baby looks already milky and amber on the top buds but the rest of the plant is still transparent. I’ll wait at least until this weekend for a re check maybe I’ll cut her in two rounds. As I be been watching a lot with micro I noticed so many dust and other stuff on the buds so I think I’ll wash her in water.
Today watered ph 6.
Let’s see!
🌱🔥🌱🔥🌱🔥🔥


Likes
12
Share
@UK420hydrogrow
Follow
Ok had a long week various problems with humidty and temp issues led me to upgrade tent from 1.2 x 1.2 to a new 2.4 x 1.2 x 2.0 also changed the flower lights to the x 2 viparspectar 450 reflectors along with the new white lighting 315 watt cdm all in one light with there 4k flower pro bulb the plants are loving the new space and abundance of lights any tips comments etc feel free to msg


Likes
23
Share
@Hashy
Follow
********************************************
Week 16 Fade (week 10 flower)
********************************************
Light cycle=12/12
Light Power=120w 50%
Extractor controller settings (during lights on).
High temp= 25c
Temp step=0c
High Rh= 50%
Rh step=0%
Speed max=10
Speed min=5
Extractor controller settings (during lights off).
High temp= 21c
Temp step=0c
High Rh= 55%
Rh step=0%
Speed max=10
Speed min=5
Smart controller settings (during lights on).
Lights on=9.00am
Radiator on= -22.c
Radiator off=+22.5c
Top fan on=
Smart controller settings (during lights off).
Lights off=9.00pm
Radiator on=-19.0c
Radiator off=+19.5c
Top fan on
VPD aim=1.0-1.4
DLI aim=30-40
EC aim=0.2-0.8
PH aim=6.0-6.5
💧💧💧💧💧💧💧💧💧💧💧💧💧💧💧💧
NPK= 0-0-0
Method= Automatic
Feed=Finishing nutes.
Neutralise=0.1ml/L
Flawless Finish=2ml/L
Easy Ph down=0.02ml/L
(1ml=24 drops, 1 drop=0.04ml)
Easy Ph Up=0ml/L
(1ml=24 drops, each drop is 0.04ml)
Ec=0.34 PH=6.1/6.0
Runs=18
Run times=4mins (L/L each)
Gap times=16 mins
Total runtime=72mins(L/L each)
Total flowrate= ml/min(ml/min each)
Auto start time=10.00am
Auto stop time=15.44pm
💧💧💧💧💧💧💧💧💧💧💧💧💧💧💧💧
********************************************
********************************************
📅19/1/25 Sunday (Day 106)(flower day 66)
📋
💧
Automatic finishing nutes
Ph down=0.01ml/L, 2 drops
Ec=0.3 PH=6.4/6.3
Volume=8.0L
Volume left=2.5L
Volume used=5.5L(90ml/min)
Volume each=5.5L(90ml/min)
Runoff.
Total runoff=0.8L
Ec=1.9 PH=/6.7
💧
📅20/1/25 Monday (Day 107)(flower day 67)
📋 Tops are ready, lowers not far off. Going to decide if im just going to harvest the tops and let the lowers mature a bit more, I'll check again in a few days and make the decision.
📅21/1/25 Tuesday (Day 108)(flower day 68)
📋
📅22/1/25 Wednesday (Day 109)(flower day 69)
📋
💧
Automatic Water (Neutralise)
Easy Ph down= 0.01ml/L (2 drop total)
Ec=0.15 PH=6.4/6.4
Volume=8L
Volume left=2.75L
Volume used=5.25L(90ml/min)
Volume each=5.25L(90ml/min)
Runoff.
Total runoff=1.3L
Ec=1.3 PH=/6.8
💧
📅23/1/25 Thursday (Day 110)(flower day 70)
📋 Small defoliation
📅24/1/25 Friday (Day 111)(flower day 71)
📋
📅25/1/25 Saturday (Day 112)(flower day 72)
📋 That's it for miss Zoap, she has matured as much as I want so she has got the chop today.
********************************************
Weekly roundup.
📋 She has bulked up enough now. Shame I can't get more light to lower parts of the plant.
Back soon.
Take it easy.
********************************************

Likes
4
Share
@Eddy568545
Follow
So sorry I wasn't able to keep up with diary been very busy with work and taking care of the kids and of course my lil babies lol had to turn the gorilla cookie to a somewhat outdoor plant but still fed daily with coco nutes and that boy is a beast prob like 3 weeks behind if that outdoors gonna decrease nutes on my indoor cuz she seems about ready can't wait super super sticky


Likes
46
Share
@DogDoctorOfficial
Follow
Hey, cannabis enthusiasts and connoisseurs! 🌿🔥 The journey with our Runtz F1 has been nothing short of legendary, and now we’re at the stage that every grower eagerly awaits—the trim and smoke report. This Runtz F1 has delivered beyond expectations, and I can’t wait to share the details with you. Let’s dive in!
The Trim Process 🌾✂️
The trimming process was an experience in itself, filled with care and attention to detail. Here’s how it all went down:
• Breaking Down the Branches 🌿:
• First, we carefully broke down the plant into manageable branches, making sure to preserve the integrity of each bud. The structure of the Runtz F1 made this easy, with its dense, compact colas ready for precision trimming.
• Trim Bin Magic ✂️:
• Using a Trim Bin, we meticulously trimmed away the sugar leaves, leaving behind only the most beautiful, resin-coated buds. The Trim Bin isn’t just a tool; it’s a game-changer, allowing us to catch every last bit of precious kief that falls during the process. This extra kief is like a bonus for those special moments when you want to add a little something extra to your smoke.
• Preserving Terpenes with Grove Bags 🛍️:
• Once trimmed, the buds were placed into Grove Bags for curing. These bags are revolutionary in the cannabis world, designed to lock in terpenes and keep your buds fresh for the long haul. Unlike traditional jars, Grove Bags use a special TerpLoc technology that creates a perfect microclimate within the bag, balancing out oxygen and moisture levels. This means your buds cure evenly without the need for burping, preserving that incredible citrus terpene profile we’ve come to love from the Runtz F1.
The Legendary Smoke 🌬️🔥
Now, let’s talk about the smoke—because this is where the Runtz F1 truly shines.
• Flavor Explosion 🍊🍋:
• The moment you take your first inhale, you’re hit with a symphony of citrus flavors. It’s like walking through a citrus grove with the sun shining down—notes of oranges, tangerines, and lemons come through strong, each one distinct yet harmoniously blended. But the magic doesn’t stop there; an underlying hint of vanilla sneaks in on the exhale, rounding out the flavor with a creamy, smooth finish. It’s an experience that dances on your palate, leaving you craving more.
• Aroma 🌿🌸:
• The smell is just as captivating as the flavor. As soon as you open the Grove Bag, the room fills with that zesty citrus aroma, complemented by a subtle sweetness from the vanilla undertone. It’s the kind of smell that makes you pause and appreciate the craft that went into growing this plant.
• The Effects 🌟:
• The effects of the Runtz F1 are as balanced as its flavor profile. Expect an initial wave of uplifting energy—perfect for daytime use or when you need a creative boost. As the high settles in, it mellows into a relaxed, yet focused state. It’s the best of both worlds: energizing without being overwhelming, and calming without knocking you out. This makes it an ideal strain for those who want to stay productive while still enjoying a potent, flavorful smoke.
Final Thoughts and Invitation 🎥✨
The Runtz F1 has proven itself to be a true connoisseur’s strain—a perfect blend of flavor, aroma, and effects that’s both complex and satisfying. This was a journey that showcased the importance of patience, precision, and care, from germination all the way to the final cure.
If you want to dive deeper into the entire process, from the first week of veg to the final trim, I’ve documented it all on my YouTube channel. Join me there for a closer look at how this incredible strain came to life, and learn more about the tips and techniques I used to bring out the best in these plants.
Thank you to everyone who’s been part of this journey, from the community to the amazing brands like Gro Diaries, TrolMaster, Aptus Holland, Kannabia, and more. Your support and tools have been invaluable.
Remember, the magic is in the details—so never stop learning, growing, and enjoying the fruits of your labor. Stay positive, stay curious, and keep spreading the love! 🌿💚
#RuntzF1 #LegendarySmoke #CannabisConnoisseur #GroveBags #TrimMagic #StayPositive #GreenMagic #YouTubeJourney
Germination method 🌱 @thecannakan
Genetics Runtz F1 @zam.nesia Runtz auto @kannabiaglobal
Nutrition
@aptusholland 🌿
@aptus_world 🌎
@aptus_es 🌍
@aptusbrasil 🌱
@aptus_thailand 🌿
@aptus_portugal 🌳
@aptususa_official 🍀
@aptusplanttechnz 🌺
@aptusplanttechaus 🍃
Ambient controls🎮
@trolmaster.eu @trolmaster.eu.support @trolmaster.support @trolmaster.agro
Soil @promix_growers_eur @promix_cannabis
LED - @lumatekeu
Watering- @autopot_usa @autopot_global
Love and attention- @dogdoctorofficial
#aptus #aptusplanttech #aptusgang #aptusfamily #aptustrueplantscience #inbalancewithnature #trolmaster #trolmastereurope #trolmastersecrets #Autopots #RuntzBattle #KannabiaVsZamnesia #GreenJoy
As always thank you all for stopping by, for the love and for it all , this journey of mine wold just not be the same without you guys, the love and support is very much appreciated and i fell honored and so joyful with you all in my life 🙏
With true love comes happiness 💚🙏 Always believe in your self and always do things expecting nothing and with an open heart , be a giver and the universe will give back to you in ways you could not even imagine so 💚
More info and complete updates from all my adventures can be found ⬆️ link in the profile description ⬆️
Friendly reminder all you see here is pure research and for educational purposes only
💚Growers Love To you All 💚


Likes
Comments
Share
@KannaGrowing
Follow
Ya estamos casi listos para cosechar.
Estamos regando con agua y solo lo estrictamente necesario para mantener hidratadas nuestras plantas.
Tambien hemos reducido al 50% la potencia de nuestras luminarias LazerLite Pro 720w.

Likes
13
Share

Likes
81
Share
@LockDownGrow
Follow
Although the yellow appearance this lady has still been growing at the same rate as the rest and shooting out the side branches nicley , she is a week behind the rest due too the first seed not germinating but week by week progress has been the same as the others
Likes
47
Share
@AsNoriu
Follow
Day 58 since seed touched soil.
Sponsored grow
MARS HYDRO TSL2000: 300W, Flower 2'x4', Veg 3'x5'
It's recommended for beginners.
Low-budget & high-efficiency.
Think its more than for beginners ;)))
Plants coped well with small distance, stretch is over, flowers start to bulk up, some buds will be really nice.
Today raised light to max, so now they have 15 cm quile healthy distance ;)))
Last top up was too powerful with Nitrogen, i see signs of overdose.
Cookie escaped best, so for some strains this feeding is right, most probably its a heavy hungry strain ;))) AND !!!!! Its first Cookie variation that i grew which is so stacked !!!! Each top is long as f@ck ;)))) doubt will be fat tho, structure of flower doesn't give big hope, but its auto, so could still develop into something insanly nice !!!
Took few bottom shoots, taking almost daily few bottom consumed / cannibalised leaves , but she needs a bit more of clearing.
Day 60. Did some clearing.
Happy Growing !!!