
Likes
Comments
Share


@420DeepGrow
Follow
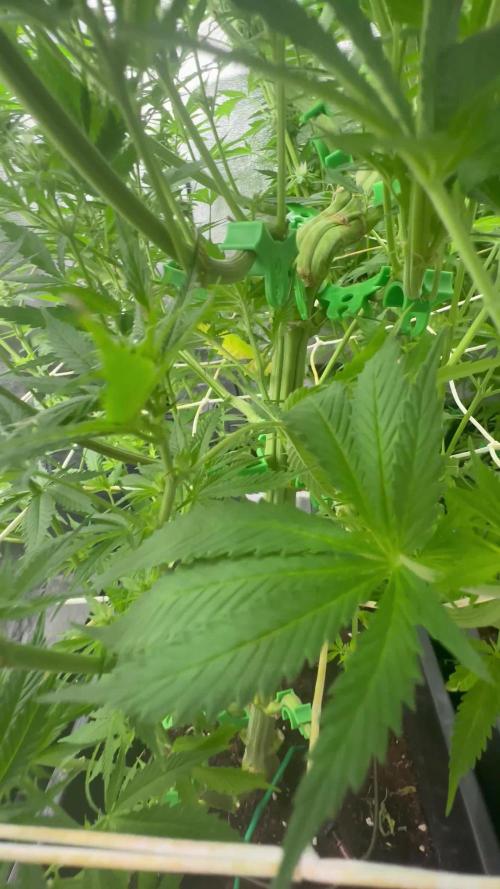
Comienza la sexta semana de floracion, aqui aplicaré abono de engorde durante una o dos semanas y luego hare el lavado de raiz correspondiente.
Se ha convertido en toda una belleza 😍 💕
📅 Dia 36: Descanso merecido.
📅 Dia 37: Riego con nutrientes EC 1350 EC escurrida 2000
📅 Dia 38: Riego con nutrientes EC 1100 EC escurrida 1750, perfecto
📅 Dia 39: Riego con nutrientes EC 1100 EC escurrida 1850
📅 Dia 40: Riego con nutrientes EC 1100 EC escurrida 1850
📅 Dia 41: Riego con nutrientes EC de 1100 EC escurrida 1750.
📅 Dia 42: Descanso

Likes
23
Share


@Vincent11
Follow
Hi all Grow mates.
After a difficult last week.With Mag deficiency's. And at the same time over defoliation.
My Girl showed some strength And character and now she looks she is going to make it after all I did to her ☹️.
Buds starting feeling up nicely.
And she looks like a plant in her final weeks off Her live again.
Going to Be Look 👀 in to the trichomes closely from now on.
Goal-Looking for a few amber trichomes and mostly milky 🥛 clouds to form up.
Hope you all enjoy following my Diaries
And have fun growing
And a Productive week to.

Likes
21
Share


@BLAZED
Follow
W19 (Harvest)
6-6
Last day before harvest.
7-6
Harvest day!
Installed a humidifier outside the tent, set to 55% aiming for a 60% humidity inside the dry tent.
21-6
After 14 days of slow drying she is ready to be trimmed.
While posting this a couple of months later i found out that i totally forgot to make pictures and video's of the trimmed buds 😅
It was a very nice daytime smoke, tasted sweet-sour.
End results:
74.26 Grams of bud
57.90 Grams of small buds and trim, in the freezer for bubble hash.
I have some trim and small buds saved up from different strains and i will be posting a diary of the full process making hash of them!
If you are interested in me making bubble hash feel free to follow me as i will make some in the next month, this way you keep notified!

Likes
19
Share


@EmeraldLakeCannabis
Follow
Great stuff, all the seeds are up. One still has it's helmet on, but it'll grow out of it soon.
The Carl #2 seed seems to be a mutant of some kind as it has way too many cotyledons.
Gave smaller amounts of water while they were seeds, gonna slowly increase to normal now that they've all popped up. I'm gonna start with a very light feeding of bloom ferts to promote rooting, and then use no nutes for the first couple weeks.
The plan for these plants will be to try and create as much lateral growth as possible while the weather gets nice outside, then I'll transfer one of the best phenos and one of the not as good phenos to 25gal pots and stick em in the sun. I'm gonna be trying to do pest control with a combination of predator insects and deterrent plants. The main goal of the outdoor grow is to test and develop my IPM skills while trying to grow the biggest plants possible.
-2/6/2021 Been a solid week so far, the growth has been fairly vigorous as of last night; it would seem that the root mass finally reached an acceptable size.
-2/7/2021 Watered with a bit of bloom nutes and some VeloKelp, shot a timelapse.
Likes
3
Share


@Diy_autoflowers
Follow
Put too much medium in the pots. Gonna have to bottom feed till flower.

Likes
31
Share


@GanjaFarmerGrow
Follow
Week three of this (up till now) 100% pure organic grow is behind us...
She is looking great, really speeded UP in the last few days...💪
She has had only water up till this point..
I'm thinking that will change in the upcoming week but i have not decided yet...
Hope it all goes good...
fingers crossed👍

Likes
35
Share


@bioaccessory
Follow
Hello colleagues!
As for an autoflower, the cycle did not take much time and brought good results for me. Thanks to GanjaFarmerSeeds for the opportunity to test a new strain, also thanks to everyone who came and commented on this diary 🙏
See you soon😀👍


Likes
27
Share


@TheBudWhisperer
Follow
Week 3 of veg. In the books and they’re all motoring along nicely. The Alaskan Thunderfuck looks to be sorting itself out so we should have 4 plants for the chopping eventually. Just gotta get em there first. They’re showing no adverse reactions to the heavier nute feed at this stage of development which is yet another feather in the cap for Druid Berkana. I’m immensely impressed with this nute line.
Just another boring week of veg. In the books. Can’t wait to see transition take over👍.
Background
Just a fem run we were able to sneak in to the dutchy cabinet for some extra bud stock. Strain details as follows:
QCS: this actually a strain of Alaskan Thunderfuck (Not AK47 as advertised). GD doesn’t have that info up yet. We’ve had it before but never grown it. I remember it being a decent and somewhat sedative indica.
Blimburn: This chocolopez strain is very interesting. We’ve been waiting at least 5 years to grow something reminiscent of a chocolate Thai. This one should fit the bill there nicely.
AMS: Their Borderliner strain caught my eye so we naturally had to… give it try! No matter how it turns out, this seed co. Has been nothing short of stellar to work with. We’ve got a whole bunch more of their stuff in the hopper for testing on the next cycle🤟.
Smiling Tiger: This is an S1 of my buddies cross called Holy Surfer. Still haven’t seen it bud out in pollinated yet but the structure is classic skunk with a big primary cola, tight node spacing and exceptionally vigorous leaf production. The smoke should be interesting and the terp profile is very pungent and sweet.


Likes
2
Share


@Growedbypepper
Follow
Podemos notar que claramente nuestra flor comienza a manifestarse y la planta tiene un verde intenso muy bonito, por ahora puede decirse que está en perfectas condiciones
Likes
7
Share


@Dpizzle1986
Follow
Most likely be the last week of nutrients.. topp.dress one more time beginning of week 5...


Likes
30
Share


@Bread_n_Buds
Follow
Here we are again ready to start again, always under the sign of Zamnesia, we make our fantastic plants and we show you what we are capable of. We have 5 autoflowering strains and 5 photoperiodic ones and now we present them to you.
The fifth and last autoflowering for now of this round that we present to you is another classic of the classics always in the Zamnesia version. We have already grown it once and we sincerely hope to find the purple phenotype, Mythical mythological herb really in music and in everything, WE ARE TALKING
To explain my germination method which is a combination of experiences acquired in the field and readings of right advisors, I have chosen to divide it into phases so whoever wants can follow them and understand better step by step.
- Preparatory Phase ---- Check the average temperature in the room, humidity status to understand well whether it is the case to start or wait, I decided for the end of August because the temperatures start to drop towards the 22-25 degrees recommended for germination.
Then another thing more or less credible depending on the sensitivity is the control of the lunar phases. I believe in it a lot, it is a method that ancient farmers used to understand when it was best to plant depending on the attraction of the moon. To make my life easier I use a simple app that advises you on the right time to plant, harvest and put in a jar (depending on the lunar phases).
- Phase 1 --- Soaking in water. There are many authoritative friends who advise against this method due to the risk of drowning, but I have always been fine and I follow the rule if it opens in water almost certainly the seed is healthy and will come out of the ground 90% normally.
- Phase 2 --- Opening of the seed in water. As soon as the seed opens and the root comes out a little you have to be very very careful not to leave the seed in water open for too long. This is why there is a risk of drowning. So as soon as the root has come out it must be planted. Do not wait for it to stretch out too much, in the absorbent paper you can wait a little longer in water no.
- Phase 3 --- While I soaked the seeds I prepared my pots: I use small biodegradable pots (choose the ones with holes underneath for drainage). A few hours before working with the opened seeds I moistened the soil with water adjusted to the right pH (5.8 - 6.2) and Plagron Power Roots. The small root is now open and we can make a little hole with a toothpick, widen it and insert the seed. Not too deep with the root facing downwards. From Serious Seeds we learned the dome technique: if you put a small dome of soil on the seed the water will settle on the sides avoiding overwatering problems.
- Phase 4 --- The plant emerges from the soil. Up to now I have not put the light on, now I turn it on at minimum after half a day of soil to give direction to the seedlings. The first week the light will be gradually brought from 40% to 60% to go to 70% - 75% in the remaining weeks of veg. During the first week maximum, I keep the cycle of 24 hours to avoid stretching. Be careful not to exceed the first week at least with photoperiodic.
- Germination % --- In water 20/20 seeds have opened for good luck I'm waiting to talk when they come out of the ground but it seems that we are going towards an excellent percentage of germination..."Not too bad"...
- Soil and Food --- The soil used is entirely organic in every part and is the Plagron Promix that will be used with the 100% organic pack supplied by Zamnesia complete with all the main fertilizers for your plant buy it at the link --
https://www.zamnesia.io/it/11457-plagron-easy-pack-natural.html
// Strain Description // Have you ever wondered what Jimi played in 1967? With Purple Haze Automatic, it has never been easier to experience the magic of Purple Haze firsthand. In just 65 days, this compact autoflowering will reward you with top-quality sativa buds that will take you on a long creative journey. -
- Get a seed of this fantastic strain --- https://www.zamnesia.io/it/8174-zamnesia-seeds-purple-haze-automatic.html
- Soil and Fertilizers entirely organic --- https://plagron.com/en
- Growbox --- https://www.secretjardin.com/
- Music and sound --- I made my girls listen to 432hz frequencies and music from www.radionula.com
- Z --- You can find these seeds, much more from the world of cannabis, mushrooms and an incredible series of accessories and gadgets on the reference site not only mine but of many growers ----
https://www.zamnesia.io


Likes
61
Share


@Verlido
Follow
Week 18 - Day 1 : Unknown information
Week 18 - Day 2 : Unknown information
Week 18 - Day 3 : Unknown information
Week 18 - Day 4 : Unknown information
Week 18 - Day 5 : Unknown information
Week 18 - Day 6 : Unknown information
Week 18 - Day 7 : Unknown information
Week 19 - Day 1 : Unknown information
Week 19 - Day 2 : Unknown information
Week 19 - Day 3 : Unknown information
Week 19 - Day 4 : Unknown information
Week 19 - Day 5 : Unknown information
Week 19 - Day 6 : Unknown information
Week 19 - Day 7 : Unknown information

Likes
5
Share

@Splashy
Follow
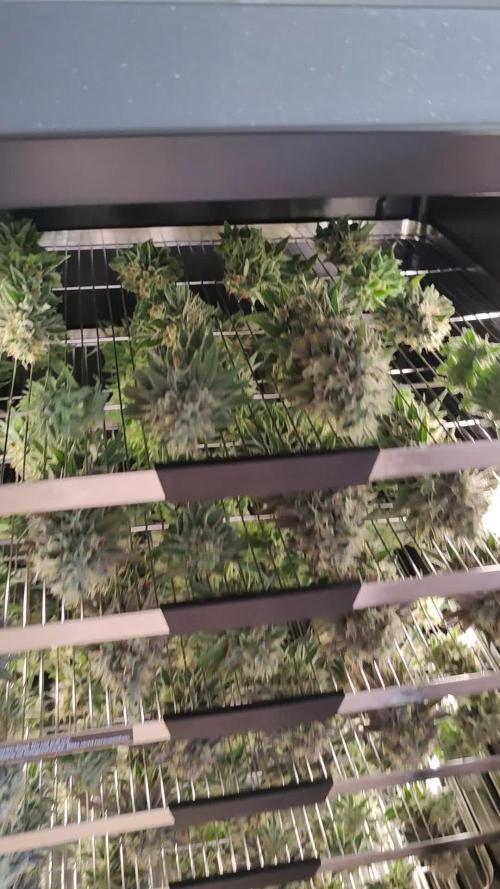
Heute war Zeit für die Ernte, der Duft ist traumhaft süß und sehr sehr intensiv. Ich hätte sie gerne noch 1-2 Wochen stehen lassen aber ich musste das Zelt frei bekommen für die permanent Marker die schon drauf warten umgetopft zu werden. Jetzt kann der vcure von vivosun Mal zeigen ob er sein Geld wert ist. Es wird die erste Trocknung in dem gerät sein und ich bin sehr gespannt drauf. Es ist der 14 Tage Modus aktiviert, 7 Tage trocknen bei 20°c und 60%rlf,danach wird es 7 Tage curing bei 18°c und 55%rlf.
15.04.2026
heute habe ich die buds aus der vcure geholt und den schönschliff mit der Schere gemacht. mit dem Ergebnis bin ich Recht zufrieden von der Menge her, der Geruch ist sehr fruchtig, ich mag ihn.
Likes
27
Share


@Bluemels
Follow
Nun ist es bald geschafft und ein holpriger Grow geht der Ernte entgegen.
In 3 Tagen plane ich die Ernte.
Glücklicherweise waren die letzten Wochen für die Mädels nicht mehr so stressig, um so mehr für mich 😜
Die Temperatur und Luftfeuchtigkeit aufrecht zu erhalten war nicht immer leicht.
Ich habe viel Zeit mit basteln verbracht 😎
Es hat sich gelohnt!
Mittlerweile sind die Blätter schon recht hell und haben sich stark zusammengezogen.
Die Trichome sehen milchig bis leicht bräunlich aus.
Sie richen appetitlich 😋 wie ein Gewürz
Likes
59
Share


@jonesy_grows
Follow
Last week I realized that topping off the rez with full strength nutrient water had upped my ppms to 2000, and Ph to almost 7
I mixed a fresh batch of 10ml and saw ppms in the 1700 range, so I watered it down to 1200, 8 ml/gal is just an estimate this week unfortunately.
I added 2.5 ml/gal big bud day 1 week 3 afternoon, Ppms should coming in at 1300
I finally got an accurate height measurement, and given the plant distance decided to turn the light power down to 60%, which should be around 120-130 watts, which is plenty for a 2x2
Did a water change week 3 day 1, used a transfer pump and it was fairly easy, just took a while
More pistils are starting to show up now
I've decided to start measuring ppm/ph as both creeped up too high last week. I cant vouch for how well ph perfect nutes work when changed weekly as directed, but they cant go 2 weeks without being measured and adjusted, and at full strength, Im sure they would burn plants.
Day 2: ppms held steady at 1350 overnight, ph is at 5.8-5.9
New growth was showing very early signs of light burn, (pale leaf tips up top, tips not pointing down) so I turned light to 50% power, mounted it straight to my top tent supports, and bent the tops that showed signs of stress.
Day 3: Ppm's still holding steady as water level goes down, so this may be the sweet spot for now.
Bud sites are stacking now
Selectively defoliated to get light deeper into the canopy
