


Likes
11
Share


@DixTheReal
Follow
Giorno 50 - la carenza di Fosforo e Potassio é sempre più evidente sulle foglie di “Caramel” che ha una crescita rallentata dei fiori; al contrario “Cream” sta crescendo bene e i fiori sono decisamente più grossi, non mostra carenze per il momento
Giorno 51 - niente da segnalare, procede bene
Giorno 52 - la resina inizia a vedersi bene sulle foglie, i fiori stanno gonfiando
Giorno 53 - ho fertilizzato solo “CREAM” perché “CARAMEL” ha carenze ed é inutile mettere ancora fertilizzante, ho dato solo acqua. Invece a “CREAM” ho dato 1 litro di fert (1ml bio grow, 1,5 bio bloom e 1,5 top max mischiati in 1,5L d’acqua. L’altro mezzo litro rimasto l’ho buttato perché era troppa)
Giorno 54 - sembra abbia reagito bene alla fertilizzazione “CREAM”, invece “CARAMEL” continua ad avere le foglie sempre più gialle, ma prosegue bene
Giorno 55 - nulla da segnalare, l’odore é molto forte, si percepisce anche fuori dalla grow box
Giorno 56 - i fiori si stanno gonfiando bene, ho dato circa 750ml di acqua a testa e defogliato la parte bassa dove c’erano tante foglie morte e secche. Ho iniziato il flush delle radici, spero di tagliare tra una quindicina di giorni

Likes
30
Share


@magicbudsgrow
Follow
Cheiro muito forte de Pinho e baunilha.
Com certeza é o melhor resultado que já obtive cultivando com o coco.

Likes
8
Share


@MaxGrowCanada
Follow
These plants are loving life.
Upped the food a bit this week, the dinamed was looking a little hungry.
I will snip clones clones tomorrow.
Hopefully I will have the flowering setup finished soon so I can move these girls over.


Likes
97
Share


@Natrona
Follow
Sour Jealousy Auto FastBuds 2025 Outside Grow
Week 10 June 1-7 FLOWER 4
This week had a couple rainy days but mostly sunny. Temperatures were normal for this time of year – mid 80s in the day and 50s at night.
This next week is calling for rain every day. I may have to move her inside as a cautionary measure to avoid too much moisture in the plant. Our coastal area stays very humid and last year I lost 2 huge plants to bud rot.
Have a great weekend staying high.
Growers love 💚🌿
💫Natrona💫

Processing
Likes
9
Share


@Wiebechillin
Follow
Issues with the 5th seed growing into a funny "U" shape. Attempting to fix the issue by straightening and re-planting.

Likes
12
Share


@TappedN
Follow
Sorry For The Delay but I was kinda busy ......Anywho on 3/19 I Changed The light Schedule form 18/6 to 12/12 To Begin My Pre-Flower Stage I Also Bent The Last Few Uneven Tops To Have A Table Top like Canopy (LST) Also Cut Off all Little Branches (Lollipopping) To Prevent Getting Any Little Pop Corn NUGs. Then ON 3/20 I Increased My Light Intensity From 25% to 50% And began giving These Girls There Flower Nutrients Listed Above .
AN Updated Video Of the Week POSTED ABOVE Video Taken About 3 Days After Making These Changes And yes The are All Showing to Be Females

Likes
101
Share


@DogDoctorOfficial
Follow
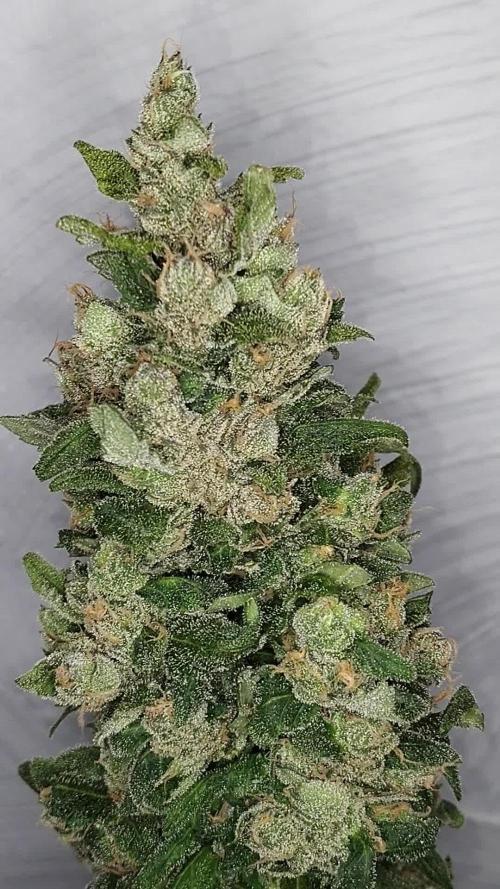
OMG the smells are becoming so intense, from lemon to the sweet caramel mix with chilies and a touch of pine trees, i think i cant put in words what im smelling and were is taking my mind, but i can tel this, what an amazing combination of fragrances that are flying around
The tricomes are shouting up as they become fatter and frostier, all cristal clear so far, i think i still have 3 mb 4 more weeks to harvest, lets see 😜
Just calculate my VPD and it’s 0.98 kPa need to increase this up to 1.2 for now s i’m moving my ligth up a bit and see if it works 🙏🤓🙏
Thank you all for following, comment, like and all 🙏 100 likes 😅🙏 🙌🙌🙌🙌🙌🙌🙌🙌 ❤️❤️❤️❤️
Loving this LED Tec 😍
Girls:
1-BlueBerry
2-Alaskan Purple
3-Poyote Gorilla
4-Hindu Kush
5-Whitw Mango
6-Super Glue
7-Badazz Cookies
8-S.A.D.
tent -8x8 / 2.4x2.4 but i'm only using 1/2 so 4x4 / 1.2x1.2
Led - Lumatek 465w Compact Pro at 100%
All i Grow is medicine for myself,
Stay safe, stay tuned and B Happy
Peace out
D


Likes
13
Share


@GanjaFarmar
Follow
To be honest overall this strain done good so as the others. Reflecting back on how i started with just a tent and light, and slowly buying the fans and filters whiles the plants were growing.
But i did want these plants to grow naturally without topping and Low Stress Training. I regret not removing the lower branches becuase i did get alot of small airy buds down there. But it was all trial and error. All i done was remove some fan leaves when good to do so every now and then. Not on a mad level tho, i did have alot of sugar leaves which i will be making some stuff with!
At veg the plants had deficiencies due to out of date Biobizz bottles. But that got sorted with the magic of Algimac and Calmag.
Overall
Next time I will definitely train the plants and maybe top a few.
Final Yield:
Plant #1 21.88 Grams
Plant #2 33.36 Grams
Plant #3 56.06 Grams
Which yield exactly 110 grams! Ounces come out very fat with these light buds
Not bad for the conditions they were brought up in, and with no training!
Thanks for everyone who has followed this diary throught out the journey! I hope this diary will help people out.
And thank you to Seedstockers for very cheap and quality seeds.
And special thanks for the GrowDiaries Team for providing the best platform for growing journals! I couldnt explain how much this Diary helped me. Its like a dream come true finding a site like this! And if you do see this message, i would love to see a Iphone app coming soon!
Kind Regards!
One love!

Likes
47
Share


@GrowGuy97
Follow
Day 7 - All 3 ladies are doing great so far, extremely excited to how they turn out! Watering with PH at 6.3, Temp 81 RH 55%
Thanks for following & happy growing friends✌️🏼🌱

Likes
34
Share


@Southwest_budders21
Follow
A lots been going on 😉
Day 30 of veg for the candyman!
All tops now reaching for light and filling out again 😏 I got people telling me what's the point or I'm stupid for doing some stuff I do but that's just me 🤷♂️🏼🤣 don't tell me I can't do something because I'll prove you wrong like I did with my last autos 😉
Pretty happy with the training this run. Will Let them grow for about another 20 days then it's flip time
Update: looks to be showing early signs of sex I think it's female
Likes
10
Share

@Ganjin
Follow
☀️ // Day 66 🍁 Chopping Day
Every grow must come to an end. I can't be the only one who always gets heartbroken when chopping down the plants. I mean, for 4 months you do everything for the plants that they're having a good life. You cheer every healthy sign from them, you want them to love life and from one day to the other, you kill them. That's just sad, isn't it? I am always telling myself that they're basically become a part of us through the endocannabinoid system, so that's their afterlife, right? Haha
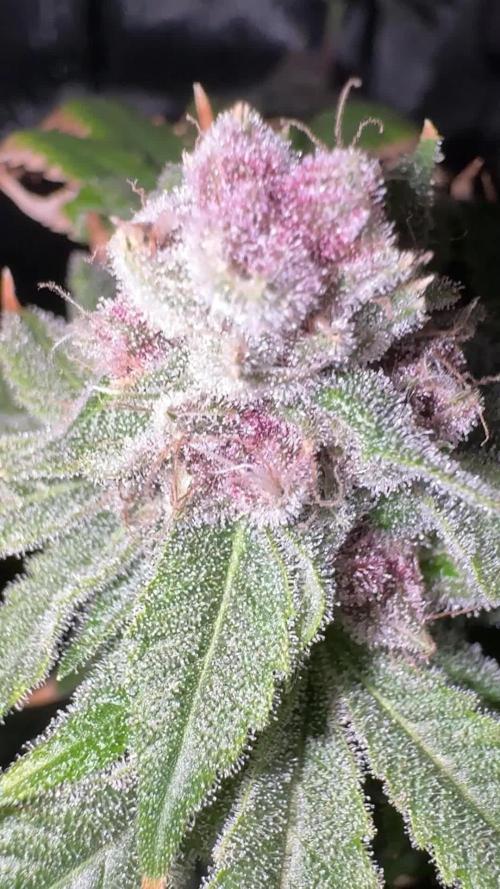
Anyway, this was a rather stressful grow. I had major problems with the soil, I just couldn't control it. I think it's because of the Peat Free stuff I mixed in, it somehow fucked up the buffer capabilities of the soil or something like that. But that doesn't matter now, I got it under control, the buds developed perfectly but the leafs are damaged by the tips. So it's not the most beautiful plant overall but the buds are very marvelous.
They have a rather unique shape, like a pyramid but with an almost flat head? And their purple hue is just breathtaking. It's a very pinkish purple which I haven't seen by myself until now. I am very happy with this genetic in that regard. But let's see how the buds really turn out.
I am aiming for a 10-14 day drying period. With 55% humidty during the first 24-48h with 19 °C. I will rise the humidty to 60 % after that period until the end. In that way, I want to make sure that the critical moisture gets out in the first 1-2 days but after that it should be a very, very slow drying to preserve as much cannabinoids and terpenes as possible.
Thank you so much for hanging around. I really love this community and I wish that we all stay around for many years and celebrate this beautiful hobby together. The final review will be up in about a month, so stay tuned for the harvest update!
Peace,
Ganjin 🌱

Likes
16
Share


@Tezza2
Follow
This week i split the stem on my purple lemonade auto to see if it gets bigger yield and bigger buds i will soon see the purple only has about three weeks to go the gorilla glue auto has along way to go but its flowering hard and fast
Likes
13
Share


@Weedy_Shepherd
Follow
One week left before I chop these girls.. Will flush them then down they go.. Will definitely shout timber while holding the Sega in hand!! Daamn I can't wait to smoke all of you baby's..!😀😀😀 🐕-------
P. S. Just chopped them down and waiting for them to dry up!
Only OG Kush remains as it still needs some more weeks!
Processing
Likes
25
Share


@Kikiwindsurf
Follow
28/3/2020: DAY 24 AND 23 OF GORILLAS. 2LST is giving me some results ! beauty structure and healthy colour in the gorillas (yellow card shows the date of birth and strain) and the LH is starting to strech after 15 days of life ! No watered since 3 days MY CANNAPY (i used only 1 time deeper undergrow and only one 2 time raw water and 1 time delta 9 foliar spray) so the next watering session will be featured by Top Bloom and Delta 9 water solution directly to the ground (no foliar) because of to prepare the ladies to its bloom. LH will get some deeper undergrow because she only get raw water.
04/4/20 : day 30 and 31 on the gorillas super good structure and super fast growth. Lemon haze is on day 22 showing us its sativa structure. Both strains started to show some hairy preflowers at the top of the main cola and arround the satellites too. LH get top bloom + top veg ; GG get top bloom + top candy. depending on the evolution of the plants, I will use my PK 52-34 in super low dosis because of I want the ladies get used to it so I can increase the dosis little by little ! REMEMBER THOOSE MONSTERS ARE NOW 12 HOURS OF DIRECT SUNLIGHT + 12 HOURS WITH 400W HPS INDOOR LIGHTING ! go to week 1 to see my artificial light setup, super simple but super efficient !
stay tuned ! next weeks gonna be an amazing explosion of flowers, smells and joyness !
Likes
18
Share


@berlinbeginner
Follow
The Sour Diesel uses a lot of nutrients, grows fast and responses well to LST and Topping. I have 3 Jelly Donutz from Humboldt Seed company in the back that i just planted 2 days ago. Hopefully , all 3 sprout.
I have promised my friends SD1 and Gelato. So, their weekly progress will not be included in the next posts

Likes
61
Share


@MadeInGermany
Follow
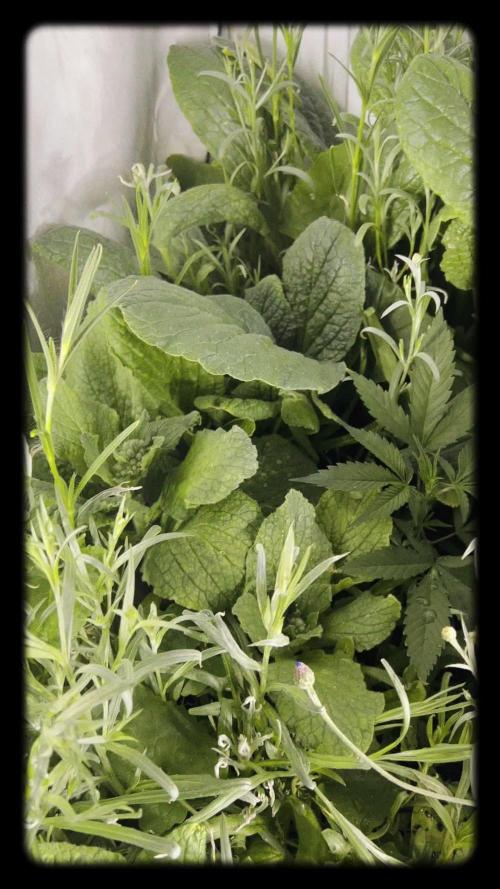
Everything is going great :-)
You can see every day how they continue to explode :-) Although we are still at the beginning of the vegi phase, the roots grow out on the first drain hose.
I carefully pushed it back up into the system :-) As fast as it all goes, I think I'll switch to bloom next week. I wish you all a nice grow 😎
Likes
63
Share

@UnorthadoxDude
Follow
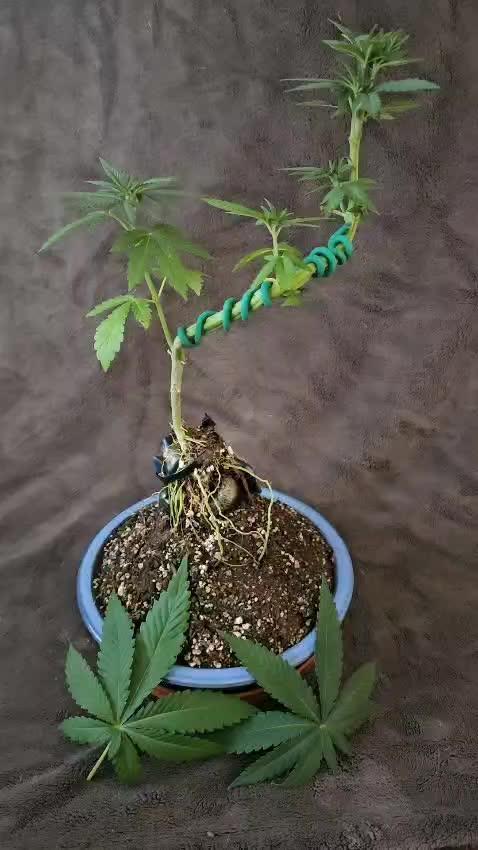
Week five of my first cannabonsai/mother project.
This young lady has been having nothing but tap water for the last few weeks. I am going to start feeding her as soon as she shows the first signs of deficiency.
After all the training on day 20, then the root reveal on day 26. I left her five full days to recover before messing any more. Then I took all her fan leaves off and adjusted the LST. I need to train here more over the coming days.
Day 31 - Photographed and took a video.
P.S. Follow me on X! @unorthadoxdude
