
Likes
Comments
Share


@LiamF
Follow
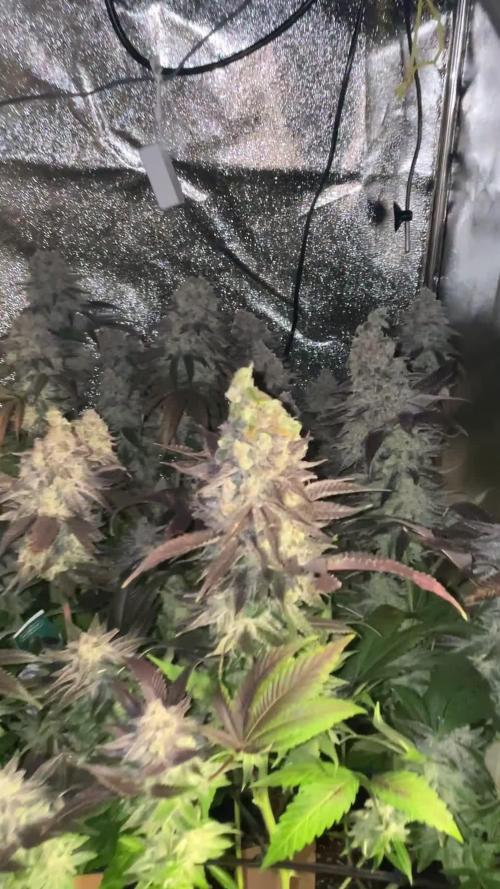
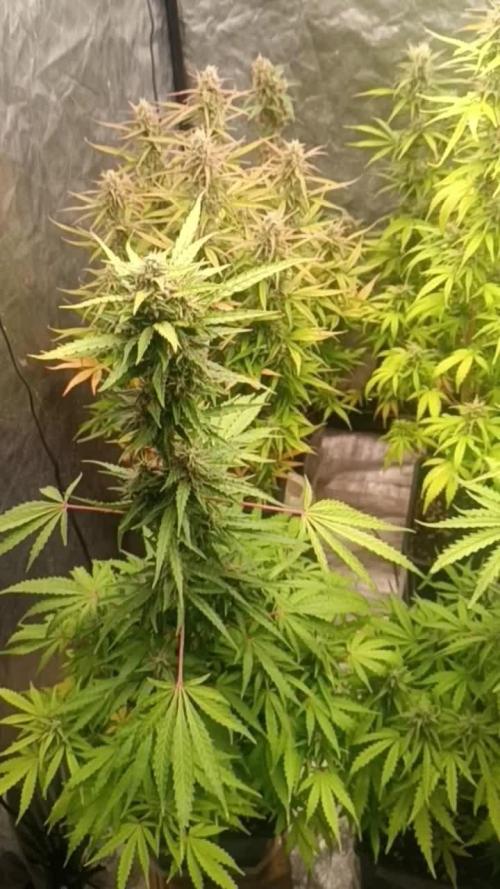
So after 106 days + 11 days drying im finally done with my first grow.
Got 97g dry buds + 30g shake
Way more then i anticipated.
Alot of the buds are pretty airy but the top ones qre pretty solid and all of them have amazing coat of trichomes.
Im so greatful i had this experience. I learnt alot and have way more confidence to grow more and my plan was to have my first grow to anwser all the questions i had.
Im cant believe i spent less then 300$ on this setup and harvested equals to like 1,500 - 1,700 $ of buds(prices in my country) thats definitely going to help me with the economy situation right now. And all this was stealth inside my closet, i had family members comming and didn't notice nothing i just had to turn off the blower fan since it's the only thing in my setup which isn't stealth.
I know i didn't gave her the best conditions but she showed me how strong is a Cannabis plant 😍
Im just starting my 2nd grow - Auto Northen Lights. Stay tuned

Likes
40
Share

@Momentum
Follow
Also wir sind hier in ein etwas größeres Zelt umgezogen, letzte Woche. Die Pflanzen müffeln schon und entwickeln langsam ihre Blüten. Die gesamte Brut ist gesund und munter.
Die Hollywood zeichnet sich zum jetzigen Zeitpunkt mit größeren Buds aus. Hab unten ein wenig MicroBuds gezupft und meine Finger rochen nach Kirsch/Himbeer Zitron Soda und rosa Hubba Bubba.

Likes
29
Share


@Geezy42
Follow
Another great week! Buds swelling nice and smelling awesome! Last feeding this week will be flushing getting ready for harvest (Can’t Wait). Picked my first bud off and tried true Indica.

Likes
38
Share


@islandgrows89
Follow
I duno if it's normal but these autos seem to be sprouting 3 or 4 new shoots daily 2from top and two from bottom. It's like someone's automatically pinching the heads while I'm at work. ive never seen a plant grow that quick. Really happy with these so far. Only half way through but there doing amazing. Just have to wait and see what end product is like weather I change from photo period to autos for good.
Edit.. So I've tied some of the branches down for a few days till they grow out from under the canopy getting a bit more light to bottom branches
Edit..
Height 30cm
1ltr a day water
2ml top max bio bizz

Likes
2
Share

@Ninjabuds
Follow
My wedding gelato is one of the only plants that seems to be over sensitive to being transplanted and moved under the larger light. I guess it’s possible it’s sensitive to over watering but I have not watered the plants in the large pots sense I transplanted them
I still have a back up of every plant so of this one don’t come around quick I’ll just rip it out and switch with its sister that’s doing just fine

Likes
Comments
Share

@CheeRz
Follow
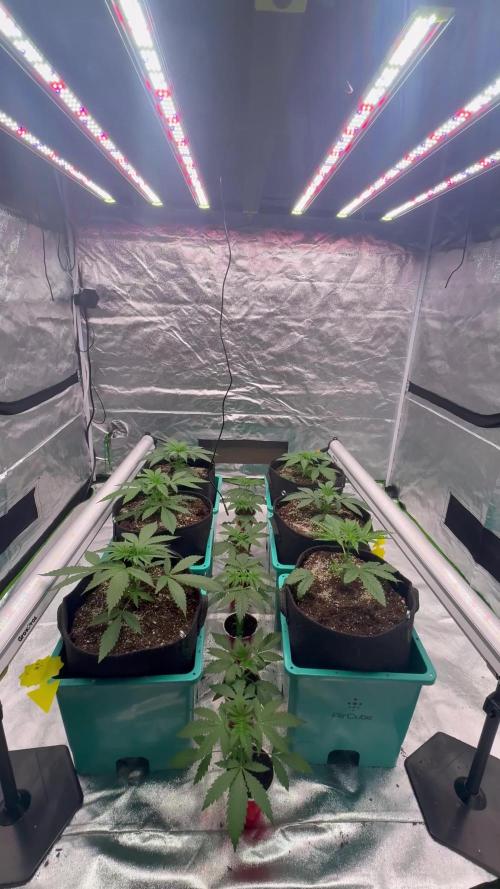
🌿 VEG WEEK 4: AK-47 XL | Divine Seeds
🌱 VEGETATIVE PROGRESS
Moving through Week 4 and the response to the topping has been phenomenal. The growth hormone distribution has shifted completely, turning this AK-47 XL into a beautifully thick, bushy canopy with multiple strong shoots pushing up.
Looking at the lower structure, the main stem is getting incredibly thick, acting like a solid tree trunk already. The node spacing remains tight, and the plant is developing a very dense structure from the top-down view. The fan leaves are wide, lush, and a healthy dark green, showing that she’s soaking up the light and converting it efficiently into rapid growth. No shock, no slowing down—just pure vegetative vigor. 📈
💧 NUTRIENT FEEDING & WATERING
She is processing the current feeding well, supporting both the thick stem development and the new branch expansion.
Current Feeding Schedule (per Liter):
Root-Juice: 2.0 ml/l
Acti-Vera: 1.0 ml/l
Calmag: 0.5 ml/l
Parameters:
pH: 6.5
Relative Humidity (RH): 69%
Temperature: 23°C
VPD: 0.88 kPa (Perfect spot!)
CO2: 716 ppm
💭 GROWER'S NOTE
The canopy is filling out perfectly after the top. We now have a great multi-topped baseline, and the side branches are catching up fast to create an even profile. Stem thickness is 10/10 for Veg Week 3, which is exactly the robust foundation needed for the heavy AK-47 XL yields later on. With a stable VPD of 0.88 kPa, environmental stress is at an absolute minimum. Ready to explode! 🚀

Processing
Likes
Comments
Share


@Smokwiri
Follow
Welcome to my diary of the Misty Gorlla by Zambeza seeds
looking nice, popped of the soil, i noticed it today and took some pictures
This strain won the first prize in the Higtimes cup in 2015 for section: Hybrid
so that sounds very promising
i'm using re-used soil for this one, so i can add some guano at proper level on clean soil.

Likes
9
Share

@Ziocannabis
Follow
Ok 👍 belle le mie banana Purple punch auto FastBuds
Pronte in poco più di 2 mesi in tutto.. e poi bel raccolto totale come quantità.
Tolgo le ultime 2 in fondo perché stanno cominciando a buttare altri pistilli nuovi, credo sia stress da calore. Controllo i Tricomi ma ho intenzione di averli opachi non ambrati , perché ho provato la stessa varietà e tende a farti venire sonnolenza
I colori variano dal verde al viola e le cime sono piene di resina e simili a pepite come compattezza
Anche la quantità mi sembra piuttosto consistente perciò direi di essere soddisfatto dalla vista e non ho dubbi sulla qualità

Processing
Likes
56
Share


@Island
Follow
Week 6 -
Week without surprises.
No-till cycle working well, watering only with water, but note that the companion plants still grow crooked.
Soon the soil still shows signs of excesses, I believe that in the next cycles these excesses will be fixed.
Hugz from Brazil.
Likes
9
Share


@pascal_dop
Follow
So meine kleine Kofferprinzessin befindet sich nun in der zweiten Blütewoche (im Video sage ich Growwoche, das ist natürlich quatsch) und ich glaub alles ist soweit gut. Ich habe die kleine ein bisschen mit Draht von der Lampe weggebogen und hoffe das hilft irgendwie. PS Ich benutz nie wieder so n whackn Growkoffer :/

Processing
Likes
14
Share


Likes
31
Share


@Mr_ZAF_Budz
Follow
Hello Canna Fam,
So week 11 has come to end and the ladies are smelling great! I did a partial harvest to the Gorilla Cookies, LSD-25 and the Girl Scout Cookies as the trichomes were ready to the top half of the buds.
I raised the pots slightly and will leave the rest of the buds to mature a bit more before I do the final harvest.
I must say the trichome product on these FastBuds is just amazing! Great genetics 🔥
I hope you enjoy the diary entry and happy growing to you all✌️🏼
Likes
5
Share


@DaddyPrime2
Follow
May 15th
We’ve had some tough winds. She handled it very well actually. Her stem bulked. Added a layer of coco on top to help with winds and to choke up on her stem
May 25th she's small and bushy


Likes
19
Share


@420DeepGrow
Follow
Gracias al equipo de Royal Queen Seeds, Marshydro, XpertNutrients y Trolmaster, sin ellos esto no seria posible.
💐🍁 Gelato #44:
Los criadores de Tyson 2.0 criaron Gelato 44 a partir de cepas finas. Al cruzar la Sunset Sherbet y la Thin Mint Girl Scout Cookies, crearon un híbrido de dominancia índica que asesta fuertes golpes en el cuerpo y la cabeza.
Su contenido de THC del 22% crea sinergia con terpenos colocantes para ablandar los músculos
Mantenla hidratada y con una dieta constante y pasará por la fase de floración en unas ocho semanas. Las plantas de interior alcanzan una altura máxima de 120 cm y producen 400-450 g/m², mientras que sus homólogas de exterior alcanzan los 180 cm y producen hasta 600 g por planta.
🚀 Consigue aqui tus semillas:
https://www.royalqueenseeds.es/rqs-semillas-cannabis-tyson/664-dynamite-diesel.html
💡TS-3000 + TS-1000: se usaran dos de las lámparas de la serie TS de Marshydro, para cubrir todas las necesidades de las plantas durante el ciclo de cultivo, uso las dos lámparas en floracion para llegar a toda la carpa de 1.50 x 1.50 x 1.80.
https://marshydro.eu/products/mars-hydro-ts-3000-led-grow-light/
🏠 : Marshydro 1.50 x 1.50 x 1.80, carpa 100% estanca con ventanas laterales para llegar a todos los lugares durante el grow
https://marshydro.eu/products/diy-150x150x200cm-grow-tent-kit
🌬️💨 Marshydro 6inch + filtro carbon para evitar olores indeseables.
https://marshydro.eu/products/ifresh-smart-6inch-filter-kits/
💻 Trolmaster Tent-X TCS-1 como controlador de luz, optimiza tu cultivo con la última tecnología del mercado, desde donde puedes controlar todos los parametros.
https://www.trolmaster.com/Products/Details/TCS-1
🍣🍦🌴 Xpert Nutrients es una empresa especializada en la producción y comercialización de fertilizantes líquidos y tierras, que garantizan excelentes cosechas y un crecimiento activo para sus plantas durante todas las fases de cultivo.
Consigue aqui tus Nutrientes:
https://xpertnutrients.com/es/shop/
📆 Semana 4:
Continuamos la etapa de vegetación, ella se desarrolla muy bien 😎, comienza el buen tiempo, temperaturas agradables para todos.
Esta semana se aplica una solución de trichodermas para una mejor adaptación aunque realmente va genial.
Se mantiene 1/3 de nutrientes Master Root y Master Grow
Processing
Likes
2
Share


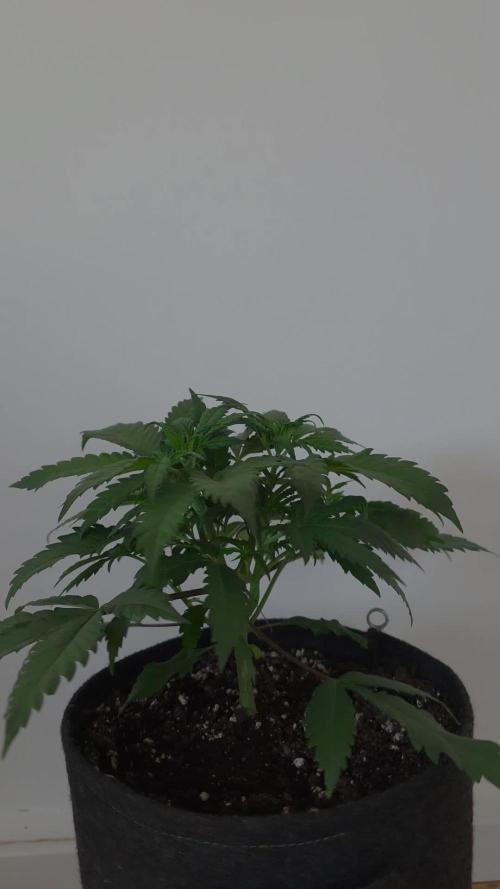
@Ab_87
Follow
1-Starting the week strong, plant is looking good. Not sure if the buds should be bigger or not but according to the strain it’s a 70-80 days flowering time so I still have plenty of time to see those buds fattening up.
2-Added 75W full spectrum LED to increase quality of pictures. In my opinion, totally worth it. Got to see my plant from a different light was amazing. Everything is looking good and the soil is still slightly moist. Probably water tomorrow. Separated all the branches to allow more light to penetrate the middle of the plant.
3-Soil completely dry, water plant with flowering nutrients. The smell seems to be a little stronger today.
4,5,6-No major changes.
Processing
Likes
8
Share


@Squaregrouper
Follow
she is just as lovely and sticky as can be normal traits of

Likes
2
Share

@Maximusprime
Follow
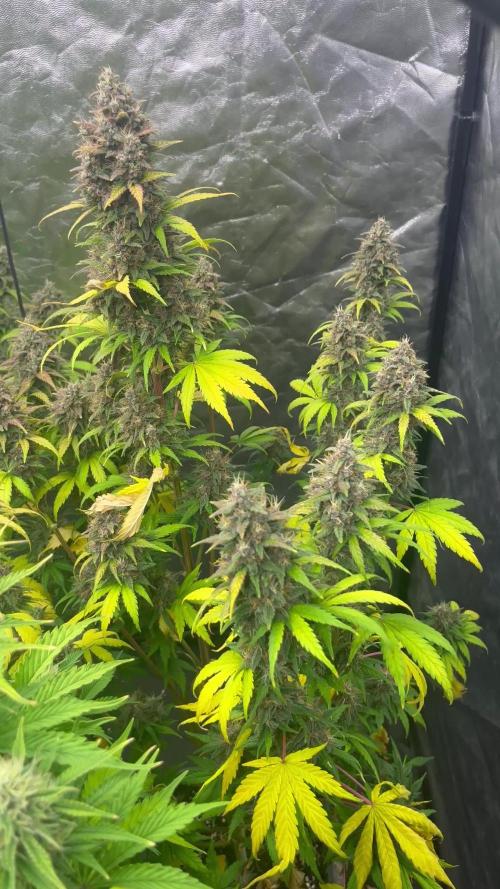
2 days before harvest ⏳✂️
The Sour OG in the front turned out super sour with a chemical, almost ammonia-like punch with hints of the OG. In contrast to the Motorbreath in the back, she is not very fuely. But the Motorbreath really smells like fuel/petrol - straight gas station vibes! It also has hints of lemon and is a little piney too, making it also appear a bit hazy somehow 🤷♂️


Likes
7
Share

@Shivashamboom1
Follow
anche questa creamzilla inizia a gonfiare i suoi bei fiorelloni... Certo che anche io e advanced nutrientes facciamo la nostra parte per fare di che escano questi bellissimi fiori, terapeutici🙏💪
