


Likes
1
Share


@RezaM
Follow
This week, I gave my plants more fertilizer to test if they show any signs of burning. Now, I'm stressed out! I think I should give myself some seaweed to relieve the stress 😂
The girls show signs of calcium deficiency. I sprayed a small amount of calcium and magnesium on them to help them recover faster. I’m not sure why the new leaves are very pale. Could they be lacking iron? I think the high soil moisture might be causing issues with iron absorption, but I’m not completely sure. I’ll wait and see what happens this week. Considering that I use regular water, I expected them not to have a calcium deficiency.
Likes
7
Share


@rhodes68
Follow
10/20 week 5
We have no complaints on the grow, at all. Literally nothing to address.
God has been kind indeed
Top dress nuets at next feed.
Just maintenance, keeping the low end clear etc.
Due to falling temps think the watering/feed will wait another day.
Gold Leaf - Finally going vertical, two inches in two days so keeping an eye on it
Green Crack - Close to topping day for her will take care of it on the top dressing
Bruce Banner - finally hitting her growth as well watching
Gor Glue - Just looks great not sure on topping here either
GSC - Man what a turn around may regret that 3 gal pot. Cutting back on the special kanga she was getting to help the roots, seems to have worked.
10/21
Fed and top dressed - topped
10/22
GC-BB-GL all recovering from topping
Plan to flip tent in a few days about the time they finish recovery
Dialing back Nitrogen by switching from Fish Mix to Bio-Grow think we at the upper range of it.
Had some mag spotting on the leaves of the BB think its due to the heat getting out of hand the other day (90 F for about 1/2 hour ) going to keep cal-mag in the mix just the same
10/23
After looking at the tent this morning I am seeing some small signs of Nitrogen being a tad high so ending for now the bio-grow but will continue the Bio-bloom
Have to head these things off at the pass so trying
Last run of kangaroots its done what its going to do by now since we aint fighting root eating critters
10/24
Fed as shown, basically its just a watering
Watching leaves flipping within a day or two
10/25
Tent flipped to 12-12
10/26
Looks just great god willing and the creek dont rise we on the right path
Video is on the Green Crack Diary only net is slow today
Running some Big Bloom see how it does

Likes
16
Share


@Ladyblazed
Follow
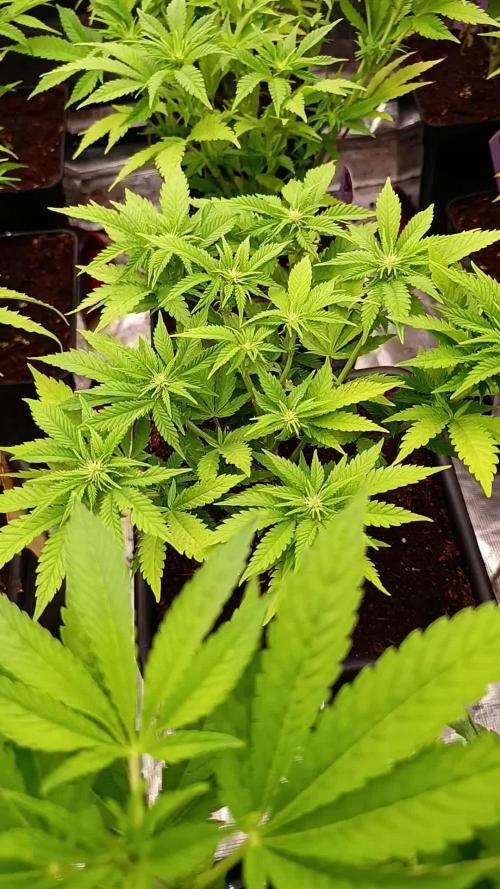
Started a little training, cut down the older fan leaves and topped up. I’m adding a tiny bit of root stimulator cause changed the pot size last week so it will to promote a faster growth. Gotta keep this lady low cause the box is quite small. So excited 😆

Likes
13
Share


@HashCakes
Follow
Gently dropped in a scrog with the biggest squares I could find to prop up or tie off heavy branches on #2. Used it to spread out #1 a bit but this late in the game tried to avoid as much pulling and bending as possible.
#1 finally picking up some weight. This one has more of a spear formation. Guessing about 4-5 weeks left. Super frosty and smelly though.
#2 just a tank. Nothing but dense golf balls. My goal was 8oz per plant and feel pretty confident this might be closer to 10ish. I'm guessing about 21ish days. Planning on deploying Winter Frost a week from today.
Topping of with 80% strength solution kept EC level between changes..
So tough to do these things justice in pics and videos.

Likes
5
Share


@RunWithIt
Follow
This plant is looking like an awesome candidate for outdoors. I feel so indecisive lol. At least I have many options to choose from this season. Same level of nutes this week as last. No training this week.

Likes
4
Share


@milchshake289
Follow
Week 2 day 1
plant is just happy but I would love to see some faster vegging.
Day 2
Fan adjustment today, felt like the plant was getting little windburn ( slight curling on the edge and dry/rough leaves)
Day 3
Added Horn- Bonemeal mix as Top dress today. It’s really fine grained so I hope this is going to help out with N + P in flower stage
Day 4
Plant still not ramping up. My guess is the roots are not developed well enough to get to the edge of the pot where the majority of the pre fertilized soil is at
Day 5
Drained the whole pot with 1l rainwater and tested run off water. It’s at 6.3ph. Hopefully the plant can reach all the nutrients now. I will add compost tea in about 3weeks. I need to wait for the compost to finish first at least partly.
Next grow will be better for sure when I’m more prepared.
Day 7
LST


Likes
9
Share

@Skunkiest_bender39
Follow
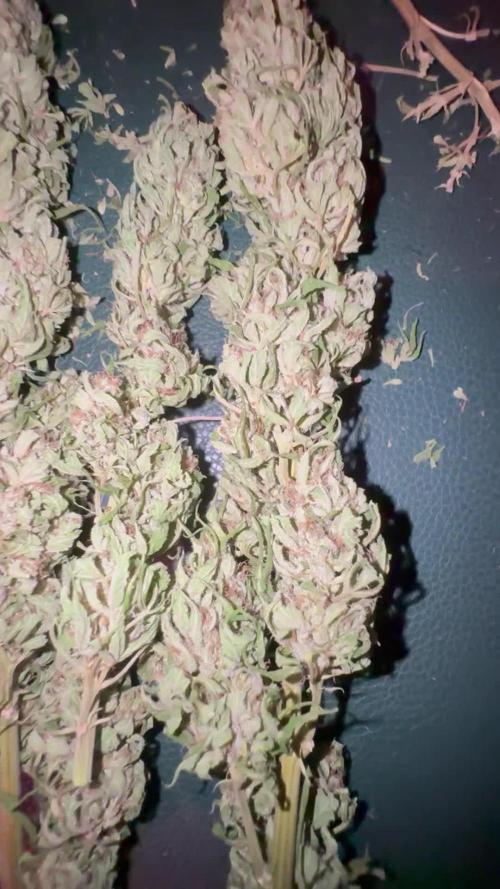
War ein Fest .Die dritte Dame ist ein mix aus beiden vom Knollen Typ leider war sie befallen noch nicht richtig getrimmt wird wahrscheinlich verarbeitet.
Alle kleben durchweg intensiv.
Haben alles gut vertragen kann man Nix gegen sagen!

Likes
7
Share


@TKCS_Pinoy
Follow
🌸 Woche - Week 13 Review
🌡️ Wetter: Viel Regen, kühlere Tage und kürzere Tage – manchmal denke ich, die Pflanze hat mehr Sonne gesehen als ich 😂.
📈 Wachstum: Endhöhe erreicht, kräftig und stabil.
💡 Licht & Energie: Selbst bei grauem Himmel holt sie alles raus.
🌿 Blattgesundheit: Robust, keine Mängel.
💧 Wasser & Nährstoffe: Regen sorgt für feuchte Erde, Nährstoffe regelmäßig zugegeben.
🔄 Entwicklung: Viele kompakte, harzige Blüten – Vorblüte läuft noch stabil, Geruch nur nah spürbar 👃.
✅ Fazit: Meine allererste Pflanze 🌱 – dauert länger, aber ich bin mega zufrieden. Wettertypisch deutsch eben: Die Pflanze lächelt, während ich mit der Jacke dastehe 😅.
------------------------------------------------------------------------------------------------------------------------------------------------
🌡️ Weather: Lots of rain, cooler and shorter days – sometimes I think the plant saw more sun than I did 😂.
📏 Growth: Final height reached, strong and stable.
💡 Light & Energy: Even on grey days, she makes the most of it.
🌿 Leaf Health: Robust, no issues.
💧 Water & Nutrients: Rain keeps soil moist, nutrients added regularly.
🔄 Development: Many compact resinous flowers – pre-flowering steady, smell only close up 👃.
✅ Overall: My very first plant 🌱 – taking longer, but super happy. Classic German weather: the plant smiles while I stand there in a jacket 😅.
Likes
58
Share


@Top_Banana
Follow
Another week has past and some type of insect is now chewing on the buds 🤔 but, apart from the that buds are fattening up nicely.. looking forward to this one..
Processing
Likes
21
Share


Likes
12
Share


@MistaOC
Follow
06.12. Blütetag 50!
Was für eine schöne Pflanze!
Auch wenn sie die ganze Straße rauf und runter wie die Hölle super lecker riecht 🤣 egal was ich mache, keine Chance es einzudämmen, sie trägt den Namen zu recht!
Ich denke an Tag 56 wird sie erlöst.
Bis dahin nur noch 10L Osmose Wasser mit 16ml CalMag (heute gegossen)
——————————————————————
10.12. Blütetag 54
Noch zwei Tage!
——————————————————————
12.12. Blütetag 56
Geerntet und zum trocknen aufgehangen.
Aktuelle Raumtemperatur: 19,1 Grad und 50,4% RLF
Gesamtgewicht der Pflanze 1,75Kg
Stromkosten 113,21€
Processing
Likes
35
Share


@hornato420
Follow
Week 7 there hasn’t been any changes for either of the girls. Girl #1 is still looking the same. It seems she has finally stopped stretching. Looking forward to seeing her bulk up in the coming weeks.
Girl #2 still hasn’t showed any signs of flowering. I’m gonna continue to be patient with her in hopes of her just being a very late bloomer.
Everything has been running smoothly. I will start to introduce bloom nutes in the next coming weeks. I didn’t expect girl#1 to get so big but I’m not complaining.
This has been such a pleasing and educational experience. Thank all of those who have viewed my diary. Thank you again for your support.
Likes
4
Share

@420DeepGrow
Follow
📆 Semana 3:
Con la EC ya controlada y estable, se termina de ajustar el pH en el coco, afinando la disponibilidad de nutrientes. Las raíces se mantienen blancas y activas, con buena colonización del sustrato y absorción uniforme.
Las plantas consolidan el estiramiento, mostrando ya preflores claras y una estructura más definida. El verde lima se va equilibrando hacia un tono más sano, manteniendo buena turgencia y orientación hacia la luz.
Se intensifican los primeros aromas y la entrada en floración es ya evidente, con una transición limpia tras la fase de ajuste.
Seguimos creciendo fuerte 💪!

Likes
33
Share


@Ferenc
Follow
Day 72: 600W LED, 18 hours on 6 hours off the same with ventilation. Ferilization is the same except BlackBerry Kush and LSD-25 they are being flushed. Water intake also remains the same 200ml per day. Humidity approx 35 percent.
Day 74: BlackBerry Kush and LSD-25 have to be harvested this week Friday so no more water. Colorado Cookies and Northern Light next week so started flushing them. Glueberry OG needs a bit more time.


Likes
Comments
Share


@VirginiaGrownExotics
Follow
She’s starting to bush out started some LST great growth and healthy just add water


Likes
38
Share


@FrulaFrulaki
Follow
I have named the other 2 plants for easier recognition - Dux and Princeps.
The plants are growing steadily and from what I can see they're growing without any defects. Fynix is a slower growing plant, probably because the shell wouldn't come off for a couple of days, but he's catching up.
I'm considering the training methods that I could use, and I was thinking I could use both topping and LST or just LST. I'll probably try both methods and leave one plant so I can see the differences. If some one could share his/her experiences I would be very grateful and you have my thanks in advance.