
Likes
Comments
Share


@Growin_it
Follow
Needed to defoliate to create airflow and start shaping the ladies.
Stretching out the lower colas across the base.
Fimmed the ends of the longer stems to get a split going for more colas.
Recharge added to feed after stripping 30%+ of the lower canopy.
Will turn to flower in a week or too.
Notes: slow growth due to the lower heat in the tent. Okay with that because the Lecky bills have been huge with all the price gouging going on.


Likes
12
Share


@BudMunchies
Follow
10/08: I decided to go ahead and remove the little one from the grow. I decided to do this because i had originally planned to only grow one plant in here so i had room for my clones from my other grow. And so i stuck to my original plan.
This lady is the smallest plant i have ever grown. She is basically just growing 3 large colas. They are each already nearly the size of a soda can and id guess there is still 3-4 weeks left at least. And so i am slightly nervous that they are going to get too big and that mold will ultimately become a problem. Will see how it goes.

Likes
13
Share

@Chucky324
Follow
Hello. This is the end of week 9 and the beginning of week 10 of flowering.
OK... One more week of light and then a couple of days of dark and then harvest.
Everything is going good here. Had 2 good watering last week. the plants are using up the nutrient that's left in the soil.
So I'm expecting some yellowing of leaves next week.
I got in touch with UKHTA Seeds last week and they said they would love it if I would give my 50% off code to someone on grow diaries.
So I've got a 50% of your first order code from UKHTA Seeds, Needs to be used by May1st 2026 though.
They would love it if diaries were made for the seeds.
Could you privet message me if your interested. If there's more than a couple of people interested I'll ask "why would YOU like these seeds" sorta quick contest to find a winner. Let me know.
OK. Have Fun.
Chuck.

Likes
6
Share


@Mr420
Follow
Day 50 little defoliation not much plant is nice and healthy. Raised light again.
Day 51 nothing done buds are getting bigger. Still nice and healthy.
Day 52 plant is budding very nicely. All is good forgot pics for d52 so you have video.
Day 53 refilled refill tank 920ppm ph'd 6.2 plant is doing great.
Day 54 plant is green tips of leafs are great and she is bud building.
Day 55 all is good.
Day 56 plant is so beautiful I can't stop taking pictures of it.
Likes
28
Share


@Southofheaven
Follow
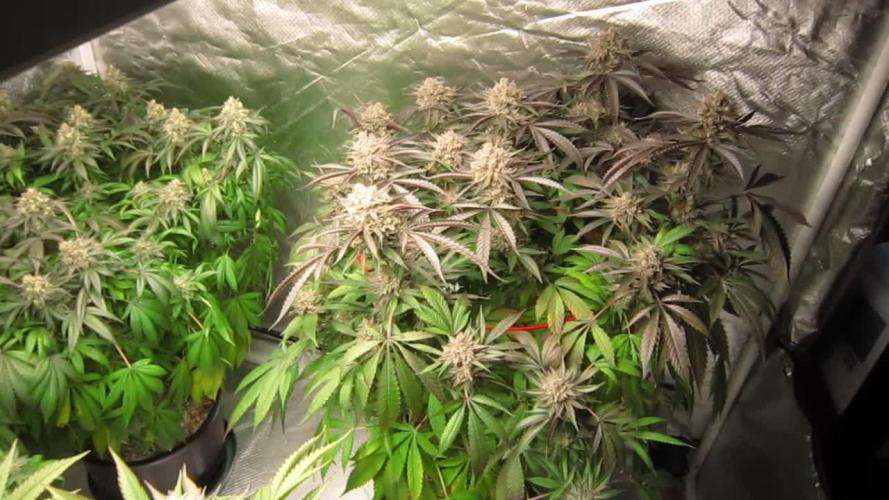
Another week of slowly reaching the harvest date.
Early sugar leaves on tops are showing average 10% amber trics.
Calyxes are swelling with each day, generating dense new trics to still ripen.
Pistils are browning, about 50% now with slight new growth/foxtailing on the tops.
Its getting real smelly.. maybe time for a filter, with a space this confined its gonna be a mission fitting one on.
Fan leaves withering off, no stress.
Buds are becoming dense and are weighing the stems down
probably looking at harvesting in 2 weeks to allow new trics to go cloudy. Hoping to click over 2 oz with this plant but aslong as the smoke is smooth and potent im not worried about yeild.
Cheers boys and girls for checking in, let me know what you think, have a good day 👍

Processing
Likes
17
Share


@greennug
Follow
grow room adjustments this week. plants are now more spread out under a total of 5 600w HPS lights. 3 fastbuds plants have an additional 45w LED light. by week 3/4 they will occupy my whole grow space and an additional 3 600w HPS lights will be added.
Plants are looking healthy and 10 or so have been topped for the first time on day 8. dinafem cookies are looking very good in structure. will upload pics every day until harvest! thanks for looking. UPDATE day 12 veg, they are looking beautiful better than i expected. there are 36 in 15litre pots now and i cant wait to make my final grow room upgrage next week and for my room to be looking like a forest! im hoping for 2-3kg off these girls and only time will tell. i will keep doing daily updates until harvest


Likes
6
Share


@Lazuli
Follow
I defoliated this plant before the pictures so i can really push weight out of her
Likes
11
Share


@Krissci
Follow
Using Trimzilla for the 1st time very excited to see how quick it speeds up the process

Likes
15
Share


@Huckleberry39
Follow
She is 4 weeks into flower and doing awesome!!! I started seeing some discoloration on her tips so I cut the nutes by 25%. She is smelling great 👍!!! Buds are stacking and fattening up nicely!! So far this has been a great grow!
Likes
325
Share


@Metatronix
Follow
A big shoutout to all the visitors and growmies reading this 👋👋👋
Blue Cheese grows nicely the biggest problem i got right now is space in the 60x60 (2'x2') it's very probably i will transplant one or both of the plants to a bigger grow room around next week.
I did swap the nutrients for bloom this week that's why there's a little foxtailing on the Blue Cheese, it's the first time i'm using the Jungle Indabox nutrients on a plant that has roots in soil, so the concentration is a bit different, otherwise the plant looks healthy, preformed some defoliation too.
Still I didn't notice any flowers but for sure next week will be a flowering week ;)
The irreplaceable TS 1000 lamp from Mars Hydro runs now on 100% (all hand on deck ;) at a distance of 30cm. from the plants.
Thanks to Mars Hydro for supplying the necessary equipment for this grow 😇😇😇
That's it for this week folks, i'm so happy to see your likes and comments on my diaries 💪👊😇 I truly appreciate it. Have a wonderful week and please come beck visit next week.
Likes
10
Share


@XoticGROW666
Follow
This week been great for this happy white fire gelato
Only feed her compost tea and sst tea
ALL ORGANIC NO BOTTLES NO NUTES!!

Likes
11
Share


@CanadianFillmore
Follow
08/25 dry weight came in at 157 grams. Very happy with the second round grow of GG4, she produced a lot more bud with the extra veg time. While I enjoyed this strain, I am moving on from her, to other strains.
Thanks for checking out my grow! 👽🌳🔥💚
Likes
14
Share


@PlantGod
Follow
Today March 10th is day 50!
I spend a few hours of work every other day to tie branches and manipulate leaves
-white pistols are showing
-will secure netting and stop using pipe cleaners to tie down at the end of the week
-I have been using nutrients about every other watering
-1.5 tsp micro .5tsp grow 1.5 tsp bloom in about 2 Litres of water
After 2 weeks. Royal Gorilla is the fastest blooming followed by the Green Gelato. The LSD is slower. The HulkBerry I started 4 days later is blooming ok


Likes
41
Share


@HollowSource
Follow
This girl is wanting to go nothing but vertical. Bent her 90 degrees and it's paid off. I've been moving the main stem around the pot trying to encourage as many tops as possible. She is looking real bushy for a sativa. I don't suspect that will last long, 1 more week then flower time.
Likes
46
Share


@DogDoctorOfficial
Follow
Hey, cannabis enthusiasts and connoisseurs! 🌿🔥 The journey with our Runtz F1 has been nothing short of legendary, and now we’re at the stage that every grower eagerly awaits—the trim and smoke report. This Runtz F1 has delivered beyond expectations, and I can’t wait to share the details with you. Let’s dive in!
The Trim Process 🌾✂️
The trimming process was an experience in itself, filled with care and attention to detail. Here’s how it all went down:
• Breaking Down the Branches 🌿:
• First, we carefully broke down the plant into manageable branches, making sure to preserve the integrity of each bud. The structure of the Runtz F1 made this easy, with its dense, compact colas ready for precision trimming.
• Trim Bin Magic ✂️:
• Using a Trim Bin, we meticulously trimmed away the sugar leaves, leaving behind only the most beautiful, resin-coated buds. The Trim Bin isn’t just a tool; it’s a game-changer, allowing us to catch every last bit of precious kief that falls during the process. This extra kief is like a bonus for those special moments when you want to add a little something extra to your smoke.
• Preserving Terpenes with Grove Bags 🛍️:
• Once trimmed, the buds were placed into Grove Bags for curing. These bags are revolutionary in the cannabis world, designed to lock in terpenes and keep your buds fresh for the long haul. Unlike traditional jars, Grove Bags use a special TerpLoc technology that creates a perfect microclimate within the bag, balancing out oxygen and moisture levels. This means your buds cure evenly without the need for burping, preserving that incredible citrus terpene profile we’ve come to love from the Runtz F1.
The Legendary Smoke 🌬️🔥
Now, let’s talk about the smoke—because this is where the Runtz F1 truly shines.
• Flavor Explosion 🍊🍋:
• The moment you take your first inhale, you’re hit with a symphony of citrus flavors. It’s like walking through a citrus grove with the sun shining down—notes of oranges, tangerines, and lemons come through strong, each one distinct yet harmoniously blended. But the magic doesn’t stop there; an underlying hint of vanilla sneaks in on the exhale, rounding out the flavor with a creamy, smooth finish. It’s an experience that dances on your palate, leaving you craving more.
• Aroma 🌿🌸:
• The smell is just as captivating as the flavor. As soon as you open the Grove Bag, the room fills with that zesty citrus aroma, complemented by a subtle sweetness from the vanilla undertone. It’s the kind of smell that makes you pause and appreciate the craft that went into growing this plant.
• The Effects 🌟:
• The effects of the Runtz F1 are as balanced as its flavor profile. Expect an initial wave of uplifting energy—perfect for daytime use or when you need a creative boost. As the high settles in, it mellows into a relaxed, yet focused state. It’s the best of both worlds: energizing without being overwhelming, and calming without knocking you out. This makes it an ideal strain for those who want to stay productive while still enjoying a potent, flavorful smoke.
Final Thoughts and Invitation 🎥✨
The Runtz F1 has proven itself to be a true connoisseur’s strain—a perfect blend of flavor, aroma, and effects that’s both complex and satisfying. This was a journey that showcased the importance of patience, precision, and care, from germination all the way to the final cure.
If you want to dive deeper into the entire process, from the first week of veg to the final trim, I’ve documented it all on my YouTube channel. Join me there for a closer look at how this incredible strain came to life, and learn more about the tips and techniques I used to bring out the best in these plants.
Thank you to everyone who’s been part of this journey, from the community to the amazing brands like Gro Diaries, TrolMaster, Aptus Holland, Kannabia, and more. Your support and tools have been invaluable.
Remember, the magic is in the details—so never stop learning, growing, and enjoying the fruits of your labor. Stay positive, stay curious, and keep spreading the love! 🌿💚
#RuntzF1 #LegendarySmoke #CannabisConnoisseur #GroveBags #TrimMagic #StayPositive #GreenMagic #YouTubeJourney
Germination method 🌱 @thecannakan
Genetics Runtz F1 @zam.nesia Runtz auto @kannabiaglobal
Nutrition
@aptusholland 🌿
@aptus_world 🌎
@aptus_es 🌍
@aptusbrasil 🌱
@aptus_thailand 🌿
@aptus_portugal 🌳
@aptususa_official 🍀
@aptusplanttechnz 🌺
@aptusplanttechaus 🍃
Ambient controls🎮
@trolmaster.eu @trolmaster.eu.support @trolmaster.support @trolmaster.agro
Soil @promix_growers_eur @promix_cannabis
LED - @lumatekeu
Watering- @autopot_usa @autopot_global
Love and attention- @dogdoctorofficial
#aptus #aptusplanttech #aptusgang #aptusfamily #aptustrueplantscience #inbalancewithnature #trolmaster #trolmastereurope #trolmastersecrets #Autopots #RuntzBattle #KannabiaVsZamnesia #GreenJoy
As always thank you all for stopping by, for the love and for it all , this journey of mine wold just not be the same without you guys, the love and support is very much appreciated and i fell honored and so joyful with you all in my life 🙏
With true love comes happiness 💚🙏 Always believe in your self and always do things expecting nothing and with an open heart , be a giver and the universe will give back to you in ways you could not even imagine so 💚
More info and complete updates from all my adventures can be found ⬆️ link in the profile description ⬆️
Friendly reminder all you see here is pure research and for educational purposes only
💚Growers Love To you All 💚


Likes
4
Share

@Peca1973_Vv
Follow
I used to grow gorilla cookies before, but then they broke it, and now it's back to the old gorilla cookies, which is excellent in every way 💪👌🤤
I don't know why I don't have an option to put how many dry buds I picked? but I picked 192g of dry buds
Likes
9
Share


@MrPipi
Follow
Its Day 80, and I think i wanna put her to sleep for 48 hours Tomorrow-ish
Day 82 : Mr. Pipi just did it... now she is in darkness
Likes
83
Share


@Hydro_Hiebs
Follow
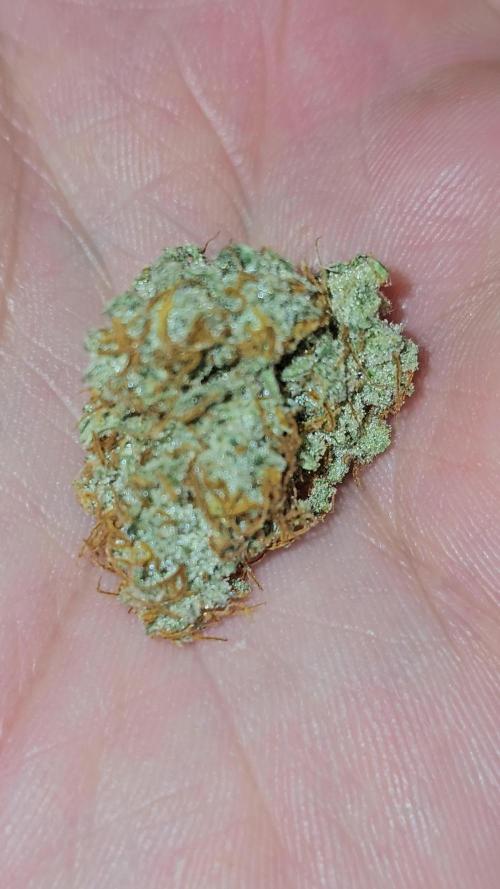
After the 9th week of flower she came to get dried for 12 days then trimmed and placed in jars for the cure. Now here we are on day 55 of the cure.
I must say this stuff is oh so sticky! It's absolutely covered in resin head to toe. When I smell the jar it smells extremely appealing. Taking after her parent Afghani her nose has a kushy gassy smell that makes you want to keep your nose right in that jar. After throwing some in my grinder I roll her up into a raw paper and light her up! On the inhale it's sweet like sugar then on the exhaul she's still sweet but with hints of gas. The effects are almost immediate. You can feel it in your face and eyes then slowly works down to the body to bring a heavy indica stone. This stuff is very strong and I usually use it for evening use. I can see this being highly medicinal for people suffering from insomnia and pain. Let me say one more thing. This stuff leaves a fantastic flavor on the palate after smoking. It is also oh so smooth after the long cure. Thank you Green House Seed CO for being the legends that changed the cannabis world 🙏

Likes
15
Share


@Meewin
Follow
Planted the Blue Dream from Seedsman outside yesterday. This ends her days under the led lights from Mars Hydro and starts her journey in the great outdoors!!

Likes
22
Share


@Nuggetnerd_420
Follow
My own blended recycled living soil water passion love & respect only.
...... added soil biology includes Wallace wonder organics myco fungi .. extreme gardening AZOS ... and synergro ... along with my own farmed castings also inoculated
500wQB running at 300w