
Likes
Comments
Share


@Unkraut
Follow
1 plant was very ripe, 1 plant was almost perfect to harvest and the 3rd could take another 1-2 weeks...but it was end of 10th week of flower and i had to go on vacation, so i perhaps choped 1 plant abit too early....still awesome result!


Likes
47
Share


@inversi0n
Follow
Wicked week.
Moving:
This week report starts with my moving to a new apartment.
It's actually not my first moving with a plant, but now it's kinda too big, so I asked my friends bag. Btw, the next day they stayed in different airports, so the bag didn't really smell after it 😂
I poured out the water from the bucket, gently placed it into the bag. And then the main rule I had is to keep the bad vertically while transplanting. And I'd suggest to just walk with the bag to the destination place, but since it was too far, I needed to order an uber. It was quiet hard to find the right car, because I cannot put it into a trunk, and I needed to order a truck or find a car with a large interior, so i could put near foot. I chose the 2nd one. Don't like extra attention 😁
Plant report:
The moving was quiet easy for her, and not for me. She recovered quiet fast after it. But here I forgot to tie her down, which is my mistake, and the next day the grow up a lot, so it wasn't enough thread length anymore.
Despite I don't use strings anymore, I still stretch her by myself with a bare hands few times a day. It actually works, just a bit worse, I guess.
Usually I grow in closets, but here they have no space for it. So I need to think about her future home.
I didn't want to buy a tent at the beginning, cause I think it's not that necessary.
I still think so, they are way more overrated than the other 'grower stuff', but may be it would be more comfy with it 😃
I forget, that my lamp was not 70% only, so I turned it to max now.
I also found out, that I got almost infected from bamboo(week 2) not only by aphid, but by ebanaya Sciara also. And they are growing their fucking babies in a wet ground. So I kind of buried them.
I wrapped opened medium in a package. Now I see and kill only 5 this little monster flying around, before that was counted in dozens.
I keep defoliating every day 4-8 leaves. To remove old useless leaves, or to open a new ones.
Finally, by the end of this week, preflower started.
After that smell also changed a bit, now it's less 'plant' and more 'buds' in the air.

Likes
3
Share


@Little_Pot
Follow
There were problems with the grow. First I burned the leaves with self made insecticide. Then she got nitrogen poisoning. She grew rather small, but the smell was beautiful: fruity and exotic, pineapple 😊. I am very happy that she still managed to grow such nice buds. I only trimmed the fan leaves and hung the stalks with buds in the basement. I hope that humidity will stay reasonable. ATM there is 75% RH
I will update the report after first smoke


Likes
10
Share


@CanadianFillmore
Follow
Start of week 7, for the Super Lemon Haze, I'm repeating the week 6 feed cycle as she's going for at least one extra week 9, compared to only 8 weeks for the blueberries, before flushing.
Last week was good, but the Super Lemon Haze continues to be a very hungry girl. She is very sticky and has a light lemon smell. The two blueberry plants continue to pack on weight and size, they have a very pungent smell and are starting to get sticky like the SLH.

Likes
12
Share


@NewMan
Follow
Začínáme šestý týden, zálivka 4.5litru každý třetí den, ph 6.2 ,ec 2.4, pomalu začínám snižovat Athénu podle tabulky a Green Sensation jedu 1ml na litr, měl se obavy jestli bude Plagron a Athena spolupracovat ale funguje to bez sebemenšího problému, možná bych i přidal víc nez 1ml Green Sensation ale radši to teď už nebudu pokoušet. Holky ještě poskočily o kousek a vypadá to že se ta vyšší a řídčí to nakonec taky zaplní. Jinak jsem je zase trošku prostříhal , Brokolice už je pořádně lepkavá a voňavá , takže spokojenost....az na ten malej stan🙈. Ať to roste 🖖 koukám ze mi to zase snížilo kvalitu u fotek tak já nevím co dělám špatně

Likes
6
Share


@XoticGROW666
Follow
Last week of the sour zkittlez
Sorry y’all I lost the veg vids but here Is the last footage of some organic grown buds compost tea & sst tea

Likes
15
Share


@Drtomb
Follow
I was feeding a MKP (low nitrogen, hugh potassium and phosphorus... For the last week. Switching back to bloom nutes with calcium and magnesium. Then the final week will be straight water.
Everything looks good, however i may have done a little more pruning then necessary, but they are really starting to beef up.

Likes
2
Share


@Autower
Follow
This was a nice strain to grow very stinky and has a hint of purple to it smells like lemonade happy with a wet weight off 310g thanks for viewing
Likes
3
Share


Likes
11
Share


@ibbzy
Follow
Week 3 of flower and decided to start using PLAGRON: Green Sensation a week earlier.
Pistils are appearing and maybe need some phosphorous and potassium.
Quite a bit of stretching going on. Had to bend back a few stems to try even out canopy. Some burnt tips? From what? No idea.
One of the strawberry cough seems to be taking longer to transition, still stretching and no pistils.
Apart from the tip burns, which I’m hoping is because of my light being too close. (Adjusted higher now)
It seems to be going OK, nothing great….


Likes
5
Share


@jardindeautos
Follow
Tenemos 3 fenos diferentes 2 de ellos muy marcados cada 1 de un parental de la versión no auto de Triton Biscotto Lime, como son Lemon Tree 🍋 [olor a SLH exagerado, (la más rapida)] y OreoMintz 🍪 [olor muy fuerte(la más "bajita" pero más avanzada en floración)] el último feno Kush más terroso proveniente de la Panty Punch Auto 👊(la más fina de momento)
En general encantado y asombrado con el desarrollo de las 3, llevan poda de bajos en los 2 primeros nudos y limpieza de internudos y chuponas interiores en la parte baja 🍃
Likes
26
Share


@Sickone
Follow
Ab geht es in die nächste Woche alle Ladys machen hervorragende vortschritte in die breite. Zudem sind die Abstände der neuen Abzweigungen relativ gering und gleichmäßig.
Aktuelles setting:
18/6 Zyklus
60-75% Luftfeuchtigkeit
Temperaturen liegen zwischen 20 und 25 Grad regelmäßig.
Der Ventilator kommt täglich für 10 Std zum Einsatz allerdings noch gegen die Wand gerichtet damit die Luft Abprallen kann und frühstens 2 Std nachdem das Licht eingeschaltet wurde da die Ladys meiner Meinung nach den Tag nicht direkt mit Stress beginnen sollen :)
Zudem entwickelt sich bei einer Pflanze
(Welche vermutlich eine andere Sorte ist vom aussehen her) einen stark bekannten Haze Geruch der mich direkt zum lächeln bringt wenn ich sie besuche! :)
PPFD: 470
DLI: 30,5
LUX: 18.000
Kelvin: 5100
Dünger bisher nicht verwendet da sie noch frisch umgetopft sind und der Biobizz Light mix laut angaben und Infos von anderern Growern für 2-3 genug Nährstoffe besitzt.
Edit: 27.04.24 Eine Lady sieht krank aus :(
Processing
Likes
6
Share


@Ferenc
Follow
I spend less time with them my friend usually look after them. She went on holiday so I will be with them lucky ones. They are okay big plants flowering nicely I constantly removing old yellow leafs. All the same they do well :).


Processing
Likes
88
Share


@No_Clout
Follow
19/09/18 - Looking great just need them to swell up faster but I’m just being impatient 😂

Likes
97
Share


@DutchFarmer
Follow
Start of week 3 of flower! 😍😜
She is looking fabulous!
Pistols are starting to swell 🌲🌲🌲🌲
Started bIg bud coco and also added some BOOST
Not applied anything defiolation or neither any training
All the top are uniform without any training
--------
--------
--------
Leave a like and comment below on your thoughts
If you want to support us, take a look at our new diaries and if you like them remember to like, comment and follow us 👍
It will be appreciated! ❤️
Join our community
https://discord.gg/2kXxgHTaCZ
Thank you very much! 💪 🙏
Likes
169
Share

@squalino
Follow
🌿 Journal de Culture : Mac 1 – "Spirit" (Plante #2) – LE HARVEST (Récolte)
#Dryrocket
Date du jour : 11/07/2026
Âge de la plante : J+91 (Semaine 13 - Jour de récolte)
Taille réelle : 170 cm (mesurée du sol)
Évolution :
Le cut final d'un monstre sacré extraterrestre
Nous y sommes ! Après 13 semaines de suivi côte à côte, le jour de gloire est arrivé pour Spirit. Aujourd'hui, samedi 11 juillet, les ciseaux ont chauffé pour le grand Harvest. Le résultat est tout simplement irréel, c'est un truc de malade !
? Le Grand Cut & L'Épreuve du Manucuring
Un travail de titan :
Commencé à 7h du matin, le manucuring s'est terminé à 2h du matin, avec seulement 4 petites pauses de 1h.
C'était extrêmement long et pénible car les têtes sont tellement denses que les petites feuilles étaient logées tout au fond. Mais le résultat en valait chaque seconde.
Une taille impressionnante :
Une fois sortie de la tente pour la mesurer en réel, Spirit affichait pas moins de 170 cm de haut depuis le sol et 140 cm depuis le pot . Une stature monumentale, presque ma taille, ce qui est totalement exceptionnel pour une variété autofloraison.
Solidité confirmée :
Contrairement à sa sœur, Spirit est restée fièrement debout jusqu'au bout grâce à la robustesse incroyable de ses branches.
🛸 Des Fleurs Extraterrestres & Pesée Humide Monstrueuse
Le verdict de la balance :
C'est ma plus grosse récolte jusqu'à présent... Spirit affiche un score hallucinant de 694 grammes humides !
Les plus grosses têtes ont été posées en premier sur la balance dans la vidéo, et le poids est impressionnant.
Aspect des buds :
Je n'ai pas de mots pour décrire ces têtes. Elles sont énormes, denses comme jamais et complètement saturées de trichomes. En raison de la chaleur et de la proximité de la lumière en fin de run, la cime ne fait plus de simples foxtails mais de véritables tentacules de résine, accentuant son look d'alien.
plusieurs têtes mesuraient plus de 50 cm de long .
Préservation génétique :
Lors de la manucure, j'ai trouvé 3 graines précieuses au cœur des branches.
Elles sont gardées très précieusement pour voir si je pourrai retrouver exactement cette même génétique dantesque lors d'une prochaine session.
🌬️ Paramètres & Stratégie de Séchage
La récolte de Spirit est officiellement divisée en deux secteurs pour s'adapter à mon environnement :
Secteur DryRocket (Le Test Final) :
Les plus grosses têtes, massives et dures au toucher, sont placées dans l'appareil DryRocket avec mon dernier sachet disponible (prévu pour un demi-kilo de weed). C'est le test idéal pour sécuriser le cœur de ces buds compacts.
Ancien Secteur :
Toutes les autres têtes, plus petites et secondaires, sont réparties de manière classique.
🙏 Remerciements
Un immense merci réitéré à @mia_biotabs et à Mrs_Larimar pour ce programme de nutrition Biotabs et les conseils qui ont permis d'obtenir ces têtes géantes, dures et résineuses. Et bien sûr, un grand merci à
@Dryrocket :
l'appareil est en place pour le test final sur les plus gros morceaux de cet alien ! Merci à tous d'avoir suivi les aventures de Spirit pendant ces 1🌿 Journal de Culture : Mac 1 – "Spirit" (Plante #2) – LE HARVEST (Récolte)
#Dryrocket
Date du jour : 11/07/2026
Âge de la plante : J+91 (Semaine 13 - Jour de récolte)
Taille réelle : 170 cm (mesurée du sol)
Évolution : Le cut final d'un monstre sacré extraterrestre
Nous y sommes ! Après 11 semaines de suivi côte à côte, le jour de gloire est arrivé pour Spirit. Aujourd'hui, samedi 11 juillet, les ciseaux ont chauffé pour le grand Harvest. Le résultat est tout simplement irréel, c'est un truc de malade !
? Le Grand Cut & L'Épreuve du Manucuring
Un travail de titan : Commencé à 7h du matin, le manucuring s'est terminé à 2h du matin, avec seulement 4 petites pauses de 1h. C'était extrêmement long et pénible car les têtes sont tellement denses que les petites feuilles étaient logées tout au fond. Mais le résultat en valait chaque seconde.
Une taille impressionnante : Une fois sortie de la tente pour la mesurer en réel, Spirit affichait pas moins de 170 cm de haut depuis le sol. Une stature monumentale, presque ma taille, ce qui est totalement exceptionnel pour une variété autofloraison.
Solidité confirmée : Contrairement à sa sœur, Spirit est restée fièrement debout jusqu'au bout grâce à la robustesse incroyable de ses branches.
🛸 Des Fleurs Extraterrestres & Pesée Humide Monstrueuse
Le verdict de la balance : C'est ma plus grosse récolte jusqu'à présent... Spirit affiche un score hallucinant de 694 grammes humides ! Les plus grosses têtes ont été posées en premier sur la balance dans la vidéo, et le poids est impressionnant.
Aspect des buds : Je n'ai pas de mots pour décrire ces têtes. Elles sont énormes, denses comme jamais et complètement saturées de trichomes. En raison de la chaleur et de la proximité de la lumière en fin de run, la cime ne fait plus de simples foxtails mais de véritables tentacules de résine, accentuant son look d'alien.
Préservation génétique : Lors de la manucure, j'ai trouvé 3 graines précieuses au cœur des branches. Elles sont gardées très précieusement pour voir si je pourrai retrouver exactement cette même génétique dantesque lors d'une prochaine session.
🌬️ Paramètres & Stratégie de Séchage
La récolte de Spirit est officiellement divisée en deux secteurs pour s'adapter à mon environnement :
Secteur DryRocket (Le Test Final) : Les plus grosses têtes, massives et dures au toucher, sont placées dans l'appareil DryRocket avec mon dernier sachet disponible (prévu pour un demi-kilo de weed). C'est le test idéal pour sécuriser le cœur de ces buds compacts.
Ancien Secteur : Toutes les autres têtes, plus petites et secondaires, sont réparties de manière classique.
🙏 Remerciements
Un immense merci réitéré à @mia_biotabs et à Mrs_Larimar pour ce programme de nutrition Biotabs et les conseils qui ont permis d'obtenir ces têtes géantes, dures et résineuses. Et bien sûr, un grand merci à @Dryrocket : l'appareil est en place pour le test final sur les plus gros morceaux de cet alien !
Merci à biotabs pour leurs engrais incroyable
Merci à growers choice pour leurs belles génétique
Merci à tous d'avoir suivi les aventures de Spirit pendant ces 13 semaines !
on se voit pour la Pesée final et le hash prochainement. ❤️❤️❤️❤️

Likes
32
Share


@Silverback_Guerilla
Follow
2/14:
Decreased distance between the lights and canopy. Let the maximum swell commence!
2/16:
Fed today..increased sugars/carbs. This was probably the last feeding with Beastie Bloomz..switching to Cha Ching at next feed and cutting back on the One.
Likes
8
Share


@Kindbudz
Follow
Forgot to water these ladies for a couple of days but after a heavy watering and a good feeding they perked right back up. I have 2 flower tents running with sunset sherbet right now. Regardless of wether I think they are ready or not I will be switching them to flower in 3 more weeks. Can’t wait to see how these ladies flower!

Likes
7
Share

@Hempcules
Follow
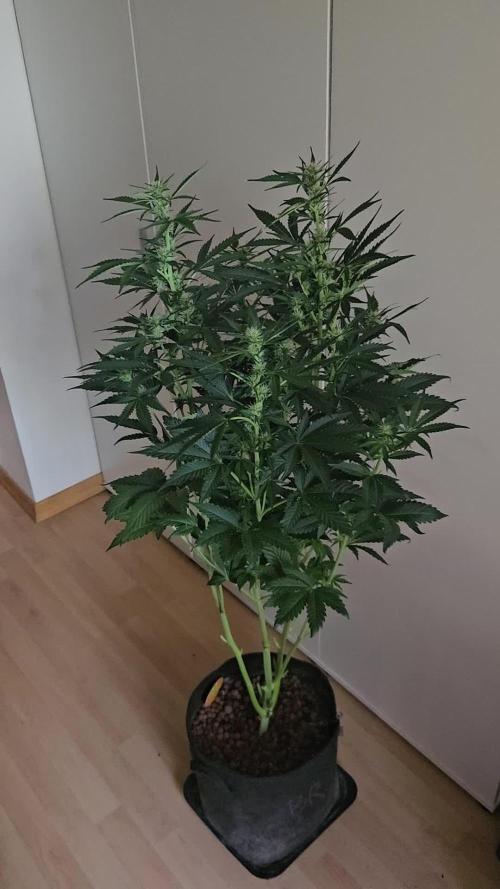
WEEK 7
Things are still going pretty well with my plant. It has gained a good amount of height, but by now it’s slowly shifting its focus toward bud production.
Overall, it looks very healthy and there are no major issues — except for the hermaphroditic neighboring plant. 😑 I hope it will still turn out alright.
PPFD: 750µmol/m²/s
Water: 2x water 1x nutrient solution
Vpd: 1,6Kpa
