


Likes
Comments
Share


@TheCannaProphet
Follow
~Entry for the 'Best Rarest & Smallest Pot by Seedsman' contest~
Starring 🤩....
~ Seedsman Zkittlez Auto ~
Zkittlez (Grape x Grape Apple) Auto x Auto Fruit (Auto Fruit Cheese x Auto Blueberry)
Zkittlez Auto is one of the very sweetest-tasting auto strains available anywhere. It is a sativa-dominant (60%) strain that was bred from Zkittlez (Grape x Grape Apple) Auto crossed with a male Fruit Kush Auto, the latter a remarkable fruity strain bred from Fruit Cheese Auto and Blueberry Auto. Growers can expect to harvest some good yields of high-THC buds.
Zkittlez Auto remains a fairly short plant, rarely exceeding 120 cm. in height wherever it is grown. This is a vigorous plant which is able to metabolize a high level of nutrients and she's a thirsty girl too! If growing indoors close to neighbors it is strongly advised to ensure good and effective carbon air-filtration in order to neutralize powerful odors. This strain's life-cycle is approximately 90 days from seed to harvest.
The leaves on this plant are big and wide serving to convert every lumen available into Zkittlez goodness. Indoor growers should obtain between 400 - 500 gr/m2 while plants cultivated outdoors will produce slightly more at 500 - 600 gr/m2. Lateral branching is very good and it is recommended to use supports/ties to prevent snapping and keep buds close to the light source.
This strain's scent is sweet and fruity with candy and berry notes. Its high-THC has been measured at between 21 - 24% with less than 1% CBD. The effect is well-balanced, cerebral and euphoric, and is very good for social situations as well as for relaxing in front of the TV either alone or with company. It also has the added effect of helping to relieve chronic pain, helping with nausea, insomnia and depression as well as stimulating the appetite.**
**Credit to Seedsman.com
______________________________________________________________________________________________________________________________________________________________________________________________________________________________________________________________________________________________________________________________________________________________________________________________________________________
~ The Setup ~
~ Grown in a 2qt plastic popcorn pot filled with Mother Earth Grow 70/30 Coco/Perlite with Xtreme Gardening Mykos added.
~ Seed was germinated directly in the medium without any 'pre-soak'
~ Feeding will be by Dutch Pro Nutrients
~ 24hr light cycle while germinating
~ 20/4 light cycle after first leaves appear.
~ 4x8 Gorilla Tent
~ HLG 650R w/ 30w Supplemental UVA Bar controlled by a Trolmaster Hydro X controller set for a 15min Sunrise/Sunset simulation. (also a HLG Blackbird for additional side lighting if necessary)
~ Supplemental co2 controlled by an AutoPilot APC 8200 co2 controller
~ AC Infinity Cloudline T6 with Controller 67 using a Terrabloom 6x24" carbon filter
~ De-Humidifier and Humidifier when needed.
~ 14k BTU IdealAir portable A/C unit plumbed into tent for temperature control.
~ BlueLab testing instruments
~ Two Hurricane 18" oscillating fans
~ Two 6" Clip-on fans
~ Two 10" floor mounted fans
______________________________________________________________________________________________________________________________________________________________________________________________________________________________________________________________________________________________________________________________________________________________________________________________________________________
The Harvest:
After checking her trichomes which were at 90% milky, I placed the Zkittlez Auto into complete darkness for 72 hours. While in the dark I maintained a temperature of 65-68℉ and a RH of 40%. After three days in the dark I removed the Zkittlez Auto and all I can say is WOW! All of the flowers on the Zkittlez were just covered in trichomes and it had a super strong sweet/fruity aroma that hit me right in the face!😍
I cut the Zkittlez and hung her in two sections as the flowers were huge, and I wanted to make sure that there wasn't going to be any issues with air circulation around them possibly causing issues.
It's wintertime here now so I took advantage of the low temp's and RH hanging the Zkittlez Auto in my attic. I sealed off a section of the attic from any light leaks and installed a de-humidifier, fan and humidifier along with a hygrometer which I suspended at the same level as the plant was hanging which give the most accurate reading of temp/RH.
After hanging the Zkittles, I adjusted the fan direction so that it was not blowing directly on the hanging plant, but kept the air slightly moving in the room. I set the de-humidifier for 50% which I run for the first 24hrs to knock down some moisture in the plant, then set it to 60-65% for the remainder of the drying time.
The Zkittles Auto hung for a full 12 days, during which I checked on it daily to empty the de-humidifier and make sure that the environment stayed on point. After hanging, it was time to trim this beauty up and get her flowers into glass jars to begin the curing process which I prefer to take at least one month, preferably 2-3 months to really get a good cure and allow all the starches to convert to sugars, the remaining chlorophyll to metabolize and the terpenes to form their bouquet!
Trimming the Zkittlez Auto by Seedsman was a breeze and resulted in some tightly stacked and absolutely gorgeous flowers that are loaded with shiny trichomes that sparkle, and a sweet and fruity aroma that will make your mouth water!😍 I was super stoked to harvest almost 100g from this beautiful autoflower that was grown in a little .5g plastic popcorn pot that I had saved from a trip to see 'Top Gun Maverick' at the theater and I can attest from cultivating Seedsman's Zkittlez Auto in the past, that with a bigger pot, it is capable of some incredible yields!
All in all, this grow was super fun and easy! I highly recommend Seedsman's Zkittlez Auto to everyone from novice's to master growers as it NEVER disappoints to produce some mind blowing fruity buds! ❤️❤️❤️

Likes
15
Share


@DailyhighclubNLyara
Follow
Still busy weeks lol,
The buds grew amazingly this week and I’m really happy with how dense the weed feels. Previous grown was under a Blurple 1000W (10W measured 😅) and vergeleken met de lamp die de dailyhighclub.nl aan mij heeft gegeven is dit 1000x beter. Dit licht komt gewoon zoals beschreven: DHCxAR1000 pro 110W Full Spectrum LED! Ja sowieso reclame hoort erbij en ik ben gewoon ontzettend tevreden met dit licht!
Ik probeer een zo budget mogelijke grow te kweken zodat iedereen zn eigen weed kan kweken. Autoflowers zijn bijna zo simpel als goede aarde an goed opletten op hoe je water geeft, liever te weinig dan te veel. Nou das niet zo moeilijk, zeg ik als lui persoon.
Maar DikkeToppenWilNietStoppen

Likes
18
Share


@TheGreenLeopard
Follow
It’s a nice grow so far in terms of expectations reality on the seed breeders. Great stuff again. I had a real germination nightmare this time around though - lots of strains failing at seedling so the numbers and strains became more 😂. So the tents are mixed up again to auto on one side and photoperiod on the other. In this tent as well as Afghan and a red gorilla - there is sweet zensation , banana krumble and red hot cookies and a peyote skittlez. Water in using ro solely through the grow. There has been one issue. I tried a “pro” substrate from biocanna this time and I have those little fleas. Really annoying and my aphids are late so kind of annoying - takes the pleasure off a bit. Any good organic solutions let me know please on comments

Likes
9
Share

@LastinG
Follow
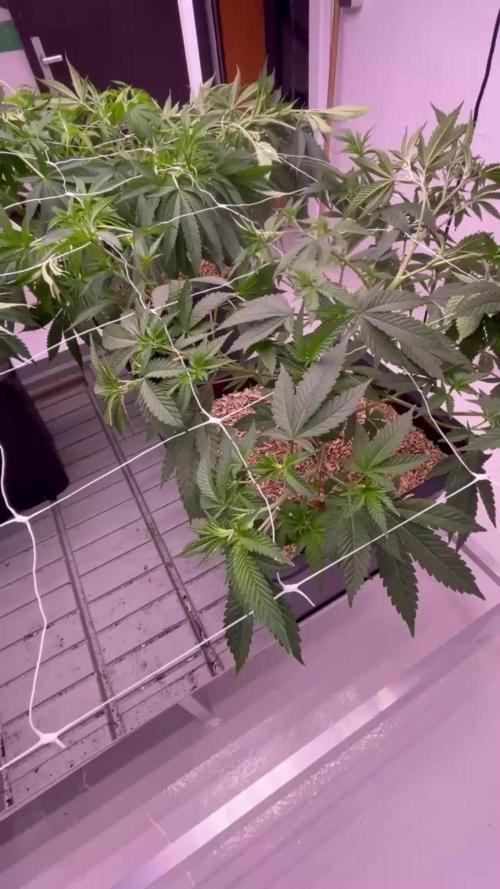
Week 6 veg and we are starting to setup for flower. Got the SCROG net up this week and the if the plants react nice ill start flower. Also spent some time on the 1000W LED controller and set up a proper day cycle – blue heavy early for tight growth, then ramping white and a bit of red later in the day. Here’s exactly how it’s tuned right now.
Nectar is still the most even and balanced of the bunch. Wide bushy shape, strong laterals, and she’s filling the net without any drama. Leaves look dark green and healthy, living soil doing its job like always.
Rainbow Melon is the absolute beast as usual. Super dense and aggressive – she’s really claiming her space under the net. Gonna have to stay on top of training and maybe pull a few more lower leaves soon to keep the airflow right, but she’s loving it.
Something Good has picked up speed and looks a lot more even now. Still the smallest but catching up nicely, good color and steady new growth coming in.
Probably 1 or 2 more weeks of veg to let them really fill the screen before we flip. Also hung the new big Biotabs banner – looks clean in the background. What do you think @Mia_BIOTABS ?? Overall everything’s happy, no stress, just solid progress. All three fertilizer are working great so far. They also got the usual foliar feeding. See you next week
Update: added photos of the stems and a 1 day after applying the trellis net. 15. I flipped them into flower



Likes
28
Share


@Professor_Chaos
Follow
Beginning of week..
This is the last and final week for sure for sure lol.. That makes 10 weeks from 12/12.. And by the trichomes they should both be prefect!.. With the Mandarin Cookiea having just a tad bit more amber than the ETHOS Cookies.. They both should have plenty.. This week may be cut a day short.. Because the only day I can find time to harvest will be the day before the next week starts.. The last day of the week (end of week).. And I want to go ahead and try the 48 hours of darkness thing once more.. To see if it may have any effect.. I guess if alot of people already do it.. What can it hurt??.. Anyways.. Still just giving rainwater.. Lately it has gone down on the PPM side.. Niceeee.. I was going to get some distilled and run it through (0 - 10 PPM) but the rainwater is at 15 - 17 PPM.. That's close enough for me.. Maybe still run a gallon of distilled the day before I begin the 48 hours of darkness thing-a-ma-doodle lol.. Today.. This is what happened... Going in: 17 PPM at 6.9 pH for both.. Run off: Mandarin Cookies was 100 PPM at 5.9 pH and the ETHOS Cookies was 54 PPM at 6.0 pH.. I think the Mandarin Cookies needs to be flushed a bit more before I feel comfortable with the flushing.. I believe its fine to not flush for a whole 2 weeks at 0 PPM or whatever.. But I do like to get it down pretty low by harvest time.. But I think everything will be fine.. Just gotta make sure I dont fuck up the drying 😬😬😬
Mid week..
Almost there!!! So excited! Can't wait! Got both runoffs at 50 PPM.. Just been watering as usual.. Both of these strains are going to be epic af! I think tomorrow will be the last day of lights on.. Going to begin the pre-harvest dark period to hopefully increase trichome/thc production or whatever it does 😂😂😂 if this bud ends up better than anything I've ever grown then I will do it every grow!.. But we shall see!!!
End of week..
No pics this update.. They are both bathing in complete darkness for a couple days then CHOP!... Haven't even peaked at them.. They both should be on point! So happy for this to be just days away from going into jars!!! I've already cut a small branch from the Mandarin Cookies and dried it for 5 days.. A little faster then I wanted.. But wow.. It tasted immaculate.. I removed every leaf I could.. Leaving just the calyxes.. No chlorophyll.. Not really enough to get a buzz from.. Plus that was like 2 weeks ago.. So it was still too early for any decent amounts of THC.. But the taste is delicious af!.. I will take some pics before the chop and post them for the "end of this week" since it is going to be a day early anyway..
End of week..
Nvm lol.. Took some pics before harvesting and here they are! Even a sneak peak at the drying in the tent.. May be awhile till I post the harvest.. Want to make sure I give the best review on these ladies as I can! Hells yeah!!! So dank!

Likes
5
Share


@GODAXE
Follow
here we are for the SSSC contest grow update.
14.06.2024
the two murphys sister grow well in their new soil. the litlle flowering one slowly get chunkier and the stunt one finally wake up and stretch nicelly ( she could be a chalenger)
18.06.2024
3 day of canicule have been annonce
at 9h00 am the outside temp have reach 29°C, the room temp is at 33° and the grow tent is at 36°.
to avoid any over heat stress to the sister they have been set outdoor for the heat wave.
20.06.2024
the outside temp hit 38°c today can t imagine how high it may have reach in the grow tent.
The murphy sister really like the sun light the stunt one just grow 2 inch per day, she is now 3 time bigger then is sister...
unfortunatelly she have been snap , almost unroot, by my neighbor dog. try to fix her best as i can.
21.06.2024
thunder storm alert today so the sun therappy is finish anyone return back to the growtent,
the snaped sister look okay. maybe i will rescue her an other time.
22.06.2024
the injured sister look really bad this morning. and passed out by the end of the day. she haved been set to dried, the terps is so amazing, kind of a woody sun ripped cherry crumble.
04.07.2024
the RIP murphys sister is dry, she gave me 1g of tinny fluffy bud sticky like hell and smelling like heavent

Likes
2
Share


@fabialien
Follow
Semana 5 de crecimiento, notamos ligera aparición de Araña roja, vamos a combatir con jabon potásico y neem hoy 8 de agosto se aplica jabón potásico y neem con esponja para erradicar posibles nidos.


Processing
Likes
15
Share


@eldruida_lamota
Follow
Buenos días familia, increíble, sin palabras con esta variedad, lástima la lie y perdimos una a principio, pero estas 2 crazy cookies crecen una locura.
Ph controlado en 6,5 y una humedad por encima de 40% así que todo fenómeno.
Una cepa bastante fácil en sus primeras semanas.
Veremos próximamente como se forman nuestras flores familia


Likes
8
Share


@sellem
Follow
24/03 watered AGAIN after 2 days with 1.5L 5.9 PH 1.5 EC, 5ml/L of Terra Bloom.
So far im really happy with plagron. Just one bottle for grow and one for bloom and the plants look healthy and show no signs of deficencies. really happy with the product. Moreso than biobizz, where i used Grow, bloom, calmag, activera and topmax and still fought deficencies here and there.
I also am conflicted about the trellis net. I like what it does but i think my tent is too full with plants or too small to really enjoy it growing-wise. I cant move the plants and its hard to reach them during watering. So i removed it again. its an on/off relationship with us :D
I also did some more defoliation, PROMISE ITS THE LAST TIME. i took out the plants of the tent for it to better reach the insides of them and made some nice videos of their progress so far.
ALSO: Tent smells really good and overwhelming when i open it! sadly, it escapes pretty fast so ill put "normal" smell on here. but its decent!
Watered again on
27/03, 1.5l 5ml/L Terra Bloom 1ml/L Green Sensation, 5.8 PH 1.7 EC
29/03, 1.5l 5ml/L Terra Bloom 1ml/L Green Sensation, 5.7 PH 1.7 EC
Likes
8
Share


@Inceptionist
Follow
Mystery Made 2 got harvested 16/11 and I'm planning to let her dry for 14-21 days before trimming and put them in glass+boveda (58%) and grove bags for final cure.
Drying conditions are as follows:
16-18°C
55-60% RH


Likes
1
Share

@PMDennismanice
Follow
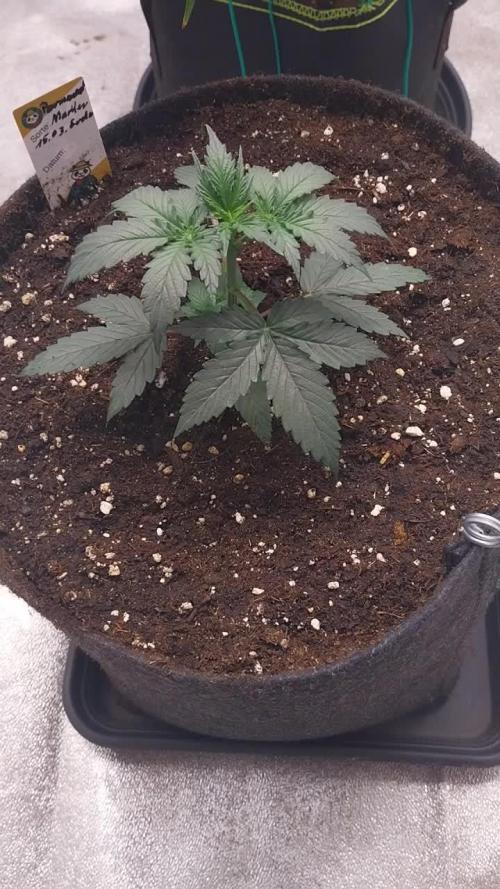
War 4 Tage abwesend und hatte über Tropfbewässerung gefüttert.Das Wasser hatte ich vorher mit Weedtamine versetzt und das scheint ihr ganz gut getan zu haben.Hätte nicht so ein Wachstum erwartet,im Gegenteil,befürchtet hatte ich Totalausfall.
Heute das erste mal mit Pflanzengeflüster besprüht.


Likes
13
Share


@smokeycropping
Follow
increible crecimiento de las nenas. 5 semana ya proxima a flora como le encanta el bokashi
a estas cepas de royalqueenseeds.
se ven sanas y comen bien muy pequeñas, muy compactas me sirguen ayudando a darles mas vegeta.
Likes
10
Share


@DeepRootsGrowTrees
Follow
COSMOS F1 CBD
ROYAL QUEEN SEEDS
This lady was my first grow in a solo cup from start to finish so I was satisfied with the grow. Knowing she would flip about 5 weeks and growing in organic soil I knew she would not get that big. She still produced frosty dense buds and was about a foot tall. Stay Growing!!
Thank you for stopping by and taking a look it's much appreciated!!
THANK YOU ROYAL QUEEEN SEEDS!!
COSMOS F1 CBD/ROYAL QUEEN SEEDS
Likes
38
Share

@DeepRootsGrowTrees
Follow
TROPICANA COOKIES FF / FASTBUDS
WEEK #17 OVERALL
WEEK #9 FLOWER
This week all is well no issues this week she's looking good buds are dense and covered in trichomes she smells sweet. Stay Growing!!
Thank you for stopping by and taking a look it's much appreciated!!
Thank you FASTBUDS!!
TROPICANA COOKIES FF/ FASTBUDS


Likes
13
Share


@MrPott
Follow
Now that I got the environment stable, it's nice to see her bud sites popping up. Did a bit more LST on her and hopefully when Nicky (the photoperiod) is done, I can boost the lights to 18 hours a day.


