
Likes
Comments
Share


Likes
1
Share


@vonlantz
Follow
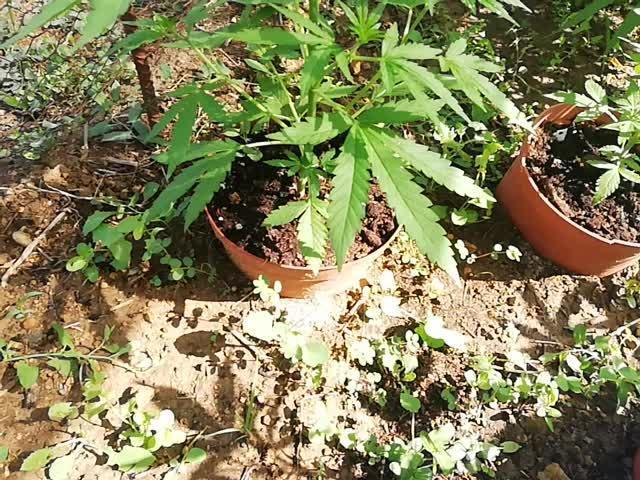
I added some hazel nut shells as a mulch and so far I think I'll let her grow as she is without LST. As I noticed - not sure if it's true or not - that outdoor LST stunned 2 of my plants. Whereas a really weak at the beginning plant - without leaves up to 3 nodes - right now outgrew both champs.
I transplanted BPP weird enough, so now she leans to the side so much. That's because I am used to LST and like to have some room for a plant to lay on the ground.
But this time I holding my hands to not to do any LST and let her grow naturally.
Day 26 - I sprayed fungicide on her, because many times ended up with botrytis

Likes
4
Share

@LaBurlaVerde
Follow
30 y 31 de julio, Días 26 y 27 desde que asomaron. Esta semana como indica la tabla de Top Crop sigo regando con Top Auto y Top Candy, subo un poco las dosis, 2 ml/l de top auto y 1 ml/l de Top Candy.
Las Cheese estan entre 12 y 13 pulgadas, no pongo los centimetros porque no los veo.. Y la titan se a quedado un pelin mas pequeña, es la mas avanzada va a ser mas pequeña que las otras, quizas es porque como podeis ver en la imagen principal tiene detras una planta que se esta haciendo tremenda y le quitara algo de sol seguramente, y aparte la malla de sombra que llevan pues no ayuda mucho. Las cheese de Eurogrow me estan sorprendiendo, es una genetica que de momento recomendaria porque si siguen asi van a dar una cosecha bastante decente. La Titan por el precio que tiene una sola semilla, pues me esta defraudando bastante, seguramente cultivandola en interior saldran plantas como dicen los de royal, pero en mi opinion las autos las tenian que hacer en dos versiones, haciendolas en interior para los que les gusta cultivarlas en su armario y otra version en invernadero o algo similar pero dependiendo de las horas solares sin iluminacion extra, seguramente asi mejoraria mucho la produccion de las autos en exterior. La semana que viene seguimos con los avances, etiquetare las plantas para que veamos cual es cual. Nos vemos pronto con la actualizacion de la semana que viene...


Processing
Likes
14
Share


@SunshineBud
Follow
Man p4 is coming on strong after knocking of the longstanding p1 Queen of the crop. Crazy, I thought plant 3 was goin to be lucky to survive and she kicks booty! Another video up there 12 days in December cuts off about an hour ago.
I have to say this week went pretty uneventful other than getting everything potted into their final 3ga pots. I'm trying to get the plants up to around 12" before flipping but getting anxious about it.
If plant 3 wasn't so dang little I'd probably had flipped the ladies already... But they're still a bit short. I'm finding overcoming impatience is the biggest lesson I'm learning.
Below is the transcribed daily notes you can find in the images above:
12/24 Measurements good, 3 still looking slow.
12/25 (Fed w/) 2 tsp/ga Big Bloom / 2 tsp/ga Grow Big 1/4 tsp/ga Clean kelp. Trimmed suckers off p2 repotted #3 1225 ppm tds, 4.43 ph out.
12/26 Humidifier wonky, got soil warming up to transplant but think maybe wait as soil still a little moist. Trimmed suckers off 4, rinsed all w/ph balanced H2O.
12/27 Humidifier ran out
12/ 28 Repotted 1/2/4 fed w 2tsp ga grow big/big bloom, 1/4 tsp clean kelp. trimmed 2x suckers off 1 b4 I thought about stress f/ potting. 1295 TDS ppm
12/29 trimmed 2 browning suckers f/ P3
12/30 cut low brances/suckers messed up leaves/babvies on P2

Likes
127
Share


@Tropicannibis_Todd
Follow
💩Holy Crap Growmies , we are outdoors and in the Ground and there Doing Great💩
The Frosty is amazing 👏
👉It's been another full week 56 days from seed and she's doing great , very nice Growth, considering shes been up against the wind and rain 👈
No problems 😊 so far so good 👍And she's now in full on flowering 😁👈 weather been great , lots of sunshine 😎
I GOT MULTIPLE DIARIES ON THE GO 😱 please check them out 😎
👉THANKS FOR TAKING THE TIME TO GO OVER MY DIARIES 👈
👉NutriNPK NUTRIENTS USED FOR FEEDING 👈rain water to be used entire growth👈
👉www.nutrinpk.com right now get 10% off using SPRING2022 as the coupon👈

Likes
Comments
Share


@Lynx_361
Follow
29.06.2025
Took a clone from each of my Plants on day one of flower.
30.06.2025
Did some LST..

Likes
2
Share


@wolfvb
Follow
So our last week started, she is looking nice and ready and she is gaining weight.
I love the pink hints on it she looks very beautiful 😍 ❤️
Can't wait to try it out.
Hopefully she is as delicious as she looks 💦
24.11.25
So today I maxed some small amounts of char by rubbing here a bit as the tircomes are still clear so I decided to add some extra food and maybe stress here a bit. To make it grow more tircomes hopefully 😅
And Manged to up the humidity by closing the windows in the room, not much and I have to run the fan at the lowest!
German growers how it's for you ?
I feel the winter is abit dry.
Likes
6
Share


@Lickey
Follow
I transplanted, leaf stripped, and flipped all within 5 days bc they were growing too tall. Not ideal. They are tough

Likes
26
Share


@Sickone
Follow
Ab geht es in die 2. Woche
PPFD wert wird auf 225-250 hochgeschraubt
Lux wird von 7k auf c.a 8.500 - 9.000 in 18H angepasst
Lampenabstand bleibt vorerst gleich da die Blätter sich meiner Meinung nach hervorragend ausprägen.
Temperatur wird Tagsüber zwischen 25 und 27 Grad maximal gehalten bei einer konstanten Luftfeuchtigkeit von 65%+
Heute am dritten Tag der Woche habe ich mich dazu entschlossen die Ladys in ihren finalen Topf zu Pflanzen, da mir dies öfters geraten wurde und ich leider diesen Fehler von Anfang an hätte vermeiden sollen.
- Falls ich nochmal zu Automatik greife, werde ich diese direkt in den finalen Topf geben -
Gute 48h nach dem Umtopfen ist ein deutlicher fortschritt am Blattwerk zu sehen, meiner Meinung nach haben sie das Umtopfen bisher gut überstanden


Likes
38
Share


@Tesla
Follow
Week 10 since switched to 12/12h. (it's in time if the first week of blooming is deducted.)
Trichomes're 80% cloudy. I didn't find any amber trichome yet. Pistils are 50% orange 50% white.
Today I started flushing the coco (a lot!). I really don't want any sign of fertilizer in my pot. So, from here no more food, only plain water.
Suggestions are always welcome!


Likes
13
Share

@Cauli
Follow
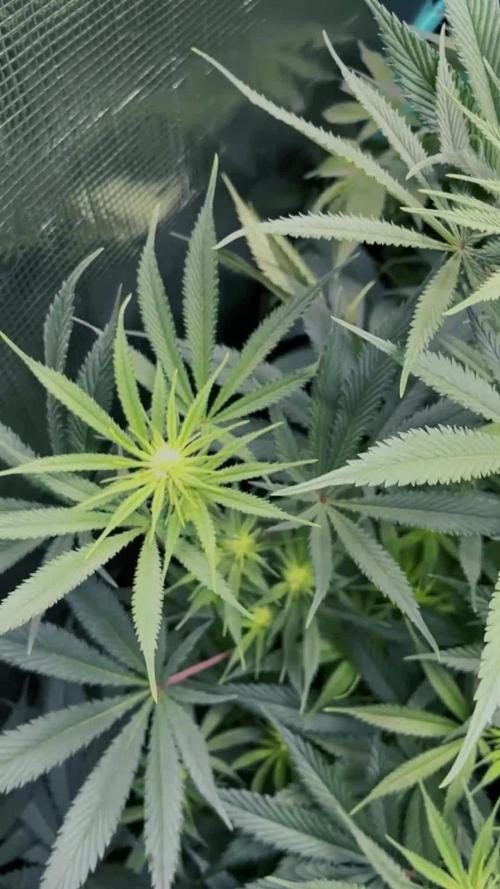
Week ten for Franco's Fullgas!.
Really love how she turned out so far – great structure and internodial spacing but her main stem stayed really thin.
Let's see if she'll get some proper buds despite this. maybe had some bad timing with the training. Despite this she is so beautiful.
And maybe it won't even be any problem?
Did cut a lot oft branches and leafs this week, now she has to do her thing and really looking forward to the next weeks with her :)

Likes
7
Share


@vertex8
Follow
Start of week 4 and the washing machine looking great, got the scrogg net laid down and will be just tucking branches back under the net.
After digging out the Jaffa plants which were not growing at all we realised that they came in soil not coco, after cleaning off the soil and treating with super thrive and great white, giving them a new mix of Coco and some food at 1.0ec they begin to show signs of life 🙌
Hopefully they catch-up with the washing machine.
Not seeing any major signs of deficiency or toxicity atm

Likes
11
Share


Likes
17
Share


@Fitzwell
Follow
She is starting to kick off buds nicely. The smell is fantastic makes me wanna slap my momma. I've been defoliating the plant here and their to allow more light to get through her


Likes
2
Share


@Organic473
Follow
These Durban girls(hopefully) are showing off…So green and full of life…I hope to at least get 1 male to continue this strain. Time will tell.
Likes
4
Share


@Willy_Balls
Follow
Last week ahead. Next time will cut nitrogen earlier. These ice cream cakes did not like it at this level. Also had a little dripper clog and mokums tulip got a little burnt. At these high ec levels they are super sensitive to drybacks.
