The Grow Awards 2026 🏆 


Likes
Comments
Share
@420DeepGrow
Follow
ACTUALIZACIONES A DIARIO!!
Miles de gracias al equipo de Royal Queen Seeds y a @James por proponerme esta aventura tan trepidante y poder conocer de cerca las nuevas F1 y sobre todo a la gran Titan F1. Espero que lo disfruteis y os sirva como referencia.
¿Qué piensas cuando lees la palabra “Titán”? Hay quienes la asocian con los hijos de Urano de la mitología griega. Otros saben que Titán es la luna más grande de Saturno. ¿Y entre los cultivadores de hierba? Estas personas reconocen a la Titan F1 como una variedad de marihuana con una genética de vanguardia. Se trata de uno de los primeros híbridos F1 autoflorecientes, y es una variedad pionera que ofrece productividad, resistencia y algo completamente nuevo.
La Titan F1 deleitará tu olfato durante la fase de floración y más allá. Esta variedad autofloreciente ofrece un potente perfil de terpenos compuesto principalmente por mirceno, farneseno, ocimeno, pineno, bisabolol y limoneno.
Gracias a MarsHydro 😊🙏 por darme la mejor luz que hay en el mercado.
La marca numero uno en focos 💡, carpas de cultivo ⛺️, extractores 🌬️ y demás aparatos que necesitas para tu cultivo.
Para esta aventura arrancaremos con 💡Mars Hydro TS 1000 Full Spectrum LED Grow Light 150W Regulable y 1 semilla autofloreciente a un ciclo de 20/4.
Verdaderos 150w con este TS1000, la mejor luz de cultivo LED para principiantes.
Ofrece una luz adecuada para 2-4 plantas 🌱. Su precio razonable, la marcada mejora del rendimiento y el control variable de la producción la hacen amigable para los nuevos cultivadores. Todo un tesoro para cualquier cultivador que este comenzando.
Usaremos para esta aventura una carpa de 60x60x90, MarsHydro una carpa para los más exigentes.Con una solapa de cremallera mejorada, dobles cremalleras de metal con forro,reflectante diamante tipo Mylar, postes de metal para una estructura mas solida, no se puede pedir nada mas.
Garantizando una respuesta en solo 24 horas tanto si has usado antes la marca como si no.
🌻🚀 Consigue tus semillas aqui:
https://www.royalqueenseeds.es/semillas-de-marihuana-hibridas-f1/624-titan-f1.html
💡 MarsHydro TS1000:
https://www.amazon.com/gp/product/B07PLY1WKK
⛺️ 60 x 60 x 90 MarsHydro:
https://www.amazon.com/dp/B081PN2QDN/
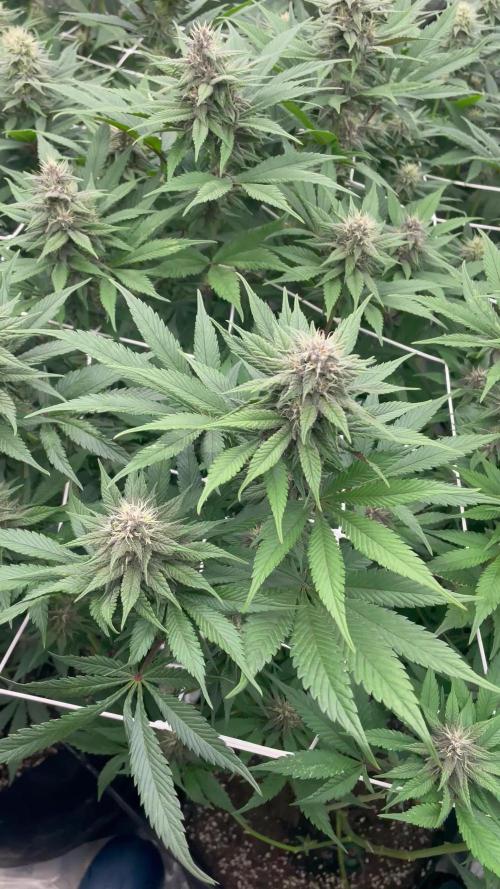
Septima semana de floracion, las planta ha terminado de estirar, las ramas laterales han estirando junto con la cola central y se muestran los futuros cogollos, es una planta muy compacta y he tenido que quitar alguna hoja baja para evitar la aparicion de algun hongo.
Se muestra una gran cola principal.
Es la genetica que mejor ha respondido, por no decir la mejor. Felicidades Royal Queen Seeds y MarsHydro 😁.
Los cogollos han estirado muy rápido y se ha formado una larga cola principal con muchos cogollos en las ramas laterales, continua cargandose de resina.
Las flores empiezan a engordar, queda poco para el lavado de raíces.
📆 Día 63 a 70: Riego con EC de 1050 a diario, los cogollos empiezan a madurar se acerca la cosecha, ha sido un cultivo muy rápido y sencillo.

Likes
5
Share
@Mrbudgrower88
Follow
The ladies are going into flower now in the main room and the second room is half up and running with four sick French macarons and 29 cuttings of all the strains


Likes
127
Share
@DutchFarmer
Follow
1 week done!
Really impressed with how strong she is!
Let’s gooo we will keep on pushing forward
Time to start the plagron sauce


Likes
86
Share
@JuanHaze_Arg
Follow
28/02 se riega con Amazonia roots 3g/L
Viene creciendo muy rápido
02/03 se riega con agua
04/03 se riega con 700 cm3 de agua de ósmosis inversa + 300 cm3 agua de la red + 0.7ml de cal mag. + 0.5 de top auto (macro y micro nutrientes) en una pequeña dosis para que se mueva más rápido! Ec final 0.7 ph 6.2
06/03 se riega con agua + calmag

Likes
19
Share
@Tommy716
Follow
The buds are really packing in the weight and resins. There so heavy the head buds are starting to drop. Switched to overdrive and cut all other nutes in half. They are holding up well. No stress signs at all. It's looking like they want a few more weeks of flowering. I'm watching them and listening to the signs they show.Everything is going great. Can't wait to taste these lovely ladies.
Likes
9
Share
@RSAFirstOrganicGrow
Follow
This week I’ve decided to defoliate a bit, I just hope she doesn’t die bcs of it. Had to get rid of some yellowing bottom leaves as well as big, sun blocking fan leaves!
Cloudy weather all week but coming week some nice sunny days are expected again!
She has a nice pungent fruity smell which make me wonder if she isn’t the Sweet Tooth haha.

Likes
178
Share
@NuggetPawn
Follow
Hi Guys,
This week has been pretty good, the plant at the bottom right just seems to struggle her way through everything, she has loads of roots, they keep growing but for what ever reason she look plain ugly and grows very slowly above the water which is evident when looking at the photo lapse I have uploaded. I bought a Torus PH Perfect capsule which is a chemical free way of stabilising the PH, since that has gone in the brain bucket, I haven’t had to make any PH amendments yet. You can see it at the end of the video. They have all been topped for the 3rd and final time around D32-33. I will train some tips down so they don’t become dominant, but other than that, they’re gonna have a free week or so of growth with no more slicing or cutting before I flip them😊 Hopefully the ugly one will have bounced back by then and I can push forward into the transition with 6 healthy bushes.


Likes
11
Share
@BLAZED
Follow
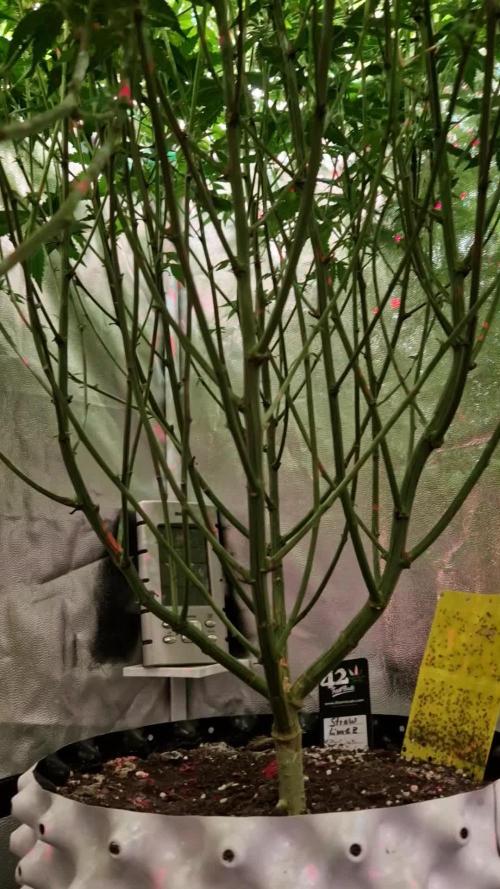
Week 6 (3-3 to 9-3)
3-3
Temps: 17.9 to 22 degrees
Humidity: 58% to 74%
4-3
Temps: 17.8 to 21.9 degrees
Humidity: 61% to 72%
5-3
Temps: 17.8 to 21.5 degrees
Humidity: 55% to 79%
Watering: Both 1000 ml. (Only calcium)
6-3
Temps: 17.8 to 21.7 degrees
Humidity: 66% to 82%
7-3
Temps: 17.6 to 21.7 degrees
Humidity: 68% to 82%
8-3
Temps: 17.7 to 21.7 degrees
Humidity: 70% to 88%
Watering #1: 1000 ml.
9-3
Temps: 17.3 to 21.5 degrees
Humidity: 63% to 87%
Installed the dehumidifier, as the humidity is getting high at lights off.

Likes
35
Share
@DutchFarmer
Follow
She has returned with two 2 tops
Lets hope she gives me sativa dreams ! 💤 😴
She is so strong 💪 and stable im impressed with Kannabia Genetics !
I LOVE YOU KANNABIA GENETICS! 😍😘
Check out my Cannabis Community, please👇like👇, follow, comment, and subscribe to my YouTube channel👇. ❄️🌱🍻
https://www.youtube.com/@DutchF4rmer
Join our cannabis community community for weekly giveaways 👌
(Discord Server)
https://discord.gg/VMu6rH4a7V
It will be appreciated! ❤️
Happy Growing 🌱🌱🌱


Likes
8
Share
@OrganicJoe
Follow
Another week, another bang.
This cycle is honestly stupid easy.
Living soil doing all the work while I just watch.
I Moved the lamp, did the defoliation, that’s it. No feeding, no chasing problems, no stress.
I even left for a business trip and the grow didn’t give a single f**k. Fully automated, zero drama.
What really stands out: the bud development at this early stage is insane compared to my previous grows. The way the buds are stacking and filling out this early is on a completely different level.
Lowkey annoyed I didn’t find this living soil earlier. The other ones I ran were okay at best. This one actually delivers.
Only thing I’m keeping an eye on now is humidity. Not trying to gamble with mold, so a dehumidifier is coming in the next days.
Feels almost illegal how smooth this run is

Likes
1
Share
@CheeRz
Follow
Some branches were so heavy I've got to support 'em with some bamboo sticks 💚💚💚
Likes
36
Share
@grundoh
Follow
Right now I am just playing the waiting game with White Widow and Industrial Plant. Both have shown signs of maturation with their trichomes but neither one has a majority of milky trichomes yet. In hindsight, I should have waited until Industrial Plant was more mature before I started flushing her -- I've lost a few weeks that I could have been continuing to fatten her up. I added more bamboo rods and tied branches to them with some plant tape on both plants. White Widow's buds are rock hard and keep bending its branches so hopefully the extra support will help.
I cut off the main cola and a side cola of Industrial Plant CBD due to bud rot that I failed to notice for roughly a week. After cutting out all of the bud rot I could find on Industrial Plant I checked over her and White Widow meticulously to make sure everything was kosher. I added a spare oscillating fan in the tent to try and improve air circulation in the room. I have had trouble with humidity and temperature shifts throughout this grow -- something I'll have to dial in as I progress. I imagine the climate shifts combined with how thick the main cola was probably contributed to the bud rot.
Seedsman White Widow Auto is ready to be harvested as of Day 100. Over 2 days her trichomes really started to turn amber. I have started flushing her as of today and plan to harvest a day or two into the start of Week 15. As for Dinafem Industrial Plant Autoflowering CBD? I am thinking of just cutting my losses if her trichomes haven't gotten to at least majority-milky by the time White Widow gets chopped. She just looks mostly-dead and only wants a drink once every 7-10 days now. That and I have some new gear I really want to test out, as well as some different ideas for my second run that I've been itching to get started on.


Likes
77
Share
@SuggaShane
Follow
I think it’s about flushing time for Gorilla Zkittlez. She stinks up the whole room. Carbon filter ain’t cutting it. Lol Gorilla Cookies on the other hand is getting huge. I think she should pull some nice weight. She’s stacking up trichromes and starting to smell pretty good. A weird smell but it’s good. Idk how to explain it. 😎 That’s all till next week. 🤙🏽💪🏽

Likes
6
Share
@MNGrowBro_Angel
Follow
Pistols are Starting To Show And she Is Very Big and Beautiful And I'm Definitely Getting her Right with the Feeding Cause She Ain't Showing Any Deficiency's I Wish My Cloning Process Worked Sadly Both Clones Died But It was My First time


Likes
44
Share
@The_Good_Twin
Follow
13 Aug 2021
Happy Friday the 13th everyone! I’m not a superstitious person, but I hope everything I did today turns out well.
Today was a big day in my grow room. I finally cleaned up my big tent and got my three little Ladies transplanted into their new pots, as well as set up their new home to maximize their environment. I moved my Spider Farmer SF-1000 light into the big tent so that each of my girls has their own dedicated light, but that the spillover from the other two will be 3x as good! I leveled the lights 18 inches above the plants for even light distribution over the entire grow area.
I also got a new standing oscillating fan for improved airflow and took out the other two I have been using. I can always add them back later if needed. I also repositioned my carbon filter and exhaust fan which opened up the whole top of the tent to place the 3rd light.
I changed a lot of stuff in my grow room today in order for it to be neater, more organized, and basically more efficient as a grow space. Now if I can just get rid of all the damn boxes! That’s an inside joke with my wife.
Now to my ladies… As I mentioned above, I transplanted my trio into their final homes today. I filled the pots with the same soil that they are currently in, Fox Farm’s Ocean Forest Potting Soil. I opened a small hole in the middle, then extracted each plant, one by one from their solo cups. I broke up the root ball of each plant so that the roots cover more area in their new home. Then I surrounded the root ball with more fresh soil and made sure each was secure in their positions. I then defoliated each plant of all their dead or dying leaves and then carried them upstairs to the grow room. After placing each plant into position, I labeled them all so I, and I’ll assume all of you, can keep track of which is which. They’re still C1, C2, and C3.
Today I didn’t want to do anything really crazy, so I just watered the plants with two gallons of properly pH’ed water in order to get the plant roots and fresh soil wet enough to stay moist and consolidate a little better into one mass. I also wanted plain water so that I could see what the TDS levels were like from just the soil and water considering that the soil has some nutrients all by itself.
So, each plant received approximately 3/4 of a gallon of water from 2 separate gallons. One with a pH of 6.4 and TDS going in of 89 ppm, and the other 6.7 with TDS of 98 ppm. Each plant had a decent amount of runoff from the water given. The runoff results were as follows:
C1 - pH 5.7, TDS 628 ppm
C2 - pH 6.2, TDS 532 ppm
C3 - pH 6.1, TDS 622 ppm
As you can see, the TDS going in was under 100, but the runoff was significantly higher. I think I’ll wait until their runoff TDS is lower before I recommence giving additional nutrients. I’ll just have to see how it goes. Temperature is hot outside again, so the temperature was a little elevated at 84F, and the humidity was 55%.
Now the fun of caring for 3 big plants at once. 🙄 I thought two was tough! What have I gotten myself into! Happy growing everyone!
15 Aug 2021
So today started the fun of feeding three plants at once. I’m still just giving properly pH’ed water to try and use the nutrients in the soil first instead of adding additional nutrients to a pot that is already full of nutrient rich soil. I may do this one or two more times before starting the nutrients in the water solution again.
I’m going to document each plant properly here in the note, but I can only put one on the updated weekly report for the website. I’m going to alternate between the 3, so today I’m going to start with C1.
Each of the plants seem to be adjusting well to their new pot, as well as to their new environment inside the big tent. I took a couple of pics of each plant today to add to the diary for your viewing pleasure.
The gallons of water (3 of them) were filled with tap water and then measured and treated independently as follows:
C1 - gallon had initial pH of 7.7.
C2 - initial pH of 7.7.
C3 - initial pH of 7.8.
I added 5 gtts (.25ml) of pH DOWN to each gallon which adjusted the pH to 6.2 in all three gallons.
TDS going in was as follows:
C1 - 94 ppm
C2 - 98 ppm
C3 - 91 ppm
Runoff was also measured independently, and all 3 had very low runoff pH levels. Very low!!
C1 - 5.2
C2 - 5.4
C3 - 5.3
TDS runoff was:
C1 - 597 ppm
C2 - 577 ppm
C3 - 647 ppm
As you can see, the TDS runoff is still pretty high due to the soil. I’m going to be looking after them carefully over the next week or so to see if any deficiencies can be seen and address them to prevent any issues from becoming a problem. So far so good. Stay tuned to see how this all ends. Happy growing everyone!
20 Aug 2021
It has been nearly 5 days since I’ve fed my ladies. I’m not proud of that fact, but it is what it is.
They are all looking a little drawn out and dry, and a few of the leaves on C2 have gotten some pinkish/red borders on some of its leaves. I don’t really have any reason other than pure laziness!
Today is the last day that I plan on giving plain pH’ed water, but I’m going to ease into nutrients on the next feeding by using half quantities till I see how they do.
Today they each were given a gallon of water. The initial pH of each gallon was 7.3. I added 3 gtts (.2ml) of pH DOWN to each gallon which adjusted their pH levels to: C1 - 6.7, C2 - 6.6, and C3 - 6.7. Their TDS levels going in were: C1 - 90 ppm, C2 - 95 ppm, and C3 - 92 ppm.
Runoff pH and TDS levels were:
C1 - pH 5.8, TDS 422 ppm
C2 - pH 6.0, TDS 529 ppm
C3 - pH 5.8, TDS 489 ppm
The temperature in the tent was 82F, and humidity was 53%. The plants still look pretty good, and are continuing to grow and adjust well to their recent changes. I’ve decided to just let these ladies grow naturally to see how it goes. What I mean is that I’m not planning on using any LST or HST methods to train them. I do plan on topping them at some point, but not yet. I’ll just have to see how it goes.
Happy growing everyone!

Likes
22
Share
@Ciocanna
Follow
The last week of vegetation is already ending. Starting from day 60, I switched to a 12/12 hour light regimen.