
Likes
Comments
Share


@DeepRootsGrowTrees
Follow
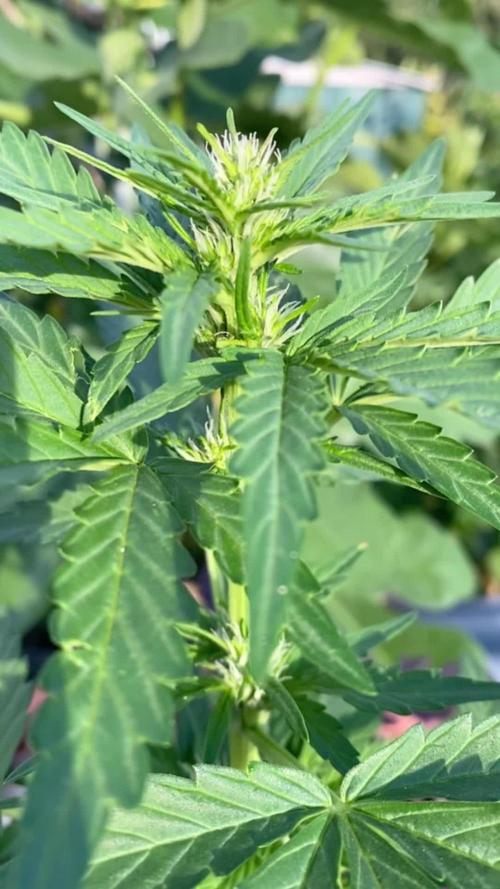
GSC BY KANNABIA
Week #21
Week #10 Flower
This is the last week for feeding the plant trichomes are about 50% clear 50% milky so it's about that time. This plant is a beautiful lady!!
Stay Growing!! Thank you for taking a look!!

Likes
93
Share


@Hou_Stone
Follow
🌱Here I am with 4 seedlings of this pretty strain.
It's so slow at the start of new crops...but these seedlings look healthy to me, I can't wait to see what they will have to offer me!🙏🤞
After a short week of growth I place my seedlings in their final 7Liters pot with a mixture that I made. I use unfertilized soil as a base.🌱
And I add organic nutrients from GreenHouseFeeding that I mix at the top of the pot (35Grams BioGrow 14Grams Biobloom).
Then I water each pot with 1L of water.💧
I use tap water. I lower the pH and sometimes add a little BioEnhancer😘
My Instagram 🌱❤️️ :
https://www.instagram.com/hou_stone420/
------------------------------------------
Equipment used :
Light FC3000 Mars hydro. power 25% at 30cm
Extractor 6 inch Mars Hydro. power 1/10. ON 24/24h
No other fan this week
Heating mat Romberg 95x95cm. ON half an hour every hour
👌
☄️🌠🌠🌠🌟
Have a nice day buddies, thanks for your visit 🙏👋

Likes
459
Share


@Ju_Bps
Follow
Hello my friends 👨🌾👩🌾,
This week was good,
I've started the training for the #1 and #2, and topped the #3
They are looking really happy and healthy 🌲💚
I've founded one thrips this week, I'll treat after banana will be harvested.
💦 I give water each 2 or 3 days
300/350 ml/plant
Water + rhizo + tera vega
Water + rhizo
Water + Rhizo + canazym
PH@6
Lamp is 100%
Thanks community for follow, likes, comments, always a pleasure 👩🌾👨🌾❤️🌲
Mars Hydro - TS 1000
https://www.mars-hydro.com/ts-1000-led-grow-light
Mars Hydro - FC3000
https://www.mars-hydro.com/fc-3000-samsung-lm301b-led-grow-light
Mars Hydro - SP3000
https://www.mars-hydro.com/sp-3000-samsung-lm301b-greenhouse-led-grow-light
The High Chameleon - Vannila T
https://www.thehighchameleon.com/shop/vanilla-t-5


Likes
13
Share


Likes
24
Share


@nijuana
Follow
I'm finishing
Flushed this week 2 time I'm waiting that the soil dry a little

Likes
15
Share


@Lordviper28
Follow
Plants have enjoyed the scrog net for support also had a nitrogen build happen with two of the red hot cookies but got it corrected and plants looking healthier

Likes
5
Share


@Mr_nugs_lover_David
Follow
Fantastic classic strain that I'll be growing this again, I've grown her 2 times in the past, love to see those Heavy indica leaves, gorgeous plant, didn't really stretched too much if you compare with the rest of the plants of this season, very discreet plant to grow outdoors, heavy producer that it's great to train and make a relatively short bush full of fat colas everywhere!

Likes
37
Share


@MrJones
Follow
MrJones Pink Sugar Breath F2 by VMAN - ViparSpectra XS2000 240W Infrared Full Spectrum LED Grow Light
´🌿⊱╮🌿╰⊰🌿 WEEKLY GOALS 🌿╰⊰´🌿╰⊰´🌿
🏡Indoor - 3"x4"x8" Custom Built Grow Closet
🌞Environment - 80F and 55% Humidity
🌾This strain likes to stretch during flower, so a heavy training regiment will be needed.
⚱️3-Gallon 📊5.8 / 6.4 PH
💧 Feeding / Dry Amendments using Mr. B's Green Trees ORGANIC BLOOM 2-8-6
🌞ViparSpectra XS2000 240W x2 Infrared Full Spectrum LED Grow Light
🕷️ IPM - We will be using Green Cleaner" 1 OZ per Gallon, and CannControl from Mammoth alternating between products each month for Integrated Pest Management.
🌿╰⊰´🌿╰⊰´🌿 PLANT UPDATES 🌿╰⊰´🌿╰⊰´🌿
📝 Notes - A good friend of mine gave me some of his crosses to test, please read below for his amazing details, I am very excited to see what I can accomplish with these genetics and my cannabis gardening approach.
╰⊰´🌿 ╰⊰´🌿 ╰⊰´🌿 ╰⊰´🌿 ╰⊰´🌿 ╰⊰´🌿 ╰⊰´🌿
🗓️ Sunday 11/20/22 Had a small problem with Fungus Gnats, used some Mosquito Buts to fix it, made a soil drench and and issue resolved. The plants are in their final weeks, and all that is left is for them to ripen, continue to fatten up, I have 3 purple Phenotypes and they look amazing!
🗓️ Wednesday 11/23/22 Lowered the H2O PH to 5.8 / 6.2, over did the last top dressing, wrong time for a little Nute burn, but the ladies are doing great!
🗓️ Friday 11/25/22 - Watered the plants last night, and tonight took a few pictures of few of the buds, they are looking amazing, the smell in the closet is just intoxicating!
╰⊰´🌿 ╰⊰´🌿 ╰⊰´🌿 ╰⊰´🌿 ╰⊰´🌿 ╰⊰´🌿 ╰⊰´🌿
Breeders Notes by VMAN
Pink Sugar Breath is a creation of Platinum Kush Breath x Pink Sugar cookies originally Bred by UFO Genetics.
Pink Sugar Breath F2 is the second filial Generation that was hunted and creates by Visions.
The vigorous cultivar takes 63 to 75 days to flower with various phenotypes. These phenotypes can express terpene profiles ranging from Bakery Dough, Sugar, Og Funk, Fruity, Gas, Dank, Chemical Floor Cleaners, and much more. Expect Purple and Pink Phenotypes to pop up fairly easily. Color starts to show within 7 to 8 days of flower for the purple and pink phenotypes. Green phenotypes have more of an OG Funk/Floor Cleaner presence
╰⊰´🌿 ╰⊰´🌿 ╰⊰´🌿 ╰⊰´🌿 ╰⊰´🌿 ╰⊰´🌿 ╰⊰´🌿
Likes
27
Share


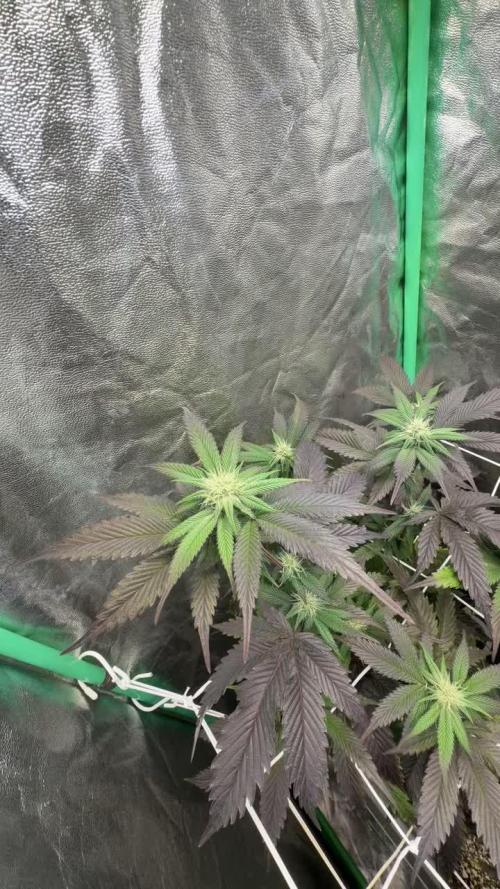
@Ganjagrandaddy
Follow
Day 76 Flowering: Ir seems we have a longer flowering pheno of the mimosa Lemon !!.
She is a huge bushy, heavy calyx laden monster!!.
It has been a roller coaster so far with this pheno of the strain. Watching the huge explosion of growth in the stretch period was amazing and I expected huge thick donkey dick colas like grows of others had shown so i was dissapointed for the majority of the flowering period with how she was progressing. Loose, Berry like patterns were all over the long stems so i knew it would be a "wait and see" ending but I now see the potency and beauty of these ripening classy looking queens. Up close ,her colours are really varied and bright with purples, reds, greens and the ripening fire brown pistils. I do not begrudge her another week flowering now and expect she will benefit from it .
Her smell is potent lemon/fuel now and very strong. Hopefully she will finish soon.
Be safe and well ..


Likes
14
Share


@MG2009
Follow
04/23/2022
I think lemon OG is done
Give her a few days more, Biscotti Skunk, grape skunk about 2 -3 weeks out, the Biscotti Skunk has very strong camphor mothballs smell. Not quite sure what to think of her hope buds fill out well. Grape Skunk is doing a bit better but lemon og has performed best in my specific micro climate, others have more flowering to.
If I'm going 63 days in flower it might as well be a Sativa variety.


Likes
15
Share


@AK1210
Follow
This lady is going from strength to strength following last weeks slug attack! I'm sure it may have slowed growth just a little while she was repairing the wound created by the slug munch.
The weather has been nice and consistent, all adding to the healing process and the low stress training encountered. 👍🏻

Likes
105
Share


@Hipichic
Follow
My experience overall can be best described as an interesting enlightening process. Since it was my first time growing it was definitely a learning experience. From the height being as tall as it was to the high winds in the area making it difficult to keep them from toppling when the buds were reaching full maturity. Thinking it would have benefited from more topping than just the once. The terps that this strain has are exquisite!! I am going to miss walking by them towering over me and just breathing in their berry cream aroma, taking in the sweetness like I had just had some dessert. Really enjoyed this strain and hope to grow it again sometime. Thanks for checking out my first grow 🌼💚✌️


Likes
6
Share


@Budking420
Follow
These girls are flowering super fast almost starting to ripen but I'm sure they'll swell more! Super excited to have this one done in a few weeks it's one of my favorite medical cultivars. The powerful fruitiness is surely a pleasant smell to take in although I reccomend a carbon filter if you live in tight quarters. Shes super happy without LST I learned as these are the last of 4 stranana that I have ran and LST once hurt my yield as I find it does have strong sativa genes. She likes to stretch out. Check back next week to see just how fast she buds! And remember its 4:20 somewhere!!!!!!!
Likes
13
Share


@GodZilla_Owner
Follow
I was able to identify the problem why the Bluedream grows so poorly. Some leaves had covered the substrate and mould had developed there.
I removed these leaves, loosened up the substrate and installed another fan. It actually took 7 days for the pot to become noticeably lighter, it was practically standing in water and hardly any air was getting to the roots.
The switch to flowering fertiliser also came too late. So all mistakes on my side that were caused by too much watering.
Nevertheless, they are continuing to develop well and I hope the end result will be reasonably satisfactory.