
Likes
Comments
Share


@grow_nerd420
Follow
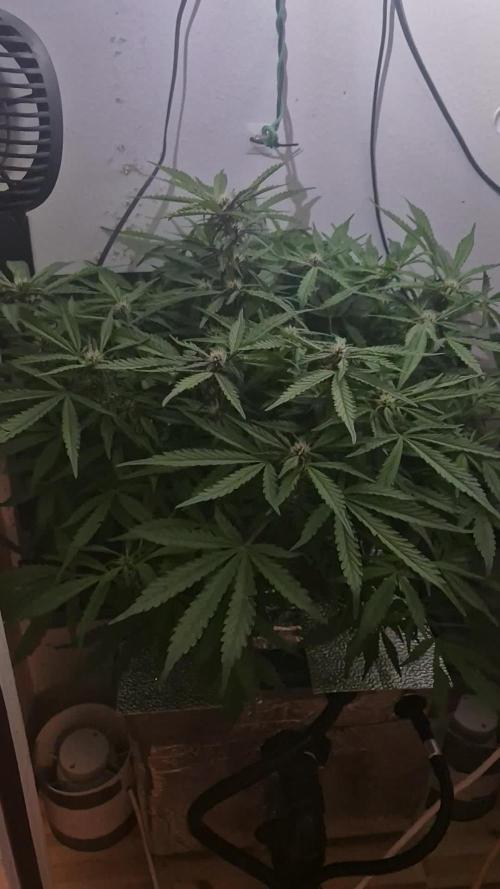
Just topped part of this beauties 🔥👌✌️
Put 2ml per l revive by Advanced nutrients
I've noticed that helps girls to recover After transplant & topping
This accually a week 3 of vegetation cuz i threat first 2-3 like seedling stage After germination stage😁😂🤪

Likes
8
Share


@buddhi_coop
Follow
I soaked the seeds for 24 hours in a mixture of BioAg Ful-power, 6.3 Ph water & aloe Vera. I then inoculated the soil with the mixture of ingredients I listed above. After that I placed the seeds 1/4” into the soil & placed them under the humidity dome after spraying them with my pump sprayer. Current temp is 75 degrees F & Humidity is 89%.

Likes
31
Share


@MrJones
Follow
MrJones VIPARSPECTRA XS1000 LED
📜 SUMMARY - I have been given the opportunity to run the next generation of LED lights by VIPERSPECTAR, the XS1000! I set up a Stealth Cabnient and moved 3 Cream Manderain Auto XL.s under these lights, the cabinet set up is automated with WIFI light controllers, and INKBIRD Temperature and Humidity Controllers, I am very excited about this opportunity!
Specs and Discount Codes Listed Below.
🔹🔹🔹🔹🔹🔹WEEKLY GOALS 🔹🔹🔹🔹🔹🔹
🌞Environment - 80F and 55%Humidity - using Humidfyer as needed.
💧 Feeding - Feeding with FOOP Canna Organic Nutrient Line
🍃Training / Super Cropped - and put 2 plants into a training hoop.
🕷️ IPM - Will be using Green Cleaner" 1 OZ per Gallon, and CannControl from Mammoth alternating between product each month for Integrated Pest Management.
💡 Vegetation & Flower (new) Viparspectra XS-1000 Release on March 15th.
🔹🔹🔹🔹🔹🔹🔹🔹🔹🔹🔹🔹🔹🔹🔹
📜 Week 9 and the buds are starting to get larger, thining I may have to clean up a few more fan leaves. great combination of Lights, Nutrients, Environment, and Strain.
🔹🔹🔹🔹🔹🔹🔹🔹🔹🔹🔹🔹🔹🔹🔹
▶️Monday 04.19.21 / Feeding about 20 ounces
▶️Tuesday 04.20.21 / Feeding about 20 ounces
▶️Wednesday 04.21.21/ Feeding about 20 ounces and defoliated a few leaves today! The buds are just getting so frosty and sticky!
▶️Thursday 04.22.21 / Like most auto-flowering plants, these Cream Manderain Auto AL's like just a bit fewer nutrients, I found the sweet spot, and these Foop nutrients are just rocking it, I added some pictures so you can see the early frost development.
▶️Friday 04.23.21 / Feeding about 20 ounces
▶️Saturday 04.24.21 / Feeding about 20 ounces
▶️Sunday 04.25.21 / Feeding about 20 ounces
🔹🔹🔹🔹🔹🔹🔹🔹🔹🔹🔹🔹🔹🔹🔹
VIPARSPECTRA XS1000 LED
🔹🔹🔹🔹🔹🔹🔹🔹🔹🔹🔹🔹🔹🔹🔹
Amazon US:
XS1000 10% off: in10MrJones http://yx-8.cn/0y-6
XS1500 5% off: in15MrJones http://yx-8.cn/0yA
XS2000 5% off: in20MrJones http://yx-8.cn/0y2Y
XS4000 5% off: in40MrJones http://yx-8.cn/0y5k
Amazon Canada
XS1000 10% off it10MrJones https://amzn.to/38udUVe
XS1500 5% off: it15MrJones https://amzn.to/3esVUyr
XS2000 5% off: it20MrJones https://amzn.to/3l5zAfg
XS4000 5% off: it40MrJones https://amzn.to/3l7k5Uj

Likes
2
Share


Likes
Comments
Share


@0ldToby
Follow
The blueberry gelato was great, cured up lovely, got me nice and high.
The cannacotta was decent, not my favorite, got me very high but the flavor wasn't there.
The slurricane was kind of bland to start with but cures up lovely, wasnt my first choice of smoke though.
The blue cheese was classic blue cheese, might have let it go too long though, didn't find any herms in there but 2 plants went to seed.
The zookies was amazing, definitely my favorite from the crop, buds nice and dense and after a short cure it was a stinky one.

Likes
16
Share


@DeepWaterGrower
Follow
🗓️ WEEK 5 / DAYS 29-35 (flo)
💧 There were no changes to the nutrient solution this week, maintaining EC 2.0 - pH 6. My main action has been topping up the reservoir with 5 LT of this solution every two days.
🌱 The stretching phase concluded this week, with the plant reaching her final height: 69 cm. She is now focusing on filling out her flowers, and her foliage is taking on a noticeably darker hue, typical for the later stages of flowering.
At this point, there's less active work to do; the focus shifts to maintaining stable environmental parameters and ensuring the pH remains in the correct range to avoid stressing the plant.

Likes
63
Share


@DogDoctorOfficial
Follow
And like in every grow things get to an end, and this one is no exception to that rule, did not yet end but is pretty dam close from it, gave her a last and only defoliation so far, this will help me in a few days wen i harvest her, and for now she looks way more beautiful to my eyes, man she did turn out outstanding , i mean, the looks, the smells , the over all everything this one is a champ.
Love her Xmas tree kind a grow with a beautiful and modestly gigantic main cola, covered in beautiful and colorful trichomes, that glue to anything they touch living a complex and unique fragrance that follows you wherever one goes, she is a delight thats for sure.
Not much to do besides observing this Queen Mama and wait for her to tell me she is ready to came down <3 <3 <3
As always thank you all for stoping by, for checking my journey , for the love support and for it all, i am blessed and humble with you all.
Just a reminder , all i grow is medicine for myself, for me and for my best friend with is me nothing to sell, so don’t even ask.
All info and full product details can be find in can find @
https://ganjafarmer.com
https://aptus-holland.com/
#aptus #aptusplanttech #aptusgang #aptusfamily #aptustrueplantscience #inbalancewithnature #trueplantscience #Ganjafarmer #growerslove
With true love comes happiness 💚🙏 Always believe in your self and always do things expecting
nothing and with an open heart , be a giver and the universe will give back to you in ways you could not even imagine so 💚💚💚
More info and updates @
https://growdiaries.com/grower/dogdoctor
https://instagram.com/dogdoctorofficial
https://youtube.com/channel/UCR7ta4DKLFMg2xxTMr2cpIg
💚💚💚Growers love to you all 💚💚💚

Likes
11
Share


@WeedM8
Follow
The way flowers are pumping is beautiful 🤩 starting to make some sirius progre

Likes
7
Share


@FrecheOma60
Follow
Insane color, insane structure, insane sugar and some very intense smell.
They are nearly ready its only about some days maybe 3-4 days until harvest i guess.
Only watering with plain rain water, dont actually flush but put the clear water into my tent so they take a bath.
My next update is when they are dry

Likes
4
Share


@Midge
Follow
Much better harvest to end this first greenhouse grow. 48g dry on this plant. Still quite airy, but resinous and great smell. More relaxed effect than harvest 1.
I could have done with another week or two with her, but the humidity was regularly into the 90s, there was very little sun and nearby tomato plants were starting to grow mold. I cut and ran, I need these meds to get me through the winter.
Final total for both plants 59g. With a bit of luck, this should keep me medicated for a while. Indications are good.

Likes
9
Share


@Canadian
Follow
Day 50 and the plant seems to be growing very fast very strong .not too much leafs which is a relieved and very nice for light penetration but be aware with the flowering stretch if your lack of Headroom other than that the plant seems to be growing without any problems developing a very lovely smell.
Day 53 I have to Super crop several branches Unfortunately they were growing straight into the light becoming burned by the intense light I hope the plant doesn't react to bad to HST and still deliver awesome buds. Also I will stop to give her any nitrogen nutrient like the micro and the grow and I will only gave her the bloom and other additives when I feed.
Thank you for reading I will continue to update have a happy grow

Likes
29
Share


@Hasard
Follow
Starting week 6
Tent is being slowly full
A little bit too hot for the next days as the weather outside will climb to 36-38°C, I thnk I will bring them some CO2. I will check with the growshop. Any idea is welcome.
The stretch is really impressive, 1 of them get 20cm in 7 days
Waiting for the buds 😁
Day 39 I have now added CO2 with an organic boost, it is linked it to the fan. Should be a little bit better with that temperature


Likes
6
Share


@Floryx
Follow
-was on vacation for a week
-plants got watered every other day by my sister
-noticed some spots on leafs as well as yellow leafs
-defoliated some yellow leafs and leafs that didnt get enough light
-put the light on 12/12 today and will start with biobizz in a few days
-Whats does the spots on the leafs mean?
Happy about every comment :)


Likes
10
Share


@RookieGrower65
Follow
Day 95 harvest of last 2 of 4 plants. 10 days after first two were harvested. BB1 and GG1 seem to have denser buds than BB2 and GG2. I think the yield will be greater also. First two plants dried for 6 days at 45-50 RH and 65-70F and put into quart Mason jars with humidity meters and pouches at 62 RH. Once second two have dried, will update dry weight for all 4 plants in Harvest week.

Likes
7
Share


@cwgrows
Follow
Fimming was a success! 3+ main branches on each lady now. Crazy seeing how fast they respond to this type of treatment. The nutrients in the soil have likely run out by now so I am started to feed using the Fox Farms trio at half strength every other watering.


Likes
25
Share


@DrGanj
Follow
Started flush now. I'm adding Nature Delight Active Sugar Boost as it's been recommended to boost terpene production. No idea if it will work this late into flower but trying anyway as apparently it has no need to be flushed and is fully organic.


Likes
90
Share


@OrganicNature420
Follow
Germination date 🌱 29/11/2021
Day 84 23/02/2022
Strain 🍁 SinCity seeds Frosted Biscotti
(Biscotti Sundae x Whitenightmare)
THC% • Unknown
💡 Mars Hydro FC-E6500
• Power draw 650W + 5%
• Max coverage 5 x 5
• LED 3978 pcs high quality chips
• Max Yield 2.5g / watt
• Noise level 0 DB
• Removable Driver & Light bars
• Daisy chain
• Fast cool system
https://marshydroled.co.uk/ 🇬🇧
PROMO CODE • (organicnature420) DISCOUNT
https://www.mars-hydro.com/ 🇺🇲
PROMO CODE • (ORG420) DISCOUNT 👍🏻
⛺ Mars Hydro 150 x 150 x 200cm
📤📥 AC infinity 6inch
💧 10lt dehumidifier
❄️ 3.1kw air con system
💉 Nutrients Living soil (dry amendments)
Grow
Bloom
Bloom2
MycoBoost
Barley
🌱 Growing Media • Soil
Notes 📝
Faster improvements by lowering temps. Terpine production on point 👍🏻 a little behind the coco girls but not enough to worry about. Little feed of greenbuzz and bat guano 🌱💚
Discount codes in bio for Mars hydro

Likes
9
Share


@BLAZED
Follow
Week 9 (12-8 to 18-8)
12-8
Temps: 22.2 to 29.1 degrees
Humidity: 47% to 61%
Watering: Both 1500 ml.
Dry Weight #2: 2.5 kg. #2: 2.5 kg.
13-8
Temps: 23.8 to 28.6 degrees
Humidity: 57% to 70%
14-8
Temps: 25.1 to 29.8 degrees
Humidity: 56% to 65%
I found out that i had the timer on 16/8 instead of 18/6 for the entire 9 weeks.
Maybe this is the reason why the plants dont grow that fast.
15-8
Temps: 24.8 to 29 degrees
Humidity: 46% to 66%
Watering: Both 1500 ml.
Dry Weight: Both 2.5 kg.
Today is the first watering from the bottom.
Also removed some leaves.
16-8
Temps: 24 to 28.4 degrees
Humidity: 49% to 68%
17-8
Temps: 20.4 to 26.3 degrees
Humidity: 45% to 79%
18-8
Temps: 21 to 28.3 degrees
Humidity: 40% to 59%
Watering: Both 1500 ml.
Dry Weight: Both 2.7 kg.
Did some mainlining/scrogging
