
Likes
Comments
Share


@eldruida_lamota
Follow
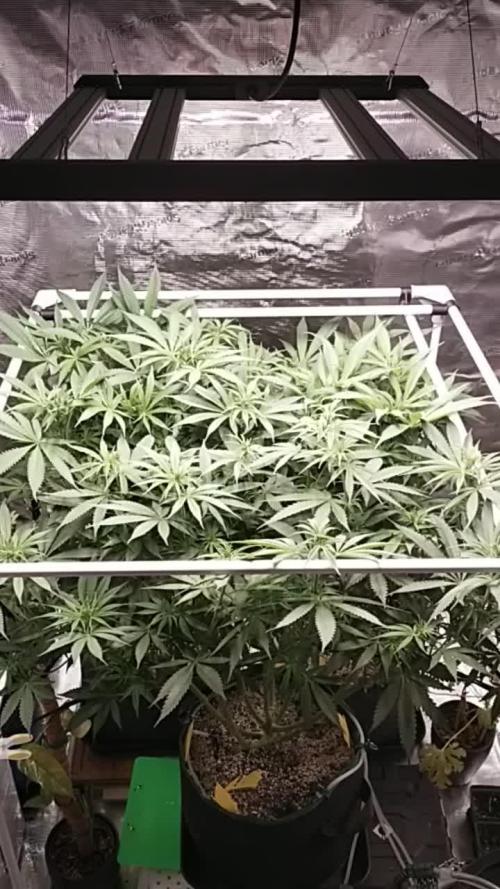
Vamos familia, estamos en la séptima semana de floración con estas Purple Og Kush de DutchFem.
Las vemos con un buen color, bien sanas y van engordando y progresando correctamente.
A subido un poco la altura pero no afecto tanto, ya imagino que seguiré dándole de comer porque pedir piden, una semana más por lo menos.
Agrobeta:
https://www.agrobeta.com/agrobetatiendaonline/36-abonos-canamo
Mars hydro:
Code discount: EL420
https://www.mars-hydro.com/
Las maximas de temperatura no superan los 26 grados y las mínimas no bajan 20, así que no me puedo quejar.
Los niveles de humedad también son los correctos van entre 50%/55% de humedad relativa.
Por supuesto el Ph lo estamos dejando alrededor de 6.
Hasta aquí es todo, buenos humos 💨💨💨.

Likes
4
Share


@Mr_Pgrow
Follow
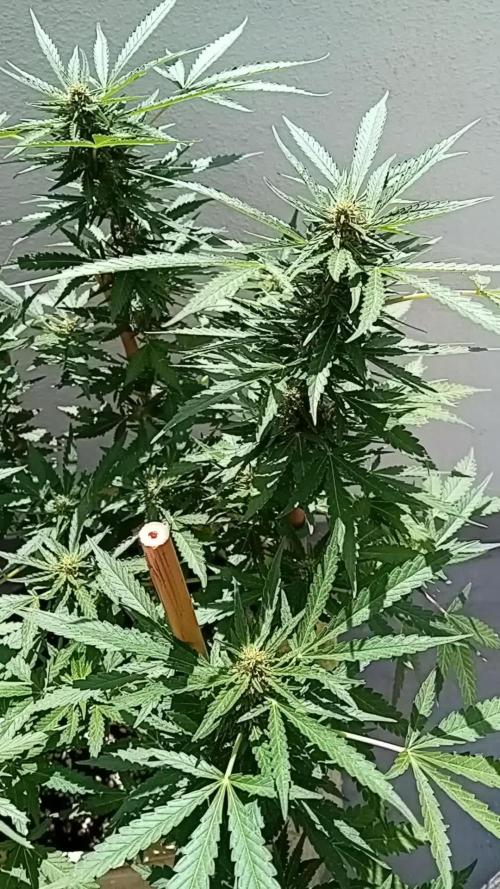
Time for chop down, I know it won't be a big harvest, but I don't mind. Not really after yield, just good quality herb.
The beautiful pungent yet subtle fruity aroma excites the cuoristy in me and I can't wait to try her.
Follow me:
https://www.theweedtube.com/user/Mr.PersonalGrow
Likes
61
Share


@Grey_Wolf
Follow
Sensi seeds Jack Herer 10 weeks of veg completed 11th Feb 2020
Hopefully this will be the last week of vegetation and this girl starts to flower because I have ran out of room to train her . I managed to get her to cover the entire circumfrence of the pot and then some, using a combination of LST and HST . I also did the last topping about 10 days ago and won't be doing any more.
The soil must still be very fertile as the plant itself looks really healthy and lush. Only water was given as I still haven't got around to extracting some worm castings from the worm farm. But it'll happen and when it does this girl will get half a kilos worth which I am sure she will appreciate.
Also apart from the odd bite mark on a leaf the plant has remained pretty much insect free as far as pest insects are concerned. I put this down to the Companion Coriander
plant that has been coexisting beside my Jack herer girl right from the start . Apparently most bugs dislike coriander and will purposely avoid it which is a win win for both plants. Thankyou for reading this weeks update and I will return next week hopefully with reports of Flowering beginning. 👍

Likes
36
Share


@MadeInGermany
Follow
Hey everyone 🤗.
Today they were planted in their 11 L pots 😀.
Now the root growth can really accelerate.
When repotting, a total of 3 g per liter of Green House Powder Feeding Bio Grow was added to the Canna Coco 😊.
That's enough for 8-10 weeks :-).
I'm curious what they are doing this week and I wish you all a lot of fun with the update :-).
Stay healthy and let it grow 🌱🍀
You can buy this Strain at :
https://sweetseeds.es/de/sweet-skunk-f1-fast-version/
Type:
Sweet Skunk F1 Fast Version
☝️🏼
Genetics:
Sweet Skunk Auto (SWS34)
X
Early Skunk
👍
Vega lamp:
2 x Todogrow Led
Quantum Board 100 W
💡
Bloom Lamp :
2 x Todogrow Led
Cxb 3590 COB 3500 K 205W
💡💡☝️🏼
Soil :
Canna Coco Professional +
☝️🏼
Fertilizer:
Green House Powder Feeding
☝️🏼🌱
Water:
Osmosis water mixed with normal water (24 hours stale that the chlorine evaporates) to 0.2 EC. Add Cal / Mag to 0.4 Ec Ph with Organic Ph - to 5.5 - 5.8 .

Likes
6
Share


@Organic473
Follow
It's flowering time or breeding time lol...Welcome the pre flowering stage I can't wait to cross her with the SKUNK #1 pollen. So far she I looking good.
Likes
69
Share


@DogDoctorOfficial
Follow
Eternity Grow Cup - Week 11 VEG Report
This is a pivotal week in our Eternity Grow Cup journey as we wrap up VEG and prepare to transition into FLOWER. Our goal has been to ensure that the plants are thriving and optimized for the next phase. This report will detail everything that took place during this crucial week.
Mass Defoliation & Structural Training
We began the week with an extensive defoliation session. Every leaf with a stem was removed to clear space for optimal light penetration and airflow. This process was done mostly by hand, clicking them off in the opposite direction of growth, while some stubborn ones were snipped with scissors. By the end, it felt like we had taken out nearly half a kilo of leaves! The room now looks clean, structured, and ready to fill out the ScroggNet.
To further enhance the plant structure, branches were attached to the pots, allowing for better horizontal growth. This technique helps maximize canopy exposure and prepares the plants for even light distribution once flowering begins. Defoliation before flowering is a key step as it reduces overcrowding, improves airflow, and sets the plants up for efficient energy use in the next phase.
Light Schedule & Adjustments
This week, we introduced a subtle but effective light adjustment. While still maintaining an 18-hour light cycle, we initiated a 15-minute delay with the whites, allowing the reds to start first. This gradual shift signals the plants that a change is coming. Similarly, at the end of the light cycle, the whites turn off 15 minutes earlier, leaving the reds on for an extended period. This strategy mimics natural sunrise and sunset, helping the plants transition more smoothly into flowering.
Additionally, at the end of the week, we will be implementing 48 hours of darkness before the official flip to flower. This method has worked exceptionally well in past grows, helping plants recognize the transition and encouraging a strong start to flowering. However, it's important to emphasize that this is a personal technique and not a universal rule. Every grower should experiment with different methods to find what works best for their specific environment.
Environmental Conditions & Challenges
Currently, our temperature is at 27°C with 60% humidity, resulting in a VPD of 1.50. While slightly higher than the ideal for VEG, our CO2 levels are over 1000 ppm, and the light intensity is at 570 PPFD, making it a manageable balance. The solution pH is 5.79 (essentially 5.8), EC is 1.38, and water temperature is 17.7°C.
One challenge we are facing is maintaining optimal reservoir temperatures. Currently, it's a bit low at 17.7°C, and we are exploring solutions to raise it slightly. However, the medium temperature sits at 22.2°C, which is a good range. The humidifier is still in use, though it struggles to increase humidity further, so we are working with what we have to keep the VPD in check.
ICL-300s Integration
The ICL-300 lights are now fully active. Unlike the last grow, where we introduced them later, this time they are on from the start of flowering prep. This adjustment is an experiment to see if the plants respond better to an early introduction. Learning is at the core of this journey, and each grow offers new insights. Whether this proves to be the optimal strategy or not, it will be a valuable lesson for future grows.
TrolMaster Hub & Data Monitoring
Throughout the week, we have been closely monitoring our grow using the TrolMaster App TM+. We are displaying some of the collected data for everyone to see the details. Stay tuned as we explore this further in the next report!
As always, we want to extend a huge thank you to our sponsors and the amazing community. Special thanks to Aptus, Groovebags, Cannakan, Promix, Ziggy Papers, TrolMaster,and Plagron, Zamnesia and Grow Diaries for making the Eternity Cup possible.
I apprecilove the support from all sides—lovers, haters, competitors, and fellow growers. The competition continues to push us to improve, and i am thrilled to see the incredible reports from others. This is a challenging yet rewarding experience, and i couldn’t be happier to be part of it.
For those following along, we invite you to check out our YouTube channel, where we upload full 4K episodes showcasing the entire journey. Some episodes are too large to be uploaded directly to Grow Diaries, so YouTube is the best place to catch everything in high definition.
This marks the end of VEG, and we are officially ready to flip to FLOWER. Next week, we will dive into the TrolMaster System in action, check the data insights, and monitor how the garden adapts to the shift. Stay tuned!
Growers Love to all, happy growing, and best of luck to all competitors!
See you all in the next update!
Genetics - Runtz https://www.zamnesia.com/6000-zamnesia-seeds-runtz-feminized.html
Nutrients - Plagron https://plagron.com/en/hobby
- Aptus Holland https://aptus-holland.com/
Controls - Trol Master https://www.trolmaster.eu/
LED - https://www.futureofgrow.com/en
LED - https://www.thinkgrowled.com
Soil - https://www.promixgardening.com/en
Germination - Cannakan https://cannakan.com/?srsltid=AfmBOopXr-inLXajXu3QFgKXCXXos4F1oEvScjMKIB5MR5dk8-GJ-F49
DOGDOCTOR 15% off
Smoking Papers - https://ziggioriginal.com/
Terpene saver - https://grovebags.com/
As always thank you all for stopping by, for the love and for it all , this journey of mine wold just not be the same without you guys, the love and support is very much appreciloved and i fell honored with you all in my life
With true love comes happiness Always believe in your self and always do things expecting nothing and with an open heart , be a giver and the universe will give back to you in ways you could not even imagine so
As always, this is shared for educational purposes, aiming to spread understanding and appreciation for this plant. The journey with nature is one of discovery, creativity, and respect. Let’s celebrate it responsibly and continue to learn and grow together!
Growers Love To you All 💚
#EternityGrowCup #RuntzHunt #GrowersLove #CannabisCommunity #AptusHolland #ProMixSoil #TrolMaster #Zamnesia #Plagron #ZiggiPapers #Grovebags

Likes
13
Share


@Selkot
Follow
.
Hey all 👋
Here we go for a second diary
I received several seeds as gifts (thanks FB), and I still have some room left in my tent, so I'm adding 1 Banana Purple Punch in an 8L pot.
The germination week went wonderfully!
The baby girl has joined her big sisters; we'll see how she does in a pot that's half the size 😉
more vids ? 👉 https://www.youtube.com/channel/UCtAGX0oCBY92aj3VJCG5q-Q

Likes
41
Share

@MadeInGermany
Follow
Hey guys :-)
A lot has happened this week :-).
She has developed very well.
Today it was topped on the main shoot for the first time.
How often I will use topping on her, I make it dependent on how everyone else develops.
I want to bloom soon so it won't happen very often :-).
It was poured twice this week with 1 l each time (for nutrients, see table above).
Fast plant spray from GBL was applied 2 times this week.
New was added this week Fast Bud from GBL is preparing her for the coming flowering.
Bio Grow Stay away for a while because the substrate is 30-50 % consists of fresh earth and the ladies are nice and dark green :-).
Today there was another spray with neem oil against the remaining tripse which I will repeat one last time next week.
As always, everything was cleaned and checked.
Have fun with the update and stay healthy 🙏🏻
👇🏼👇🏼👇🏼👇🏼👇🏼👇🏼👇🏼👇🏼👇🏼👇🏼👇🏼👇🏼
You can buy this Nutrients at :
https://greenbuzzliquids.com/en/shop/
With the discount code: Made_in_Germany you get a discount of 15% on all products from an order value of 100 euros.
👇🏼👇🏼👇🏼👇🏼👇🏼👇🏼👇🏼👇🏼👇🏼👇🏼👇🏼👇🏼
You can buy this strain at :
https://www.exoticseed.eu/
Water 💧 💧💧
Osmosis water mixed with normal water (24 hours stale that the chlorine evaporates) to 0.2 EC. Add Cal / Mag to 0.4 Ec Ph with Organic Ph - to 5.8 - 6.4
MadeInGermany

Likes
53
Share


@Schnabeldino
Follow
The buds have developed very well this week.
I had to run the dehumidifier for a few days because it was too humid for me. I had had experiences with mold and therefore preferred to be more careful
I am very satisfied... The gorillas already look very sticky and shine silver, like a silverback gorilla.
The Honey Cream looks like I remember it...very fluffy and hairy calyxs
---------------------------------------------------------------------------------------------------
Controller AC Infinity Pro
- connector for the external light control, RJ-12
- 2 plugs with which I can control dehumidifier and humidifier.
- 2 fans run 24/7, 1 Oscillating from spider farmer
Light - 12/12 h
PPFD - 900-1000 µmol
VPD - 1,3 - 1,6
week average
RH: 54,8 %
Temp: 24,2 °
VPD: 1,38 kPa


Likes
84
Share


@Smokwiri
Follow
Wow, looking great, buds have taken shape and can start with filling up a bit. This Mars Hydro light is amazing, the buds are quite big for week 4.
Cant wait to see next weeks development.
The boosters name is Pro Bloom, most have new names in europe, same company, different names


Processing
Likes
49
Share


@Guerilla_Jack
Follow
Hello growers!! I bend the main branches down.Side branches are spreading nicely.. Everything looks fine for now.Nice green day too you all😁


Likes
16
Share


@Foggedaboudit
Follow
One more week I reckon for the early one and a couple more for the rest! The smell is so loud!
Likes
9
Share

@TheGreenfulOne
Follow
The stretch is slowing down, and the first pistils are appearing across the canopy. The SCROG net is full and the lollipoping has significantly improved airflow.

Likes
3
Share


@DeeDeeKushner
Follow
She has stretched a lot more than I thought she would! Day 18 of flower and I believe we’re done stretching from here on out. I defoliated a bit so some of the lower bud sites can absorb some light. Also gave her some nutrients this morning. Onward to week 10 ✌️🏾

Processing
Likes
8
Share

@eldruida_lamota
Follow
Que hay familia, yo con muchos dolores de cabeza esta variedad es difícil de cojones, piden mucho alimento, han ensanchado bastante así que me toco hacer poda de bajos que no me gusta nada.
También estoy al ojo por que me huele a hermafrodita una de ellas, no me hagan caso el cultivo anterior salió top y ando todo el día fumado... pero no es el caso.
Nuestras green ak son bastante sensibles a los cambios de temperatura y bueno, no se la recomendaría a medir principiante si no más a gente con varios años de experiencia para poder sacar lo mejor de ellas.
Ph controlado 6,5 no fallamos en eso ni en el alimento ya veremos próximamente como avanza saludos familia.


Likes
22
Share


@wheedtobeus420
Follow
Day 14 she’s loving life. I learned our ph was coming out at ph 8.5 or over so we got that handled and since she’s exploded. I’ve very excited to have her in the arsenal again.
Likes
2
Share

@MaltaHerbman
Follow
Day 1 of the 4th week in flowering time to start pk 13 14.
So far had spray neem oil 2x a week at night and happy with results plants looks enjoy the plagron nutrients and our sun.


