The Grow Awards 2026 🏆 


Likes
Comments
Share
@GR0WER
Follow
New week starts
__________
🌞26.04
It's a first day of pre-flowering period today. I've changed schedule to 12/12hrs and turned on third 100w lamp. (This is not entirely correct, because I'm using one and a half 200W lamp. There was no room for two of them and I was forced to cut one of them in a half)
My babies started to grow dramatically fast after flushing two days ago and i decided to do one more particial defoliation procedure. Now a yong branches they grew has more light and space wich should help them to produce more flowers.
Spraiyed all four with 'Sea Weed' and prepared to feel a strong smell after a few days (if You know what I mean 😉).
I'll flush them with 'FloraKleen' solution tomorrow to outwash saults, then start to feed them in a 'Pre-flowering' mode.
🌞27.04
Nothing today except 'SeaWeed' spraying. I decided to not flush my plants today, because the soil is still too wet. I'll do this procedure tomorrow in the morning (when the lights will turns on).
Girls are growing dramatically fast now, especially 'Hulk Berry' wich was the smallest. It dobled its volume in one night!
🌞28.04
I flushed my plants with 45 litres of 'GHE FloraKleen' solution in 3ml/l retio.
It was a success!
Drenage EC fall from 1.9 to 0.9 (from 1850ppm to 800). Now I'll wait four or five days before watering to soil dry.
Also, I spraiyed them with 'GHE Sea Weed' as usual.
'RG'#1 leaves already toching my box wall, but I am afraid to defoliate it once more to pervent male flowers developing because of a big stress on pre-flowering period.
🌞29.04
All four plants are growing faster then ever after "GHE FloraKleen" flushing. Their leaves became 1.5 times wider in one night! Even 'HB' miniature leaves are spredding out in size.
I spraiyed them with 'G.H. Protect' today.
🌞30.04
My plants crones are too thyck. They're asking for one more defoliation, literally. I'm still afreid to do this. Maybe I will do this a few days laiter when I'll water them. Till then I'm only bending big leaves under the top of a branches.
'G.H.Protect' spraing and that's all for today.
🌞01.05
Nothing for today. Even no spraying.
My grow box is in the 'stealth' mode (hidden in the wardrobe-looking shell) so there will be no photo today. It's too difficult to open it, ecpesially there is no sense to do this just to take a picture. I'll water my plants tomorrow, so there will be an update.
🌞02.05
No watering today, the soil still too wet.
I made one more defoliation instead. Almost half of a crones were cutted (big old leaves and some lowest branches). I think it's a good thing, because there were alot of new branches and no light reaching them. Now light goes toll the very bottom of my plants, forcing small yong leaves to grow quicker.
___________
Week ends.

Likes
4
Share
@handsammich
Follow
Definitely would’ve been better had I not moved but nonetheless it was a great run overall, super frosty and sticky with not very dense buds which made for a difficult trim but I didn’t mind.

Likes
Comments
Share
@TnA_homegrown
Follow
Single plant autoflower harvest. Super happy with the smoke and this is our 2nd autoflower and will be doing LST on future runs

Likes
20
Share
@CanadianFillmore
Follow
Start of week 3 of flowering for plants 2 & 3. They are showing signs of heat stress, three days last week temps in the grow room reach 35°c. Aside from some heat stress, the plants still look healthy and the bud sites are developing nicely. Light defoliation of each plant, removing the dying leaves and some of the ones showing signs of dying.


Likes
193
Share
@Mr_und_Ms_Lue_Roots
Follow
Hallo liebe Gartenfreunde,
Ein aufregendes Tagebuch geht fast Glücklich zu Ende. Alle eigen erwarteten Ziele wurden zwar nicht vollständig erreicht, Strainbedingt werden wir aber nicht noch mehr Energie dort hineingeben egal in welcher Form. Die Buds sind zwar schön fest und ansehnlich groß (hier bei Höchstleistung 400 Watt) aber insgesamt nicht ganz unser. Die Buds sehen fast identisch aus wie bei der crop Mutter aus dem letztenJahr. Die unterschiedliche Anbaumethode lässt jedoch keine genauen Schlüsse zu, was das vergleichen betrifft. Das Autopot System hatte jedoch zu anfang Probleme mit der Kappilare, wahrscheinlich daher da der Pott erst verspätet in das Autopot System kam und auch etwas zu trocken war. Sie sind ja vom Balkon draußen, in den innenbereich gezogen.
Ja ansonsten haben wir sie schön über 7 Tage gespült und über Kopf aufgehangen. Die Trichome sind von der Reife her soweit akzeptabel. Wir konnten einige Erfahrungen gut schreiben. Wir wissen jetzt was bei nur 400 Watt circa rumkommt. Da es ein auslaufgrow ist, haben wir Absichtlich aufgrund der Strain und vorereignisse nicht soviel Energie in sie investiert. Wie schon mal angemerkt, hatte sie auf den letzten Metern durch Stress angefangen ab und zu ein Samen zu produzieren. Wir haben nie einen Pollensack gefunden. Aber sie genau wie die Haupt- Mutter hatte diesen Mangel in der Blütephase aufgezeigt. Aber wir hatten durchweg kein Stammschimmel, was aussagt, das wir sie vegetaionsmäßig ein stückweit regenerieren konnten. Augenscheinlich sind auf manchen Mainbuds 4- 5 Samen verteilt zu sehen. Hoffen wir mal, dass es nicht schlimmer ist wie es gerade den Anschein bis hierher macht. Hätte aber auch definitiv noch wilder ausgehen können über solche ein Zeitraum. Ein paar andere pflanzen hatten wir ab und an mal betreut 😅
Ein bissen haben wir noch mit der Kamera einfangen können.
In diesem Sinne pünktlich gestern zum B-day (des männlichen parts) geerntet. Egal wie, ein tolles Geschenk

Likes
13
Share
@GrowerGaz
Follow
Had some issues with mildew this week so have been defoliating and spraying with water and h2o2 , added more wind .
After three days this has not solved the problem , so had a friend round with his cleanlight uv-c lamp. Hopefully this will clear the problem, caused by bringing the monster Skittles inside from the back garden.


Processing
Likes
6
Share
@Jack_Greenstalk
Follow
3 Plants. 3 citrusy phenos!
#1 : First to sprout rapid rooter. TASTE: Pure Lemon front end into hashy cakey afghani. refer to this as the "lemon hashcake" phenom very dense, beautiful nug structure. Yielded 24.5 dry grams of primo smoke. Uplifting more cerebral sativa high with some punch in body as well. happy stress reliever for sure! has some "gassy" or fuel notes to it but very subtle
#2 Tangerine pheno: I orginally thought sour 76 was sour diesel x 76 Afghan til i read hso marks post on uk420 forums saying its cali sour d x 76 afghan. cali sour d is cali orange x sour d x mexican sativa. and it shows in this pheno which smell and taste pretty similar to tangie my friend grows which is cali orange x skunk 1 (mexican sativa x Colombian sativa x afghan indica) pretty similar genetics roots! Smell: Sweet tangerine 🍊
Taste: Just like tangerines 🍊
Medical Effects: Hybrid feeling effects felt both in body and mind. Stimulating mentally, relaxing in the body. Mild pain relief generally with amazing relief improving feeling in joints (reduced swelling or irritation in otherwise aching areas, loosened tension at joints)
Notes: After breaking up or grinding the sweet tangerine open jar/bud smells turns more sour tangerine with very subtle gas aroma. This one is scary strong! I am an all day regular smoker of the most potent buds I can find, and I never make it thru 1 bowl of this without long breaks after each hit. Starts off strong and creeps to EXTREME psychoactivity. Not for the faint of heart this one might not be best for "new smokers" 😎🔥🔥🔥 yielded 26.1 grams if id have taken clones this woulda been the keeper of the batch, but I got more to check out in future run :) and I got a cloner and veg chamber to start keepin the keepers now I know i like the strain!
#3 Lime Fuel pheno: Smell: Lime🍈 and gas ⛽
Taste: lime
Medical Effects: Cerebral uplift. Creeper. thought it was weakest on initial smoke but 10 minutes in it end up being strongest high of all 3. super wicked sativa, buzzy uplifting all similar to Cinderella 99 or strong jack herers this has almost a "scary high" first few times but once you get used to it or microdose, it is a super fun creative medicine. Helps my arthritis pains and gives me the clean up the house kind of high
Notes: Foxtailed, lowest yield of 3 sour 76's likely because its place directly under the light (perhaps didnt like too intense direct light) but is the most potent of the 3 as well. yielded 22.5 grams of dry


Likes
48
Share
@CrazyHorse
Follow
So the last week has finally arrived. The girl is fully mature, she dazzles with colors and has a wonderful scent that I have never felt before and it is difficult for me to compare it. Tomorrow I'm starting to dry this beauty :)

Likes
Comments
Share
@KcKoolaidMan
Follow
These were a big few weeks the buds realy stacking on. Starting to look nice and get some smell.
Water still 6.5 and using the spiderco drip system.
Phtontek still at 75%
Processing
Likes
70
Share
@CBD_Sweden
Follow
@MephistoGenetics,
Hi all the happy people here in GrowDiaries.
This is my second cultivation ever and it will be fun to try a bigger space than my closet grow.
First, I'm just going to say I'm done with the construction of my new growroom.
The room is 2.14 meters by 1.7 meters and has a ceiling height of 2 meters.
It provides a floor area of 3.6 square meters.
I use a 54 Watt Lightwawe T5 for germination and 2 Pcs 400 Watt HPS lamps.
I have a channel fan that replaces the room air about 40 times an hour to get a comfortable environment in the room, the air enters a fresh air intake from the outside.
The air is purified through a carbon filter to then leave the room to the rest of the basement.
Then I use that heat to heat the rest of the basement.
I will use 10 pcs 15 liter Autopots to grow with and a 100 liter water tank that supplies the pots of water and nutrition.
I will grow completely organically in soil and will watercure my buds to get the best possible medicine for me.
But there are no cultivation rooms to be displayed here, so I continue with what is most important.
I am very excited to see how the new growroom will work and how this Illuminauto 21 - Sour Crinkle will turn out.
Illuminauto 21 - Sour Crinkle (Grape Crinkle x Sour Crack)
Two of our fastest and frostiest varieties collide to make a sweet and sour delight!
Expect super frosty, compact nugs that won't be a toke for novices.
Destined to be a great strain for extraction work too!
Plant size - Small - Medium
Cycle time - 60-65 days from sprout
Indica/Sativa - 80/20
Frost level - Extra Ridiculous
https://www.mephistogenetics.com/product-page/illuminauto-21-sour-crinkle
--------------------------------------------------------------------------------------------------------
2017-09-18. Start of week 4. I have defoliated her and she got water and nutes. She is 20 cm high and have not start to stretch yet.
--------------------------------------------------------------------------------------------------------------------------------------------
2017-09-20. Kl 23.00. Did some massive defoliation, added video and pics
------------------------------------------------------------------------------------------------
2017-09-22. The girl has recovered well after my massive defoliation. She is now 24 cm high. Gave her water and nutrition today.

Likes
34
Share
@MadeInGermany
Follow
Info:
Unfortunately, I had to find out that my account is used for fake pages in social media.
I am only active here on growdiaries.
I am not on facebook instagram twitter etc All accounts except this one are fake.
Flowering days 14
since time change
to 12/12 h.
Hey everyone ☺️.
We are in the second week of flowering and she is still developing very well :-).
Very nice growth so far :-).
This week it was poured twice with 1.2 l each time.
The tent was cleaned and the humidifier refilled.
I wish you all a lot of fun until the next update.
Stay healthy 🙏🏻
You can buy this Strain at :
https://www.exoticseed.eu/
Type:
Quick Sherbet
☝️🏼
Genetics:
75% Indica / 25% Sativa
Sunset Sherbet X Black Lemon
👍
Vega lamp:
2 x Todogrow Led
Quantum Board 100 W
💡
Bloom Lamp :
2 x Todogrow Led
Cxb 3590 COB 3500 K 205W
💡💡☝️🏼
Soil :
Canna Coco Professional +
☝️🏼
Fertilizer:
Green House Powder Feeding
☝️🏼🌱
Water:
Osmosis water mixed with normal water (24 hours stale that the chlorine evaporates) to 0.2 EC. Add Cal / Mag to 0.4 Ec Ph with Organic Ph - to 5.5 - 5.8 .

Likes
7
Share
@LoganatorDude
Follow
So I suspect the Golden Goat to have subtle mag def. I’ve upped the Epsom salts a bit to help. Also the Mandarine XL Auto is amazing and this discoloration in its leaves I believe to be from getting handled and snagging on the trellis when bending through. I try to be delicate, but it shows.
I’ve not been taking meticulous account of things but here’s as of day 19…
Day 19:
Low/High - 66F at night, 76F during the day.
Moisture Levels: set @ 56% RH
Moisture level fluctuations from 54%-68% depending on time and temperature as well as moisture levels in the pot itself. As the pot gets dry I will lower the VPD a bit.
Fly Traps: CLEAN-w/ 2 fungus gnats (1/week) both located @ MXL
(MXL= Mandarine XL Auto)
No signs of mold or mildew.
Ventilation Setting: Humidity 57% RH
Light Intensity (Dimmer Switch @ 75%)
3” tall.
The Critical Purple Autoflower shares the tent: while exhibiting signs similar to mosaic virus, I believe this to not be the case, and instead a genetic pigment deformation possibly induced from the high UV LED lights. I’m only basing this theory of of other anecdotes. I’m not willing to test the contagion properties, but I’m going to pop a seed for just that purpose. Until then I wear gloves or wash hands and sterilize equipment before and after each plant until I can rule out a contagion or not.
Planing to update my feed and get some ppm measurements. Also I’m thinking the MXL is ready for a little Regalia and a foliar feed. Only thing is a 2 hour window from 3-5am! But I will feed a little Regalia and Venerate sometime this week.

Processing
Likes
2
Share
@Ay_ef_see
Follow
Repotted veg area. Most are still babies. Will receive final transplants before going into flower in a couple more weeks. The clone I took from the sativa-dom is doing well, as is the og lemon x cupcake. Will veg these two for the longest, and will eventually end up in 5-7 gal pots. Also plan to take some cuttings from these two.
Two girls in flower are approx 21 days apart. I call them the supercroppeds because that’s what they are. Sc1 is on day 49 of flower a/o aug28 and sc2 is on day 28. Both seem happy and healthy. Believe there may be an abundance of nitrogen in sc1 as some leaf tips are burnt and folding back. Two plants about a month in veg have been put into flower as well. A sort of 12/12 from seed kinda thing.
I have been experimenting with the basics thus far. A sea of green will be underway in a couple more weeks, once these babies grow to toddlers. Been outdoors mostly, no nutrients. Plain Jane from Mother Earth. Comes out great each year. All unknown strain bagseed. A tad different growing in a 2x2 room.
Likes
36
Share
@MadeInGermany
Follow
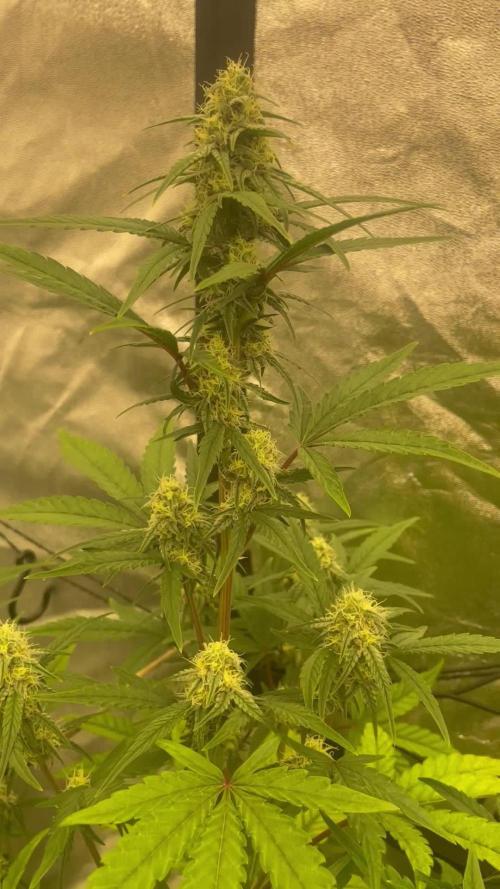
Flowering day 21
since time change to
12/12 h.
Hey everyone 😃.
Both phenotypes are developing very well 😊.
The buds are starting to develop, so I have now added 2.5 g per liter of GHSC Powder Feeding bio Bloom substrate.
This week it was watered twice with 1.1 l per plant each time.
The humidifier was refilled and the tent cleaned.
Let's see how they look next week 😍 Until then, I wish you lots of fun with the update.
Stay healthy 🙏🏻 and let it grow 🍀🍀
You can buy this Strain at :
https://sweetseeds.es/de/sweet-skunk-f1-fast-version/
Type:
Sweet Skunk F1 Fast Version
☝️🏼
Genetics:
Sweet Skunk Auto (SWS34)
X
Early Skunk
👍
Vega lamp:
2 x Todogrow Led
Quantum Board 100 W
💡
Bloom Lamp :
2 x Todogrow Led
Cxb 3590 COB 3500 K 205W
💡💡☝️🏼
Soil :
Canna Coco Professional +
☝️🏼
Fertilizer:
Green House Powder Feeding
☝️🏼🌱
Water:
Osmosis water mixed with normal water (24 hours stale that the chlorine evaporates) to 0.2 EC. Add Cal / Mag to 0.4 Ec Ph with Organic Ph - to 5.5 - 5.8 .

Likes
6
Share
@Smiley33
Follow
Week 3-4
Got plenty of rain over the weekend so I'm sure I won't have to water for a few days. The plants have a nice natural canopy of trees above the greenhouse and we decided to take the roof part of the greenhouse off so the plants can breathe and get adequate air flow. I have the fans blowing on them to keep air circulating to strengthen the stem and to keep pests from landing.
The sun makes the plants look yellow in the video, they are not yellow anywhere just to be clear. They seem to be doing great but this is my first rodeo and my sister who has experience seems to think they are coming along nicely and should do just fine. Let's hope so 🤞

Likes
28
Share
@blazin_skywalker
Follow
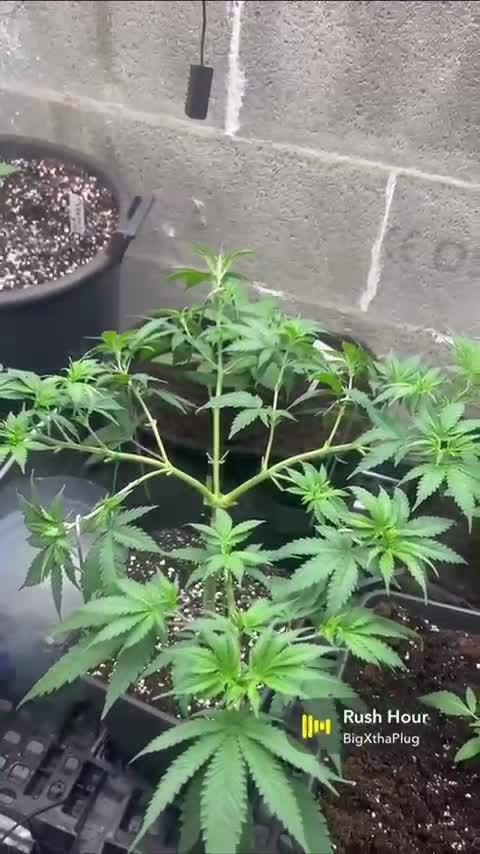
Blue had a solid start right out of the gate. She grew nice thick, full leaves and was happy as a clam cake.... Until I decided to FIM 🤦♀️.
I had originally planned on topping her like her tent mate, but someone suggested a FIM, I had never done it before, so I thought, "Why not?!"
Well Blue didn't seem to like it all that much, and as she began to grow out I did a poor job of opening her up enough to get proper sub-canopy circulation. I think this was mostly due to a combination of me not knowing what to expect from a FIM in regards to its grow pattern and not having a clear vision of my end game from the start, and the fact that Blue Dream'matic seems to just be a generally "bushy" plant and my natural grow style didn't adapt quickly enough to due her justice.
Looking back now, I should have done a better job at doing a bit more defoliation than I did - but I found myself holding back once I had realized the stress I caused the plant from the FIM. That was a mistake.
Over the rest of her grow she took a nice turn for the better. I went through and stripped some of the lower buds and opened up her underbrush as best as I could. She ended up giving me some nice fat trichome covered buds in return.
I cut her down and hung her in my climate controlled closet holding 69.8°F and 55%RH. Six days later she was jarred up.
Blue Dream'matic gave me 85g/3.0oz of quality bud plus an additional 1.9oz of popcorn bud.
A day after being in jars I noticed the humidity in the jars was 79%, so I put the buds into some brown paper bags overnight, and this morning I let them get some more air. The buds being so large are sneakily holding more moisture than I had realized.
I'll update with my strain review once she's done curing. ✌️000
Likes
Comments
Share


Likes
11
Share
@Xpie77
Follow
Kweekverslag – Week 7 Bloei
Datum: 13 mei 2025
Strain: Serious Happiness (Serious Seeds)
Licht: Mars Hydro 450W LED
Medium: Aarde
Voeding: Plagron Terra Bloom (verlaagd), Hesi PK 13/14 (gestopt)
Fase: Bloei – Week 7 van ± 9
---
Topontwikkeling
De toppen zijn volledig ontwikkeld en zwaar, met dikke, compacte bloemen.
Trichomen: 80-90% melkachtig, 10-15% amber – het oogstmoment komt dichterbij.
Pistils: 70-80% zijn bruin/oranje en trekken zich langzaam terug.
Geur: zeer sterk, fruitig met een pittige ondertoon – geurfilter draait op volle kracht.
---
Voeding – Afgbouwfase
Hesi PK 13/14: gestopt aan eind week 6
Plagron Terra Bloom: verlaagd naar ± 2 ml/L
Eventueel enzymen (zoals PowerZyme): 2 ml/L
SuperVit: optioneel – 1 druppel per 4-5 L water
pH: 6.3 – 6.5
EC: ± 1.6 (geleidelijke verlaging richting spoelen)
---
Omstandigheden
Lichtcyclus: 12/12
Temperatuur: 21–23°C dag / 18–20°C nacht
Luchtvochtigheid: 40% (laag houden voor schimmelpreventie)
Luchtstroom: constant, extra gericht op de hoofdtoppen
---
Onderhoud
Bladeren beginnen vanzelf te vergelen – dit is normaal in deze fase.
Planten krijgen minder voeding en worden voorbereid op het spoelen.
Dagelijks checken op schimmel (met name binnenin toppen).
---
Vooruitblik naar Week 8
Spoelen met water of enzymen starten, afhankelijk van trichomenkleur en effectdoel (helder = meer high, amber = meer stone).
Oogst verwacht in week 8 of 9, afhankelijk van voorkeur.

Likes
22
Share
@EhJay
Follow
First timer grower with no green thumb. Learning as I go doing thorough research. The environment is hard to control in my shed, as my humidity and temperature are fluctuating more than is required within the range of +/-10 degrees. My next girl will definitely be done inside.
Day 4 might have stunted its growth due to increasing temperatures into the high 30's.
Day 6 slight yellow tint on the outer edge of the leaves
Total growth for both girls in the first week is 1.5 inches. All in all, considering the condition they are under, I think they are looking pretty good.
