
Likes
Comments
Share


@AsNoriu
Follow
Day 87. Thought will be trim jail with her, but nugs formmed very nice, think she was most mature from this run. All trim for bubble hash, rest hanging, two rows of colours and sparks ! ;)
Day 97. 98 g. went for curing
Happy Growing !

Likes
10
Share


@ColonelForbin1990
Follow
Well last feeding was Tuesday so will be all water from here out. Excited to cut these ladies down soon. Two weeks of flush and I’ll let them do their thing. If I see anything going wrong I may cutdown early or I may chop Betty a week before Vanna to see if I get any differences. We had a hot week last week but they seem to be fine. Heat got to about 85 last Saturday but it cooled down quickly at night. Here they are. In all their glory.

Likes
5
Share


@Ginger_gnome
Follow
Damn 1 of my Grand daddy Purp plants is growing like its life is depending on it lol. As you can see I swapped out that cob light and added my SE-3000 to the room so that I'm running all Spider-Farmer lights during flower. I put it over that tall GDP because I can let the plant get a lot closer to ot then one of my SF lights. I have to say when it comes to what I consider Amazon Special grow lights (Mars Hydro, Phlizon, Spider-Farmer, Viparspectrum, Etc) Spider-Farmer is by far the best. The SF-4000 light I have is still running at 100% after using it for roughly 10 grows now. Other LED brands I've ran only lasted 2-3 grows before they needed to be replaced. I've had the SF-2000 for just over a year now and it's got about 4 grows on it and again still working 100%. Now I just finished my first run in my 3x3 with the SE-3000 (last 2 weeks I'm running a blurpe LED light to see how it effects the potency) and I was extremely happy with thw outcome of the light. For only 300w I feel like it did a better job then my 450w SF-4000 light in my 4x4 tents.
The humidity levels and temperature have been doing great all week during day/night even with temperatures outside dropping to 3c. I'm expecting November/December/January to be very difficult out here to try and keep the temp up. So what I might do is run a 400W HPS light in my 3x3 next go around during the day to keep it warm and then run the main room at night with the LEDs. We'll see what it's like when I get there tho. Also thinking of moving the 2x2x4 to the main room and putting my 2x3x5 tent were it is. Again tho we well see.
Well that's all for now. So happy growing everyone!!!


Likes
4
Share


@DeepRootsGrowTrees
Follow
CHERRY 🍒 COLA by FASTBUDS
Week #11 Overall
Week #6 Flower
She's getting close to being done maybe 2 weeks max before harvest she's really been a starting plant throughout her grow!! Stay Growing!!
FASTBUDS CHERRY 🍒 COLA

Likes
1
Share


@GrowMaster93
Follow
Hello friends, another week behind me. All in all, everything is going great, I have a light output of 300 watts and for that number of watts it already looks magnificent! At the Lemon tree and runtz muffin have formed in the last few days many trichome is also already a strong smell to perceive the thinning with biobizz grow was a unique thing and give the plants a nice boost for 2-3 weeks. Today I noticed something, when I saw to the tent was light on although it was dunekelfasse, somehow I got to the timer:/ it’s about 2 hours before it actually started, I turned it off again to restore the rhythm quickly, I hope I don’t have to expect big problems because so far everything was going great. What I also notice more and more that the buds have the right weight!! I tried at the runtz to take a photo where you see all the buds above, but no chance the leaf roof is too dense but still well lit, it’s just amazing how many flowers are forming there!!!!!!That’s it for this week and I wish you good smoke TM️
Hallo Freunde, wieder 1 Woche mehr hinter mir. Im grossen und ganzem läuft alles Top, ich habe eine Licht leistung von 300 Watt und für diese Wattanzahl sieht es jetzt schon prächtig aus! Bei der Lemon tree und runtz Muffin haben sich in den letzten tagen viele trichome gebildet zudem ist auch schon ein starker Geruch zum wahrnehmen 😁 die dünngung mit biobizz grow war eine einmalige Sache um den Pflanzen für 2-3 Wochen einen schönen Schub zu geben. Heute ist mir was aufgefallen, als ich zum Zelt sah war Licht ein obwohl es dunkelfasse war, irgentwie bin ich an die Zeitschaltuhr gekommen :/ es ist ca 2 Stunden bevor es eigentlich beginnt an gegangen, ich habe es wieder abgeschaltet um den rytmus schnell wieder herzustellen, ich hoffe ich muss jetzt nicht mit grossen Problemen rechnen weil bis jetzt alles top lief. Was ich auch zunehmend bemerke das die Buds richtig an Gewicht haben!! Das war es für diese Woche und ich wünsche guten Rauch.
Likes
4
Share


Likes
14
Share

@birdmountain
Follow
Hollands Hope macht gerade die auffälligste Entwicklung durch. Ihre Blüten haben sich seit letzter Woche sichtbar vergrößern und entwicklen sich en Masse entlang der Triebe. Sie spreizt sich in die Breite. Die regnerische, windige und manchmal sonnige Woche hat sie gut überstanden, so soll es bleiben.
Die Blüten beginnen sich etwas rötlichbraun zu verfärben, wahrscheinlich eine Reaktion auf die sinkende Temperaturen. Ein Duft ist bei ihr nicht weiter festzustellen, das Höhenwachstum ist nun eingestellt.
Vielen Dank für den Besuch und beste Wünsche für eine schimmelfrei Woche!😀

Processing
Likes
2
Share


@NewbieLearner
Follow
Northern lights always has this amazing purple to it. Hitting a bong of the outdoor now actually very smooth and a decent high cant wait to test the first indoor run of this strain.


Likes
18
Share


@DogDoctorOfficial
Follow
Hey fellow green thumbs! 🌿💚 The day has finally come—our Auto Northern Dragon Fuel from Super Sativa Seed Club has been harvested! After an exciting journey, we’re thrilled to share the details of this incredible plant’s final stage. Let’s dive into the harvest report!
🌟 Harvest Details:
Day 75: Harvest Day
• Harvest Date: Day 75
• Harvest Method: Our beautiful Auto Northern Dragon Fuel was harvested yesterday. After weeks of careful nurturing, the time was right to bring in this amazing plant. 🌿🌼
• Preparation: Before hanging, we meticulously cleaned the plant, removing all leaves without trichomes to ensure a smooth drying process and to enhance the quality of the final product. 🌿✂️
Current Drying Process:
• Method: The entire plant is now hanging upside down to dry. This method helps maintain moisture levels within the buds, allowing for a slower and more even drying process. 🌿🔄
• Environment:
• Temperature: 18-22°C (65-72°F)
• Humidity: 50-60%
Maintaining these conditions is crucial for achieving a perfect dry and preserving the plant’s aromatic and flavorful profile. 🌡️💧
🌟 Plant and Bud Characteristics:
Auto Northern Dragon Fuel:
• Bud Structure: Dense and sticky, with an impressive trichome coverage. The buds are beautifully formed, showcasing the robust genetics of this strain.
• Aroma: Even in the drying phase, the rich and potent aroma is unmistakable. Expect a delightful scent that hints at the powerful experience to come.
• Trichomes: A thick layer of trichomes covers the buds, promising a potent final product with a great flavor profile. 🌿✨
🌟 Care Tips:
• Drying Process: Patience is key. Allowing the plant to dry slowly will enhance the final quality, preserving both flavor and potency. Ensure good airflow around the hanging plant to prevent mold and mildew. 🌬️💧
• Trimming: Once the drying process is complete (typically 10-14 days), it will be time to trim the buds. This is where we’ll shape the final product and get it ready for curing. ✂️🌿
• Curing: After trimming, curing the buds in jars for at least 2-4 weeks will further enhance the flavor and smoothness. This final step is essential for achieving the best possible smoking experience. 🍁
🌟 Genetics Spotlight:
Auto Northern Dragon Fuel:
• Characteristics: Known for its robust structure and dense buds, this strain has shown remarkable resilience and impressive bud development throughout the grow. The final product promises to be potent and flavorful, thanks to the thick trichome coverage and rich aroma.
• Harvest Expectations: High-quality buds with a strong aroma and potent effects. The slow drying process will ensure the best possible preservation of cannabinoids and terpenes.
🌍🌿 Fun Fact:
Did you know? 🌿✨ Drying the entire plant slowly helps retain more terpenes, which are responsible for the plant’s aroma and flavor. This method also helps preserve the potency and quality of the buds, resulting in a smoother and more enjoyable experience.
For all the in-depth action and detailed explanations, head over to my YouTube channel! 🎥✨ I’m sharing all the tips, tricks, and step-by-step guides to help you get the best results from your grow. This week’s harvest has been particularly exciting, and there’s so much more to explore and learn together!
👉 Join me on YouTube Link in my profile 👈
🌟 Conclusion:
Harvesting Auto Northern Dragon Fuel at Day 75 has been a rewarding experience. With the plant now drying, we’re eagerly awaiting the final product. Stay tuned for updates on the drying, trimming, and curing process, and get ready for a high-quality harvest!
Happy growing, and see you next time! 🌿💚✨
#SuperSativaSeedClub #HarvestReport #NorthernDragonFuel #PlantMagic #GardeningJoy #NatureLovers #PlantPower #InspireGrow #YouTubeJourney

Likes
24
Share


@Samsemilla
Follow
Die siebte Blütewoche beginnt, den Ladies geht's relativ gut und ihre Knospen werden immer verlockender. 💚😍
Die Woche neigt sich dem Ende zu und es gibt nicht viel zu berichten.
Der Appetit steigt!

Likes
16
Share


@Deer420
Follow
Jsem nadšen jak kvetení pokračuje. Ještě máme před sebou velký kus cesty. Dnes 25.5. poprvé přidán Green Sensation.
Ať to roste přátelé
🍊🍧🌻🌺🌷💐🏵️


Processing
Likes
93
Share


@Ferenc
Follow
Week 6th started. I will add each plant 100 ml water 2x a day so 400ml altogether. I still always spray the topsoil also. The same fertilization method will be done, Monday, Wednesday, Friday 2x 100ml acacia honey and bat guano water mix for each plant. I changed their places so Purple Punch is the left side now and the Gelato Cookie D'ohpe placed to the right. I always rotate them to get equal light. Last day of the 6th week. Gelato Cookie D'ohpe doubled its height. I decided to make the Purple Punch flower but it is not autoflower I separated it for 36 hours darkness and then I will give 14 hours darkness and 10 hours light the first 7 days. So every night I will put it in the tent with the other one and remove in the morning to be in darkness. I also need to reset the timers. End of this week Gelato Cookie D'ohpe is 65 cm, Purple Punch is 35cm.

Likes
22
Share


@Slobasian
Follow
Both plants same weight just ones more built into a bat and the other is built with small strong side shoots


Likes
15
Share


@Growgirl1114
Follow
My little Solo Cup Red Poison ☠️ Loving the color on the baby buds, so excited for the next month for sure. PH is solid and she’s loving the @foxfarm neutrinos. Our cat had to get a nibble the other night, She says it’s tasty ✌️😆✌️

Likes
4
Share


@Abendkraut
Follow
First week of flowering and I can see them all growing tall gaining a few cm/per day. First set of pistils are visible on all 4 ladies.
I started adding Terra Bloom 2ml/L every other day.

Likes
11
Share


@goeser
Follow
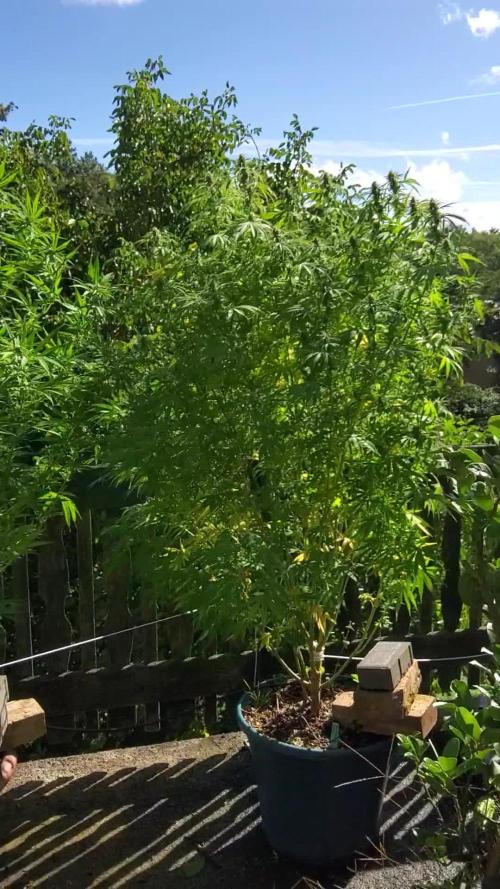
17.09.18 | was 4 weeks away, traveling, but my plant (regilar seed) grow well and started to flower.
190cm tall and with flowers. Took my lady ro another spot with more sun and i will start to add blooming fertilizer too


Likes
4
Share


@Weedmonster
Follow
Começaram a cria os primeiros brotos, com um bom desenvolvimento, sem algum tipo de stress… vamos seguir com o sistema😉🤫