
Likes
Comments
Share


@koci263
Follow
growing chem pie was amazing from start to finish, he made beautiful buds covered in resin. Every day it was wonderful to go and see how it blooms.
during cultivation I came across two completely different phenotypes. One had rather more open but very firm buds, but the other was more like a crossbow and also firm buds.
During drying, a little mold appeared on one of the bud, but otherwise everything is fine. after a month of curing, the taste of the smoke was very pronounced.


Likes
4
Share


@Drtomb
Follow
Changed out the nutes. Dropped the calmag and the Silica. Using just the Plant Prod MJ bloom.
The Blue Gelato 41 is hard to tell. Lots of the plants are below the second trellis. The one that sits above looks. Like will have a big cola. I should have prunes slightly more, but noted for next time.

Processing
Likes
2
Share


Likes
5
Share


@Naujas
Follow
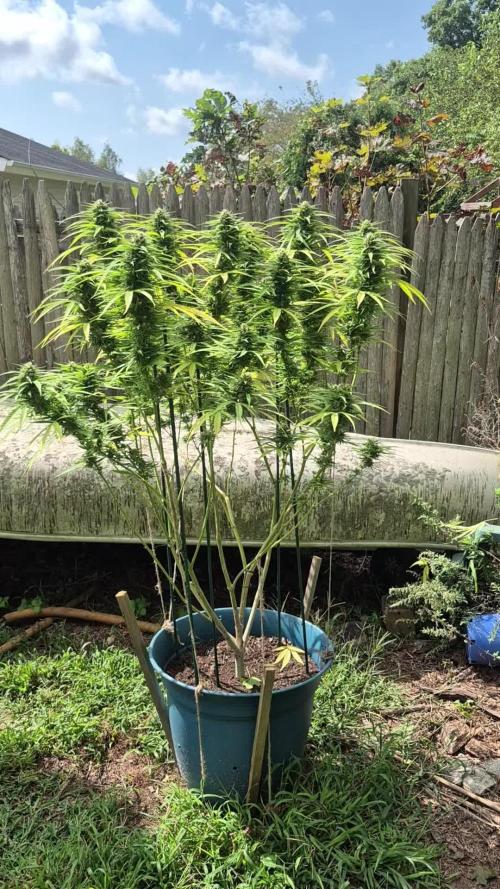
84 days!!!! I came back after a 12-day vacation, and immediately rushed to cross it:) it's a pity that I didn't see her last 12 days, I only got a few photos while I was away :) but that's the point:) The girl coped with nature's challenges really well, there were cold, rainy, windy days that she endured, but there were also very hot days +35° C during which she warmed herself on the northern balcony where the sun shines for a maximum of 5 hours under ideal conditions:) but the result makes me very satisfied and happy, a cool strain :) good luck to everyone, the update will be after the harvest dries out:).

Likes
7
Share


@Ryno1990
Follow
The Purple Goat Cheese from Goat Genetics is comming along good after another round of topping now just gotta let her sprout up some more under the medic grow fold 6 an then she will be ready for flower

Likes
8
Share


@BuzzingHighAbove
Follow
Critical Purple Kush was an effortless grow. The plant beside her got spider kites but they didn't like that CPK so much. She had a few show up on lower leaves, never any webs. I treated for them twice and they never resurfaced.

Likes
26
Share


@GERGrowDesigns
Follow
Dear Growers ,
Welcome to Week 7 or Flower week 4 // Day 49-56 from Sweet Seeds Orange Apricot Xl Auto.
Incase of Moving to a New Home . I Decided to skip 3-4 Weeks from every Diarie of the 12x12 Automatic Project . Everything should be Normal in the next Weeks .
Project Setup & Conditions:
• Brand/Manufacturer: Sweet
• Tent: 222cmx150cmx150cm
• Light: 2x 720 Watt Full Spectrum
• Humidity: 50%
• Soil: Narcos Organix Mix
• Nutrients: Narcos Products
• pH Value: 6
If you want Germinitation results like mine , check out Kannabia Seeds with my link [https://www.kannabia.com/de?ref=61966] and grab the germination device or the strains I used . Trust me – it’s worth it for sure !
Get another 20% Discount at all products using the code [GGD] at the Checkout .
Stay curious and keep up Growing —we look forward to welcoming you back for the next chapter soon!


Likes
16
Share


@Bread_n_Buds
Follow
Our two Green Cure F1 Hybrids of course by Zamnesia Seeds inaugurate a new photographic era for my studio: a magnificent immense, curved and perfect background has truly materialized in my farm, all in the name of Zammi.
The graphics drive me crazy and the Zs in the background like Tetris are a gem of the very talented content creator of Zammi who gave me this gift. There are so many possibilities this is only the first time I've used it...
Let's get to the plants because I'm really overexcited for this super top background and I could talk about it for hours...
As said several times but it is worth repeating when harvesting, this time we followed the logic of comparing 2 plants: the first left to grow freely with just a little cleaning and the second with the application of techniques, a mainlining to be precise.
Speed: The good news is that they practically matured together, the one without techniques is perhaps a little more mature but really just a little. Both ready in 10 weeks.
Resin/scents/taste: Truly an excellent level of resin and a fantastic coffee/chocolate scent that develops from the trichomes, it wouldn't be easy to say that it's CBD if I didn't know, delicious already in the dry room ready for 15-20 days of treatment and then off to the Autoflower World Cup, they definitely go in the CBD category.
Production: The amount of grass is not bad at all, considering that they grew in full winter in vegetative mode, that they are in an 11-liter pot, in my opinion we are around 100 grams both maybe a little less. Let's remember 10 weeks guys now the plants go very fast without losing quality.... At least those of Zamnesia...
I'm very happy to have some CBD to consume, I recently ran out of oil and I miss it a bit.
Look at the photos there are many, comparative, alone and also on a black background, I'm working on the trichomes now and will upload them soon.
The F1 Hybrids from Zamnesia are truly spectacular...think about them.
Remember that we used Soil + Fertilizers + Additives 100% organic from Plagron, we love the taste of organic grass, you can notice the difference when I taste mineral and then hydroponics let's not talk about it.. Better a little less grass but more in line with mother nature at BreadandBuds.
Choose your ideal soil and fertilizers accordingly on the Plagron website with a fantastic auto-calculation sheet and get the fertilizers on the Zamnesia website.
---- https://plagron.com/en
Try a seed of this variety that drives us crazy..
---- https://www.zamnesia.io/en/10672-zamnesia-seeds-green-cure-cbd-f1-automatic.html
Description Zamnesia // Zamnesia's breeding team has harnessed F1 genetics to bring you Green Cure CBD F1 Automatic. This autoflowering cultivar is easy to grow, accessible and reliable for all levels of experience. Ready in just 11 weeks, growers can expect impressive yields of tasty buds with a clear-headed effect that's ideal for meditative moments.
All of this is provided in a place that, according to its own words, offers "all the best that nature has to offer", in fact.
---- www.zamnesia.com
------- Curiosity --------
My plants listen to Black music by
---- www.radionula.com alternating with 432Hz Stimulants
very easy to find online try doing a search on youtube and pushing music for your girls. It's very effective from my point of view. Try it!
*** Trichomes and Video coming soon

Likes
293
Share


@Ju_Bps
Follow
Hello growmies 👩🌾👨🌾🌲🌲,
👋 Still looking good, since transplanted, look growing fast,
I down a bit the terra grow, start to have a little overfert.
💪 Continuing Defoliation, Topping, lst
💧 Give water each 2/3 day
And vaporise plant with water + Plagron Roots (1ml/l)
1.5 l Water + Roots + Grow + Zym + Sugar Royal (1 + 4 + 1 + 1 ml/l)
1.5 l Water + Roots + Grow + Zym (1 + 4 + 1 ml/l)
PH @6
💡Mars Hydro - FC 3000
37% 45 cm
Mars Hydro Fan kit
Setting 4
Have a good week and see you next week 👋
Thanks community for follow, likes, comments, always a pleasure 👩🌾👨🌾❤️🌲
Mars Hydro - Smart FC3000 300W Samsung LM301B LED Grow Light💡💡
https://www.mars-hydro.com/fc-3000-samsung-lm301b-led-grow-light
Mars Hydro - 6 Inch Inline Fan And Carbon Filter Combo With Thermostat Controller 💨💨
https://www.mars-hydro.com/6-inch-inline-duct-fan-and-carbon-filter-combo-with-thermostat-controller
Fast Buds - Gorilla Cookies FF🌲🌲
https://2fast4buds.com/us/seeds/gorilla-cookies-fast-flowering

Likes
120
Share


@CBD_Sweden
Follow
Hi all the happy people here in GrowDiaries.
This is my second cultivation ever and it will be fun to try a bigger space than my closet grows
First, I'm just going to say I'm done with the construction of my new growroom.
I put some pictures on the construction here in week one.
The room is 2.14 meters by 1.7 meters and has a ceiling height of 2 meters.
It provides a floor area of 3.6 square meters.
I use a 54 Watt Lightwawe T5 for germination and 2 Pcs 400 Watt HPS lamps.
I have a channel fan that replaces the room air about 40 times an hour to get a comfortable theme in the room, the air enters a fresh air intake from the outside.
The air is purified through a carbon filter to then leave the room to the rest of the basement.
Then I use that heat to heat the rest of the basement.
I will use 8 pcs 15 liter Autopots to grow with and a 100 liter water tank that supplies the pots of water and nutrition.
I will grow completely organically in soil and will watercure my buds to get the best possible medicine for me.
But there are no cultivation rooms to be displayed here, so I continue with what is most important.
Today I have put my seeds in my moisture dome and hope the seeds have germinated within a few days.
I am very excited to see how the new growroom will work and how this CBD Fast Eddy plant from Royal queen seeds will turn out.
CBD Fast Eddy Automatic is combining Cheese x Juanita la Lagrimosa x Ruderalis, Fast Eddy is a rapid growing, flavourful, and CBD-rich auto strain that goes from seed to harvest in 8-9 weeks, produce generous yields, and induce a clear, mellow, and most importantly, functional high.
THC: 9%
CBD: High
Yield Indoor : 400 - 450 gr/m2
Yield Outdoor: 80 - 130 gr/plant
Height Indoor: 60 - 100 cm
Height Outdoor: 80 - 120 cm
Flowering: 6 - 7 weeks
Harvest month: 8-9 weeks after sprouting
Genetic Background: Cheese x Juanita la Lagrimosa x Ruderalis
Type: Sa 50% In 40% Ru 10%
Effect: Clear, Painrelief
Climate: Mild
..............................................................................................................................................................................................................................................................................................................................................
Update 2017-08-15. Both seeds have germinated and planted in small pots inside the humidity dome.
I'm so glad it worked so well and now it's just hoping they'll start growing and become 2 big healthy girls :)
...............................................................................................................................................................................................................................................................................................................................................
Update 2017-08-16. I have mixed my own soil today. Its 40% sieved peat harrow H2-H4 0-30 mm, 45% sieved peat harrow H4-H6 0-30 mm. 5% sand and 10% of compost soil. And i use 15% of perlite and mix it all together.
...............................................................................................................................................................................................................................................................................................................................................
Update 2017-08-20. These girls are much slower to germinate and to start growing than the other 6 girls I started at the same time.
One of the germinated seeds split in half, so I had to take a new seed and germinate it. It took 2 days.
It was just a smal taproots after germination with this strain as opposed to my Fastbuds cbd.
But I hope everything goes well from now and that they live up to their name, Fast Eddy.
................................................................................................................................................................................................................................................................................................................................................
Update 2017-08-21. New pics.
................................................................................................................................................................................................................................................................................................................................................
2017-08-22. Nr1 dident make it and died. Started germinate a new seed to get another Nr1.
..............................................................................................................................................................................................................................................................................................
2017-08-27. Nr 1 is in a small pot in humidity dome and i hope shes going to break the surface soon. Nr 2 is slow but doing fine.
---------------------------------------------------------------------------------------------------------------------------------------------------------------------------------------
2017-08-28. Nr2 is transplanted in 15 liter autopot.
---------------------------------------------------------------------------------------------------------------------------------------------------------------------
2017-08-29. New movie of the girls Nr2. Its no water for 3 days now so the roots develop more and match the plant above the soil. The temp controlled fan is awesome, its easy to set what temp you like to have in the room. Right now its 28 celcius. And humidity is 56%.
-----------------------------------------------------------------------------------------------------------------------------------------------------------------------------------------------
2017-08-29.
Hello to you who read my diary, I just want to say that I am pleased that you have chosen to check in with me and in my diary.
I just want to say that I do this for myself and for a steady flow of my medicine.
Everything you read and see in my diary is 100% honest and I will never distort or beautify anything here.
I document my crops so that I can learn from my mistakes and also to look back at those different crops.
I try to update with pictures every day and with text if something special has happened in the garden.
This is my strainhunt for the best medicine and the beginning of my journey with cannabis and the cultivation of it.
-----------------------------------------------------------------------------------------------------------------------------------------------------------------------
2017-08-30. Cleaned the room this morning, just vacuuming and cleaning with chlorine solution. Im testing the fan to control temp and humidity, it works great.
Added a movie. Everything is looking great right now.
------------------------------------------------------------------------------------------------------------------------------------------------------------------------
2017-08-31. 3 New pics.
------------------------------------------------------------------------------------------------------------------------
2017-09-01. New pics and a video of the grow room from today.


Processing
Likes
4
Share


@DrewbieDoobieNoobie
Follow
Getting closer to being able to sex the plants week 5 or 6 I should have a definite answer on the 3 remaining healthy plants I can start to smell them a little I have a feeling these are gonna be pungent when they start to flower. I think they might be girls but still no preflowers got something that looks like it might be but I don't want to start my seed making process un till I am sure, and "when" I hope to get at least one lady I will clone up to my maximum of 6 plants. the Dry amendments seem to be doing there job do not let the photos fool you they are a healthy mint green. I have yet to apply the earth juice Transition one week before the flip I will add it to the feedings. hope you are all staying safe till next week. take one to the dome and stay at home.


Likes
54
Share


@KingSalomonsWeed
Follow
30.11. Hi people's. I like you. Day 66 Blüte 41.
31.11. Es schleichen sich lila und purpurtöne überall ein. Wird aus dem häßlichem Entchen ein Schwan?
Wer Lust hat, bleibt dabei. Noch mindestens 11 Tage Dünger.
01.12. Ich geb n Dreck auf Spinnmilben. Bio, das muss. Egal, seht, diese Farben, alles Irre voll mit Trichomen. Das sind real Farben. Genauso sieht sie aus.
Wowhh.
Oder? Also ich finds gut. Richtig gut, und ihr habt nur 50%... So ganz ohne Duft.
Der Duft Himbeer Bonbon mit Afghani.
Und Wind hilft nicht gegen Spinnmilben... Oder sollte Immer Wind sein?
Ich Idiot, besser wäre es bestimmt. Bei mir 12 h Wind, danach Windflaute... 12 h.
Und herrlich, da haben sie ganz viel Zeit zu Spinnen. Diese Spinnmilben!
Ächz, da merkt mann das ich ein Großmeister ehrenhalber bin.
Aber ich gebe mir Mühe, mit den Pflanzen.
Und komischerweise, auch wenn sie oft aussehen als wenn sie verrecken, die Knospen sind oft mit das beste Weed der Welt.
Oder genau deswegen?
03.12. Ab jetzt Wasser. Sie gibt ordentlich gas.
Unter Vergrößerung"> 90% milchig. Vor zwei 2 Tagen waren es ca 40%....
Und sie wird dunkel Pink. Pink Rozay...
Was heißt eigentlich Rozay?
Rozay is a name for boys and girls. The meaning is beautiful, rose The name Rozay is most commonly given to Dutch girls.
Lol.
Also Kotelett in 7-8 Tagen bei Tag 52?
Mal schauen.
Übrigens schöne Lila Blätter... Wenn mann sie umdreht. Von oben sieht sie eher wie Weißer Spinnen Kot aus.
Aber untendrunter sind sie Saftig...und Lila.
So, bringt mein Stamm zerreiben, Trichome?
Ja, ich finde ja. Ist ja eigentlich Logisch. Ne durch brüche gestresste Pflanze weiß, das sie alles geben muss, da sie wenig Zeit hat.
Ich habe es nicht erfunden, nur Nachgeahmt.
Kennt ihr das eigentlich mit ner Metallschraube?
Likes
49
Share


@Roberts
Follow
Green Cure CBD has a earthy, citrus aroma. She is finishing up bulking, and looks about 2 to 3 weeks from done. She has grown really well in a solo cup. Thank you Zamnesia seeds, and Medic Grow. 🤜🏻🤛🏻🌱🌱🌱
Thank you grow diaries community for the 👇likes👇, follows, comments, and subscriptions on my YouTube channel👇.
❄️🌱🍻 Happy Growing 🌱🌱🌱
https://youtube.com/channel/UCAhN7yRzWLpcaRHhMIQ7X4g
Likes
6
Share

@Bdog7878
Follow
All doing well. Watering every 2 days. The weather has been pretty good. 55 at night 73 to 78 day humidity around 60 to 70 rh. The one Mimosa x orange punch is starting to get some purple leaves. I noticed a slight strain from switching to bloom nutes but they seem to have moved past and are doing great. I did find a couple of buds with the very start of bud rot on the mop#1 I removed the buds and see no sign of more. I think this weekend is gonna be the last fert on the mop#1 going to start the flush and im thinking the week after for the mop#2. Most water and all fert solution goes in between 6.2 to 6.7 ph

Likes
53
Share


@BudBoutique
Follow
! this is my current status, gonna upload my last veg weeks within the next week - got a bit busy around Spannabis - thank you for your understanding! 💚
Welcome to Bud Boutique Grow Diary - really appreciate all your love and support :)
Dont forget to check out my other current grows!
🗓️ This Week:
- Day 24: attaching once a week APTUS Foliar with Regulator & Nutrispray with the amazing CannaFogger by Petra Grow
- Day 28: bud development is super beautiful on each pheno #1 and #2
Thank you for still staying with me 💚
___________________________________________
--- 🌱 Strain (Sponsor) ---
🏷️ P.C.R. by Art Genetix
https://www.artgenetix.world/product-page/p-c-r
--- 🥗 Nutrients and Feeding (sponsored by APTUS: APTUS Ambassador) ---
🍸 APTUS: full nutrient schedule extreme
-- Regulator, N-Boost, P-Boost, CaMg-Boost, K-Boost, Allin1 Liquid, Startbooster, Topbooster, Enzym+ every feeding
-- Fulvic-Blast, NutriSpray as Foliar each once a week
🔗 https://aptus-holland.com/
--- ♻️ Grow Control (Sponsor) ---
TROLMASTER: TENT-X + LM14 Light Adapter to dim/sunrise/sunset lights + Temp & rH Sensor all remote on App
🔗 https://www.trolmaster.eu/
--- 🚿 PetraGrow (Sponsor) ---
CannaFogger Foliar Spray
🔗 https://www.petratools.com/product/petragrow-cannafogger-atomizer-new-mini-fogger
--- 🏭 Grow Setup ---
💡LUMATEK Zeus Pro 600
* 🏠🌿 Indoor: Homebox 120x120x200cm (4x4)
* 📐🌀 PrimaKlima exhausting Fan 1180m3/h (running on 60-80%)
* 🌀 Can Light Filter 800m3/h & 1x Fanbox 1x Dyson fan for Air circulation
🔗 https://lumatek-lighting.com/zeus-600w-pro-29/
🔗 https://primaklima.com/de/shop/ventilatoren-de/ec-ventilatoren/pk160ec-tc/
🔗 https://canfilters.com/products/filters/
All Likes and comments are highly appreciated!!!
👨🌾 don't forget to check out my Instagram for daily educational content: budboutiquee
- Bud Boutique
