
Likes
Comments
Share


@eldruida_lamota
Follow
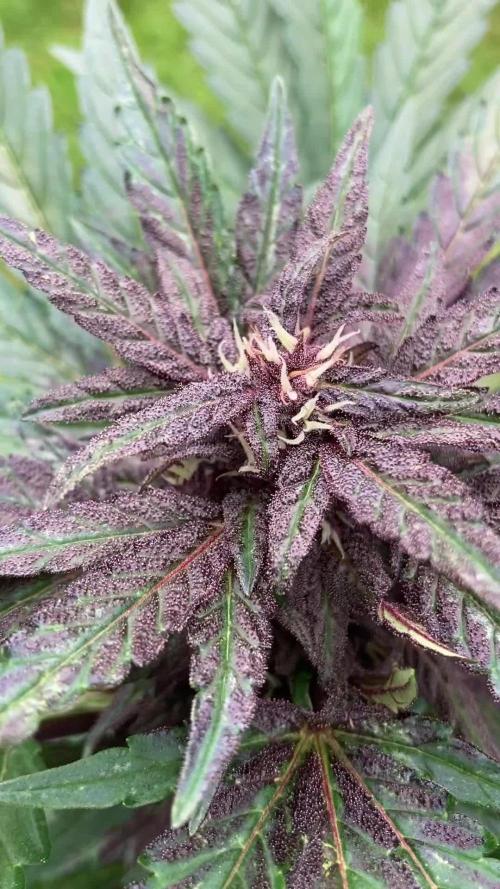
Vamos familia actualizamos la cosecha de las Purple OG KUSH de Dutchfem .
La verdad que el secado muy bien 7 días en Malla y a los botes, 40% humedad y 24 grados es la temperatura ambiental que han tenido en el secado.
Por lo demás de miedo os la recomiendo.
Gracias a DutchFem, Agrobeta y Mars hydro , sin ellos este proyecto no sería igual 🙏.
Agrobeta:
https://www.agrobeta.com/agrobetatiendaonline/36-abonos-canamo
Mars hydro:
Code discount: EL420
https://www.mars-hydro.com/
Buenos humos.

Likes
7
Share


@Danger90946
Follow
Day 37 11/30/2021- Welcome to week four of flower. I see lots of trichomes everywhere and the smell is starting to pick up as well.
Day 39 12/02/2021- Water day for them. Also camera needed update but made it work. IOS/ANDRIOD PAR METER APP. It is very accurate highly recommended this for everyone.
https://apps.apple.com/us/app/photone-grow-light-meter/id1450079523
Will update daily will time lapse video.
Day 40 12/03/2021- Lots of trichomes everywhere. Buds are also forming up nicely.
Day 42 12/05/2021- Just water this girl today. Today also is the last day of the week, we should be have ways done hopefully harvest by the end of the month. Will do last top feed on Wednesday.


Likes
32
Share


@Arcadium
Follow
Still not a drop of rain for the last 3 weeks, 26C daily, full sun, really exploding in growth these days. Gave her another soak of some local Kelp / Fish mix, also been spraying with Aloe / Neem / Kelp mix twice weekly. Responding well to very little nutes / water.
Catepillers seem to have peaced out, this warm weather caused their population to explode, lettuce and other veg was also hurt, not normal.
FIM recovery was very quick, I'll be fimming 3 top nodes this weekend, need to keep this height under control at this rate of growth.

Likes
12
Share


@MadeInGermany
Follow
Harvest day 70
since time switch
to 12 / 12 h
Hey guys :-)
Finally it's time 💚
The lady is done the large leaves have been removed and hung upside down to dry in the dark drying room.
You can now stay there for 13-15 days at a temperature of 18-20 degrees and 55-62% humidity.
After 13-15 days it is neatly trimmed by hand and placed in jars with boveda packs 62.
After 4 weeks Boveda 58% come in and are ready for testing ;-).
After everything has been cut cleanly, the last update comes with the smoke report and the finished pictures.
Let's get to the plant 💚.
First of all I would like to compliment Green House for this genetics.
Unfortunately, the rating system at Growdiaries is a bit strange because I have to give the stars before the Smoke Report and in the end it might have led to more stars in terms of taste.
The growth was great from start to finish.
She had no problems at all and also had no problems with animals 👍.
I'm amazed at the great smell the beautiful buds give off😀.
Of course I cut cuttings and if the taste is as good as the smell it will be grown again ☺️.
A final report comes with the Smoke Report.
Until then, I would like to say thank you to the whole Green House team and wish you all the best fun with the diary 💚🙏🏻
Have fun and stay healthy 💚🙏🏻
👇🏼👇🏼👇🏼👇🏼👇🏼👇🏼👇🏼👇🏼👇🏼👇🏼👇🏼👇🏼
‘Powered by GreenHouse Feeding’
Copy the link for 10% off all Nutrients 👇🏼
http://shop.greenhousefeeding.com/
affiliate/madelngermany_passiongrower/
👇🏼👇🏼👇🏼👇🏼👇🏼👇🏼👇🏼👇🏼👇🏼👇🏼👇🏼👇🏼
Water 💧 💧💧
Osmosis water mixed with Cal/Mag (24 hours stale that the chlorine evaporates) to 290 ppm and Ph with Ph- to 5.8 - 6.4
MadeInGermany

Likes
23
Share


@Wazowskid
Follow
Took them outside because it was a sunny week, looking good so far. I take them outside as much as I can because I'm still worried that the 10€ light bulb won't be enough powerful.

Likes
7
Share


@Philippovic
Follow
Nach genau 84 Tagen war es nun soweit, gegen Ende hin wurde die Blueberry schön dunkel und entwickelte einen hervorragenden Duft!
Likes
23
Share


@RazzleMatazzle
Follow
We have successfully made it through week 5. The Runtz genetics continue to show strong growth—this plant literally grows before your eyes every day. As soon as some shoots are removed, the plant starts developing even more vigorously.
The only one that seems a bit neglected is the third plant in the last row. This week, I’ll try to weave the main shoots into the net more effectively. I suspect that due to the varying plant sizes, it’s not getting enough light.
None of the three plants have shown any pistils yet, which I personally think is a good sign, as it allows them to focus on growing in height and width first. There are still slight mineral deficiencies visible in the leaves, but I am counteracting this by increasing fertilizer and using foliar spray.

Likes
26
Share


@eriinho
Follow
hello growers"
I started the 2nd week of flora by cleaning the reservoirs, adding a new nutrient solution and adding ADVANCED NUTRIENTS BIG BUD and making a big deloliation. 👊
For the beginning of the 2nd week of flora a LOLIPOP pruning was also done.
-------
We completed another week, the buds are growing at an accelerated pace. Next week when I'm cleaning the reservoirs, I'll do a new defoliation on the girls. I'm running out of space in my tent they are growing absurdly. 👽

Likes
6
Share


@Kanbal
Follow
So I heard that matterhorn is an unstable plant but I never thought it was so unstable.
One fenotype are doing well but plants from another mother are struggling.
I checked the condition every day and every day the EC dropped and the pH rose. Which meant eating, but still showing problems on the leaves. During this period I made a mistake with the water temperature, namely when the water temperature is above 20 ° C the oxygen in the water drops drastically and these were the beginnings of my root problems. I didn't know it then, but later root rot appeared.
Likes
19
Share


@Dendegrow
Follow
Its over, thank you for this plant anesia it helps a lot at Parkinson disease symptoms!

Likes
37
Share


@Kirsten
Follow
30.8.24:
The plants are still developing very slowly.
I may top dress with Ecothrive Life Cycle again, as it's taking longer than expected. So they can probably benefit from that.
I overwatered all plants, there was run off. I watered 2 days in a row. There weren't any visual signs that this affected the plants. I'm not going to water, until the soil is dry enough to mix in the ammendments.
I'm sill using the Xpert Nutrients Bloom Booster, I have noticed that FBP1 and FBP3 have gotten more sizeable since using this product. It's hard to tell on my FBP2 as the buds are already huge.
I have continued to defoliate today.
I also moved the plants around to maximise light exposure.
The branches on FBP3 and FBP1, were looking flimsy. So I tied a few more branches with string, to keep them from breaking and taking up so much room.
1.9.24:
So today I added Ecothrive Life Cycle, Diatomaceous earth, also went ahead and added the Bat guano.
I watered it in with 2 Tbs of Black strap molasses in 1 ltr of water, to each plant. Each plant also got 1ltr of water with 3ml of Ecothrive Flourish. Additionally I used 2ml of Xpert Nutrients Bloom Booster in 1ltr of water.
I've noticed that there are new pistils are growing out of the top buds. I think it may be light and or heat stress. It's up to 30°C, at some points. The humidity is pretty stable at 40-50%.
I've lowered the light intensity slightly, and am now using 2 fans on low settings. To try to get the heat to lower.
2.9.24:
I've decided that stakes are necessary to FBP1 and FBP3. So have made some 70" tall.
I also finally got round to cleaning out the bottom of the tent. It was a mess, so I disinfected it with F10. I didn't get any anywhere near the plants.
The plants top soil had dried up overnight, I'm assuming the dehumidifier has something to do with it! It is is a great piece of kit.
I watered each plant with 1ltr of dechlorinated water, PH'd to 6.0. Each 1ltr had 1 ml of Ecothrive Flourish.
I don't want the microbial ammendments, to dry out and ruin it. So I'm thinking about watering just once a day, only 1 ltr per 5 gallon pot.
Additionally my companion plant, Rosemary has some either; webbing or Mould on it, so I took it out of the tent, and will treat soil
In that pot with a neem oil drench, and see what happens. I need to repot it, my mint plant in the tent also has exploded and needs repotting.
3.9.24:
I've watered again, as the water is getting drank by my dehumidifier. Couldn't live without it though!
I added 3ltrs of water to each plant included was;-
3ml per litre of Ecothrive Flourish,
2ml Xpert Nutrients Bloom Booster.
Dechlorinated to 6.2.
Still haven't managed to add the extra plant stakes yet.
4.9.24
Today all the top soil was dry, and with my dehumidifier so close, I've added another 2ltrs of water each with;-
2ml of Xpert Nutrients Bloom Booster
2ml of Ecothrive Flourish
2ml of cal-mag.
PH'd to 6.0.
Had to add additional stakes in to FBP2 (my best pheno)! As the flowers are soo heavy, it's crazy actually. I've been using 6% silica, since the beginning.
I am checking the trichomes daily through the jewellers loupe. They do actually still look clear / glassy. I'm glad I did top dress this week, as it looks like we're going to be going for a long while yet. 2-4 weeks.
Ps. If I've made mistakes in this update, I'm 9/10 faded on my Royal Critical. 😅
5.9.24
I watered with 2 ltrs of water per plant PH'd to 6.0. For each litre, I added 1ml of Ecothrive Flourish and 2ml of Xpert Nutrients Bloom Booster.
I accidentally bent a branch on FBP3. I have taped it together tightly with duct tape.
I also added more stakes to FBP2 as the flowers are getting super heavy, which is an awesome thing, as I was prepared for staking, and tying. Can't wait to taste these when they're ready to harvest! 🤤
Ps.
I'm thinking of making up a new 5 or 10 gallon pot with a super-soil mix, I did that for this run, but now I know more about ammendments, hopefully it will be better this time. I'm going to leave the soil mix as per the instructions to cook / dry, before planting this time.
Will update again 🙂
Likes
18
Share

@India_Calcoen
Follow
09-09-2025
Purplematic CBD is doing fine. I didn’t see any pests or plagues, and I’m really happy about that. I really had enough of the pests and plagues 😓😤😫 I also moved her to the garage.
14-09-2025
Checked her trichomes today: mostly clear. She is strong 💪 Maybe I can harvest her in two weeks?


Likes
4
Share

@GoodTimesOrganics
Follow
Hi liebe Community und Willkommen zurück im Sensi Seeds Wettbewerb!
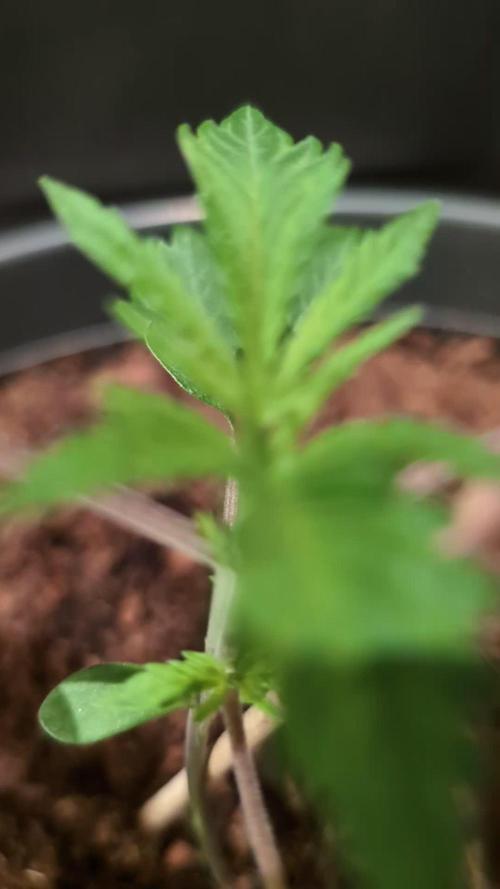
Nach der zweiten Wachstumswoche entwickelt sich ein kleiner gesunder Sprössling!
Die ersten Ansätze der Seitentriebe sind zu erkennen.
Die Höhe liegt bei 12cm und für den Grow habe ich das gesamte Bio Tabs NL Arsenal abgewendet!
Danke nochmals an dieser Stelle für das Sponsoring! 💚 Bio Tabs ist ein super zuverlässiges Düngesystem mit wenig Aufwand und top Ergebnissen!
Die Bedingungen im Growschrank sind für die Wachstumsphase top!
—————
🌡️ Temp: 26
🌚 Temp: 18°C bis 19°C
💧 RH: 64%
🌬️ VPD: 1,1 kPa
☀️ ppfd: 330 mpm
—————

Processing
Likes
12
Share


@Italianganya88
Follow
Letzten 7 tage unglaublich an masse und höhe gewonnen echt atemberaubend das anzusehen ,hab das zelt gut voll bekommen mit wenig plants bis jetzt alles super. Habe heute meine neue Led lampe bekommen bin positiv begeistert.Habe 600watt durch eine 1200watt ausgetauscht.


Likes
77
Share


@Skunk_Life85
Follow
Start of week 6 and she is 2 days into flower. Gave them a good feed. Ppm are at 970's.the extra 2 light have done a good job at filling in for side lights. Just sprouted HSO: PURPLE TRAINWRECK. Super stoked....The Barnes farm vanilla kush didn't germinate Evan after 5 days and some finess so....dud...the Banana has become a bush of a plant, bud sites everywhere.

Likes
22
Share


@valiotoro
Follow
Sooooo impressed with the size & quality of the buds😳
Super dense & sticky✂️
The smell is sweet fruity mix berries🤤🍓
Likes
12
Share


@KalooNie
Follow
These gals are doing fantastic! Smell is really starting to come out now, smells like a very strong citrus pine 👌🙌 Switched them to full strength flowering nutes and they're doing pretty well. I probably should have transitioned them a little earlier but a little stress doesn't hurt, they're growing just fine! Heat is also an issue but they'll manage 😅
8-4-18 :: Largest plant's bucket got empty on accident; Filled a 15gallon reservoir of full strength nutes and pumped the solution into the bucket as always. Next day my largest plant is dying and the other two are fine, looks like lockout. Flushed for a day and then added nutes, no improvement.. Orange pistils are appearing pretty fast on it too as if it's trying to ripen but not grow. My heart is broken😰
UPDATE: Realized I was an idiot and didn't plug up the holes I drilled into the top of the buckets (I stick a hose in there to fill them up) and the roots were exposed to light.

Likes
19
Share


@adam_pawloski87
Follow
What a fun run this was ! These Ogreberrys finished up from 81 days to 102 days with nice hints of gassy , sour purple , sweetness and glistening with frost! These ladies will cure up for a month an will be ready to test out ! So much fun , I highly recommend this strain if your looking for some oooy gooohy resiny grape smelling nugs !
