
Likes
Comments
Share


Likes
4
Share
@Smev1337
Follow
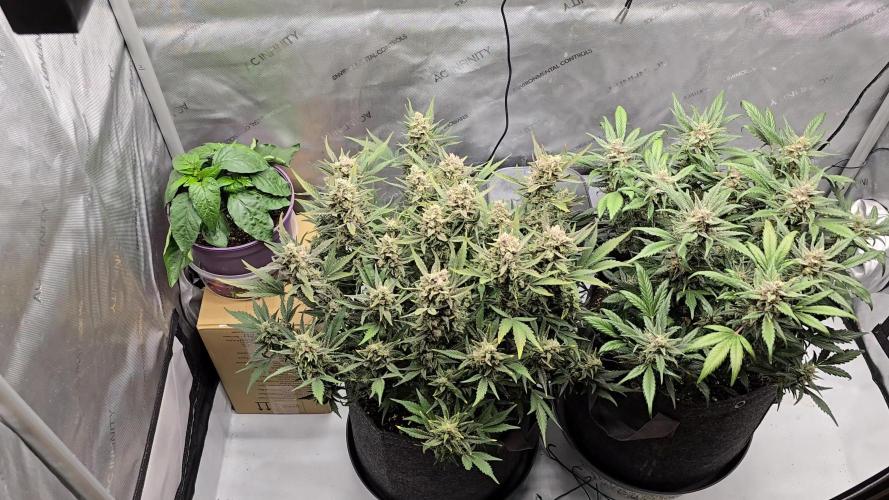
Hey all! this week both ladys are going good just the left plant started to yellow on the leaf tips so i don't know what that might be but we are in late flower anyways i guess! everytime i enter this room i smell these fruity terps and its really nice, the right plant also is producing lots of trichomes under the leafes hehe👽 happy growing all!💚✌️😎
Likes
8
Share


@Ieiogrow94
Follow
Eccoci qui...
Tutto va per il meglio, questa settimana ho eseguito Lollipopping e Defoliation per far si che le cime principali sprigionino al meglio il loro vigore.
Siamo verso la fine del progetto ora bisogna solo aspettare la fine...
Grazie a tutti per il supporto🔥🌲❤️

Likes
22
Share


@Chubbs
Follow
What up fam, weekly update on these as they're getting really close to being finished. I'd say this coming week they'll get harvested and hung up to dry. They look and smell amazing. Did a major dedoliation taking all the major leafs off so the lower flowers can mature for a few days. All in all Happy Growing.
Likes
54
Share


@Fibro_Witch
Follow
Updating for the Week of 9/5
Unfortunately still behind but glad that I'm making videos so I don't have to remember everything!
Defoliated inner branches and fan leaves that needed to be moved out
Top dressed with some Down to Earth mineral Vegetable Garden 4-4-4. Put down about 1 cup spread out over the roots and then covered with some compost. We've been getting a lot of rain so I really don't need to water, therefore I think the dry will work out well and it saves time.


Processing
Likes
13
Share


@Silverback_Guerilla
Follow
SUNDAY 5/5:
Rearranged the gardens..have 17 plants in the 4 x 5 now...yowsa!
MONDAY:
Plucked some dead leaves and did a trichrome check on her. She's getting close now! Prolly about 80% cloudy and 5% amber! I'll start flushing her tomorrow or the next day if she's not dried out yet.
TUESDAY:
I observed some white spots on a few leaves here and there, so I sprayed her today with Trifecta Crop Cure, a concoction of a bunch of natural plant oils. I already decreased the humidity in the room to 45% with my new 70L dehumidifier, so I think she'll be fine. I'll spray her again tomorrow and the next day, then I'll have to hope that did the trick, because she is already in the harvest window.
WEDNESDAY:
I flushed her today with about 4 gallons of ph'd spring water and bembe. It was her last dose of any nutes...flushing with only spring water from here on out.
THURSDAY:
Took a couple of photos and tried installing my new Solacure FlowerPower UVB light, but it was dead on arrival.😢..back to the 15.0 reptile UVB lights for now I guess...

Likes
43
Share


@Joni2017
Follow
On day 54 I washed roots 🚿🚿 days 55 and 56 without irrigation of water or nutrients 😋. Day 57 the princesses are very well 😍 humidity 38-40% temperature 26ºC, 15% of the tricomas are already amber color 👏🏻👏🏻💪 this is about to candy 😆😋

Likes
Comments
Share

@JorgeNitales420
Follow
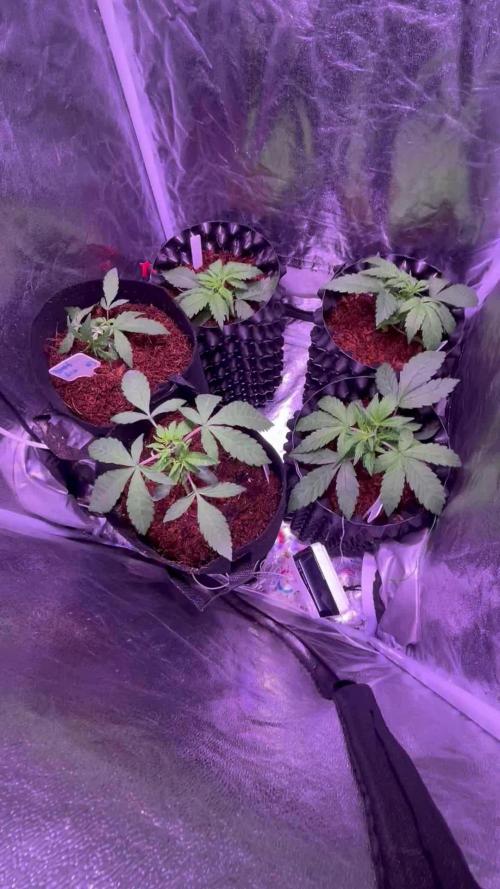
Week 4 of veg
230ppm of
0.2ml/l Calmag
0.2ml/l Micro
Did some topping on the biggest ones and lst on the smallest
Topped the soil with coco coir to improve first layer drainage

Likes
41
Share

@Silverback_Guerilla
Follow
11/30:
I fed them today and supercropped the taller one a little bit. Just trying to encourage her lowers to compete for apical dominance.
I raised the lights another few inches
12/1:
I raised the lights about a foot because of a couple of taller plants, so these girls and most of the others are on a platform so as to be within 15 inches of the lights. Their platforms are some of the shortest, and I think they're about to catch up with the others.👍
12/2:
Busy with life...didn't do much.
Very cold days, so the high temp in the closet was 72f today👈
12/4:
Switched to 13/11....afraid of it taking too long to flower and ending up with a bunch of pain in the ass 5-footers..

Likes
1
Share


Likes
4
Share


@Mr_nugs_lover_David
Follow
It's been a wonderful journey, I'm very happy about this lady's performance, she has produced a high quality harvest, low quantity but I didn't maximice the space as good as I should, but definitely a wonderful genetic to grow, the flowrs are super sticky, full of trichomes and the smell is just the clasic amnesia smell you expect.


Likes
9
Share


@Not_a_tutorial1990
Follow
It's been great.. upgraded their tent, girls are stretching fairly but not excessively. I remove lst tie downs before flowering [experiment] but had to redo to maximize light penetration, previous topping and lst created a lot of bud sites
Happy growing guys..

Likes
44
Share


@Jays_Not_Here_Man
Follow
Girls are stacking nicely ❤️ The one is a bit more finicky than the rest, she is showing signs of nutrient lockout/ ph , but should be easily corrected if I’ve diagnosed it properly. I ended up calibrating by ph pen and I was off by .15 on the scale, might not seem like a lot, but in flower it can be! Shouldn’t set us back too much 🇨🇦👊❤️

Likes
120
Share


@Kitties_and_Colas
Follow
~_~_~_~_~_~_~_~_~_~_~_~_~_~_~_~_~_~_~_~_~_~_~_~_~_~_~_~_~_~_~_~_~_~_~_~_~_~_~_~_~_~_~_~_~_~_~_~_~_~_~_~_~_~_~_~_~_~_~_~_~_~_~_~_~_~_~_~_~_~_~_~_~_~_~_~_~_~_~_~_~_~_~_
12/20/21
🐱 The girls are behaving beautifully, color is uniform no issues whatsoever.. they do seem a little on the small side to me for week 6 but I might be staring too closely lol.. the new growth (at topping points) is approx. 1.5inch now. We cleaned bare the undersides of all plants (bottom 1/3) in preparation for flower..right or wrong we always start introducing mild bloom nutrients about a week before flower (I'd love to hear some opinions on this practice)..I think we'll start flower in week 8 but ultimately I'm going by the length of new growth, I'd like the new tops to be kinda long after their flowering stretch..thanks for reading if you made it this far and happy harvests everyone!!! ❤️💡🌱😽💨
~_~_~_~_~_~_~_~_~_~_~_~_~_~_~_~_~_~_~_~_~_~_~_~_~_~_~_~_~_~_~_~_~_~_~_~_~_~_~_~_~_~_~_~_~_~_~_~_~_~_~_~_~_~_~_~_~_~_~_~_~_~_~_~_~_~_~_~_~_~_~_~_~_~_~_~_~_~_~_~_~_~_~_
12/22/21
😽💨 decided to flip anyway lol, being a 10+week strain I worry about our current supply running dangerously low in that time.. these should look great after their stretch 👌
~_~_~_~_~_~_~_~_~_~_~_~_~_~_~_~_~_~_~_~_~_~_~_~_~_~_~_~_~_~_~_~_~_~_~_~_~_~_~_~_~_~_~_~_~_~_~_~_~_~_~_~_~_~_~_~_~_~_~_~_~_~_~_~_~_~_~_~_~_~_~_~_~_~_~_~_~_~_~_~_~_~_~
Processing
Likes
17
Share


@Hawkbo
Follow
I still have to go thru all the photos but wanted to get the video up for all of them first. If your interested in the pics come back at the end of today and they will be up it just takes a while. Noticing more seeds poppin thru, I hope it's from the moonshine cookies pollen cuz the female turned out bomb and the male wasnt too bad either so they might be decent seeds. Started the flush on the citradellic and the other ones might have got their last feed yesterday. Should be finishing up next week and the week after.
Processing
Likes
29
Share


@starke
Follow
Happy belated Day 100 my dear Clones, today is Day 101 and 54 of Flower 🌹😍❤️ Another week and we should be good to harvest. Had a first look at her trichomes, milky with some clear. Bring it on my sweet sugar ✌️ And look at that beautiful rainbow 🌈 Always stunned by the sheer beauty of those plants, this one in particular 😍
Day 104 and 57 in Flower, just more rainbows. Watered with pure water, they still drink a lot... Let's see, will have to check the trichomes soon. Can't wait ❤️

Likes
290
Share


@Ferenc
Follow
It has been raining and raining since whatever... 2 weeks....checked the trichomes nice milky white.
Based on the fact the the weather won't be better and also the temperature is lower day by the now usually 6 Celsius degrees in the evening and 13-16 during the day or less, I decided to harvest next week.
I was thinking to let her out 3 more weeks just to have more amber trichomes but she is OK, ready but this weather is not ...
She is sativa dominant as I saw in the breeder's description so totally cool.
So she ain't gonna be maturing that much she reached the point.... especially because no sun....
... but compare to that she has som nice colas so I am excited let's see soo guys. Thanks all of you checking this progress out.
Beautiful lady, large LST made her really nice literally she looks like more plant but yes ONLY ONE PLANT IN THE PICTURE AND THE GARDEN :)
Have a lovely day :)

Likes
14
Share


@ITAIvangrower
Follow
Ho allungato qualche ramo verso l'esterno, stanno andando piuttosto bene :)