
Likes
Comments
Share


@HippyHemulen
Follow
Girl is looking healthy and i transfered moss pellet when i saw root coming at bottom in 11L pot with Biobizz All-mix and about 5-10% coco with clay pebble drainage at bottom. Used mychorizza too in transplant hole to help roots growing at start. Pretty sunny days with little bit rain almost every day but little bit too cold this week. 13-15C at days and few night dropped 4C otherwise 8-10C.
Day 1: Started counting veg at 24.5.
Day 4: Transfered moss pellet in 11L pot.

Likes
3
Share


@Unculti_responsable
Follow
Bueno esta semana estaban muy bien la planta pero ya estaba muy alta y estaban por llegar a la altura máxima de la carpa , pusimos una malla así bajaban las ramas y podían recibir mejor luz toda la planta, estamos fertilizando con engorde y guano también abonamos con humus de lombriz, la planta está muy bien así q vamos a ir viendo como sigue

Likes
228
Share


@StarLorr
Follow
Welcome to my Pablø Escøbar diary.
In this diary:
Seeds: sponsored by Ðivine Șeeds
Media: Promix HP
Nutrients: Advanced Nutrients, Diablo Nutrients.
Light and Weather: Şun☀️and Mother Earth.🌎
___________________________
Feeding:
Wed 12Jun: 4L nutrients pH'd 6.5
Thu 13Jun: 2L water not pH'd in bottom saucer only.
Fri 14Jun: 4L water not pH'd
Sat 15Jun: 4L water not pH'd
Mon 17Jun: 4L water not pH'd
___________________________
We had a beautiful week with fresh days and nights, nothing out of the ordinary besides Thursday's wind gusts followed by thunderstorms during the evening and night. Pablo handled it no problem.
___________________________
Thanks for stopping by, likes and comments are appreciated!👊🏻😎
Keep on growin!
Keep on tokin!!!
😙💨💨💨💨💨

Processing
Likes
8
Share


@DaLawry
Follow
Cherry Punch just got her last feed this past week. The next 2 weeks will be full flushing for them. Garlic cookies, watermelon Skittlez, Mint cookies, cookies and cream, and wedding cake are going to be fed up to weeks 7-8. All the plants are finishing nicely! smells are getting a little more dank forsure!😎


Likes
3
Share


@Alpengrower
Follow
great cultivar by Compound Genetics. strong candy / grape smell. VERY easy to trim.u


Likes
13
Share


@knicko
Follow
Auf der Waage im getrockneten Zustand waren es 130g somit habe ich mir den Fixkosten ein €/g von 2.55€/g das finde ich nicht schlecht

Likes
85
Share


@Organic_G
Follow
Ein weiterer Grow kommt zum Enden.
Insgesamt wurden von Anfangs 5 Planzen, 4 zur Ernte gebracht, die andere hat gezwittert und ich habe Sie aus dem Zelt entfernt.
Das Ergebniss nach 14 Tage trocknen bei 60-65% RH & 17-20 C.
Pheno 1 : 61,40 g
Pheno 2 : 33,85 g
Pheno 3 : 29,22 g
Pheno 4 : 56,42 g
Summe : 180,89 g getrimmtes Trockengewicht
Seit auf den nächsten Grow gespannt meine Freunde!
Smoke Review folgt, wenn die Blüten ordentlich gecured sind.
Likes
3
Share


@Herbman420
Follow
Amazing week for the gorilla cookies in Coco as I notice with the last ones they were hungry I decided to take a risk and start this one off in 400 parts per million this week. And it's working great. I will level them out for a couple feeds just to get them used to that. What I have come to realise is that the only thing about these plants now is that they've just got the auto flower in genetics. Everything else is photo . Amazing work fast buds have done over the years. Thank you for looking at my diary and we'll see you next week.and remember it's 420 somewhere 🌱👍

Likes
41
Share


@BOMbolenath
Follow
Big plant going to develop big buds. It smells something like sweet floral.


Likes
Comments
Share


@Shoeless31
Follow
All caught up. Transplanted into 3 gallon pots. Lightly watered with some calmag and recharge
Roots were good and just about ready for the upgrade. No pics but I’ll keep this in mind for my next grow and take some. I know I looked on here and watched YouTube videos to see how was done and it has been very helpful

Likes
27
Share


@Trickybis82
Follow
Hey growmies,
So I'm into the final 5 days of Flushing before harvesting and hanging up to dry!!.
All I can say at this point is this plant smells absolutely amazing very potent is smell and looks. She is so frosty under a light its unbelievable.
I have also just started a journey on edible cakes,pastries. Some pics I will put up from a previous harvest of grape gusher and wedding cheesecake. I cannot wait to cook and make butter and oils with this beauty.
Likes
21
Share


@Papablob
Follow
26/10 ci elle pouvait murire vite maintenant sa m'arrangerai. Elle m'oblige a rester en 12/12 et c'est restrictif. 🤨
27/10 vite mais bien. 😉
29/10Je me doutais bien que l'humidité allait monté. 😕
31/10 elles deviennent carnivore pour halloween.😈 Enfin.. demain ou après demain elle a un rendez-vous avec le sécateur. 🤤
01/11 le capteur d'humidité est mort 😅 En attente d'un neuf, je mets l'humidité a vue de nez.😬
🤤 elle a l'air terriblement bonne.👌♥️♥️

Likes
2
Share


@RatmanJR
Follow
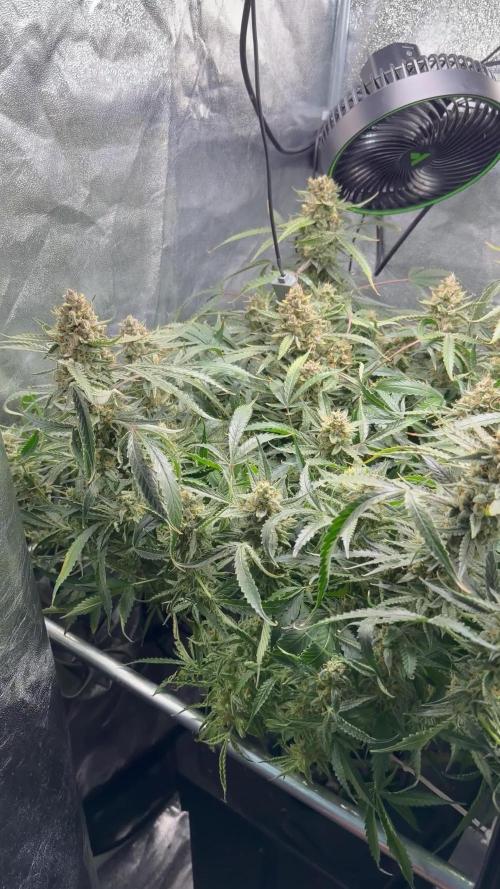
July 26th. 63 days post flip.
Flowers are continuing to fatten and swell. Same shots from last week looks like flowers gained about 10% size
Difficult to get good shots but it looks like I still have a lot of clear Trichomes. Going to let her go one more week until she hits about 30% amber Trichomes. Going to check every day though.
Nothing but water for this living soil for the last few weeks. Been watering by hand last two weeks because setup was under watering. This along with lowering the lights last week from 80% to 60% last week and I noticed leaves are doing a lot better.
Smells like straight grape juice mixed with mint at this point. Amazing and absolutely cannot wait to try it.
God bless!


Likes
4
Share

@420DeepGrow
Follow
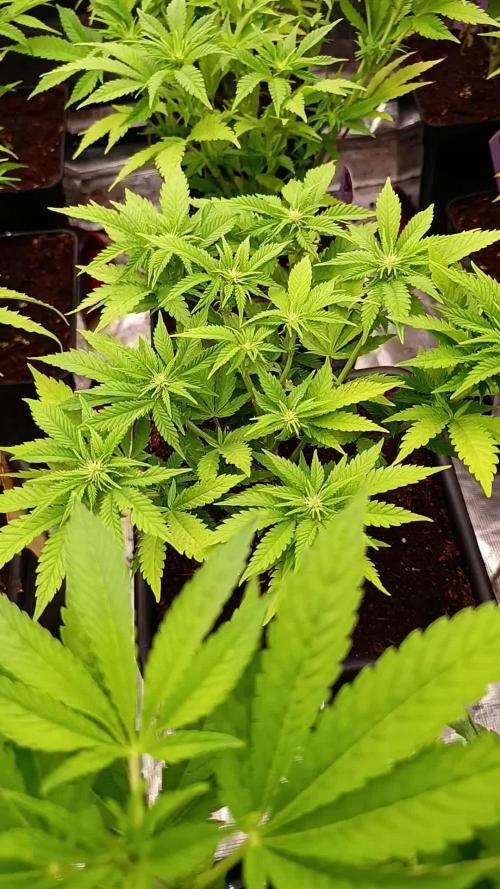
📆 Semana 3:
Con la EC ya controlada y estable, se termina de ajustar el pH en el coco, afinando la disponibilidad de nutrientes. Las raíces se mantienen blancas y activas, con buena colonización del sustrato y absorción uniforme.
Las plantas consolidan el estiramiento, mostrando ya preflores claras y una estructura más definida. El verde lima se va equilibrando hacia un tono más sano, manteniendo buena turgencia y orientación hacia la luz.
Se intensifican los primeros aromas y la entrada en floración es ya evidente, con una transición limpia tras la fase de ajuste.
Seguimos creciendo fuerte 💪!
Likes
5
Share


@pzwags420
Follow
Cantaloupe haze needed a good flush brought runoff from 2000 ppm to 1100ppm will continue to monitor.

Likes
31
Share


@Reaper
Follow
Very interesting week now. the buds start to swell up here, as u can see the stem is insane lol this is a freakin autoflower wtf the yield will be insane. shes drinking 3 liters every 2 days with 1ml/l greens sensation 1ml/l calmag and 1000ppm basic nutrient (4-6-6) Npk
all under 1 400watt HPS bulb.


