
Likes
Comments
Share


@Hou_Stone
Follow
I'm happy for a first time, I obviously made a lot of mistakes but above all I learned a lot 👌😎


Likes
31
Share


@MrJoint
Follow
✌️🎃 Thank you for checking my cultivation.
🤤 I can’t wait to harvest.
🛁 Washing times.

Likes
23
Share


@Hashy
Follow
📋 Comments
Zoap by MSNL is a really good strain, very rapid growth early on in its life and continues at a nice rate right up to harvest. From my experience I'd say this was one of the easiest plants i have ever grown.
📋 Data
Seed to havest=112 days.
Veg time=40 days.
Flower time=72 days.
Wet weight=990g
Dry weight=79g
📋 Smoke report
Trimming this was a delight. I let her hang for 15 days before trimming. Nice easy plant to trim. I didn't have any real larf either, the trim is coated with trichomes so I'll do a hash run with it. The buds are pretty damn solid with plenty of sticky trichomes all over them, just like we want. I was getting a citrus smell when trimming.
After 2 weeks curing in the terplock groove bags I had a sample (miles better then jars). 1st sample was using my pax plus. 2nd sample was a joint. I'm getting an earthy cherry taste with a sweet aftertaste. This high is great, I'd guess at 25%Thc or more.
📋Grow stats for GDG 22
#1 Lemon cherry gelato=104g
#2 Zoap=79g
Total=183g
Lights on.
20hrs×7days=140hrs
18hrs×33days=594hrs
12hrs×78days=936hrs
Total hours=1670hrs
Light power=211.09Kw
Rad power=415.73Kw
Extractor=43.5Kw
4 gang=56.62Kw
Top fan=27.82
Total electricity=754.76KW
Electricity cost @£0.25/Kw=£188.69
Average light power a day=1.78Kw
Average watt per hour=106w
g/watt=(183÷106)=1.72g/w
£/g=£1.03/g
📋Final word.
Considering how cold it's been i have managed to get a decent VPD throughout the grow, I'd go as far to say the extra money spent on electricity was definitely worth it. I didn't run into any major problems and the Plagron nutes were excellent, I'm thinking these are going to be my goto from now on. I combined the trim from both plants to make a hash run and managed 14g of hash. That takes my total to 197g for the grow. Very happy.
Back soon.
Take it easy.
********************************************

Processing
Likes
4
Share


@fezzollas
Follow
That was the most difficult week. It was very cold and rainy, the humidity of the air reached 90% at most, but without sequels, thank God. On day 63, I defoliated and she is strong, fat and definitely smells like cheese.

Likes
4
Share


@birdmountain
Follow
Es war Zeit für die Ernte, im Urlaub hatte sich an der Pflanze im Folientunnel Schimmel an der Hauptcola gebildet und auch etwas an der Pflanze auf der Terrasse. Es hatte in dieser Woche sehr viel geregnet. die Pflanze wurde geschnitten und zum Trocknen aufgehängt.

Likes
14
Share


@Canna96
Follow
This week went well for the Durban Nights. Not much to report, she hit day 14 today and is working on her 3rd node, I will transplant her in 48 hours, then hopefully top her in about a week or less. I will wait for her to grow at least 7 nodes so I am sure her roots are solid before the topping, but she will absolutely explode after transplanted into coco coir so that shouldnt be a problem. I will also complete the first two sets of toppings at the 3rd node, so that should shave a little time off as well as I previously completed the 2nd and 3rd toppings at the 5th and 3rd node to further spread out the plant.
Super excited for this strain as it is a cross of Durban Thai and Jack Herer which are two of my favorite Sative Strains. I hope everyone has a safe weekend.
Thanks for stopping by, Stay Safe and Blaze On!!! 💪
Website: https://medicgrow.com/
https://growdiaries.com/grower/medicgrowled

Likes
4
Share


Likes
7
Share

@MrLahey
Follow
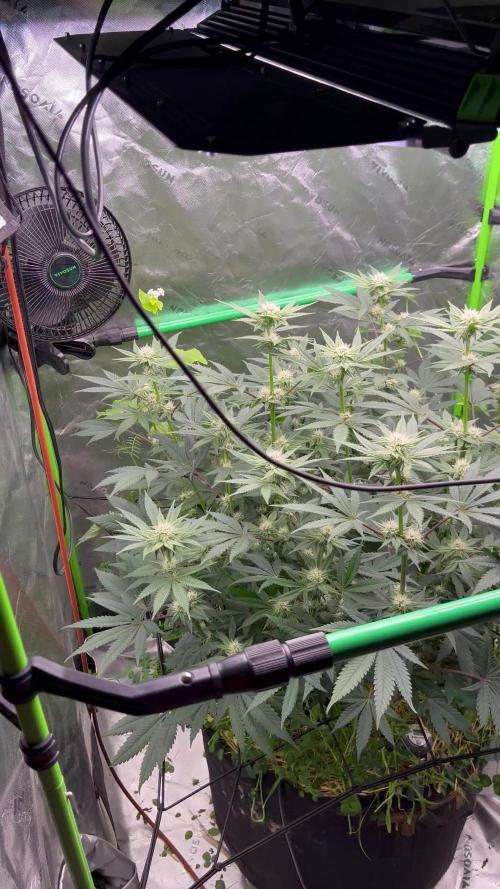
Today is day 23 of flower and she’s still stretching. It seems the one I have is really stretchy which makes me happy I put the lower trellis net where I did. Maybe it’s an act of cannabis defiance for being so stunted at the beginning or perhaps I’m just anthropomorphizing lol.
I did minimal defoliation the first 21 days of flower and since then I’ve done it each day little by little. I’ll probably do one more bigger defoliation tomorrow nightand then I’ll probably step back and let nature take back over.
At day twenty she started to smell rather syrupy. I feel like that’s early for a cultivar to start smelling this noticeably strong considering that it’s estimated to average around 60 days in flower according to HSC. I’m hoping this means she’s gonna have like 4D terpenes and crazy strong cannabinoid profile lol.
The Blumat is keeping her perfectly watered. I think it’s translating to a much heartier and healthier plant than when I was watering by hand. I’m waiting for my typical mid flower nutrient issue to show up any day now and if it doesn’t I’m gonna thank the Blumat for that and assume my previous plants mid flower issues were due to me not meeting the voracious water demands of a plant in early flower.

Likes
12
Share


@la_piper
Follow
22.04 1day 12/12
ола начало 5го дня 12/12.
вижу дефициты - меняю бак.
на 40л свежей воды из под крана в 200ppm по 100мл А/Б+30мл силиконики+20мл ph[-] итого:
ppm 940
ph 5.6
ола
7дней 12/12
долил свежего 18градусного компота 40л прям перед поливом) и того в баке около 70л.
на улице душанбе , в боксе тож жарковато, ну чую руками , что прибор подпёздывает и к тому же он под лампами, хоть и на уровне растих, пластик всё равно нагревается, поэтому там меньше 30 явно.
так же для личного удобства сделал перестановку и чуть подзагнул всё таки хейзы, куча побегов открылось под свет.
пол ещё не показали. мутант продолжает болеть, он сам выбрал свой путь, ещё шепнули что с виду оч сативный фенотип попался, и поэтому ебёт голову, мол сатива иначе кушает

Likes
9
Share


@caspersaints1
Follow
Day 65-42
Fed 2L
Day 66-43
Nothing - starting to see fading
Day 67-44
Fed 2.5 L
Say 68-45
None
Day 69-46
Watered with 2l forgot to ph and 500ml 5.3 water
Usually at around 7.6 pl before placing ph down . Oops
Day 70-47
Fed 1.25L
Started flush
2ml active boost
4 ml dragon force
Start normal watering at day 54
Day 71-48
Nothing
Day 72-49
Fed 2L
Day73-50
Nothing
Day74-51
Fed 2 L
Day 75-52
Nothing
76-53
Fed 2L
Day 77 -54(15th)
Nothing
Day 78-55 - last day with feed
Fed 2 L
1 L ph’ed to 5.8
1L ph’ed to 6.1
Last day watering with nutes . Now to watering with normal ph’ed water
Day 79-56
Nothing
Day 80 -57
Nothing , (did not water as was not dry but looking back I should’ve )
Day81-58
Watered 2L but no run off . ( will water again tomorrow hopefully get a lot
Day 82-59
Watered 1.5
400-500ml run off
Day 83-60
Nothing
Day 84-61
Fed 2L
Day85-62
Nothing
Day 86-63
Last day water
Day 87-64
Nothing
Likes
142
Share


@MadeInGermany
Follow
Hi people 🤗
A lot has happened this week 😄
The 3 Blue Cheese and 2 Kosher Tangie Kush which have been in the flowering tent for 1 week have become very bushy 👍
Unfortunately I just noticed that I completely forgot to take pictures of the Blue Cheese Phenotype # 3 🤦♂️🏻
The picture will be given later.
The rest of the Vegi tent is also progressing very well.
They are repotted in 11 liter pots this week, and then come to the flowering chamber die the following week
The next week there will be new pictures, until then I wish everyone a nice start into the new week 🙏🏻💪🏻
Let it grow 🍀🌱


Likes
123
Share


@MrHightimes
Follow
Well My friends gave me a bigger tent so I got a little more time to let them develop!
I'm very ready to take them down just waiting a bit longer for a few more amber trichomes.
I'm still feeding them ripen but i wish last week i'd given them a feed in addition too.
They look nice in the new tent, there is loads more room, and while the lighting didn't go up as much as I'd like,
They have a nice big fan oscillating on them now and room to stretch.
________________________________________________________________
I suppose I'm glad I waited. I wanted to take a few more pics and get one last video in! I'm def seeing a bit more amber in the trics and
i think it will make em a bit better for these 2 extra waterings! Probably gonna chop them soon!!!!
Likes
24
Share


@ElChicoDelaWeed
Follow
21 DÍAS DESDE EASY START.
Maceta RQS 10L.
-EASY BOST ORGANIC NUTRITION.(preparación del suelo con 50g en 10 litros de sustrato con perlita)
-EASY COMBO BOOSTER PACK.
-En la 3ª semana sigo regando las 4 plantas con agua mezclada con la pastilla EASY GROW BOOSTER (la dividí en 4 trozos para la semana 2,3,4 y 5 diluyendo en 1L. de agua la mezcla).
-Las 3 que están en vaso de plástico esta semana le voy añadir al vaso uno granos del EASY BOOST ORGANIC que no le mezclé cuando las planté).
Likes
11
Share


@Chubbs
Follow
420Fastbuds
FBT2304/Week12
These beautiful girls are getting close to being finished, and really, I can not wait. The fade on the bigger one is a little more heavier than the other but over all health seems to be great. They are super super sweet smelling which is intoxicating when you get a wiff. Checking the trichs and still seeing a few clear on the taller one so will hold off a couple days before looking again and chopping. All in all Happy Growing
Likes
Comments
Share


@Bizio
Follow
Well, there's not much to say, I was only waiting for the trichomes to ripe, and I finally got a good percentage of opaque compared to the transparent ones with almost 0 amberish also because all of them are mainly Sativa.
Yesterday I started the 72 hours of complete darkness so Saturday morning I'm going to harvest the babies and hang them for the first drying process. 😊
I'm really curious about the final yield I hope is gonna be enough for me and my flatmates. 😋
Keep growing fellas! 💪

Likes
2
Share


@Saintvicious
Follow
She's unstoppable. Looks like we are about to be in pre flower. It's show time.
Likes
42
Share


@DrLaggis
Follow
🌱 Day 43 - Beginning of the Third Flowering Week 🌱
Hello grow friends! 🌿 Today marks the start of the third week of the flowering phase. This week, I’m trying to adjust my nutrients a bit. I plan to slightly increase BioBizz Grow, as well as BioBizz Bloom, according to the feeding schedule. 🌱💧
I’m continuing to prune and thin out the plants a little each day, aiming to keep them stress-free. ✂️😊 The terpenes and buds are developing wonderfully so far, but I’m still struggling with very high humidity levels. 🌡️💦
Since my grow setup is on the second floor and we’re currently experiencing humid temperatures here in Germany, it’s been a challenge. I’m trying to reduce the humidity from 62% down to 50% during the day, but it’s proving difficult. 🌬️📉
I’ll keep you updated on how things progress! 🌿✨
🌱 Day 47 - Everything is Going Well 🌱
Watering and Nutrients
Today, I watered and fed the plant again. 🌿💧 Each plant received 1 liter, which is about 10% of the pot's volume. The plant is responding well to the nutrients, and growth is steady.
Defoliation and Light Exposure
I’ve done some light defoliation to ensure that every part of the plant gets proper light exposure. ✂️💡 My goal is to avoid any shadowed areas, allowing the buds to develop fully.
Temperature Management
The temperature is still quite high, reaching 27-28°C during the day. 🌡️🔥 I’m finding it difficult to bring it down, but the plant seems to be handling it well. To maintain a healthy environment, I keep both the fan and the exhaust system running on the highest setting, ensuring good air circulation. 🌬️🔄
Humidity Control
Currently, the humidity is sitting at around 45-50%. 💧 It’s not perfect, but I’m monitoring the plant closely and making adjustments as needed.
Careful Defoliation
I continue to remove one or two leaves each day to minimize stress on the plant. 🍃🌿 This slow, careful defoliation ensures that the plant stays healthy while making sure all buds have access to light.
Guard Dogs on Duty
My dogs took a peek into the grow tent today and are now keeping a watchful eye over the plant. 🐕🌱 They’re doing a great job of “guarding” it! 🐾
I hope you enjoyed this update! I’ll continue to keep you all informed, and don’t forget—I post daily update pictures of the plant! 📸🌿 Stay tuned for more!


Likes
3
Share


@DRAZ_420
Follow
All of the branches have been tied down for LST she is reacting super well so far. The smell on it is definitely becoming apparent. Love how they are reacting ti the nutrients from green leaf as well very responsive. Everytime i prune leaves of more just grow immediately pretty amazing. Cant wait to smoke this plant :)
