The Grow Awards 2026 🏆 


Likes
69
Share
@Natrona
Follow
Fractal was harvested on Sept 12. Due to extended period of high temperatures and humidity with more rain expected every day following another hurricane. The other gals were showing disease. That was the determining factor to chop all outside girls down.
Fractal hung in the dark for 2 days. Because her grow family experienced bud rot and wilt, she was examined carefully for any disease. She was disease free.
Fractal had a long vegetative phase. Probably too long since I started my outside grow in April so they would be hardened off before I went on vacay in May. Three months of veg caused massive vegetative growth. The various breeder notes on photo period seeds indicate late September or October harvest. So that was in the back of my mind during this grow.
👉
Note for next year start seeds later in spring.
👉 Plan start date based on counting back from the vernal equinox.
👉 Based on such a long growing season, Autos may be preferable to finish quickly and not have extended vegetation phase before flower.
Thank you @DivineSeeds for the opportunity to grow your exotic strains and participate in your contest. I will definitely grow fractal again.

Likes
39
Share
@Bluemels
Follow
Tag 105: Trotz heller Blätter wachsen die Blüten stetig.Noch 3 Wochen bis zur Ernte!

Likes
26
Share
@morganfreeman420
Follow
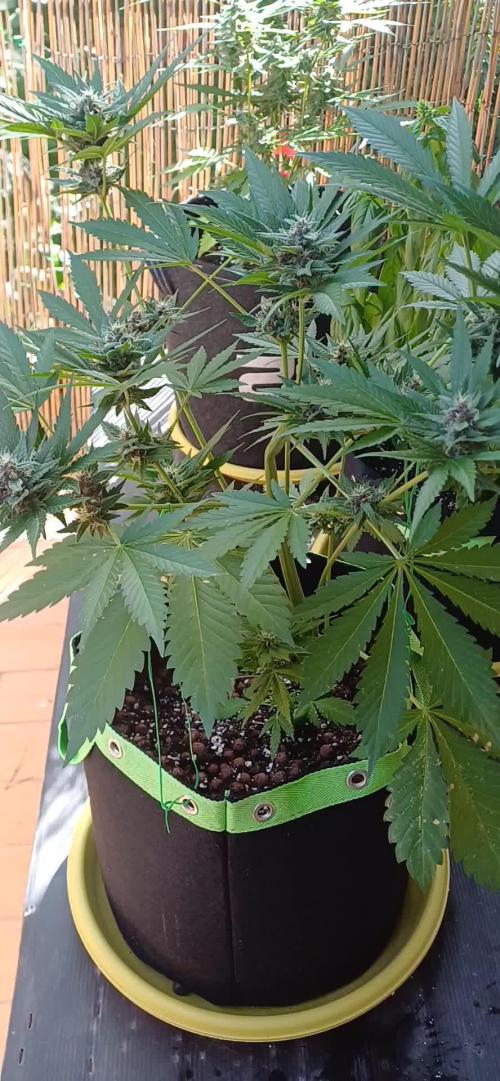
Seguimos en etapa de vegetación, aún nos faltan unas dos semanas más para entrar en flora, ya empezamos a aportar nitrógeno

Processing
Likes
9
Share
@russrahl
Follow
Flipped to flowering on these girls as the screens are now almost full across the 4x8 tent and we will still need to train them along the screens for the next 2-3 weeks. So working for a packed tent this time hopefully. Plants have been exploding in growth daily. Water was changed out and new water added with 3/4 Remo Flowering lineup and UC Roots at full strength. Smell is starting to get noticeable when you open the tent and is very pleasant.

Likes
31
Share
@JuicyFruit
Follow
Day 76 - 07/12/19
The Quick One has turned into a Fat One! The colas are just huge! nice lavender smell and very sticky! the buds also look a lot more dense this time compared to my last diary probably due to adding calmag and pk13/14 and this plant is over twice as tall haha. it finished its stretch at 43cm so shouldnt be a bad sized harvest.
I fed the plants last night with their last dose of nutes and im going to start flushing from today right up until harvest.
My tap water is at 140ppm so this should be okay for flushing. ive grown all my plants with this tap water and tbh i used to let it sit out for a day or two to evaporate chemicals but i havent done that in ages. plants dont seem to mind it straight from the tap. but yeah flushing from today right up until around the start of next week. it should only need a week flush as its coco coir but im expecting to harvest on Day 85.
The top of the main cola started to look weird and was definitely getting burned from the light. i took a small bit off as i cant adjust the height of my lights just now, gotta fit these rope rachets the light is just so damn heavy lol. im not worried tho, expecting about an ounce from this harvest, maybe more from my diesel auto diary.
Still im very proud. this is my first plant with big colas, and not only tall but fat! cant wait to see how dense the buds turn out to be and i think my last harvest was at week 9 so this has had much more time to mature.
I pulled a lot lot of leaves off this plant as they were crispy and yellowing. ive been feeding light amounts of nitrogen for a while so its either just the plant yellowing or the crispiness is light burn. either way you will notice from the pictures. upper colas have no fan leaves lol. and i added a couple of photos through the jewelers loupe, couldnt really get a good angle. but the breeder estimate is 8-9 weeks and il be finishing on week 12 so itll most likely be ready.
I got a few more seeds and they are going to be stunning! award winning genetics and also exotic and high thc autoflowers! im using biobizz light mix and i should be starting once i harvest this diary so keep an eye out for that and check out my other diaries if you get a chance.
Day 78 - still giving 1.8l of water per day. wanted to ensure im getting all the nutes and salts out of this so i gave 1.8l of phed water earlier in the day and 1.8l of phed water 6 hours later. going to try stick to the 1.8 per day as the soil dries out overnight with that amount :)
Other than that the plant is looking great. some faint purple colors and its pretty frosty! nice big buds. once the plant is harvested and trimmed im gonna dry some on a drying rack for about a week. and some hung up to dry in a cardboard box for 2 weeks.
Day 79 - 10/12/19
Harvested the top half of a side cola today so its cured just before christmas 🎄 and i wanted to let light penetrate the lower buds!
Have a look at the pictures and let me know what you think in the comments :)
Biobizz light mix arrived and im thinking of starting my next batch of seeds, keep an eye out for those diaries starting up :)
I plan to harvest on day 85! so excited for this one!
Day 79 same day update:
Took a few pictures of the bud drying :) im gonna dry it slowly and just let the 21-23c room temperature 50-60% humidity do its job. and let me know what you guys think about using a drying rack like in the picture for buds?
Day 80 - 11/12/19
A few days shy of 12 weeks now so i decided to harvest another couple of side colas! Snipped a cola down to individual buds removing all trim and the other cola i didnt break down i just trimmed. il add photos tomorrow to show what i mean :)
The trim was really frosty and looked quite cloudy/plastic and the buds are covered in cloudy/amber pistils.
I smoked a couple of bongs of the test bud which has been drying for about 24 hours now and im pretty stoned! very relaxed in my back and shoulders. no muscle pain. my head is heavy with enhanced audio and visuals :) this is turning out to be a beautiful afternoon smoke! very proud of myself :) Only a few more days until full harvest and i cant wait to cut the main cola down. id say the main cola could be near an ounce when dried as it looks thicker than my arm 😂
Day 81 - 12/12/19
What a night ive had :) been up for ages fine trimming 2 side colas i pulled off the plant tonight. the flushing was worrying me with the extra humidity rise. i added a ton of pictures to show off the whole ordeal as best as possible :) and i came across some mold halfway up one of the giant colas. was a very small pocket of fluff so i cut around the affected area and didnt lose too much (about 2g if dried) the side colas were so much bigger than expected. completely filled my whole raw tray with buds and my drying rack is starting to fill up.
Im like a small child again as these colas are the biggest individual piece of weed that ive held :) really proud that i grew this!
I also got a lot of trim and little popcorn buds. gonna keep then for edibles and dry up these test buds.
3 Days until harvest of the main cola :) and check out the pictures and videos i added at the end. huge colas! :)
Processing
Likes
8
Share
@Peter_Panther_420
Follow
Girls are doing great the gelato and gg4 are already frosting up and there is bud sites everywhere these plants are stacked! Green crack still vegging but surely the stretch is coming soon they will be monsters 🤙🏼💯
Processing
Likes
5
Share


Likes
6
Share
@Marquise_ao_Sul
Follow
This is the begginig of the 5th week. the smell stert to show some signs!!
Have goood aspect!
:-)


Likes
34
Share
@Salokin
Follow
Hello Growmies,
As we navigate through week 9, the crescendo of the Watermelon Candy F1 Hybrids’ flowering odyssey is near. Nestled within the verdant grove alongside the Epic Buzz and Red Banana Pudding strains, our Watermelon Candy troupe is displaying the telltale signs of impending harvest.
The plants exude a melody of sweetness, with trichomes glistening like morning dew under the subdued glow of the IR lights, revealing a spectacular array of colors not typically seen in the standard lighting spectrum. Despite the compact nature of the buds, which is a result of the 12/12 light cycle they've been flourishing under, the density of these floral clusters cannot be overstated—like tiny, aromatic asteroids.
Plant #1 continues its reign with a prolific bud structure that's nothing short of mesmeric. Plants #2 and #3 exhibit a bounty of floral nodes, each one a testament to the bounteous yields that are just a fortnight away. Their canopies spread wide, a testament to the cultivar's vigorous growth habit and the attentive care they’ve received.
Though the buds might not break records in size, their solidity is remarkable—a testament to the precise environmental controls maintained by our trusty TrolMaster. The buds are rock-solid, heavy with resin, and brimming with the promise of potent effects and delectable flavors.
Our nutritional regimen remains unchanged, delivering the essential elements for these final, crucial stages of bloom. The meticulous oversight of our automated systems ensures that our Watermelon Candy Hybrids are relishing in their peak conditions, as we nudge them gently toward full maturation.
With a harvest on the horizon, the anticipation is palpable. These final days are a mixture of excitement and the bittersweet acknowledgment that this chapter is closing. Soon, we’ll be able to savor the fruits of our labor, a sweet reward for the weeks of dedication and camaraderie in our grow community.
Until then, we'll continue to marvel at the transformation, watching as each plant fulfills its genetic destiny, soon to provide joy and relief in its final form.
Stay lifted,
Salokin

Likes
19
Share
@Hashy
Follow
Notes.
Week 18 (week 11 flower)
Light settings
12/12 on at 9.00am off at 9.00pm
Viparspectra
Light power= 75% 165w
VPD aim 1.0-1.2
DLI aim 35
Extractor settings
temperature 23c with 0c steps
Humidity 30% with 0% steps
Max speed 10
Min speed 4
Monday 17/7/23 Day 120 (day 74 flower)
Looking good.
Tuesday 18/7/23 Day 121 (day 75 flower)
Defoliate
Wednesday 19/7/23 Day 122 (day 76 flower)
Harvest
#4 276g
Hung to dry.
Extractor settings
temperature 20c with 0c steps
Humidity 50% with 0% steps
Max speed 10
Min speed 2
Thursday 20/7/23 Day 123 (day 1 dry)
Removed some fan leaves.
Thursday 27/7/23 Day 131 (day 8 dry)
#4 runtz, dry 29g. Larf 2g. Rot 5g.
Saturday 29/7/23 Day 133 (day 1 cure)
Saturday 5/8/23 Day 140 (day 8 cure)
Put humidity packs in the jars.
Friday 11/8/23 Day 146 (day 14 cure)
Stop using auto burping system now and burp less frequently for a bit.
Saturday 12/8/23 Day 147 (day 15 cure)
Sunday 27/8/23 Day 162 (day 30 cure)
Sampled
Stats for the grow
#1 377g
#3 338g
#4 276g
#5 393g
#6 312g
Total wet weight =1696g
#1 FBPHP12, dry 40g. Larf 4g.
#3 FBPHP14, dry 38g. Larf 4g.
#4 runtz, dry 29g. Larf 2g. Rot 5g.
#5 Pink Rozay, dry 38g. Larf 6g.
#6 Candy Rain, dry 34g. Larf 0g.
Total dry weight. 179g
Total dry larf weight 16g
Loads of trim so going run some hash.
Likes
71
Share
@DogDoctorOfficial
Follow
Greetings, fellow growers! Week 5 has brought us to a pivotal moment in our Anesia pheno hunt journey as we embark on the transformative process of topping our thriving beauties. Let's delve into the world of topping and explore the magic behind this essential technique.
Topping is a fundamental aspect of plant training, involving the removal of the apical meristem, or main growth tip, to encourage lateral growth and bushier plant development. By snipping away the topmost growth, we redirect the plant's energy towards the lower branches, stimulating new growth and increasing overall yield potential. It's like giving our plants a strategic haircut, with the promise of fuller, more abundant foliage in return.
But topping isn't just about increasing yield – it's also about promoting a more balanced and uniform canopy, ensuring that light penetration is maximized and no precious photons go to waste. With each well-placed snip, we're sculpting our plants into lush green masterpieces, ready to flourish under the glow of our Future of Grow LED lights.
Speaking of lights, maintaining optimal environmental conditions is key to our plants' success. That's why we've raised our TDS to 420 and adjusted our pH to a precise 5.8 using our trusty Blue Lab Guardian monitor. This advanced monitoring system allows us to keep a close eye on nutrient levels and pH fluctuations, ensuring that our plants receive the perfect balance of nutrients for optimal growth and health. It's like having a guardian angel watching over our garden, guiding us towards horticultural excellence.
And let's not forget the satisfying sight of water droplets glistening on freshly topped plants. These tiny droplets are more than just a visual treat – they serve as a gentle reminder of our care and attention to detail, ensuring that our plants receive the hydration they need to recover and thrive. It's a moment of zen in the midst of our bustling garden, a testament to the beauty of nature and the joys of cultivation.
With each passing week, our Anesia pheno hunt grows more exciting, and I can't wait to see what the future holds. Stay tuned for more updates, more growth, and more green goodness as we continue to cultivate joy and growth together in our Green Oasis!
Genetics Red Banana Pudding = RBP
Apricot Oreoz = AO
Zoomiez = Z
Future#1 = F
https://anesiaseeds.com/
Plant nutrition - Aptus Holland - https://aptus-holland.com
LED Photons - Future of Grow - https://www.thefuturofgrow.com/
Controls - Trol Master - https://www.trolmaster.eu/
Watering - Autopot - https://autopot.co.uk/
Tent - Mars Hydro - https://marshydro.eu/
Love and attention - Me, myself and i
As always thank you all for stopping by, for the love and for it all , this journey of mine wold just not be the same without you guys, the love and support is very much appreciated and i fell honored and blessed with you all in my life, With true love comes happiness. Always believe in your self and always do things expecting nothing and with an open heart , be a giver and the universe will give back to you in ways you could not even imagine so
More info, the ocasional give-away and exclusive updates from all my adventures can be found - links in the profile description
Friendly reminder all you see here is pure research and for educational purposes only
Growers Love To you All 💚


Processing
Likes
12
Share
@eldruida_lamota
Follow
Finalizamos la cuarta semana de floración , y las 2 power plant xL son las plantas más grandes del proyecto.
Con una defoliación esta semana, ya que tenemos que dar acceso a los lúmenes en todo el área y que formen buenas colas de flores.
50% humedad ,27,5 grados de maxima, 6.5 Ph , y aporte alimenticio de la gama de advanced nutrients.
Esta genética se comporta muy bien para ser Sativa y cultivada en indoor.


Likes
11
Share
@HIAZ_urbanbudfarmer
Follow
Week 3 day 16, topped today & will start mainlining her, going good.
Likes
13
Share
@KIOSKOdeCHUKI
Follow
Hola amigos!!!! Buenos os comento un poco la situacion; me quedo al final 3 runtz 3 bruce bummer 1 girl scouth cookies y 1 lemon haze auto..me a decepcionado los regalitos que hace la pagina eurogrow..ultimamente no sale nada bien con ese tipo de semillas de regalo.veremos y estaremos pendientes de que no salga algun macho.un saludo estamos en contacto!!👍👍👍