


Likes
209
Share


@BioBuds
Follow
This week could not have gone any better. Shiba Inu went through the roof, as it should. 'Dog coins is greats', we all know this by now and should be the only logic when selecting crypto's. Then came another nice surprise: My 6th place price for best diary came in. @FastBuds had already sent it, thanks to Heather and the Fastbudsteam. What a great company they are and can't wait to try the free seeds they send me too.
I selected Mimosa Cake, Bruce Banner, Forbidden Runtz, and since they didn't have the t-shirt in my size (that's right, big boy here), I was allowed to select an extra strain: Green Crack. Thanks again to all the people at FastBuds for being an awesome company! 😘
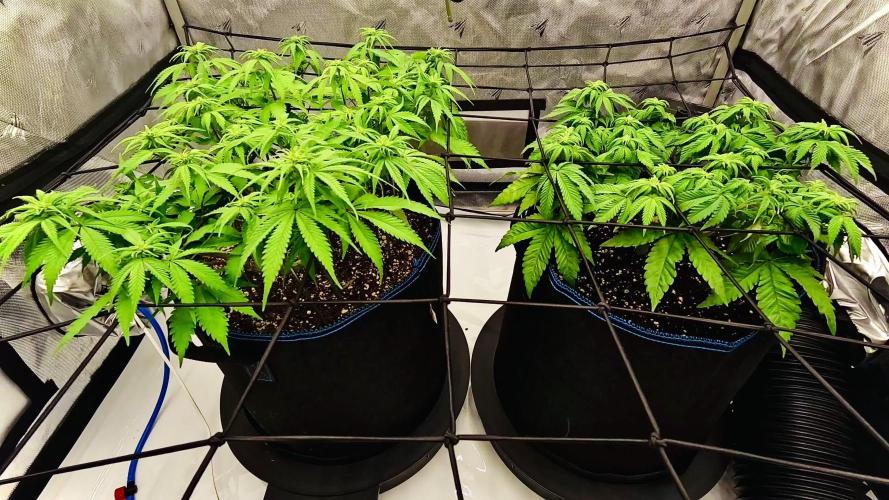
Well finally I have fixed all the stress, what they needed was apparently some good old BioBuds Super Soil love... You guys need to check out my recipe on the germination page. This is some awesome shit even for younger plants. I think I nailed it with only European ingredients, to match Master Mark and Subcools recipes.
You can clearly see how the transplant only made them better instead of further stressing the plants. I'm so happy. With one or two weeks delay, finally, we are underway.
The FIM I did last week did not hold so fimmed her again, I think I might have been too careful.
But now the light (still many thanks to @MarsHydroLED, hook 'em up for a great discount on your SP-3000 or other light) and the soil are proving to be a great team in even recovering stressed and hurt plants.
The climate in the tent could be a little moister but for now, I'll mist just the plants to keep the gnat problem at bay. The gnat problem seems over by just spraying all the topsoil with a solution of 5 tablespoons of citric acid in a liter of water. Just a fine mist covering most of the topsoil kills the larvae and sticky traps and a bowl of vinegar with some dish soap did the rest.
Thank you for check-in in this week, to find a happier BioBuds after last week's struggles. See you on the next one and happy growing.

Likes
10
Share


@Uneasy
Follow
04.11--> Pistil appeared 6 days after changing the light pattern to 12-12. They're growing faster than I expected, won't fit in the cabin 😬
07.11--> One of the plants turned out to be male. I saw buds with pollen sacs and moved them away from the cabin. This was not nice. I will not be able to get close to the harvest amount I planned. 😔


Processing
Likes
5
Share


@dutchMASTAkilla
Follow
Added frame to keep tent from being sucked in by filter fan.

Likes
4
Share


@Minuteman_Organics
Follow
Things are finally moving along. The greenhouse is getting pushed to next year due to rain every weekend. Still growing the plants next to the location just gonna have to scale back and put two plants in each 65 gallon. They will be trained with a trellis net heavily to compensate.
These girls are up to 16 tops each. Hoping the heavy training will pay off for this pivot


Likes
9
Share


@Goldbud
Follow
6 cm in the first week flowering not bad it's getting bether. I Have defoliated in the basement giving her more Fresh air under the skirt! For the stretch phase added some molasses Orgatrex together with Bactrex.

Likes
20
Share


@eldruida_lamota
Follow
Como estamos , aquí seguimos de confinamiento pero entre buenos humos y hoy toca actualizar las farm cheese de genofarm,
A estas alturas e de decir que ya entramos en la recta final y estoy completamente satisfecho con esta variedad.
Crecimiento rápido floración mucho más rápida cogollos compactos y llenos de resina, eso que hablo de que quedan varias semanas entre lavados y demás pero muy bien.
Sigo controlando ph 6.2 humedad 50% y temperatura en 26.5 .
Y estos resultados gracias al ts600 de mars hydro.
Esta semana Añadi overdrive importante al final de una floración, para conseguir mejores resultados, nos vemos la semana que viene, buenos humos fumetillas.

Processing
Likes
1
Share


@Teddy01500
Follow
Bonjour à tous, ces derniers jours ce sont bien passé pour mes petit bébés elles grandissent doucement mais sûrement.C’est la première fois que je travail avec cette gamme de produits (je vous est mis des photos des produits 😉) pour l’instant j’en suis satisfait après, il faut voir le résultat final ce qui est moins facile 😂. Mes petit bébés commence leurs 5ème semaine (je me suis trompé d’une semaine 😕 désolé 😉) trop pressé!!! 😂 de mettre de nouvelles photos 😜. Je vous dis à là semaine prochaine vivement 😉 bonne journée à tous. Je vous remercie 😉.

Likes
Comments
Share

@fubar_1337
Follow
This week was marked by stable climate control and healthy plant response after the recent transplant. The SCROG net was maintained, and light defoliation was performed on the larger plant to open up the canopy. The smaller plant, though bushy, was left mostly intact to avoid over-stressing after transplant. Both plants showed daily leaf movement — reaching for the light during the day and relaxing at night — a sign of good turgor and rhythm. Environmental conditions stayed well within target, with VPD averaging around 1.14 kPa during the day and 0.92 kPa at night. On Sunday, a corrective action was taken to address minor color variations: the feed was adjusted to include the full bloom-phase nutrient mix at 75 % strength. Spoiler: within 24 hours, the color balance already started to improve.
Reason for transplanting the smaller plant:
The smaller Special Queen was transplanted from an 11 L fabric pot into an AutoPot system to ensure more consistent watering and nutrient delivery during the bloom stretch. The original pot was starting to dry out unevenly, which risked fluctuations in moisture and root zone health. By moving it into the AutoPot setup, we aimed to stabilize its environment, promote steady root expansion, and allow it to keep pace with the larger plant under the SCROG. The transplant was carried out carefully to minimize root disturbance, and the plant showed no signs of transplant shock in the following days.
Likes
16
Share


@ChewiesGrow420
Follow
Added Exhale c02 and top dressed in each pot with 1 tablespoon per gallon of growing medium my pots are 3.6. I added 3 tablespoons. It is my hopes that with adding the slow release dry amendments and once the c02 bag sarts growing my plants will finally grow. They are short but have 4 nodes at day 21. What is an exhale c02 bag? “The ExHale bag is a patented strain of mycelium that produces an abundance of CO2 without fruiting. This means that when our bag is activated, the mycelium grows, eating the substrate it comes with, giving off heaps of CO2 straight into your garden, and it does all this for 6 months - guaranteed!”
At day 25 I am not impressed with the size of these girls? Hope they hit a growth spurt soon? Their internodes are stacked very nicely.
At day 28 growth is very slow. Practically none existent since my top dressing at day 23. 2 plants have received a very minimal nutrient burn. As I do not have a soil ph tester? I will be watering with a ph of 6.0 rather than 6.5, hopefully that helps. ONWARD!


Likes
4
Share

@BLAZED
Follow
Week 3 (27-11 to 3-12)
What's good everyone?
We started this week off with removing the 2 bottom shoots.
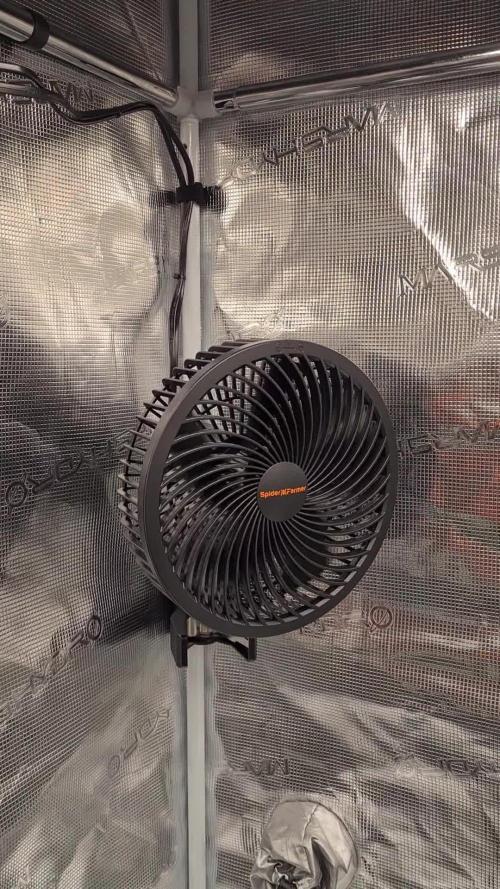
The next day Santa came early 😁 Got 2 new clip fans and the AC5 Power strip from Spider Farmer.
The power strip has 5 outlets you can control in the app, they can be turned on based on a time cycle, humidity or temps.
It comes with a sensor that monitors light, temperature, and humidity.
And a soil sensor that monitors soil moisture (VWC), temperature, and electrical conductivity (EC).
It also has a light adapter to connect 2 lights, that can be controlled in the app aswell.
The app shows the current VPD, i try to keep this around 1.0.
In the middle of the week we topped her aswell.
The next day we increased the light intensity from 30% to 35%.
LUX: 13.000/13.500 to LUX: 15.000/15.500
This week's growing conditions were 17.9°C to 22.4°C with a humidity of 55.5% to 67.6% and watered 2 times with 0.5L.
See you next week!
Likes
50
Share


@DogDoctorOfficial
Follow
Week 5: Transplant Time & Root Power!
Oh man, this was one of those weeks! We transplanted all five phenos into bigger pots, and let me tell you, they’re thriving! (Check out the complete video episode for all the details 😉).
The girls are looking amazing, all pretty much the same size for now, so I don’t have any favorites yet—but let’s see what the future holds!
For photos, I used both my Nikon P900 and Sony A6000, with a bunch of lenses and filters to preserve the true colors—these LEDs are powerful!
Current Setup & Conditions
This week, they’re still chilling with their sisters in the big tent, but in about a week, they’ll be moving into the TrolMaster ecosystem for even better environmental control.
Watering: pH 6.06, EC 0.96
Temperature: A bit cold , but it is what it is. We’re facing some freezing outdoor temps (as shown last week in the frosty veggie garden pics!), yet these Runtz are holding strong like true champions. 💪❄️
Nutrition: Still on the Aptus Clean Program, with:
Regulator
System Clean
RO Water Conditioner
All-in-One Liquid
Root Development: The Real MVP!
Let’s go deep on roots! The mycorrhizae in the Pro-Mix soil has been working its magic, and I’m still boosting them further with a touch of Aptus Holland Mycor Mix. The root development on this transplant was insane—super white, healthy, and ready to explode with growth.
What Are Mycorrhizae?
The word “mycorrhiza” comes from Greek:
• Myco- meaning fungus
• Rhiza- meaning root
Mycorrhizae are a type of beneficial fungi that form a symbiotic (mutually beneficial) relationship with plant roots. These fungi extend far beyond the root zone, creating an underground network that helps plants absorb water, nutrients, and improve overall health.
This is not a single species but rather a whole category of fungi, mainly divided into:
1. Ectomycorrhizae – Live on the outside of plant roots, forming a sheath around them. Common in trees like pines and oaks.
2. Endomycorrhizae (Arbuscular Mycorrhizae, AMF) – The most beneficial for most crops and cannabis. These penetrate root cells, forming structures inside the roots that exchange nutrients.
Where Are Mycorrhizae Found in Nature?
Mycorrhizae naturally occur in forests, grasslands, and undisturbed soils worldwide. They play a crucial role in maintaining ecosystem balance by helping plants access nutrients from the soil.
In a natural environment, plants are constantly forming relationships with these fungi. However, in modern agriculture, excessive tilling, chemical fertilizers, and fungicides have reduced their populations, making supplementation necessary in many cases.
How Do Mycorrhizae Work?
Once mycorrhizae colonize a plant’s roots, they start forming an underground fungal network called the mycelium. This network extends the plant’s reach into the soil, acting as a second root system.
Benefits of Mycorrhizae:
✅ Enhanced Nutrient Uptake – Mycorrhizae help plants absorb phosphorus, nitrogen, and micronutrients that would otherwise be unavailable.
✅ Improved Water Absorption – The fungal network can reach deeper into the soil than roots alone, helping plants survive drought conditions.
✅ Stronger, Healthier Roots – They promote thicker, more robust root systems, reducing transplant shock.
✅ Better Soil Structure – They produce glomalin, a protein that improves soil aggregation and helps retain moisture.
✅ Natural Pest & Disease Resistance – Healthy plants with strong mycorrhizal relationships tend to be more resistant to soil-borne pathogens.
How Mycorrhizae Help in Cannabis & Gardening
In controlled growing environments, using mycorrhizae is a game-changer. Since cannabis relies heavily on phosphorus, the enhanced nutrient uptake provided by mycorrhizae is especially beneficial.
Best ways to apply mycorrhizae:
• At transplant – Dust roots with mycorrhizae powder or mix into soil.
• As a soil drench – Some liquid formulations allow fungi to colonize even after planting.
• Mix into your growing medium – Using pre-amended soil like Pro-Mix HP Mycorrhizae ensures roots have early access.
Pro Tip: Mycorrhizae need living roots to survive! Avoid using synthetic fungicides or excessive chemical fertilizers, as they can kill the fungi.
Think of mycorrhizae as a natural root booster. They’ve been around for hundreds of millions of years, helping plants thrive in all conditions. By using them in cultivation, you’re mimicking nature, ensuring your plants grow stronger, healthier, and more resilient.
When used correctly, mycorrhizae can increase yields, improve plant health, and reduce the need for synthetic inputs—making them a must-have for any serious grower!
Can’t wait to see how they’ll look in the next transplant!
I made a few changes to my improvised photo studio, including a pink background for now—because why not? Let’s keep things fun and full of color! 🌸📸
Massive gratitude to all our sponsors and of course, a special shoutout to Zamnesia, Plagron, and Grow Diaries for making this amazing cup happen. 🙌
And to the community—followers, supporters, lovers, haters—I love you all! ❤️ Let’s keep pushing forward, learning, and making this grow legendary!
Stay Tuned for More!
Next week, i may be moving them into bigger pots and getting them into their final environment. You won’t want to miss this next stage!
See you all next week—stay tuned, keep growing, good luck to all and let’s make history together! 🚀🌱
Genetics - Runtz https://www.zamnesia.com/6000-zamnesia-seeds-runtz-feminized.html
Nutrients - Plagron https://plagron.com/en/hobby
- Aptus Holland https://aptus-holland.com/
Controls - Trol MAster https://www.trolmaster.eu/
LED - https://www.futureofgrow.com/en
LED - https://www.thinkgrowled.com
Soil - https://www.promixgardening.com/en
Germination - Cannakan https://cannakan.com/?srsltid=AfmBOopXr-inLXajXu3QFgKXCXXos4F1oEvScjMKIB5MR5dk8-GJ-F49
DOGDOCTOR 15% off
Smoking Papers - https://ziggioriginal.com/
Terpene saver - https://grovebags.com/
As always thank you all for stopping by, for the love and for it all , this journey of mine wold just not be the same without you guys, the love and support is very much appreciloved and i fell honored with you all in my life
With true love comes happiness Always believe in your self and always do things expecting nothing and with an open heart , be a giver and the universe will give back to you in ways you could not even imagine so
As always, this is shared for educational purposes, aiming to spread understanding and appreciation for this plant. The journey with nature is one of discovery, creativity, and respect. Let’s celebrate it responsibly and continue to learn and grow together!
Growers Love To you All 💚
#EternityGrowCup #RuntzHunt #GrowersLove #CannabisCommunity #AptusHolland #ProMixSoil #TrolMaster #Zamnesia #Plagron #ZiggiPapers #Grovebags


Likes
27
Share


@adam_pawloski87
Follow
Let’s go Day 36 !!! This week went real great, girls built up a lot of structure, and stayed super healthy ! Today they got fed just water phd at 6.5 ! They been really loving that balance! I also removed a lot of under trim since we are going into preflower , so had to shave up those legs lol ! It’s really great for them , the love that airflow , but don’t take off too much or you could shock your plants so be careful ! Can’t wait to see what these girls do this week ! Hope you all enjoy an are ready for another amazing productive week ! Peace , Love , an positive vibes to y’all Cheers LetsGrowwww!!! 😶🌫️💨💨💨💨
Likes
43
Share


@OrganicPower
Follow
Week 9 flower is coming to an end and the OG Kush still has about a week to go. I thought this seed was a dud, but I think it’s gonna be my best! The heads are mostly cloudy, no amber. Flowers seem hard and dense. Stripped most the large leaves that I could easily get at and just watering still letting the soil stay a bit on the dryer side, but consistent. Steadily lowering the humidity the best I can and manage, but it’s a bit difficult as I took down the humidifier to clean and get ready for harvest and got the dehumidifier going, but got another cold snap coming through and it’s dry outside and the house heat is running, don’t have a clean filter for the humidifier now, trying to get it right, right to the end, but Mother Nature is making my unnatural grow difficult lol. Thanks for the view and long read if you made it to the end! Keep calm and grow on!


Likes
9
Share


@sunshinegroww
Follow
Just been topped at around day 21 should done it earlier but here we go so far looking good and very healthy environment looks dialed in too