
Likes
Comments
Share


@GrowPassionItalyChris
Follow
Non riesco più ad aggiornare il diario come sempre comunque è stata una settimana bellissima! Ogni varietà sta completando le fioritura in maniera abbondante. Infiorescenze dure e molto resinose si formano in ogni parte delle piante. Sembrano tutte XXL di dimensioni! Molto profumate ogni varietà ha il suo raffinato aroma, non manca molto alla fase finale della fioritura. Sono felice di ogni varietà, complimenti a chi le ha create! Un abbraccio a tutti


Likes
31
Share


@The_Doctor_Green
Follow
Como se puede ver al dia de la fecha (19/01) las plantas de macetas vienen creciendo con un problemita,que no sé cual es, pero las hojas algunas están tomando un color amarillo.
Pensando que puede ser una carencia, le suministre 2 ml x litro de agua de oro negro de namaste, en los próximos días tendré que ver los resultados para ver si mejoran.
Con respecto a la planta de la tierra, viene creciendo bien y fuerte, doble sus puntas principales para que crezca más horizontal.
Likes
9
Share


@Bigtinyy
Follow
Being my first grow not 100% sure what was going on there.. They did slow growth for a few days..
Likes
6
Share


@Myrcene_Dream
Follow
-Germinated seed in peat pellet and 3 days later sprout popped up
-Put peat pellet with sprout in a 5 gallon fabric pot containing Pro-Mix HP
-Placed into tent where temp/humidity is constant at 78F 70%
-Gave a 3tbsp top dress of Gaia Green all purpose on day 6
-Watering a bit every 3rd day or so


Likes
Comments
Share

@hassehujasse
Follow
Clipping from HASSEGorilla Auto 28 days Twice topped, main lining, HST, LST ,Every ST)
Hasse style 70/70 box 7 plants


Processing
Likes
26
Share


@GrowGuy97
Follow
Day 49 - Still giving the ladies just PH water with no nutrients trying to see if I can fix whatever is wrong with them😅 All in all the White Widow & Orange Sherbet plants I took individual pictures of are growing great & should have a pretty nice yield! Thank you for following & make sure to check back for daily updates! Happy growing friends!🌱✌️🏼


Likes
16
Share


@Right2Flower
Follow
Day 100 - All ladies looking good at this point in the grow. Noemi's pistil hairs have mostly all curled up and turned amber in color. Also her trichomes are starting to appear amber in color. Will flush her pot with about 5 gallons of pH'd water soon. Natalia's pistils are about half curled up/amber and half white. Her buds still appear to be packing on trichomes and weight.
Likes
93
Share


@DrJones
Follow
The stench coming off this plant is unbelievable. When I open the tent, the smell slaps me in the face and instantly fills the room with funky sweet goodness. 😆
RQS says this strain takes 9 weeks of flower but she had a major defoliation during early bloom so we’ll see. Maybe I’ll give her an extra week.
Thanks for stopping by growmies 🙏
Have a good week 🙌💥

Processing
Likes
12
Share


@DudeGrowsWeed
Follow
I'm adding week 2 first, then I'll go back to week 1 and fill in all the details on my set up and strategy. But at this point the CBD Medi Kush is 2 weeks out of the humidity dome. I sprouted these seeds in a paper towel again (even though I swore it off previously) . I started with 3 seeds and all 3 sprouted within 48 hours, transplanted the seeds to soil with the roots sticking out of the shell about 1/2 inch (or 1 cm) then only 2 of the 3 seeds grew out of the soil. Also, I'm growing 2 DinaFem DinaMed CBD plants also from seed and had the EXACT same experience with the 3 DinaMed seeds. I still feel I have the best success rate with putting the seed directly in soil. I'll be planting seeds directly in soil from now on. If I try something else again please slap me 😉
Anyway, since out of the humidity dome both plants are looking great! Nice and bushy looking little seedling. I don't plan on feeding anything for a while and let the plants use up the nutrients in the soil.

Processing
Likes
15
Share


@MG2009
Follow
06/26/2020
It has been a long time since I updated this diary(2 months)
So I decided to take her to 8 tops and see what happens. I will do more weekly update going forward. M
06/28/2020
She is recovering well so time to get her growing,
blood meal (12-0-0)
Should get her fired up! I'll do 1 tbls around edges plus 2 tbls of fruit and flower.
Likes
39
Share


@Silverback_Guerilla
Follow
10/19:
I fed today. Only one plant has any signs of deficiency..an Orange Sherbet that needs more Mg than everybody else.
Serious stink now! Wow..gonna have to order another carbon filter..
I shot a little video of the soil remediation amendments I'm using these days. This will be the first time I use the Coast of Maine Lobster Compost. I usually use a different brand with added biochar and mycorrhizae, but I wanted to see what all the fuss is about the efficacy of lobster compost.
Recipe:
About 50 gallons of soil, previously flushed with TPS Liquidsoil to re-establish the microbial population.
1 cu ft - Coast of Maine lobster compost
15 lbs - Earthworm castings
4.5 lbs - Microgrow granular inoculant
4 lbs - Bokashi
4 lbs - Dr Earth Veggie, Tomato, and Herb organic fertilizer
2 lbs. - Nectar for the Gods - One Shot granular fertilizer
2 lbs - granular humic acid plus molasses
1/2 lb - texas greensand
1/2 lb - azomite
1/2 lb - dolomite
10/20:
Halle Berry(Blackberry A) is getting soooo fat..maybe 20" in circumference!
I spotted another couple of nanners on the Strawberry Pie and decided to leave them to do their thing..might be some very interesting hybrids as a result.
It occurs to me that it's almost time to start germinating the next batch of beans...👍
10/23:
Fed them and rotated the edge plants. Switched to Cha Ching.
10/24:
Halle Berry is foxtailing a bit ever since I upped the wattage in the tiny tent. She's fading nicely..I'll probably flush her towards the end of next week.
I started germinating the next batch of beans today, so I'm gonna need these bitches to hurry the fuck up now..
10/26:
Fed them and rearranged a little bit. I dialed back the ONE, increased CaMg and Sweet & Sticky. I flushed Halle Berry with 8 gallons of warm water and LiquidSoil. She's ripe, but I'll let her go another few days.
Likes
61
Share

@wolfvb
Follow
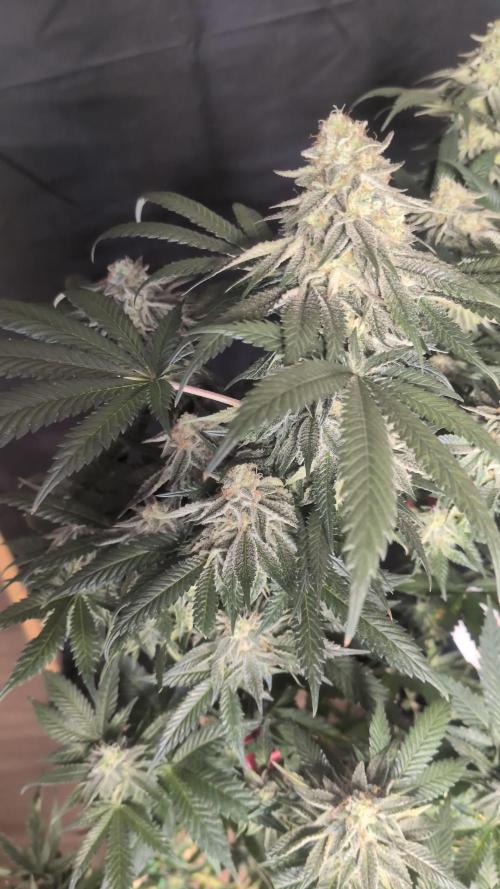
🌿 Mellow Jelly - Nearing the Finish Line! ❄️🔥
Let's go! Welcome to Week 17. The Mellow Jelly is looking phenomenal as we get deep into late flower. She is stacking dense, heavy colas and fully expressing her premium genetics.
📈 The Details / Progress Report:
Structure & Canopy: The frame we built with the training clips is holding the heavy canopy open perfectly, ensuring excellent light penetration all the way down.
Extreme Frost: Resin production is completely off the charts right now. The sugar leaves and swollen calyxes are caked in a thick, sticky layer of trichomes.
Maturation: The colas are swelling up beautifully, and the vast majority of the pistils have receded and turned a deep, fiery orange.
Trichome Check: Getting up close to the buds, the heads are looking incredibly milky across the board, with amber starting to peak through right on schedule.
💧 Next Steps:
We are purely in the coasting and monitoring phase now. The focus is keeping the environment perfectly dialed in and checking those trichomes daily to nail the ideal harvest window. She is an absolute beast!
Let's keep it growing! 🌱💨
Likes
109
Share


@PapaNugs
Follow
These girls are doing well still. Responded well to their training and recovered from their topping. All is well and have watered twice in the last week.
Likes
21
Share


@GRow_M8s
Follow
- Drying for 3 days, the 2 airports-plants chopped and dried in the dehumidifier and the other 2 hanged upside down as they were.
- Humidity -> 40-50% and temps -> 21-24C°.

Likes
5
Share


@yerbatero
Follow
Como escribí anteriormente, no pensé en realizar un seguimiento, por lo tanto, no tengo fotos de todas las semanas. Desde esta semana sí llevaré un seguimiento. Estas fotos y videos son del día que inicia la semana 6. Desde el inicio de la floración, la planta ha multiplicado por tres aproximadamente su tamaño. El olor es riquísimo, como a frutas exóticas muy dulces. Fui demasiado ambicioso y le di demasiada vegetación considerando el pequeño espacio de la carpa. Como dispongo de muy poco espacio, quise aprovecharlo al máximo; todo el espacio está repleto de puntas, lo que no deja pasar mucha luz a los cogollos de abajo. Hay demasiada materia vegetal, por lo que, para evitar la aparición de hongos, tengo muy vigilada la humedad. La extracción de aire y la ventilación están encendidas casi todo el tiempo para evitar la botritis. Nos vemos la siguiente semana.

Likes
3
Share


@4F1M6
Follow
Shes booming through the stretch! Got branches rowing up great as she fills right out. Did a big defoliating of most the leaves under the first net. Allow some air flow through the under skirt. Did a preventative treatment using dr zhymes. Than gave her a good shower to wash off any residual build up.
I'm just starting to see pre flowers coming in at the nodes. So she will still have some stretching period to go. I'd say atleast another week of stretching out and filling up my net. Before I start seeing those white stigma pom poms coming in at the bud sites. Lets see what this lady can do.
Until next update. Happy growing and stay lit fam.
Likes
13
Share


@Canadian
Follow
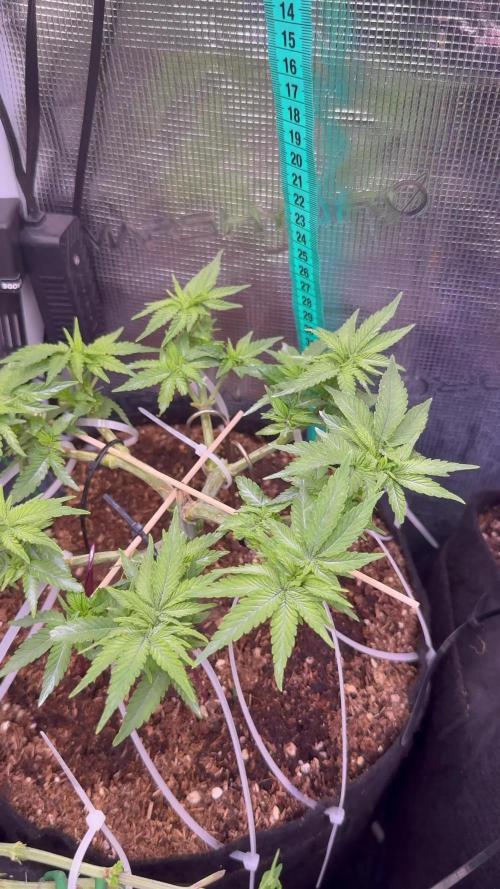
The candycane seems to be not growing too much is just seems to be packing on some weight on those buds so I don't think they're going to grow much more the heights are like this:
21.5 inch
15.5 inch.
I also seem to have a problem with nitrogen deficiency possibly .
They have a very light scent of a fruity sweets candy if I can describe it somehow. I will post more pictures without the grow light on so is better view of how the plant are doing .
Day 45 today I feed my plants solution a little bit heavy on the nitrogen in order to try to flush out any build-up salt that could be causing a lockout or simply just i haven't water enough because I don't I like poured too much water on to them to avoid actually run out.thank you for reading I have a happy grow.


Likes
2
Share


@UrbanBoer
Follow
I recently just realized that my experiment was successful, before fill these buckets with my grow medium I drilled less holes than all the other plants buckets… turns out the fewer holes the the medium becomes swampy, however my gorilla is doing great, she flowering with grace.